Dependencies analysis
If you have a large Java project with several modules that uses multiple libraries, any operation that requires an essential structural change can be difficult. For example, if you decide to remove one of the libraries, extract an API or a new module, or modularize your application by switching to Java 9 Jigsaw modules, you need to analyze dependencies within your project in order to make sure that your change is not breaking anything.
IntelliJ IDEA has a tool that allows you to analyze dependencies between modules, packages, and classes in your application and prepare for structural changes — the dependency analyzer.
tip
In IntelliJ IDEA, you can visualize dependencies between the parts of a project (modules, classes, and so on) and highlight the information flow using the Dependency Structure analysis.
In the main menu, go to Code | Analyze Code | Dependencies.
Alternatively, if you want to analyze a specific item, right-click it in the Project tool window and select Analyze | Analyze Dependencies.
In the dialog that opens, specify the scope of files that you want to analyze.
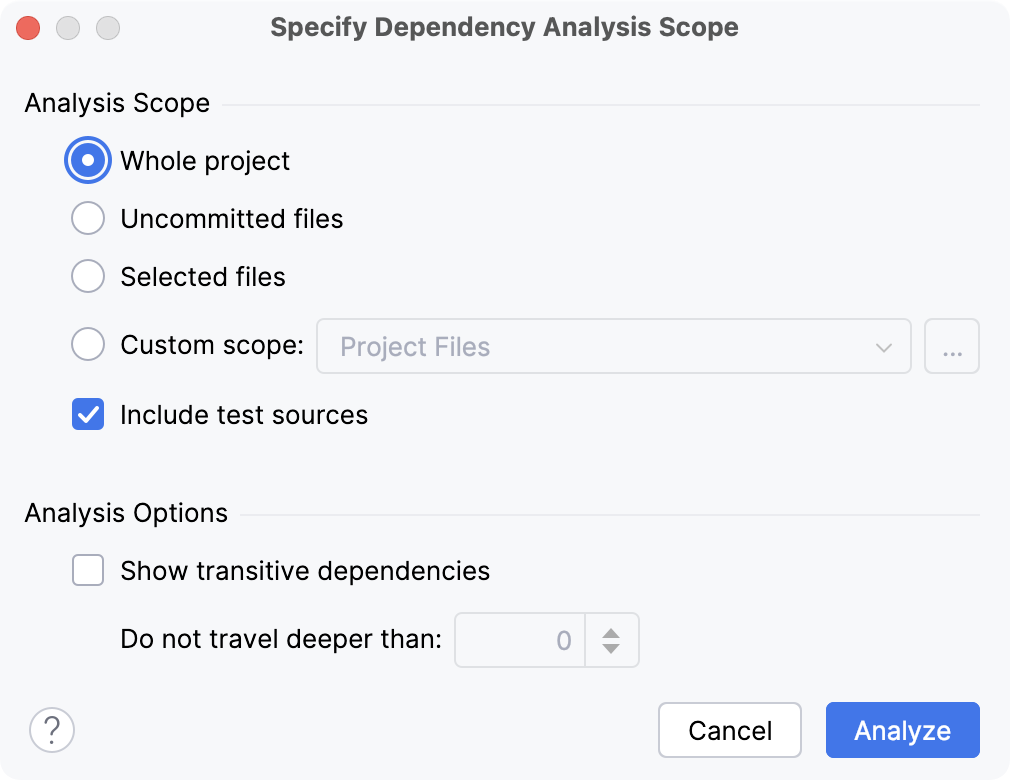
If the necessary scope is not created yet, click
and define a new scope in the dialog that opens.
Select the Include test sources option if you want to analyze your test code together with the production code.
Select the Show transitive dependencies option if you want to analyze transitive dependencies and specify the necessary threshold.
For example, A depends on B, and B depends on C. By setting the threshold to 1, the IDE will display B and C dependencies for A. By setting the threshold to 0, only B dependencies will be displayed for A.
Click Analyze to run the analysis.
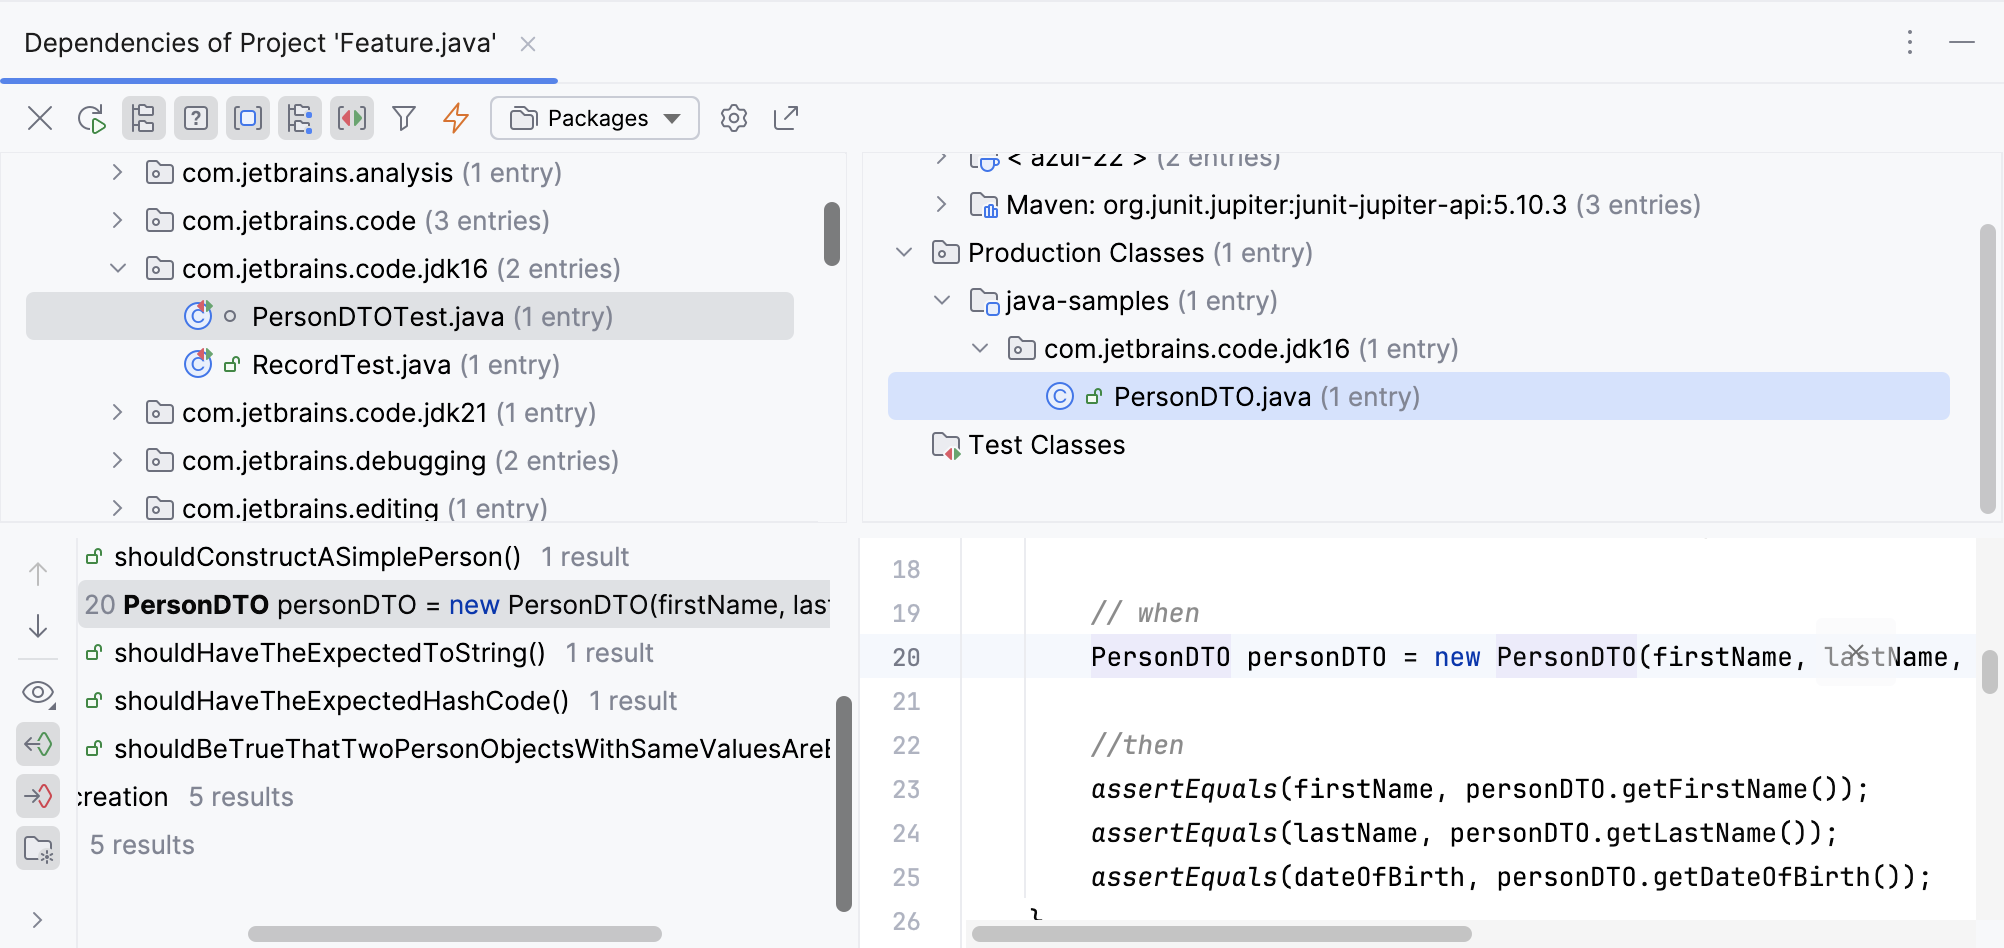
When the analysis is finished, the results are displayed in the Dependency Viewer tool window.
In the left pane of the tool window, select the node in which you want to search for dependencies.
In the right pane, select the node on which the selected node depends.
Search results are displayed in the lower pane of the tool window. Use the options on the toolbar to manage your search results.
Module dependencies analysis shows all modules that exist in the specified scope, the relationships between these modules as they are specified in the Dependencies tab of the Project Structure dialog, and the cyclic dependencies between the modules.
You can use this type of analysis to make sure that the dependencies you have previously defined still exist in your project.
In the main menu, go to Code | Analyze Code | Module Dependencies.
If there are no selected modules in the Project tool window, you will be prompted to specify the scope of analysis. You can inspect the whole project, the current module, or a module group.
Alternatively, right-click a module in the Project tool window and select Analyze | Analyze Module Dependencies.
The Module Dependencies tool window opens listing all modules withing the selected scope of files.
If any cyclic dependencies are found in the selected module, they are shown in the right part of the tool window.
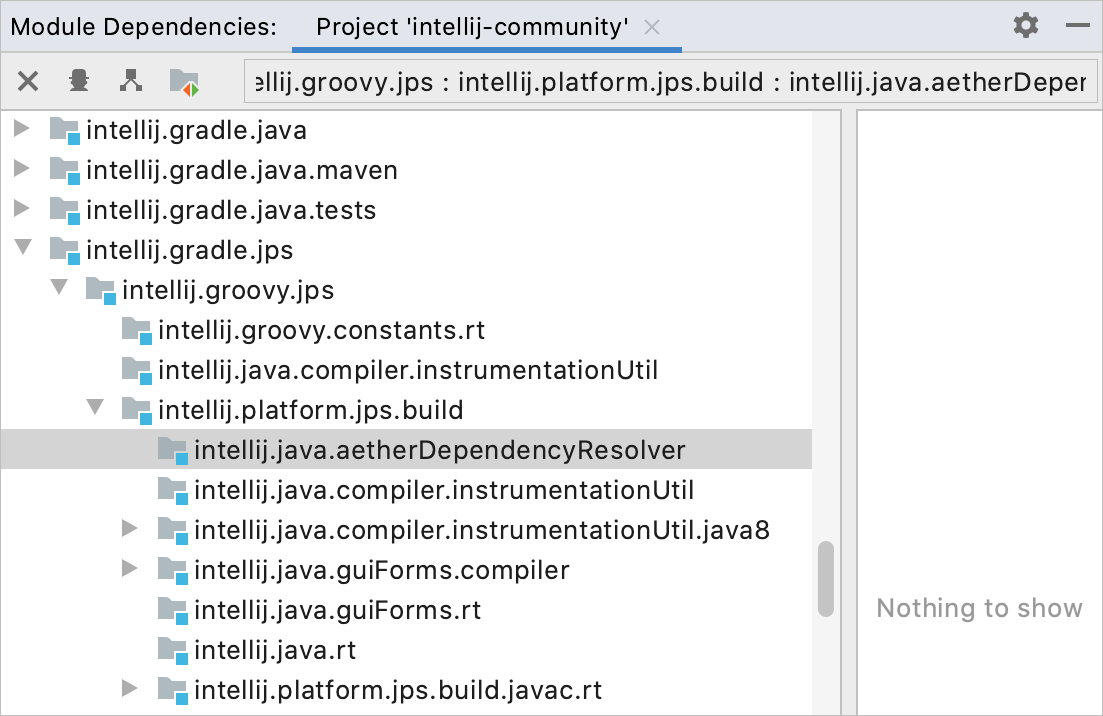
Select a module in the tree view and click
on the toolbar of the Module Dependencies tool window to find the modules that depend on the selected one.
In the dialog that opens, specify the scope of files that you want to analyze.
Select the Include test sources option if you want to analyze your test code together with the production code.
Select the Show transitive dependencies option if you want to analyze transitive dependencies and specify the necessary threshold.
For example, A depends on B, and B depends on C. By setting the threshold to 1, the IDE will display B and C dependencies for A. By setting the threshold to 0, only B dependencies will be displayed for A.
Click Analyze to run the analysis.
When the analysis is finished, the results are displayed in the Dependency Viewer tool window.
In the left pane of the tool window, select the node in which you want to search for dependencies.
In the right pane, select the node on which the selected node depends.
Search results are displayed in the lower pane of the tool window. Use the options on the toolbar to manage your search.
This tool window is available after you run the Analyze Module Dependencies option and displays module dependencies as they are defined in the module settings. In this tool window, you can change the direction of the dependencies and perform a more detailed analysis of the source code.
Item | Description |
|---|---|
Close the current tab. | |
Open the Specify Dependency Analysis Scope dialog and analyze dependencies. | |
Change the direction of dependencies. | |
| Include test dependencies. |
Item | Shortcut | Description |
|---|---|---|
Expand All / Collapse All | CtrlNumPad +/CtrlNumPad - | Fold or unfold all nodes. |
Open Module Settings | F4 CtrlEnter | Open settings of the selected module in the Modules page of the Project Structure dialog (CtrlAltShift0S). |
Analyze Dependencies Analyze Backward Dependencies Analyze Cyclic Dependencies | Select one of these options to analyze dependencies. |
tip
For a visual representation of module dependencies in your project, use module dependency diagrams.
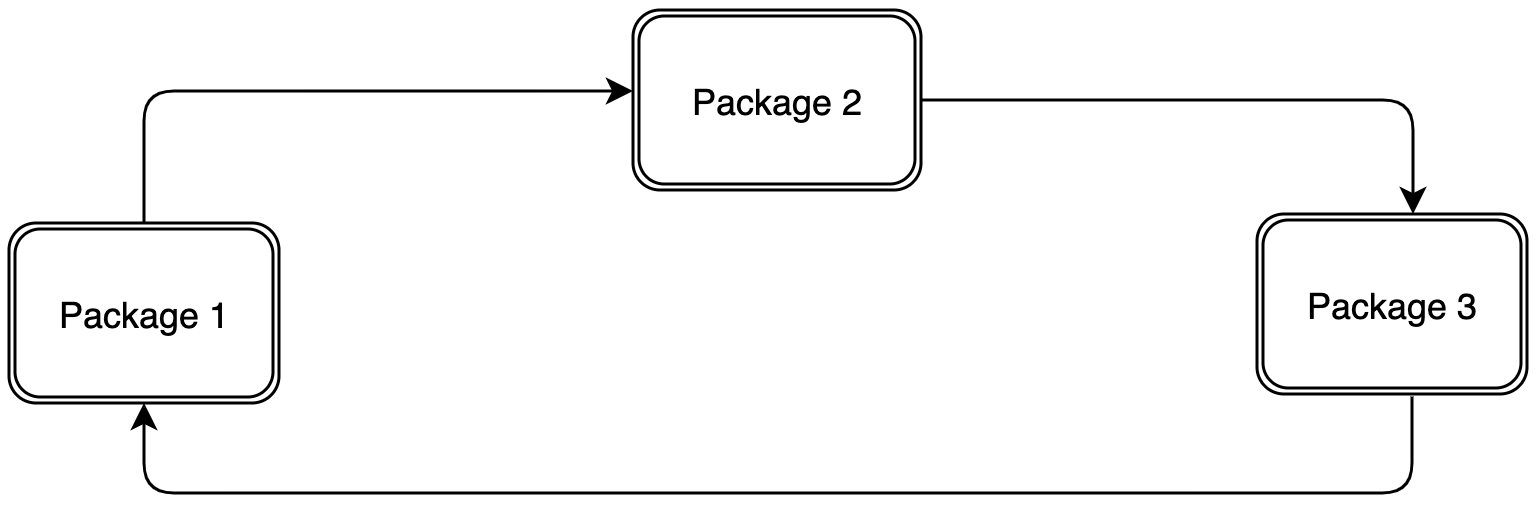
By analyzing cyclic dependencies, you can detect circular relationships between packages in the specified scope.
For example, a cycle occurs when classes from package 1 reference classes from package 2, classes from package 2 reference classes from package 3, and classes from package 3 reference classes from package 1.
In the main menu, go to Code | Analyze Code | Cyclic Dependencies.
Alternatively, right-click an item in the Project tool window and select Analyze | Analyze Cyclic Dependencies.
In the Specify Cyclic Dependency Analysis Scope dialog, select the scope of files that you want to analyze.
Select the Include test sources option if you want to analyze your test code together with the production code.
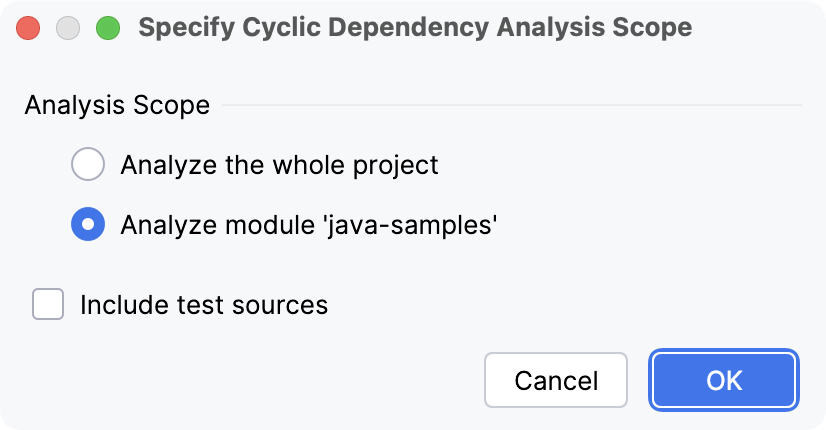
Click OK to run the analysis.
When the analysis is finished, the results are displayed in the Dependency Viewer tool window.
In the left pane of the tool window, select the node in which you want to search for cyclic dependencies.
Search results are displayed in the right pane. Use the options on the toolbar to manage your search results.

With this type of analysis, you can find other classes or modules in a certain range of files that depend on the specified scope of analysis (the whole project, a module, a file, unversioned files, and so on).
Analyzing backward dependencies might be time-consuming, especially in large projects.
In the main menu, go to Code | Analyze Code | Backward Dependencies.
Alternatively, if you want to analyze a specific item, right-click it in the Project tool window and select Analyze | Analyze Backward Dependencies.
In the Analysis Scope section of the dialog, specify the part of your project for which you want to find the dependencies.
Select the Include test sources checkbox to analyze the test sources.
In the Analyze usages in section, specify the scope in which you want to search for dependencies.

When the analysis is finished, the results are displayed in the Dependency Viewer tool window.
In the left pane of the tool window, select the file or the scope of files that you want to search for.
In the right pane, select the scope in which you want to search the selected dependencies.
Search results are displayed in the lower pane of the tool window. Use the options on the toolbar to manage your search.
If the necessary scopes are not created yet, click and define new scopes in the dialog that opens.
The Dependency Viewer tool window opens automatically once the analysis is finished and displays the results. To open the tool window manually, go to View | Tool Windows | Dependency Viewer in the main menu but make sure to run the analysis first.
Dependency Viewer consists of the following areas:
The toolbar at the top of the tool window. Use these buttons to filter dependencies.
The Analyzed Code pane in the left part of the tool window contains the project tree. Selecting an item for which you want to find dependencies opens the Parent Code pane.
The Parent Code pane on the right shows the items on which your selection depends.
The Usage pane in the lower part of the tool window opens when you select an item in the Parent Code pane.
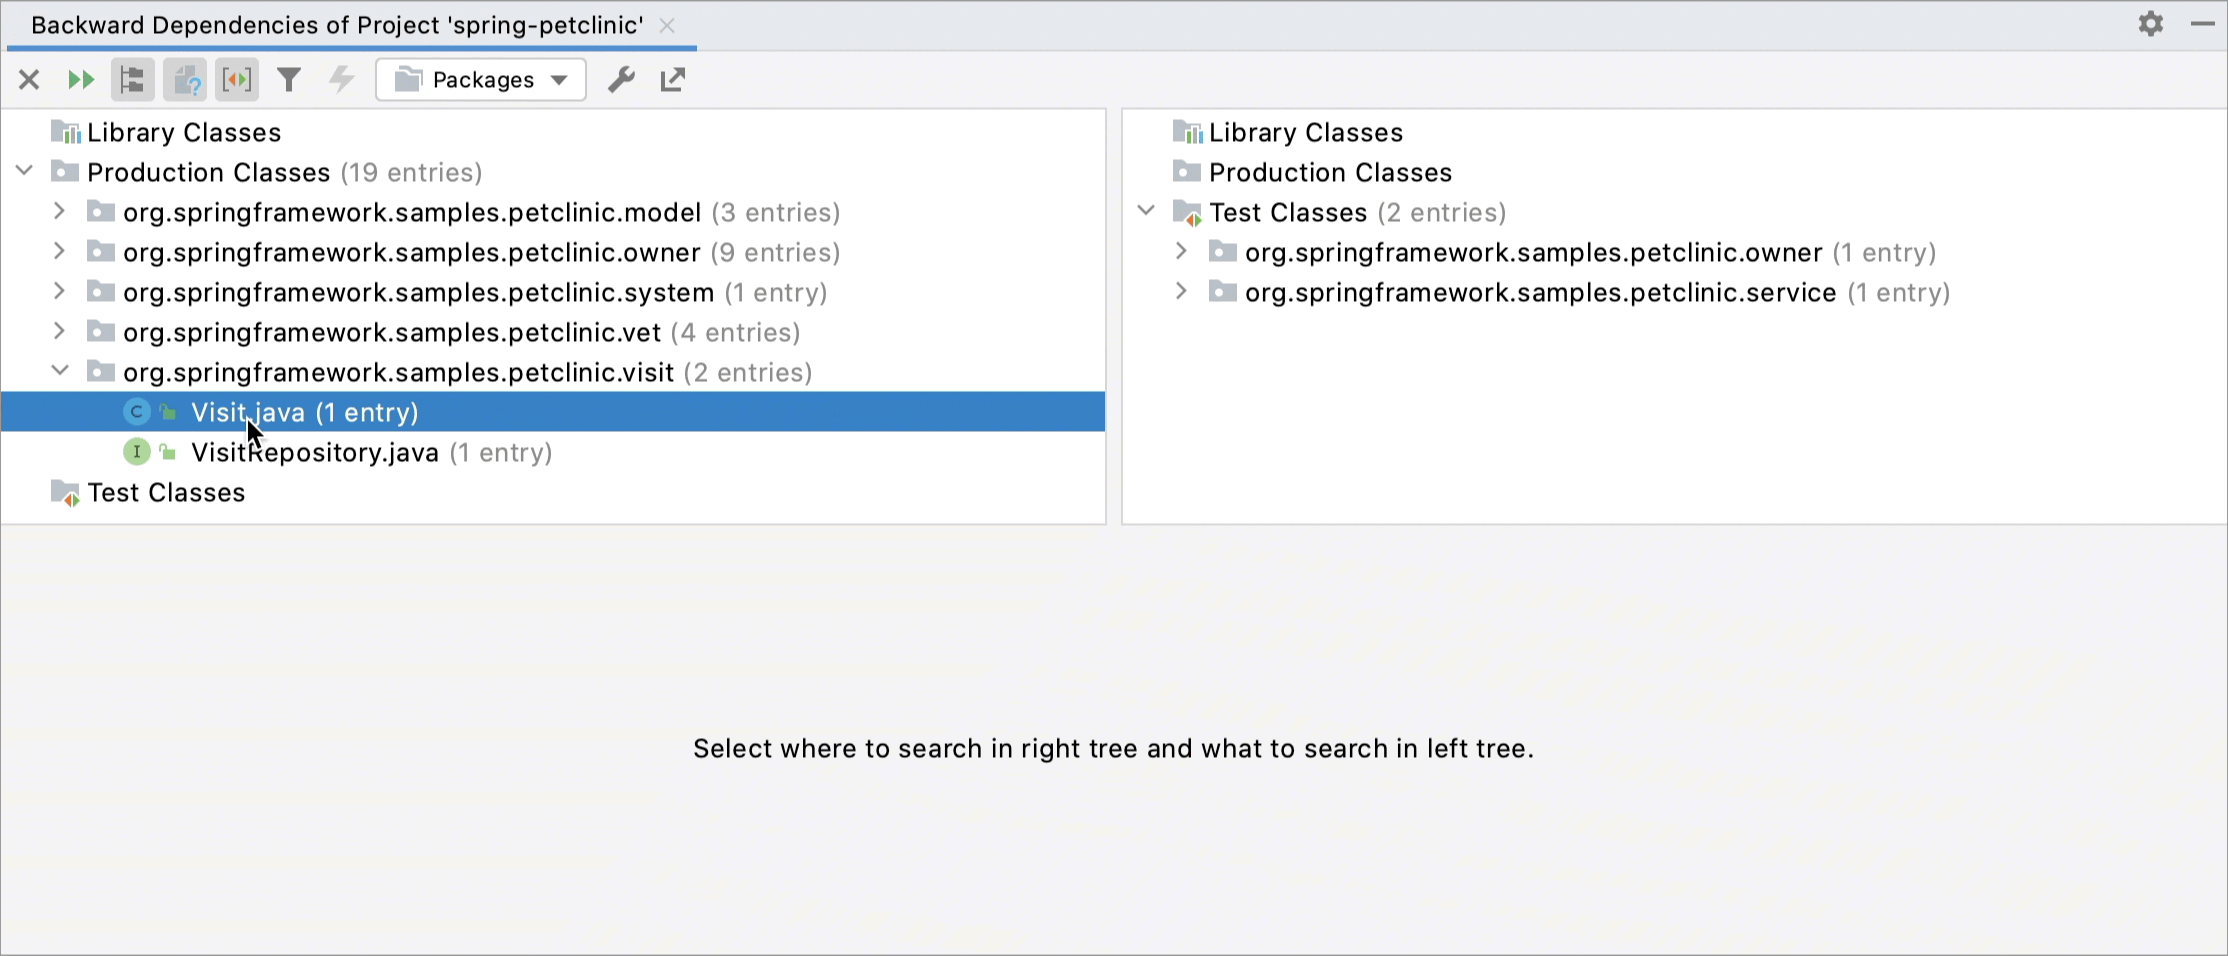
Item | Tooltip and Shortcut | Description |
|---|---|---|
Close | Close the current tab of the tool window. | |
Rerun CtrlF5 | Rerun the dependency analysis in the same tab. | |
Flatten Packages | Display all packages as a single-level tree view. | |
| Show Files | Display files on the Analyzed Code and Parent Code panes. Otherwise, both panes display only packages. |
| Show Modules | Display items under the corresponding modules in the tree view. Otherwise, project items are displayed under their packages. |
Flatten Modules | Arrange items in the tree by user-defined module groups. | |
Group by Scope Type | Group items in the tree by scope (production, test, libraries, and so on). | |
Show Illegals Only | Display only illegal and invalid dependencies. | |
Mark Illegal | Mark the selected dependency as illegal. | |
Edit Rules | Define rules for the dependencies analysis. | |
Export to Text File | Export the results of the analysis to a text file or copy them to the clipboard. |
When analyzing dependencies, you might need to exclude some of them from the analysis process. You can do that using the Validate Dependencies option.
On the Dependency Viewer toolbar, click the
Edit Rules button.
In the dialog that opens, declare the rules that describe invalid and valid dependencies.
Click
in the required section of the dialog depending on the rule that you want to create.
Deny usages ofAllow usages ofFrom the Deny usages of list, select the dependencies that will be recognized as invalid.
From the in list, select the scope of files in which the selected usages will be treated as invalid.
If the necessary scopes are not created yet, click
and define new scopes in the dialog that opens.
From the Allow usages of list, select the dependencies that will be recognized as valid.
From the only in list, select the scope of files in which the selected usages will be treated as valid. These usages will be valid only in case they are used in this scope.
If the necessary scopes are not created yet, click
and define new scopes in the dialog that opens.
Select the Skip import statements checkbox if you want to ignore references in the import statements.
Apply the changes and close the dialog.

Click
on the Dependency viewer toolbar to rerun the analysis with the new rules.
Thanks for your feedback!