Installation guide
dotCover is a Visual Studio extension. It supports Visual Studio 2010, 2012, 2013, 2015, 2017, 2019, and 2022. After installation, you will find the new ReSharper entry in the Extensions menu of Visual Studio. Most dotCover commands are available in that menu, but there are also a lot of features integrated in the editor, Solution Explorer, and other Visual Studio windows. Most of dotCover commands are also available with keyboard shortcuts.
JetBrains .NET products are shipped in the unified installer, where you can select products to install, uninstall, and update. By default, JetBrains .NET products are installed in the current user profile, but you can also install a specific configuration of the tools for all users.
New installation with default settings
Download and run the installer.
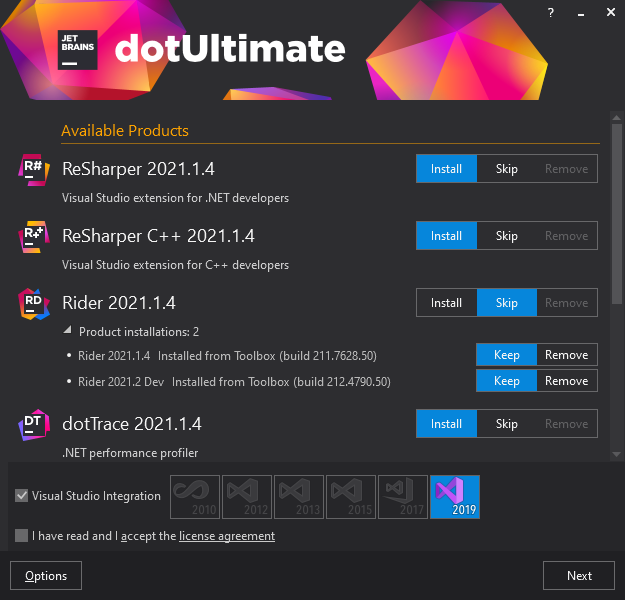
Make sure the Install option is selected (blue) next to the products you want to install.
By default, the selected products are installed into all Visual Studio versions on the target machine. If necessary, at the bottom of the installer window, you can deselect some Visual Studio versions. (the selected versions are blue).
Read and accept the license agreement and then click Next at the bottom of the installer dialog.
Review the products to be installed and click Install.
Deal with previous versions
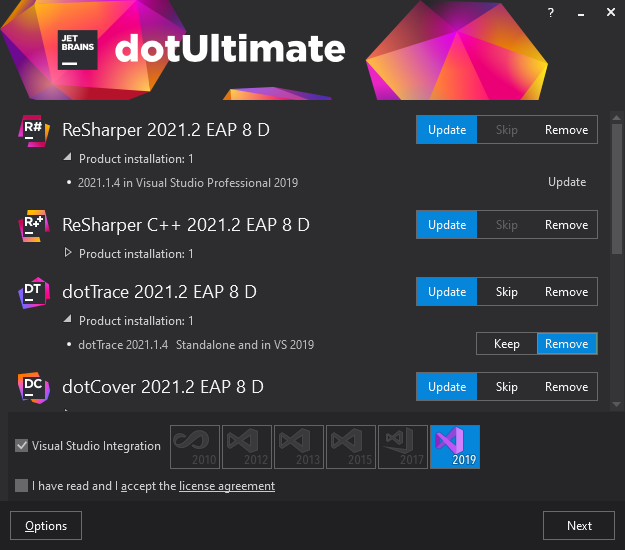
dotCover does not allow you to install its different versions in the same Visual Studio version. However, several different dotCover versions can be installed in different Visual Studio versions.
If a previous version of any JetBrains .NET products is installed on your machine, select whether to update or remove it. For standalone products, such as dotPeek, you can choose the Skip option to keep the previous version.
Under each product that was installed previously there is the Product installation(s) section, which you can expand to see what happens to the previous versions.
Installation for all users of a computer
By default, JetBrains .NET products are installed into the current user profile. This is the recommended way of installation because it does not require administrative permissions, it allows automatic updates, and so on.
However in some corporate environments, installations of programs into user profiles are not allowed. In this case, you can install JetBrains .NET products into the 'Program Files' folder and thus make them available for all users on the current machine.
This installation mode is not compatible with existing installations in user profiles. That is, if there are any JetBrains .NET products installed in user profiles, you need to uninstall them before installing into 'Program Files' and vice versa.
Download and run the installer.
Make sure the Install option is selected (blue) next to the products you want to install.
By default, the selected products are installed into all Visual Studio versions on the target machine. If necessary, at the bottom of the installer window, you can deselect some Visual Studio versions. (the selected versions are blue).
Click Options at the bottom of the dialog.
Select Install for all users on this machine, click Apply, and then allow the elevated permissions in the Windows UAC dialog.
The product selection page will open again indicating the All users installation at the top.
Read and accept the license agreement and then click Next at the bottom of the installer dialog.
Review the products to be installed and click Install.
Silent installation via command line (Administrative mode)
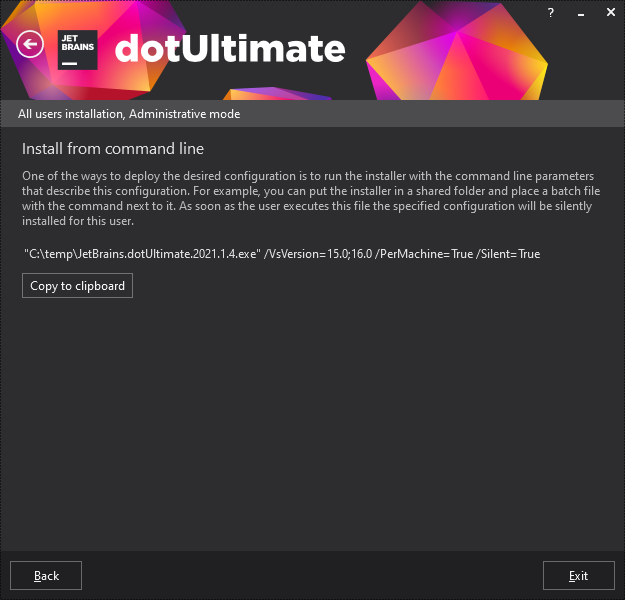
You can use the installer to create a command line with all configuration options. You can then copy that command and use it in your custom installation scenario. For example, you can put the installer in a shared folder and place a batch file with the command next to it. As soon as the user executes the batch file the specified configuration is silently installed on their computer.
You can find the full list of the command-line parameters in this article.
Download and run the installer. Make sure that it is the offline installer and not the web installer (the downloaded file should be named JetBrains.dotUltimate.<version>.exe).
Click Options at the bottom of the dialog.
Select Administrative mode and click Apply. Optionally, you can also select Install for all users on this machine if you want the script to install JetBrains .NET products into the 'Program Files' folder on the target machine.
The product selection page will open again indicating the Administrative mode at the top.
First, select target Visual Studio versions then choose which products should be installed.
Read and accept the license agreement and then click Next at the bottom of the installer dialog.
The installer will generate a program line command that you can copy.
Manage dotCover via Toolbox App
Toolbox App is a control panel that allows you to manage all JetBrains developer tools, including dotCover, from a single point of access. It lets you launch dotCover in different versions of Visual Studio, maintain different versions of the same tool, install updates and roll them back if needed. It also remembers your JetBrains Account and uses it to automatically log you in when you install and register new tools.
Install dotCover via Toolbox App
Launch the setup file.
When the installation is complete, accept the JetBrains privacy policy and sign in with your JetBrains Account.
Now you can manage existing tools, install new tools, and download updates:
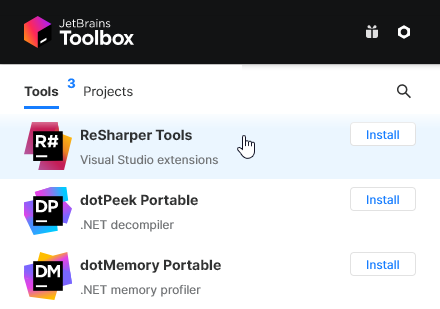
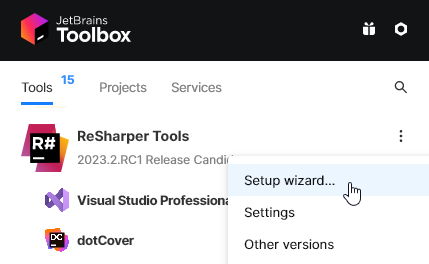
If you're using the Toolbox App, the installer doesn't appear when you update dotCover. To launch the installer when dotCover is already installed, click the three-dot button next to ReSharper Tools and select Setup wizard… to access the dotUltimate installer.
Install into experimental instance of Visual Studio
Visual Studio's experimental instance feature (previously known as custom hives) is intended for developing and debugging Visual Studio extensions, and maintains a separate copy of the configuration needed to run Visual Studio. Each experimental instance can have an entirely different configuration, from theme and window layout to the extensions that are loaded.
By default, JetBrains .NET products are installed as a per-user extension for the main instance of Visual Studio. It is not visible in other existing instances. However, it can be installed into other experimental instances. You may need that, for example, if you are developing a ReSharper plugin.
To install to an experimental instance, run the installer, click Options, select Install into experimental instance and enter the name of the instance. The experimental instance does not need to exist before starting the installation.
To launch Visual Studio in an experimental instance, run the Visual Studio executable in the command line with the following parameter:
Installation directories
JetBrains .NET products are installed in the following directory by default:
%LOCALAPPDATA%\JetBrains\Installations
If you have installed JetBrains .NET products for all users, the installation directory is:
%\PROGRAMFILES(x86)%\JetBrains\Installations for 64-bit systems and
%PROGRAMFILES%\JetBrains\Installations for 32-bit systems.
Directories of products installed into experimental instances of Visual Studio have the experimental instance name as a suffix.
Installation log
If something goes wrong during the installation, you can study the installer log. Regardless of how you install dotCover, you can find the log in the following directories.
For v. 2018.1 and above: %LOCALAPPDATA%\JetBrains\Shared\vAny\Installer
For older versions: %LOCALAPPDATA%\JetBrains\Shared\v{internal R# version}
Upgrade to Visual Studio 2026
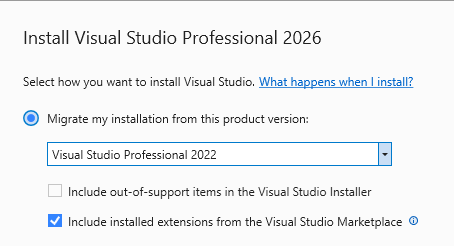
Visual Studio 2026 introduces a mechanism for transferring extensions when upgrading from a previous version. The installer suggests migrating installed extensions as the default option:
But because ReSharper integration in Visual Studio goes beyond the standard extension points, it will require an additional step when upgrading. To streamline the transferring into the new Visual Studio, ReSharper 2025.2.2 and later additionally installs ReSharper Migration Assistant — a small helper extension that facilitates the Visual Studio upgrade process. You can see this extension by choosing from the Visual Studio menu and switching to the Installed tab. This extension does nothing until you upgrade to Visual Studio 2026.

After upgrading to Visual Studio 2026, ReSharper will not be automatically transferred, but the Migration Assistant will. All you have to do after the upgrade is to choose from the Visual Studio menu. It will download the latest version of ReSharper and guide you through the initial setup.
