Upgrade with an MSI Distribution
You can use the MSI distribution to upgrade an existing Hub installation of any type.
The following software is bundled with the Hub MSI distribution:
Jetty servlet engine and HTTP server
Java SE Runtime Environment 8 x64
The MSI distribution does not include JRE x86. If you want to install Hub in an x86 environment, you will need to download and install the Java Runtime Environment that is compatible with your operating system.
The MSI installer requires .NET Framework version 2.0 or later.
Prerequisites
Before you upgrade, perform the following prerequisite tasks:
Create a backup of your current database. Hub does not provide forward database compatibility. Your database is migrated to the format that is compatible with the latest version during the upgrade procedure. This means that you cannot revert to a previous version and continue to use the database that was processed during the upgrade.
Copy the backup of your current database to a secure location just in case you encounter problems with the upgrade and need to roll back to the previous version.
- If you upgrade from an MSI installation of Hub version earlier than 1.0.663, check the current location of your
dataandbackupsdirectories. By default, these folders are not created in the installation directory. However, the default locations can be changed in the web-based Configuration Wizard during installation.The uninstaller that is built into Hub versions earlier than 1.0.663 removes the entire installation directory. If your
dataandbackupsfolders have been moved to the installation directory, they are deleted by the uninstaller and the upgrade fails. To avoid this problem:Locate the installation directory of your current Hub installation. The default installation directory for an MSI installation is
C:\Hub. In any case, the current installation directory is stored as the value for the<workdir>property in the%programdata%\JetBrains\Hub\conf\internal\launcher.service.settings.xmlfile.If the installation directory contains the
dataandbackupssubdirectories, create a backup of the current installation and move the backup to a location outside of the installation directory.Uninstall the current Hub installation and install the latest version by following the Upgrade path in the Configuration Wizard, selecting your current backup as the upgrade source.
Upgrade an MSI Installation
If your Hub service was previously installed using an MSI distribution, you can use the MSI distribution to upgrade to the latest version of Hub.
The Windows Installer Package handles all of the following upgrade procedures automatically:
Stops the currently running service.
Uninstalls the previous version.
Installs the new version.
Restarts the service.
To upgrade an existing MSI installation:
Download the MSI distribution from the JetBrains website.
- Open the Windows Installer Package (MSI file).
The JetBrains Hub Setup Wizard opens.
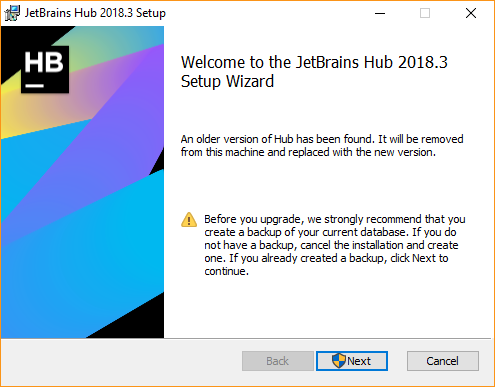
- Follow the instructions in the setup wizard.
- When the setup wizard is complete, the web-based Configuration Wizard opens in your default browser.
If you do not have a web browser installed on the host machine, copy the URL from the setup wizard and open the page on a workstation with a web browser.
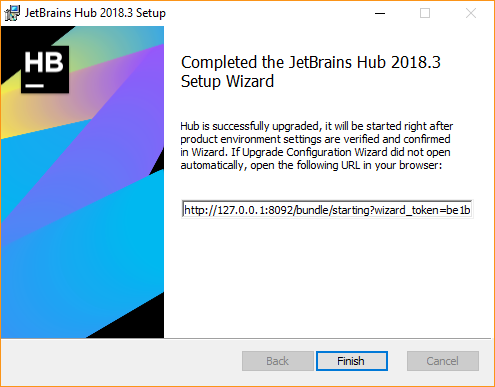
- When the setup wizard is complete, the web-based Configuration Wizard opens in your default browser.
Click the Finish button to close the setup wizard.
- Switch to your web browser and continue with the upgrade installation in the web-based Configuration Wizard. The Configuration Wizard gives you the following options to continue with the upgrade:
Upgrade using the settings that were detected in the previous installation.
Select a different upgrade source. Use this option when you have another backup of your Hub database in a different location or want to use the location of another Hub installation as the upgrade source.
If you select a different upgrade source, verify that the service user account JetBrainsHub has full access permissions to all of the directories that are displayed in the wizard. This account is created by the installer to run the Windows service. If you continue without granting access to the JetBrainsHub account, you encounter an error.Discard the detected settings and perform a clean installation.
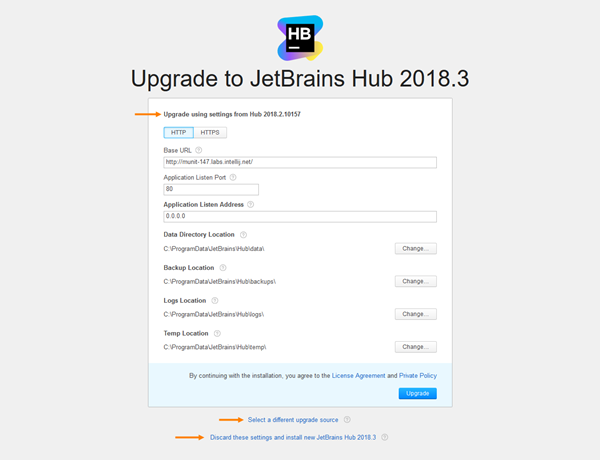
Once you have selected the settings you want to use for the upgrade, verify the basic system settings:
Setting
Description
Base URL The URL where end users access Hub.
Application Listen Port The port your Hub server listens to after installation.
Application Listen Address The IP address that your Hub listens to after installation.
Data Directory Location The directory where Hub stores content data.
Backup Location The directory where Hub stores backups of the database.
Logs Location The directory where Hub stores log files.
Temp Location The directory where Hub stores product-specific temporary files.
To change the location for any of these file types, click the Change button and select a new location.
- When done, click Upgrade.
The configuration is applied to your Hub server.
Do not close the page in the browser until the setup is complete. When the Hub server is ready, you are redirected to the login page.
- Enter the credentials for the administrator account and click the Log in button.
Hub opens to the Users page.
That's it. Your Hub instance is upgraded and ready for use.
Upgrade a ZIP Installation with an MSI Distribution
You can upgrade an existing installation that was installed with a ZIP distribution and change the installation type to MSI at the same time.
Before you upgrade, create a backup of your current database.
To upgrade a ZIP installation with the MSI distribution:
Stop the Hub service. For details, see Start and Stop Hub MSI.
Use your operating system tools to verify that all Java processes that are launched by Hub are no longer running. If there are Hub-related Java processes that are still running, kill the outstanding process trees.
- Open the Windows Installer Package (MSI file).
The JetBrains Hub Setup Wizard opens.
- If the setup wizard detects data and configuration files from a previously installed version, select the recommended option to perform a clean installation.
The setup wizard displays this option when an earlier version of the MSI distribution was installed and later uninstalled on the server.
When the setup wizard is finished, the web-based Configuration Wizard opens in your default browser.
If you do not have a web browser installed on the host machine, open the URL that is provided by the setup wizard in a web browser on another workstation.
- On the Select Upgrade Source page, click the Select button and select an upgrade source.
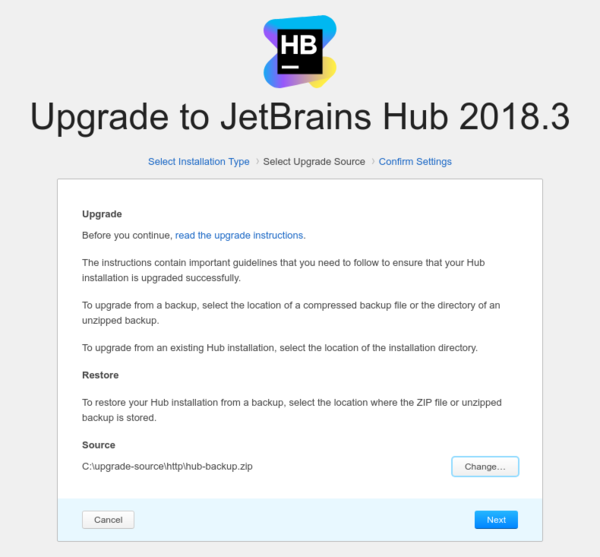
Select the location of the previous ZIP installation as the upgrade source.
orSelect the location where a backup copy of your database is stored as a ZIP file or unzipped backup.
Verify that the service user account JetBrainsHub has full access permissions to all of the directories that are displayed in the wizard. This account is created by the installer to run the Windows service. If you continue without granting access to the JetBrainsHub account, you encounter an error.
When done, click Next.
Continue from step 6 of the upgrade procedure as described for the MSI Installation.
Upgrade a Docker Installation to an MSI Distribution
You can upgrade an existing installation that was run in a docker container and change the installation type to MSI at the same time.
To upgrade from a docker image to the MSI distribution:
Create a backup of the Hub database while your existing Hub installation is running.
Download the MSI distribution from the JetBrains website.
- Open the Windows Installer Package (MSI file).
The JetBrains Hub Setup Wizard opens.
-
When the setup wizard is finished, the web-based Configuration Wizard opens in your default browser.
If you do not have a web browser installed on the host machine, open the URL that is provided by the setup wizard in a web browser on another workstation.
On the Select Upgrade Source page, click the Select button and select the backup file that you created as the upgrade source.

Verify that the service user account JetBrainsHub has full access permissions to all of the directories that are displayed in the wizard. This account is created by the installer to run the Windows service. If you continue without granting access to the JetBrainsHub account, you encounter an error.
When done, click Next.
Continue from step 6 of the upgrade procedure as described for the MSI Installation.
Troubleshooting
If you encountered a problem and the installation failed, see if any of the following conditions apply.
Condition | The upgrade to Hub 2018.3 fails. The Hub service is not started. The database of your existing installation is not upgraded to the latest version. The installer rolls back to the previously installed version. |
|---|---|
Cause | Undetermined. |
Solution |
|
Condition | The MSI installer successfully upgraded the installation to the new version, but the Configuration Wizard fails to open or reports an error. The Hub service fails to start. |
|---|---|
Cause |
|
Solution |
|
Condition | The upgrade fails. Hub is already installed. The product code of the previous installation is displayed. The previous installation cannot be upgraded automatically. |
|---|---|
Cause | Hub was previously installed with another administrator account. |
Solution |
|
Report a Problem with the Upgrade Installation
If you continue to experience problems with the upgrade installation:
- Attach the following files to help us investigate and fix the issue:
- Compress the contents of the
logsdirectory and attach the ZIP archive. The default location of this directory is%programdata%\JetBrains\Hub\logs.If the location of this directory was changed in the Configuration Wizard, you can find the actual location in the
logs-dirproperty of the%programdata%\JetBrains\Hub\conf\internal\bundle.propertiesfile. Compress the contents of the
confdirectory and attach the ZIP archive. The default location of this directory is%programdata%\JetBrains\Hub\conf.Attach the
install.txtfile.
- Compress the contents of the
Our customer support engineers will investigate the issue and work with you to resolve the problem.
