Common Settings for Auth Modules
The Common Settings page displays configuration options that are applied to all of the authentication modules in Hub. To access this page, select Auth Modules from the Access Management section of the Administration menu, then click the Common settings link in the toolbar.

General Settings
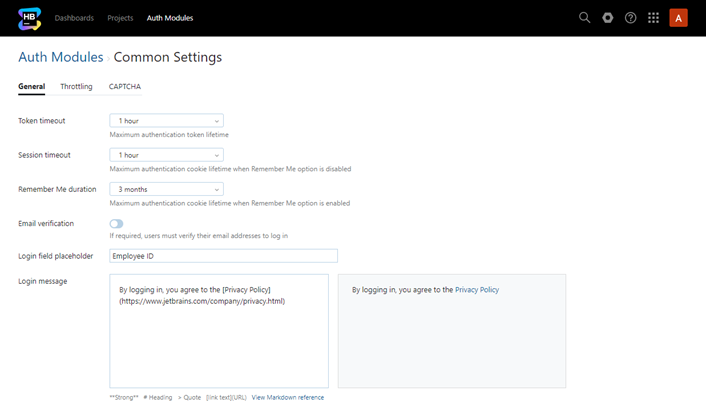
The following settings are shown on the General tab:
Setting | Description |
|---|---|
Token timeout | Specifies the maximum lifespan for access tokens. By reducing this value, you limit the amount of time a malicious user who has obtained an access token can access the application. The default is one hour. |
Session timeout | Specifies the duration that a session can remain idle before Hub terminates it automatically. This sets the lifetime for the session cookie that lets users access the application without having to log in again when the Remember me option is disabled. |
Remember Me duration | Specifies the duration that Hub remembers a login session. This sets the lifetime for the session cookie that lets users access the application without having to log in again when the Remember me option is enabled. |
Email verification | Determines whether users must verify their email addresses to log in to Hub. To improve the security of your installation, enable this option. Note that email verification is not required for users who have Low-level Administration permissions. This ensures that your administrators always have access to the application. |
Login field placeholder | Sets the placeholder text that is shown for the login field on the login page. Use this setting to tell users which values are accepted as a login. The default placeholder is Username or Email. For example, if you're using a directory service that only accepts logins with an employee ID, you can show Employee ID instead of the default placeholder. |
Login message | Adds a message to the login page for your Hub installation. Use this, for example, to provide a link to legal documents that describe how you manage personal data that is stored in the application. |
Throttling Settings
Throttling or rate limitation helps protect Hub from brute-force attacks. The options on the Common Settings page lets you apply rate limits to login attempts and requests to verify credentials. Rate limits are applied per login. Rate limits help slow down brute-force attacks by blocking new login requests following a series of consecutive login failures, so they keep your passwords safe.
This feature is designed for use with reCAPTCHA. When rate limitation is applied to a login, the user can solve a CAPTCHA-based challenge and try another password. If reCAPTCHA is not configured, affected users must wait until the cooldown period elapses to attempt another login.
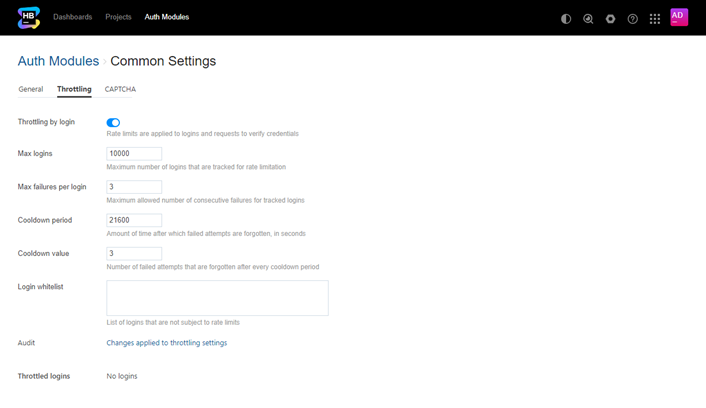
When you enable Throttling by login, use the settings on this tab to manage how throttling is applied to logins and requests to verify credentials.

Setting | Description |
|---|---|
Throttling | Enables rate limitation for logins and requests to verify credentials. |
Max logins | The maximum number of logins that are tracked for rate limiting. The purpose of this setting is to maintain a relatively large number of counters that is not an infinite value. This avoids storing all failed logins and consuming too much memory. A counter is created for each login that uses an invalid password. When Hub has active counters equal to the maximum number of logins, the collection is full. If the collection is full:
The number of active counters decreases according to the settings for the Cooldown period and Cooldown value as described below. |
Max failures per login | The maximum number of consecutive failed requests that are allowed before rate limitations are applied to a login. Every time Hub registers a failed login, an entry is added to the counter. When the counter for a login reaches the threshold that is set as the Max failures per login, rate limits are applied to this login. Subsequent attempts for this login are rejected even when the password is correct. This prevents attackers from iterating over a list of passwords until they guess correctly.
Attempts that are rejected when the counter is full do not increment the counter higher than the maximum number. This prevents attackers from overloading the counter, forcing the account owner to solve a CAPTCHA challenge on every login attempt. |
Cooldown period | The interval at which entries are removed from the counter for each login, in seconds. Entries are removed from the counter for each login according to the cooldown period. The cooldown value determines how many failed logins are forgotten in this time frame. |
Cooldown value | The number of entries that are removed from the counter for each login per cooldown period. For counters that reach the maximum number of allowed failures, login requests are rejected for the login that hit the threshold. When the counter falls below the maximum, login requests are processed. The user once again try to guess the password for this login.
|
Login whitelist | A list of logins that are not tracked for failed login requests. Enter each login on a new line. When a user exceeds the max failures per login, the login is shown in the Throttled logins list. To add a login to the whitelist and disable throttling for the affected user, click the Add to whitelist button. You can use the whitelist to ensure that your administrators can still log in even when Hub is tracking the maximum number of logins. However, users on the whitelist should take extra precaution to secure their accounts with strong passwords, as their logins are not protected against a brute-force attack. |
Audit | Links to a list of audit events related to changes that have been applied to the throttling settings on this page. |
Throttled logins | A list of logins that are currently tracked for rate limiting. Use this list to track which accounts have recorded one or more failed login within the cooldown period. To add accounts to the login whitelist, select one or more accounts in the list, then click the Add to whitelist button. |
CAPTCHA Settings
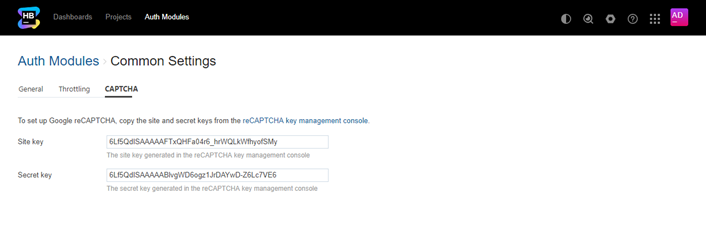
The settings on the CAPTCHA tab let you set up and use Google reCAPTCHA.

The reCAPTCHA service asks users to solve a CAPTCHA-based challenge to prove that they are not a robot. This challenge is presented in the following situations:
When registration is enabled for the Hub authentication module. Users must prove that they are not a robot to register their own account.
When throttling by logins is enabled and the maximum number of failed login attempts is exceeded. The affected user must complete the challenge to try another password.
To enable reCAPTCHA for self-registration and throttled logins:
In the reCAPTCHA Settings section of the Auth Modules > Common Settings page, click the link to access the reCAPTCHA key management console.
The Create reCAPTCHA key page opens.
Register your Hub domain with the reCAPTCHA service. reCAPTCHA is a part of Google services, so you can use your Google account to log in. Read the tips provided on the page before you register and generate your keys.
Copy the Site key in Google and paste it into the corresponding input field in the Common Settings page.
Copy the Secret key in Google and paste it into the corresponding input field in the Common Settings page.
Click the Save button.
The reCAPTCHA validation input is enabled for users who register their own accounts in Hub or whose logins are throttled.
How to Recover from a Brute-force Attack
Few attackers are going to have the patience to guess the conditions that trigger authentication throttling. They're much more likely to give up and move on to an easier target.
However, if an attacker managed to gain access to the application without triggering the rate limitation, you might have a problem. It doesn't necessarily mean that the throttling failed — it means that you let users create weak passwords that were too easy to guess.
If you suspect that a malicious user has gained unauthorized access:
Check your security logs to identify compromised accounts.
Browse the audit events to detect suspicious activity and identify changes that were performed by compromised users.
Update the settings of your Hub authentication module to enforce a stronger password policy. For more information, see Set a Password Policy.
Access the user profile for each compromised account and request that they change their passwords. You can force these users to change their passwords the next time they attempt to log in. Alternatively, you can force all users to change the passwords for their Hub accounts. For more information, see Require New Passwords for Hub Logins.