Migrate from NetBeans to IntelliJ IDEA
Switching from NetBeans to IntelliJ IDEA requires understanding of the differences between the two IDEs. This section covers some IntelliJ IDEA-specific aspects.
Import a project to IntelliJ IDEA
Launch IntelliJ IDEA.
If the Welcome screen opens, click Open.
Otherwise, go to in the main menu.
In the dialog that opens, select the directory in which your sources, libraries, and other assets are located and click Open.
If you are using Maven with NetBeans, and you want to import a Maven project into IntelliJ IDEA, select your project's pom.xml.
In the Open Project dialog that opens, click New Window.
IntelliJ IDEA will add the .idea directory to your project. This is used to store the IntelliJ IDEA project settings such as VCS settings, inspection profiles, or code styles. The NetBeans .nbproject directory and the build.xml file will remain untouched, and you'll be able to use IntelliJ IDEA along with NetBeans.
If you used NetBeans with Ant, keep in mind that the Ant plugin is unbundled.
IntelliJ IDEA is fully integrated with Maven and Gradle. If you use one of these build tools, refer to Maven and Gradle for more information about working with them in IntelliJ IDEA.
User Interface
Terminology differences
NetBeans and IntelliJ IDEA use different names for similar entities. The following table maps the most important NetBeans concepts to IntelliJ IDEA ones.
NetBeans | IntelliJ IDEA |
|---|---|
Project | Module |
Global library | Global library |
Project library | Module library |
Project dependency | Module dependency |
Projects
IntelliJ IDEA creates a project for an entire code base and a module for each of its individual components. NetBeans projects are more like IntelliJ IDEA modules.
Unlike NetBeans, IntelliJ IDEA cannot open multiple projects in the same window. When you open a project, you have to choose whether to open it in a new window or to close the current project and open a new one instead. For more information, refer to Open, move, and close projects.
Project groups
In NetBeans, a project group is a way to organize projects you are currently working on. Projects of the same group are opened in the same window; you can switch between projects groups without leaving the IDE.
In IntelliJ IDEA, you open one project per window, so you don't have an equivalent for NetBeans project groups. You can encounter this term when you group your recent projects on the Welcome screen, but these groups do not appear on the Project tool window.
Modules
Both NetBeans and IntelliJ IDEA had already had their modules before the Java 9 modular system was introduced. In NetBeans, a module is a type of project within a NetBeans Platform application. In IntelliJ IDEA, a module is an essential part of any project: when you create a project, you'll have at least one module. In NetBeans, a module is identified by its MANIFEST.MF file, while each IntelliJ IDEA module has the .iml file, which keeps its configuration.
NetBeans modules can belong to a module suite. It is another type of project, which facilitates the deployment of multiple interdependent modules on top of NetBeans. In IntelliJ IDEA, you can also group modules, but, unlike in NetBeans, a module group is not a project, it's just a way to organize your modules and quickly build them within the same project.
Options dialog
The equivalent of the NetBeans Options dialog is the (for Windows and Linux) or (for macOS) dialog. You can open it by pressing Ctrl+Alt+S. This dialog is used to control behavior and appearance of IntelliJ IDEA.

You can also use the Project Structure dialog (Ctrl+Alt+Shift+S) to manage JDKs, libraries, module dependencies, and so on, similarly to the Project Properties dialog in NetBeans.
For more information, refer to Settings and Project Structure.
Use NetBeans key bindings
IntelliJ IDEA includes several predefined keymaps, including NetBeans.
In the Settings dialog (Ctrl+Alt+S) , select Keymap.
In the right-hand part of the dialog, under Keymap, select NetBeans.
If you want to customize some of the shortcuts of the predefined keymaps, refer to IntelliJ IDEA keyboard shortcuts.
Work with Projects
Most of the options available in the Project Properties dialog in NetBeans are available in in IntelliJ IDEA.
Set the project JDK
Setting the JDK for a project consists of two steps:
Register a JDK in the IDE so that the IDE knows in which folder on your computer the necessary JDK version is installed.
In NetBeans, this setting is available in .
In IntelliJ IDEA, you do it in .
Select a JDK for a project:
In NetBeans, this setting is available in the dialog.
In IntelliJ IDEA, you do it in .
For more information about working with JDKs in IntelliJ IDEA, refer to SDKs.
Define libraries
Just like in NetBeans, in IntelliJ IDEA you can use global libraries, which are available for all projects, and project libraries. You can define global libraries in and project libraries in . For detailed instructions, refer to Libraries.
Add support for a web framework
Framework support is enabled at the module level.
In the Project tool window Alt+1, select the necessary module.
Press Ctrl+Shift+A and type
Add Framework Support.Once the action is found, click it to open the Add Framework Support dialog.
In the dialog that opens, select Web Application and select a version of the Servlet specification.
If you want the deployment descriptor web.xml file to be created, select the Create web.xml checkbox.
Click OK.

You can also enable support for a web framework while creating a new project. For more information, refer to Web applications.
Run applications
In IntelliJ IDEA, you can run your application right from the editor by clicking ![]() near the declaration of a class with the
near the declaration of a class with the main() method and selecting Run '<CLassName>.main()'.

Similarly to NetBeans, you can also run it from the Project tool window by right-clicking a class and selecting Run '<FileName>.main()'.
Additionally, if you want to pass arguments or environment variables to your program or otherwise customize its startup, you can use run/debug configurations. A run/debug configuration is a named set of startup properties. You can run the same application with different configurations if you want to change its startup logic or output. When you run your application from the editor or from the Project tool window without selecting a configuration, IntelliJ IDEA creates a temporary configuration with default values. You can then edit and save it as a permanent configuration.

With IntelliJ IDEA, you can also create run/debug configurations based on existing configuration templates, share your configurations with teammates via XML files, and much more. For more information about running applications and managing run/debug configurations, refer to Run applications.
Use Version Control
The most popular Version Control Systems including Git, Subversion, Mercurial, Perforce, and more are supported by IntelliJ IDEA. VCS integration for your project can be configured in on the Version Control page of the Settings /Preferences dialog. For more information, refer to Version control.
Code editor
For an overview of the IntelliJ IDEA editor, refer to Editor basics.
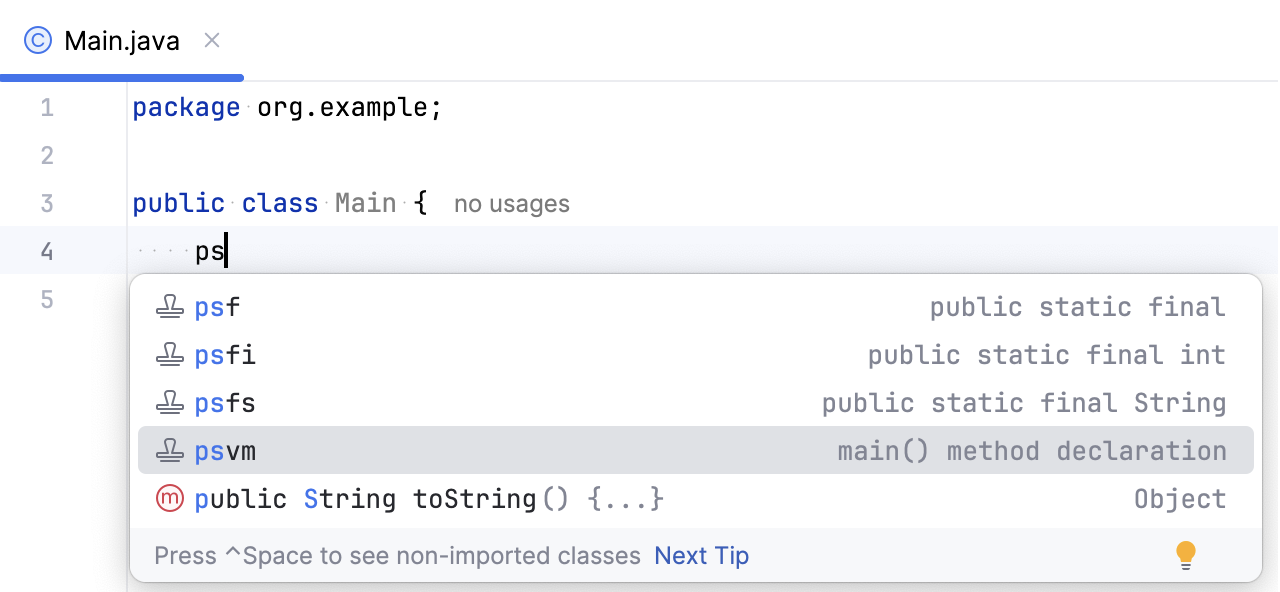
Code completion
In IntelliJ IDEA, the list of code completion suggestions appears automatically after you type one or two characters. To narrow down this list, use:
Ctrl+Space. Reduces the list to keywords and the names of classes, methods, and fields available in the current context. Note that the list changes when you press Ctrl+Space for the second or third time.
Ctrl+Shift+Space. Shows only the types appropriate for the current context (smart type-matching code completion).
With IntelliJ IDEA, you can customize many of the code completion settings. For more information, refer to Code completion.
Code templates
In NetBeans, code templates are pieces of code associated with abbreviations. In IntelliJ IDEA they are known as live templates. Some templates are different; for example, private static final is abbreviated as psf in NetBeans while it is prsf in IntelliJ IDEA.
The list of available templates can be found in . There you can also add your own templates or modify any existing ones.
Code analysis
IntelliJ IDEA can analyze dependencies, data flows, and stack traces, find duplicates, and evaluate code quality. You can check available options in the menu.
Just like in NetBeans, you can use code inspections to detect anomalous code. In IntelliJ IDEA, inspections are highly customizable: you can disable them, suppress them for a specific piece of code, change their severity levels, and create custom inspections. For more information, refer to Code inspections.

Similarly to hints in NetBeans, you can use intention actions and quick-fixes to quickly alter or correct your code.
Action Items
In NetBeans, the Action Items tab displays TODO comments, code problems, and compiler errors. In IntelliJ IDEA, you can get similar information using the following tool windows:
TODO: view TODO comments. For more information, refer to TODO tool window.
Problems: view errors and warnings found by IntelliJ IDEA inspections. For more information, refer to Code inspections.
Syntax highlighting
Just like in NetBeans, when you place the caret at a symbol, IntelliJ IDEA highlights all usages of this symbol in the current file. In IntelliJ IDEA, you can use the Highlight on Caret Movement option to enable and disable highlighting matched braces, current scope, and usages of the element at the caret. For more information, refer to Disable automatic highlighting of usages.
If you want to keep highlighting occurrences of a code element while moving the caret away from it (Keep Marks option in NetBeans), in IntelliJ IDEA you can press Ctrl+Shift+F7.

If you have many variables or a function with many parameters, you can use semantic highlighting to assign a different color to each parameter and local variable. Additionally, you can configure visibility-based code highlighting for public, protected, and private Java members (methods, fields, classes) in .

Save changes
Unlike NetBeans where you have to manually save your changes, IntelliJ IDEA saves them automatically. Saving is triggered by various events, such as compiling, running, debugging, performing version control operations, closing a file or a project, or quitting the IDE. Additionally, you can configure IntelliJ IDEA to trigger auto-save when switching to another application or if the IDE is idle for a specified period.

Compile on save and deploy on save
In NetBeans, you can enable compilation and deployment on save. In separate settings, you can configure other on-save actions such as reformat code or remove unused imports. In IntelliJ IDEA, all these actions are available in .

For more information, refer to Trigger actions when saving changes.
Plugins
Although you cannot use NetBeans plugins in IntelliJ IDEA, a lot of functionality implemented in these plugins is available in IntelliJ IDEA out of the box. Besides, there are a lot of plugins for IntelliJ IDEA, so you can always find a plugin with functionality similar to that of your favorite NetBeans plugin. You can install plugins from JetBrains Marketplace or from the disk.
Open plugin settings
Press Ctrl+Alt+S to open settings and then select .

Use the Marketplace tab to browse and install plugins from JetBrains Marketplace or from a custom plugin repository.
Use the Installed tab to browse bundled and installed plugins, enable, disable, update, or remove them. Disabling unnecessary plugins can increase performance.
For more information, refer to Plugins and Install plugins.
If you want to write a plugin for IntelliJ IDEA, have a look at:
Information for Plugin Developers on the IntelliJ IDEA Plugins page