Editor cookbook
This document, intended for advanced language designers, should give you the answers to the most common questions related to the MPS editor. You may also like to read the Editor documentation, which contains exhaustive information on the subject.
How to create an editor definition
The DSL that MPS offers language designers to design editors is built around the notion of cells. The language designer combines editor cells and places them on the screen in a way that reflects the desired final layout of the notation.
The inspector window at the bottom of the screen, which can be slides in after pressing the Inspector tool button in the bottom-right corner of the screen or using the Alt/Cmd + 2 keyboard shortcut, shows additional styling and layout properties of the cell selected in the editor above.
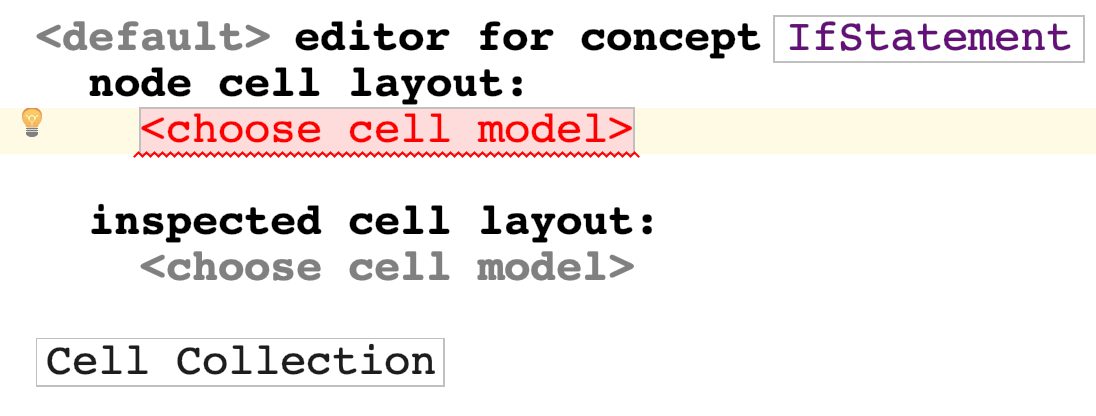
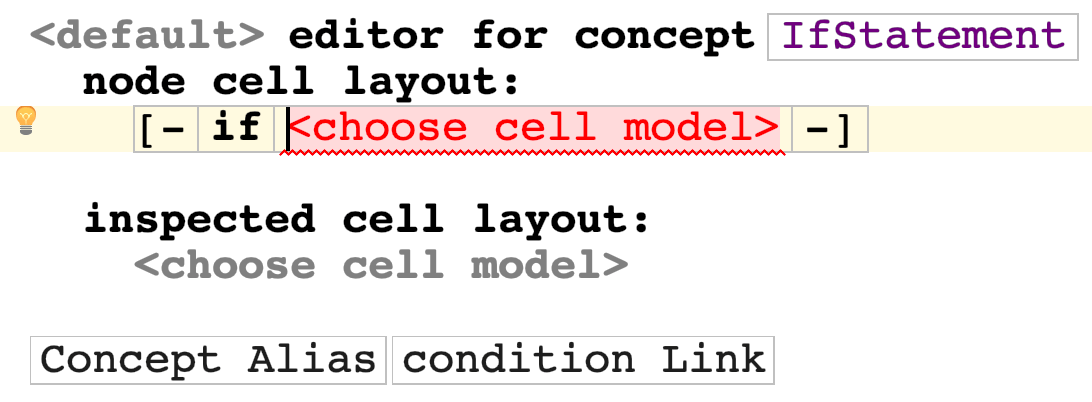
An empty editor definition shows a red placeholder for a single cell
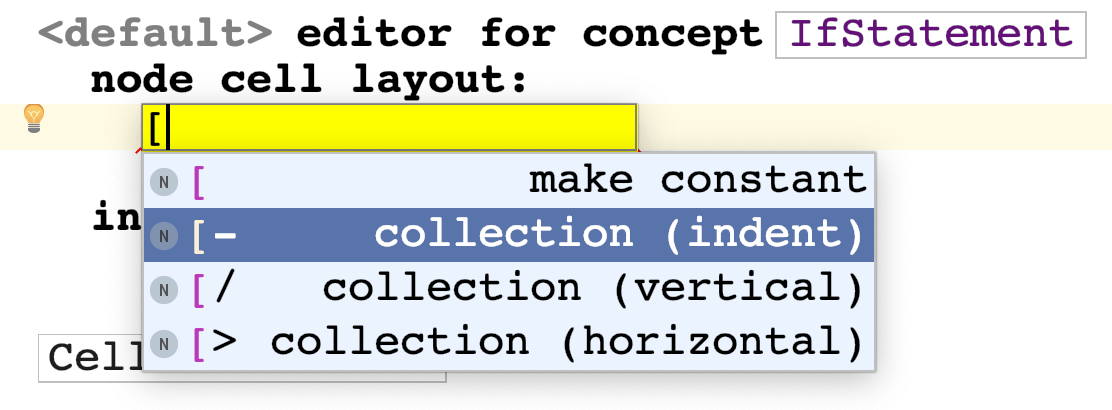
Pressing Control + Space will offer various types of editor cells that can be inserted. The constant cell, for example, will display given un-modifiable text label.
An empty constant text looks like this in the editor definition:
When used by the end user, the editor will show an empty space in place of the empty constant cell.
You can type any arbitrary text that you want the constant cell to display to the user at run-time:
Cells mapped to properties, nodes or references
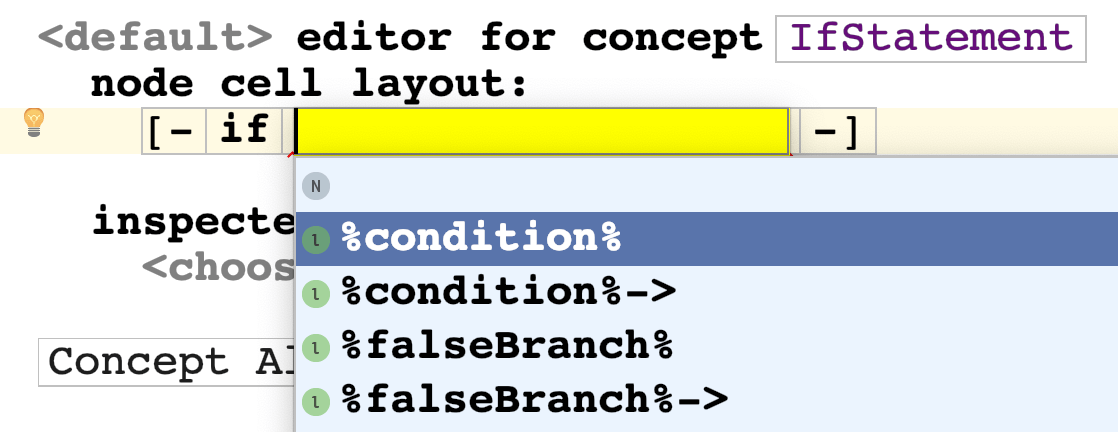
The completion menu also offers cells that will show values of a node's property, a child or the target of a reference. These cells also typically allow the users to modify the values displayed.
Layout
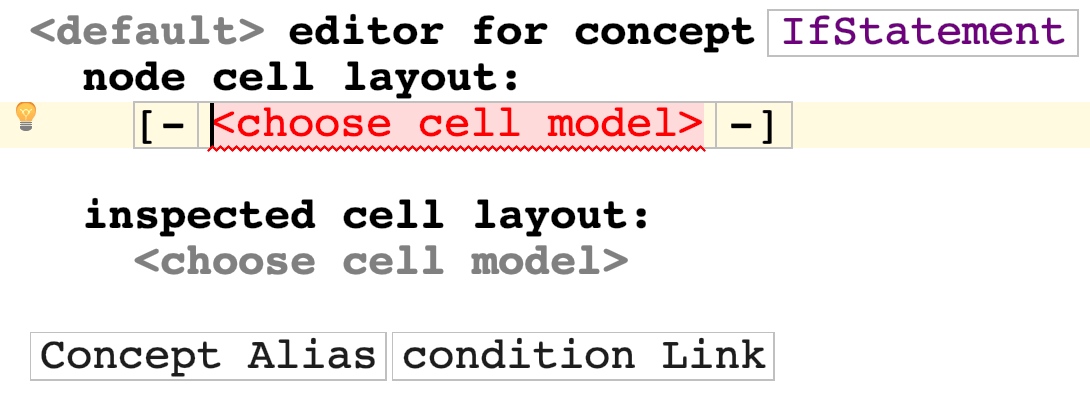
Editors that consist of a single cell are not very useful. In order to combine multiple cells in the editor definition a collection layout cell must be used. MPS offers three types of these - vertical,horizontal and indent collection layout cells.
The collection layout cell will take care of positioning the cells that it wraps:
Hit Enter to insert and additional cell:
This way you can insert as many cells as needed. Nesting collection layout cells in other collection layout cells is possible.
The indent layout gives the designer control over where to wrap lines. Setting the indent-layout-new-line property in the inspector for a cell will make the cell the last on a line.
The following cell will be placed on the line below:
Similarly, setting the indent-layout-indent property will make a cell indented:
How to properly indent a block of code
Nested blocks of code are typically represented using indented collections of vertically organized statements. In MPS you almost exclusively use indented layout for such collections, if you aim at making the experience as text-like as possible. Vertical and horizontal layouts should be only considered for positional or more graphical-like layouts.
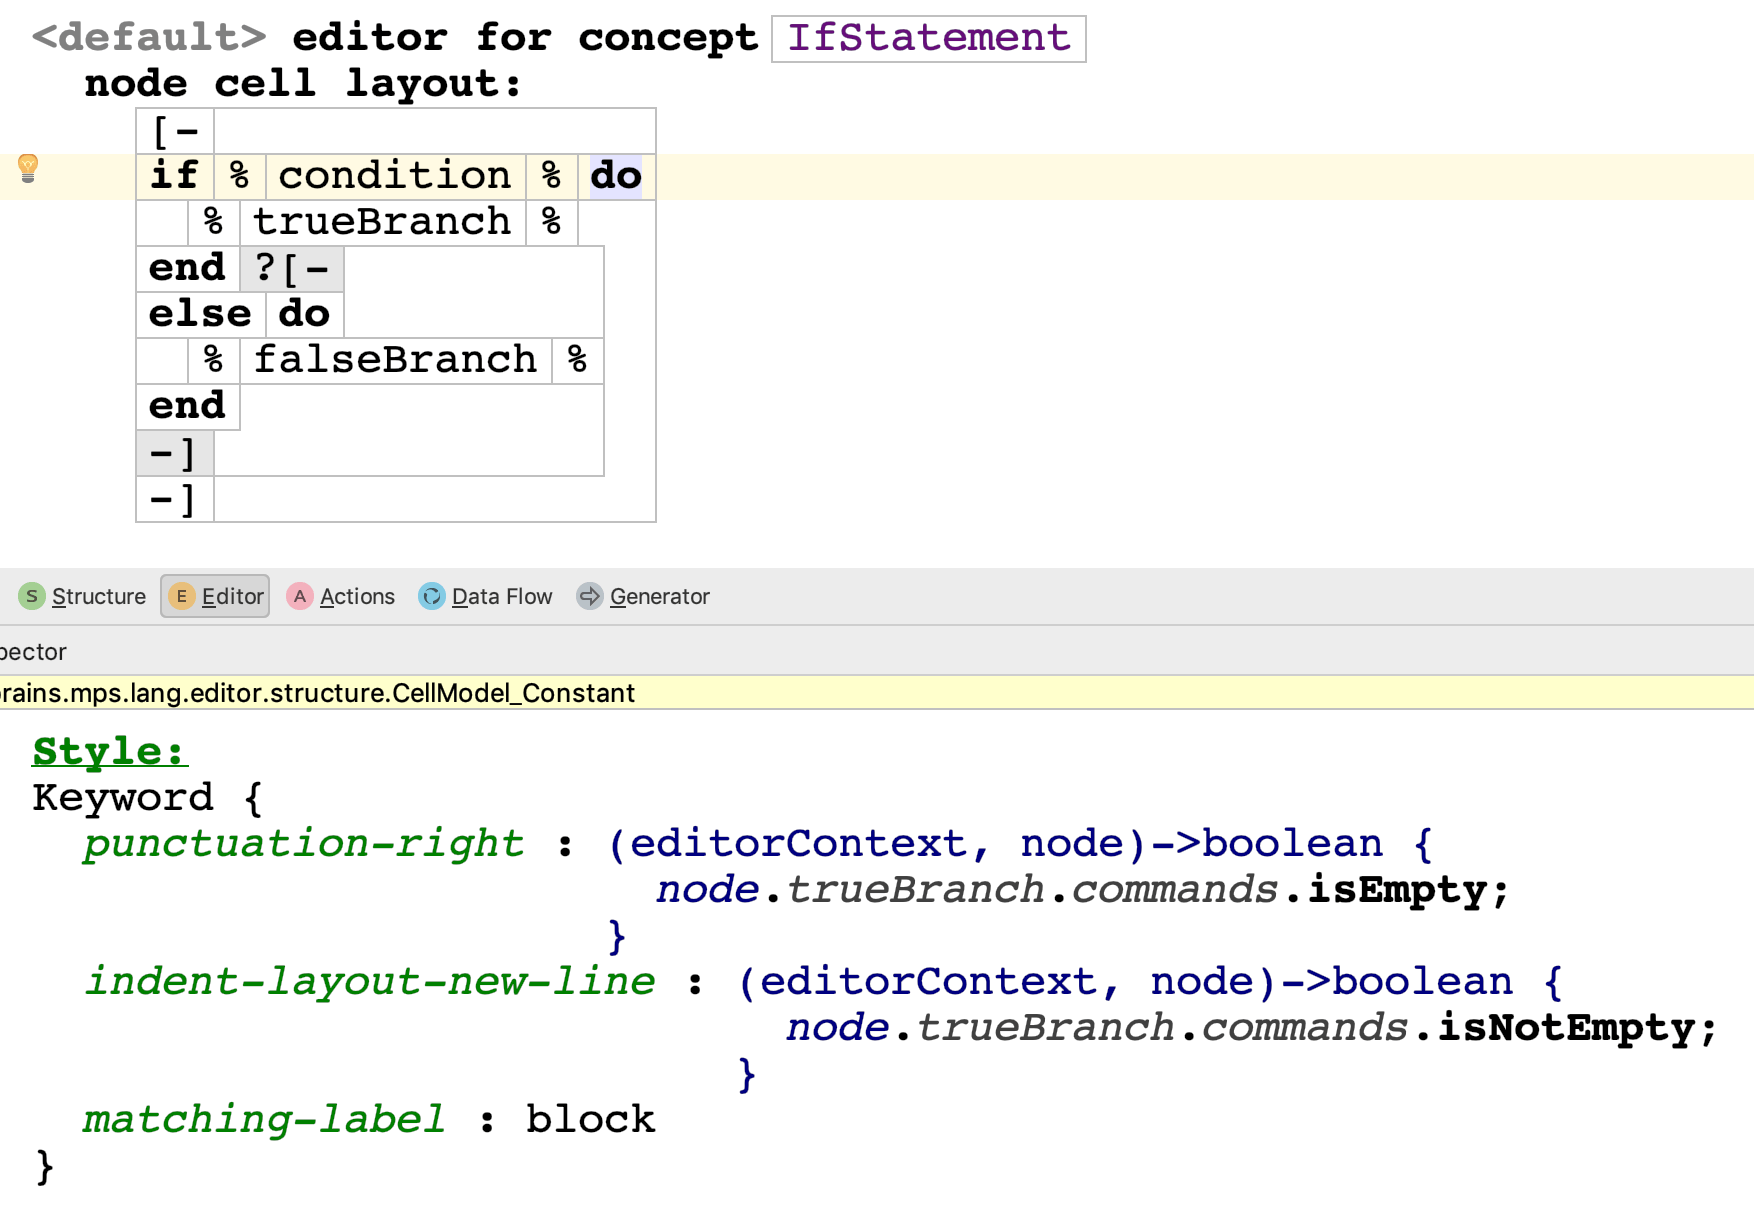
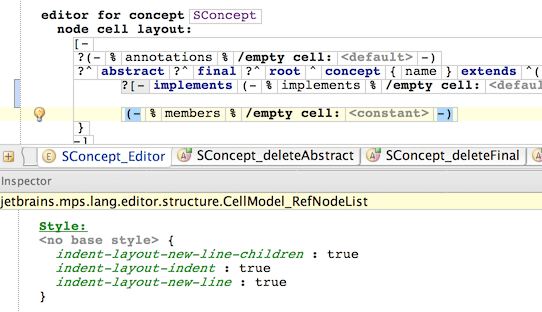
So for properly indented code blocks you need to create an Indented collection ([- ... -]) and set:
indent-layout-new-line-children so that each collection element (child) is placed on a new line
indent-layout-indent to make the whole collection indented
indent-layout-new-line to place a new line mark behind the collection, so that next nodes get placed on a new line underneath the collection
indent-layout-on-new-line Optionally you may need this flag to place the whole collection on a new line instead of just appending it to the previous cell
Enhancing the editor definition
Alias
Concepts can have an alias defined, which will represent them in code-completion pop-up menu and which will allow users to insert instances of these concept just by typing the alias. The editor can then refer to the text of the alias using the AliasEditorComponent editor component. This is in particular useful, when multiple concrete concepts inherit an editor from an abstract parent and the alias is used to visually differentiate between the multiple concepts.


You then refer to the alias value through the conceptAlias property:

Unique constraint
In general, constraints allow you to restrict allowed nodes in roles and values for properties and report violations to the user.
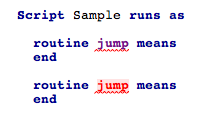

Frequently you'd like to apply constraints to limit allowed values in your code. E.g. the names of method definitions should be unique, each library should be imported only once, etc. MPS gives you two options:
Use constraints - these define hard validity rules for abstract syntax (structure) of your language. Use these if you want to disallow certain nodes or properties to be ever made part of the AST.
Use NonTypesystemRules - these provide additional level of model verification. You are still allowed to enter incorrect values in the editor, but you will get an error message and a red underline that notifies you about the rule violation. Unlike with constraints you can also specify a custom error message with additional details to give the developer helpful hints.
Constraints

NonTypesystemRules
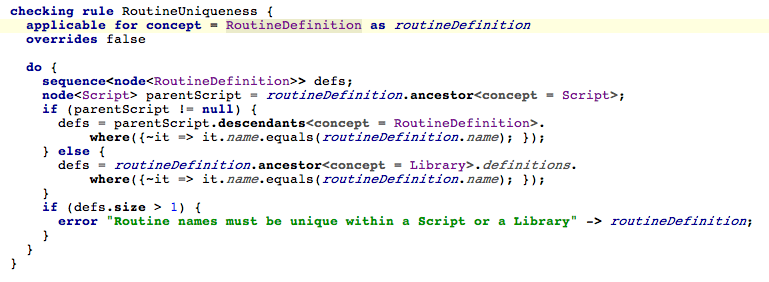
An indented vertical collection
Indent layout is the preferred choice instead of vertical/horizontal ones where applicable. To create an indented vertical collection you can create a wrapping indent collection (marked with [- -]) and set
indent-layout-indent: true
selectable : false. (false means the collection will be transparent when expanding code selection).
Then, on the child collection use indent-layout-new-line-children : true.
Optional visibility
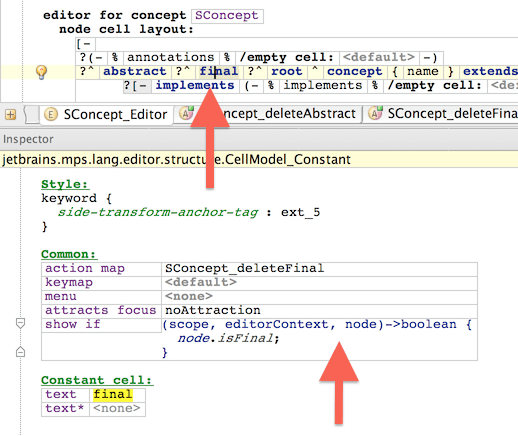
Elements, that should only be visible under certain condition, should have its show if property set:
Defining and reusing styles
Each cell can have its visual style defined in the Inspector. In addition to defining style properties individually, styles can be pre-defined and then reused by multiple languages.
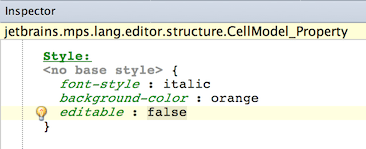

You can define your own styles and make them part of your editor module so that they can be used in your editors as well as in all the editors that import your editor module.
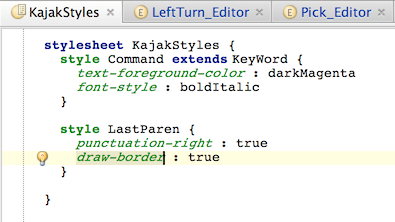
Reusing the BaseLanguage styles
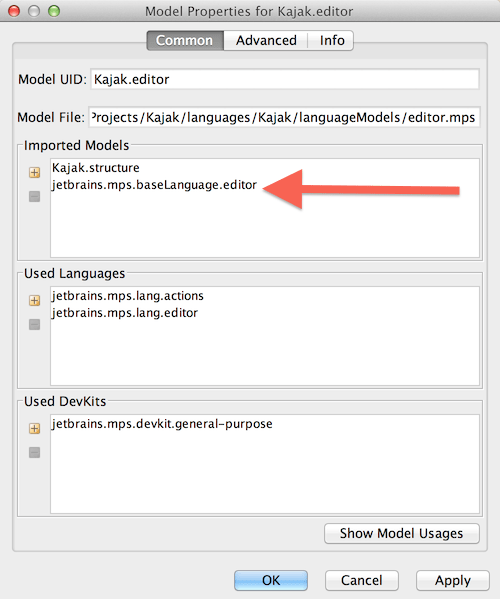
BaseLanguage comes with a rich collection of pre-defined styles. All you need to do in order to be able to use the styles defined in another language is to import the language into the editor of your language.
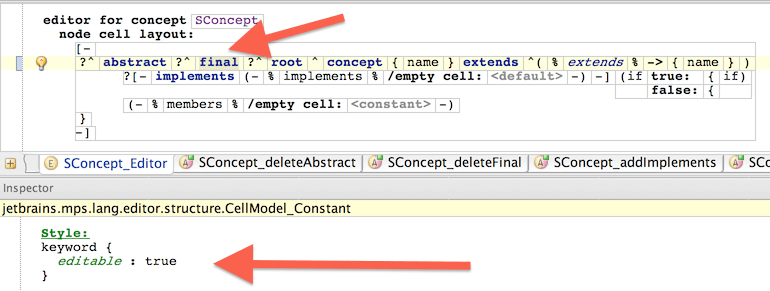
Making proper keywords
Keywords should have the keyword style applied so that they stand out in text. Also, making a keyword editable will make sure users can freely type inside or next to the keyword and have transforms applied. With editable set to false MPS will interfere with user's input and ignore characters, which don't match any applicable transformation.
Adjust abstract syntax for easy editing
Making all concepts descent from the same (abstract) concept allows you to mix and match instances of these concepts in any order inside their container and so give the users a very text-like experience. Additionally, if you include concepts for empty lines and (line) comments, you will give your users the freedom to place comments and empty lines anywhere they feel fit.
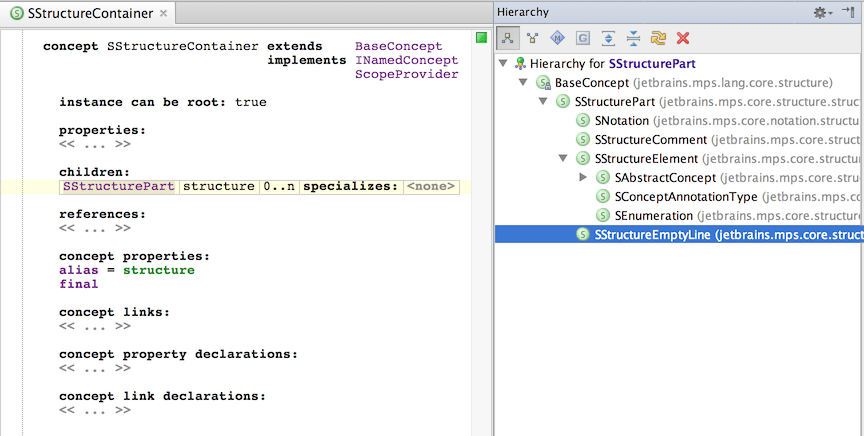
In our example, the SStructureContainer does not impose any order, in which the members should be placed. The allowed elements all descend from SStructurePart and so are all allowed children.
Specify, which concept should be the default for lists
When you hit Enter in a text editor, you get a new line. Identically, you may want to an empty line concept or some other reasonable default concept of your language to be added to the list at the current cursor position, when the user presses Enter.
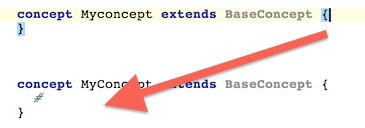
The behavior in the second image below should be preferred to the one visible on the first one:


The red placeholder is caused by either a missing node in the position or an instance of an abstract concept. Since abstract concepts should not be instantiated, the editor always shows them in red.
When the user hits Enter on a collection cell a new node is created and inserted into the collection. The concept of the newly created and inserted node is the same as the declared concept of the collection. If the concept is abstract, the newly created and inserted node will be in instance of that abstract concept and thus rendered in red.
There are three ways to prevent such situations:
Use a non-abstract concept to declare the concept of the child collection. BaseLanguage uses this approach for Statement, which is a common super-concept to all statements and is not abstract in order to represent empty lines.
Specify a default concrete concept in the Constraints of the abstract concept. This will use the specified concrete concept whenever the abstract one is to be instantiated. Such a concrete concept will then be used as a concept for empty lines.
Use element factory on all collections, in which a different than the abstract concept should be used for creating newly inserted nodes (described below).
Specifying default concept is as easy as setting the element factory property of the collection editor:
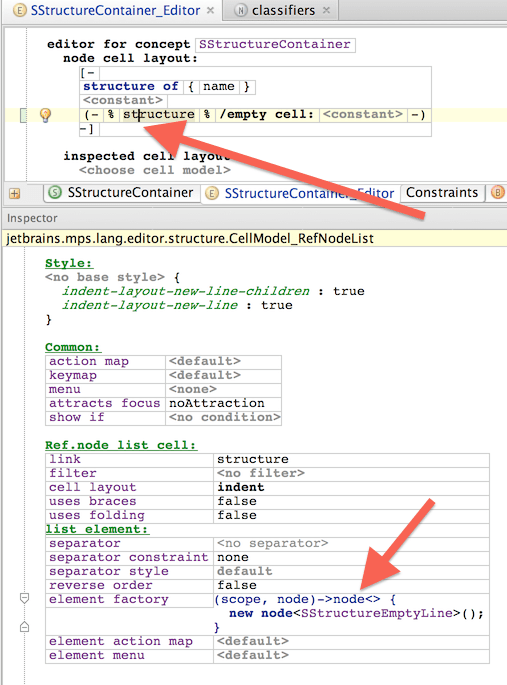
Make empty lines helpful to further editing
Making empty lines to appear as default after hitting Enter is the first important step to mimic the behavior of text-editors. The next step that will get you even closer is to make empty lines react reasonably to user input and provide handy code completion.
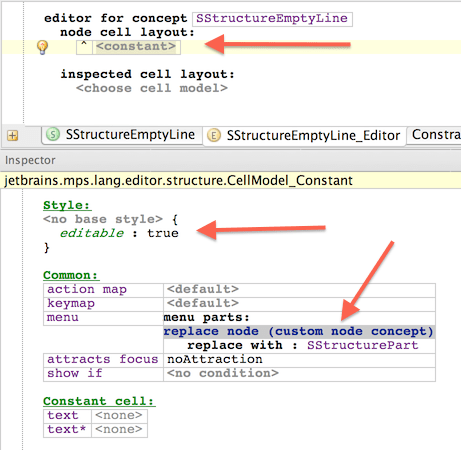
You should make your empty lines similar to the one above - add an empty constant cell, make it editable and specify the super-type of all items to populate the code-completion menu with. If you followed the earlier advice and have all your concepts, which could take the position of the empty line, descend from a common ancestor, this is the type to benefit. Specify that ancestor as the concept to potentially replace empty lines with.
Hiding concepts from the completion menu
The completion menu can be customized using the Transformation Menu language. By default it shows all non-abstract concepts that can be substituted in the current location. Some concepts, such as empty lines or comments, you may want to exclude from the completion menu explicitly. To do so, you need to define a Default Substitute Menu for the concerned concept or its super-concept in the editor aspect of your language and leave it empty. MPS uses that menu to populate the completion menu with items whenever your concept is considered for substitution. Leaving the menu empty will result in your concept never getting inserted into the completion menu.
Easy node replacement
Similarly, you will frequently want to allow developers to replace one node with another in-place, just by typing the name of the new element:
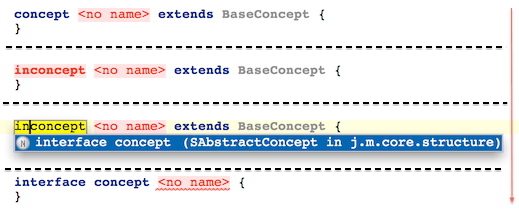
Just like with empty lines, for this to work, you set the replacement concept to the common ancestor of all the applicable candidate concepts. These will then appear in the code-completion menu.
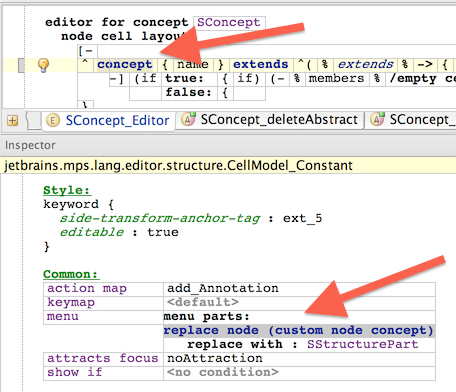
Vertical space separators
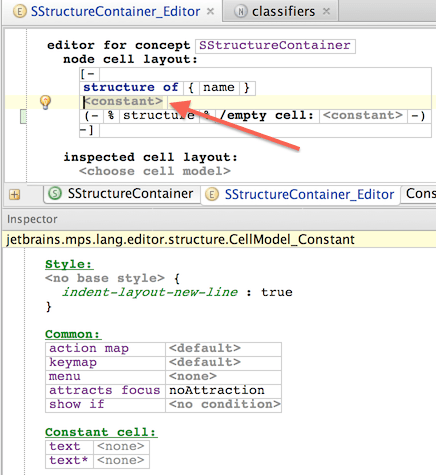
To create some vertical space in order to separate elements, constant cells are very handy to utilize. Give them empty contents, set noAttraction for focus to make it transparent and put it on a separate line with indent-layout-new-line.
Handling empty values in constants
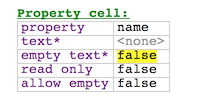
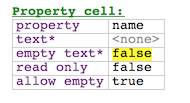
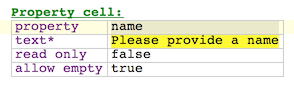
A value of a property can may either hold a value or be empty. MPS gives you three knobs to tune the editor to react properly to empty values. Depending on the values of the allow-empty, text* and empty text* flags, the editor cell may or may not turn red or display a custom message when the property is empty.
Empty values not allowed. The cell is displayed in red to indicate an error. |
|
|
|---|---|---|
Empty values not allowed. A custom message has been provided to empty cells. |
|
|
Empty values are allowed. An empty cell displays a default message in gray color. |
|
|
Empty values are allowed. A custom message has been provided to empty cells. |
|
|
Empty values are allowed. The empty cell is visually transparent. |
|
|
Empty values not allowed. The empty value has no default text and is marked in red. |
|
|
Horizontal list separator
The separator property on collection cells allows you to pick a character that will
Visually separate elements of the list
Allow the user to append or insert new elements into the list
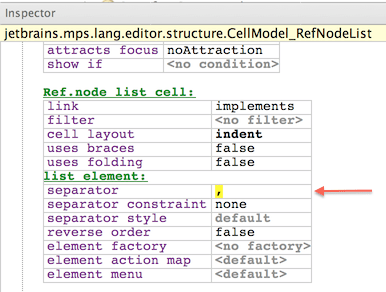

Although separators can be any string values, it is more convenient to keep them at one character length.
Matching braces and parentheses
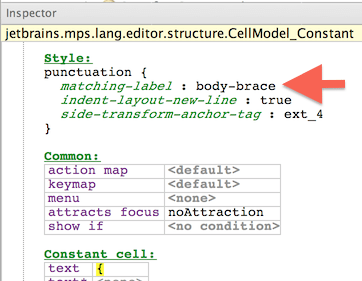
Use the matching-label property to pair braces and parentheses. This gives the users the ability to quickly visualize the wrapped block of code and its boundaries:

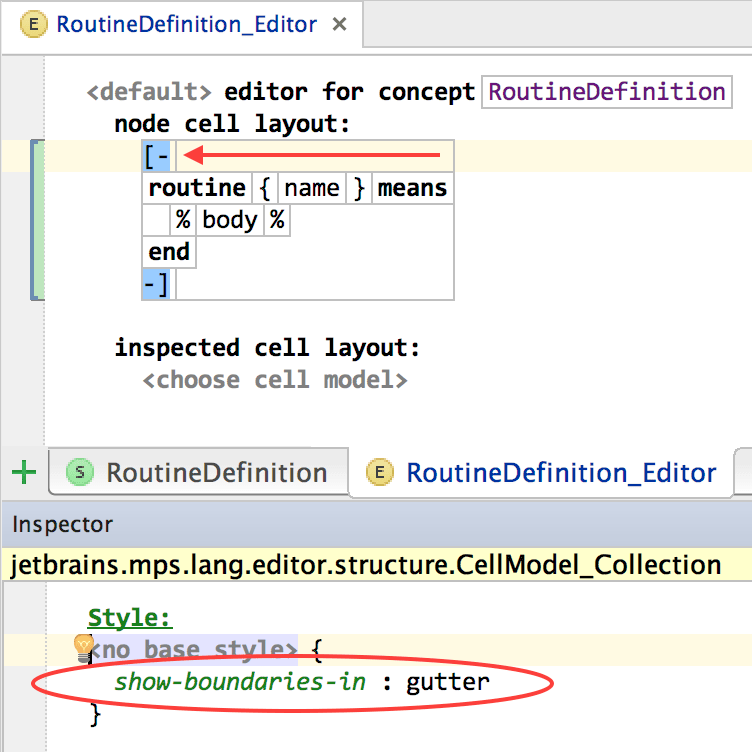
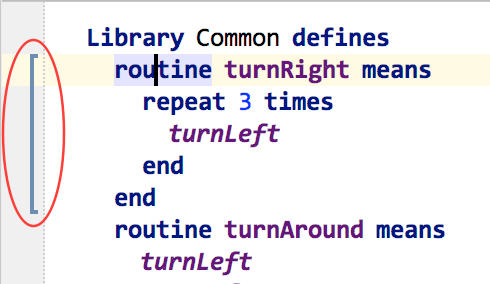
Since MPS 3.4 you can also use show-boundaries-in style on a collection cell to specify how its boundaries are to be shown. The style has two values, gutter and gutter-and-editor. If you set the style of a collection to gutter-and-editor, the collection's first and last cell will be highlighted in the editor when one of the cells is selected and a bracket will be shown in the left-hand editor gutter. Setting the style to gutter will only show the bracket and may be useful if you want to show where a particular collection begins and ends but there isn't a well-defined last cell in the collection.
Example:
The result:
Empty blocks should look empty
By default an empty block always takes one line of the vertical real-estate. It also contains a default empty cell, which gives the developer a hint that there's a list she can add elements to.

You may hide the << ... >> characters by setting the empty cell value to be an empty constant cell, which gives you a slightly more text-like look:

One additional trick will hide the empty line altogether:

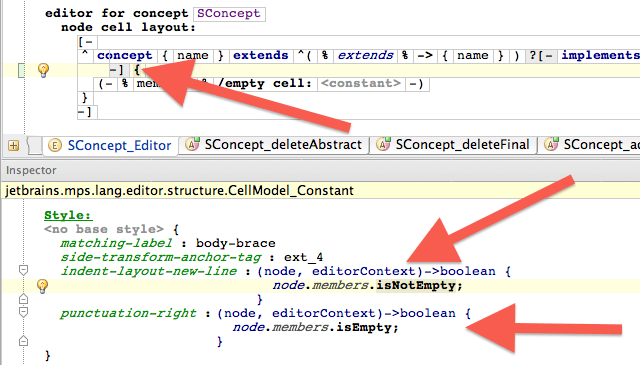
What you need to do is to conditionally alter the indent-layout-new-line and the punctuation-right properties of the opening brace to add/remove a new line after the brace and assign control of the caret position right after the brace to the following cell. Since the empty constant cell for the members collection follows and is editable, it will receive all keyboard input at the position right after the brace. This will allow the developer to type without starting a new empty line first.
Make empty constants editable
It is advisable to represent empty cells for collections with empty constant values that have the editable property set to true. This way users will be able to start typing without first creating a new collection element (via Enter or the separator key).
Common editor patterns
Prepending flag keywords
Marker keywords prepending the actual concept, such as final, abstract or public in Java, are quite common in programming languages.
private abstract class MyCalculator { ... }
Developers have certain expectations of how these can be added, modified or deleted from code and projectional editors should follow some rules to achieve pleasant intuitiveness and convenience levels.
Typing part of the keyword anywhere to the left of the main concept name should insert the keyword
Hitting delete while positioned on the keyword should remove it
The keyword should only be visible when the associated flag is true - for example, the final keyword is only shown for final classes in Java
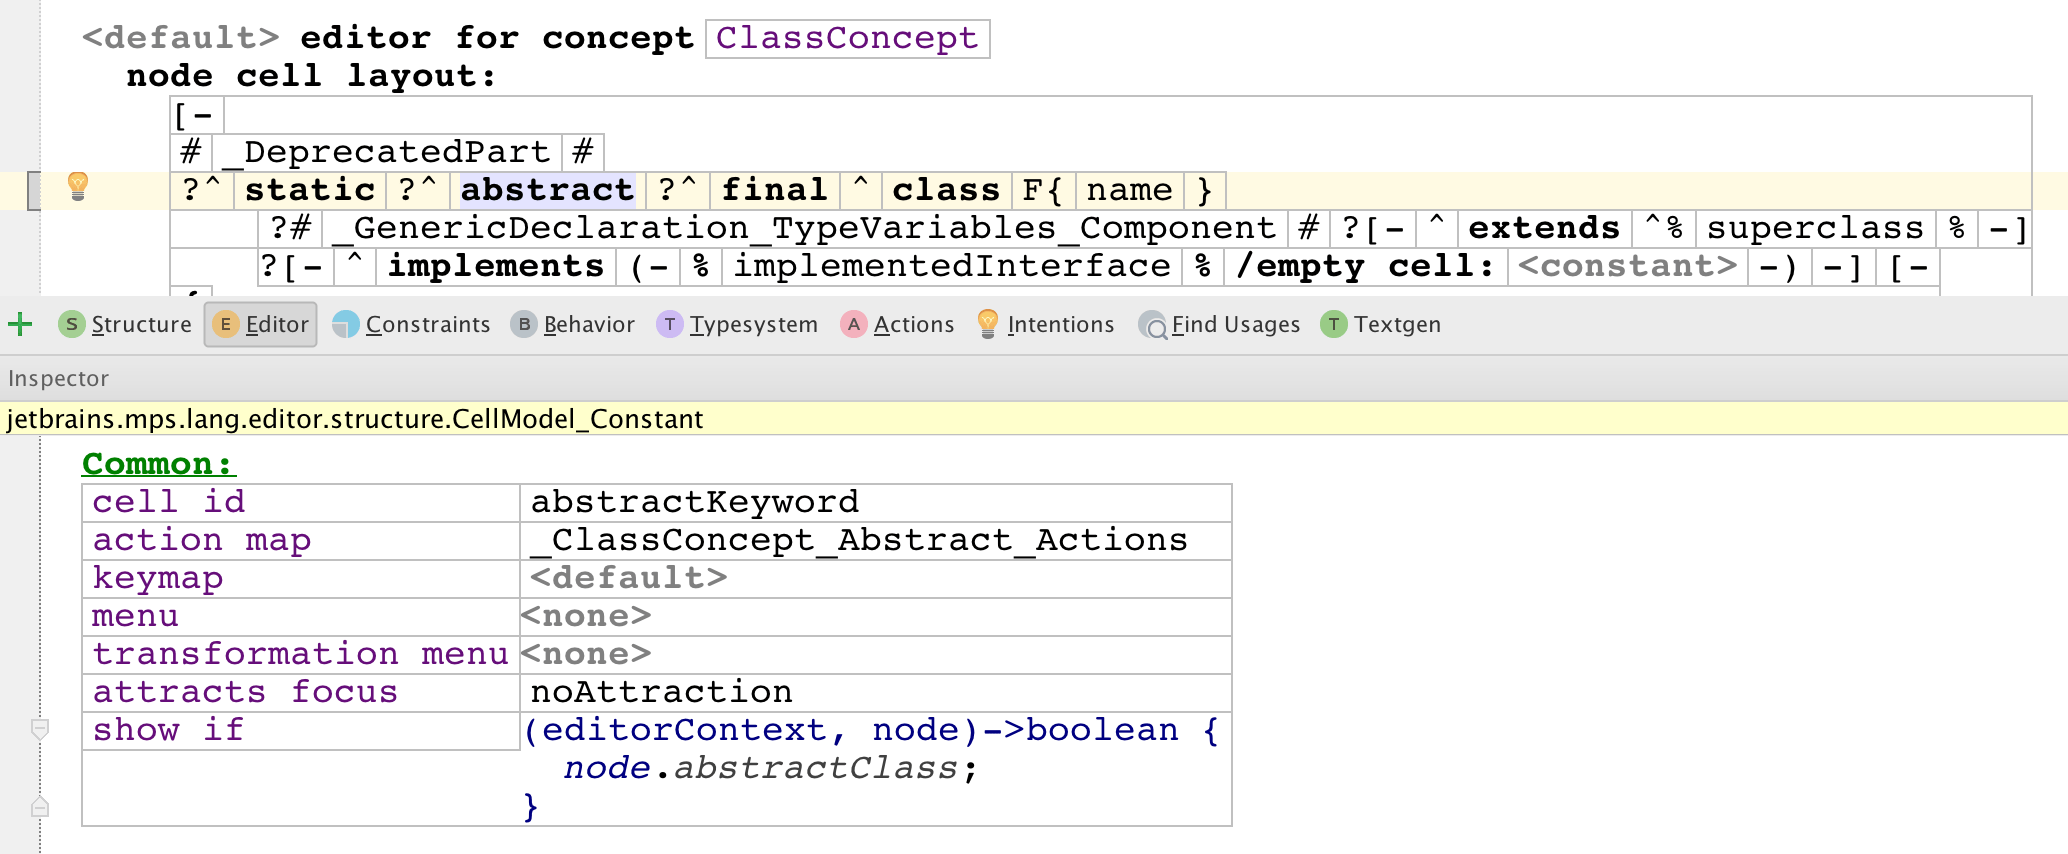
Notice that the keywords are optional, with the show if condition querying the underlying abstract model.
The action map property refers to an action map, which specifies that when the DELETE action is invoked (perhaps by pressing the delete key), the underlying abstract model should be updated, which will in turn make the flag keyword disappear from the screen.
Notice that the aproveDelete call gives the user a chance to revoke her decision to delete the flag and also how positioning the cursor after deleting the flag is handled.
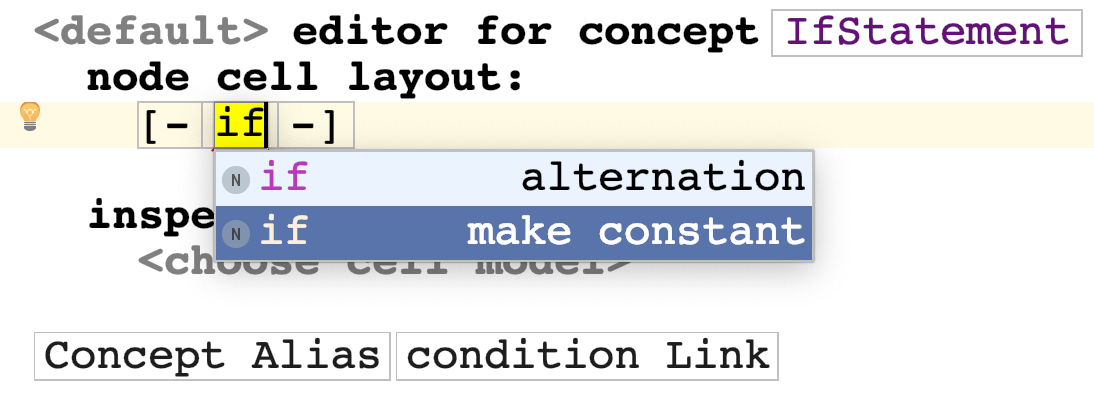
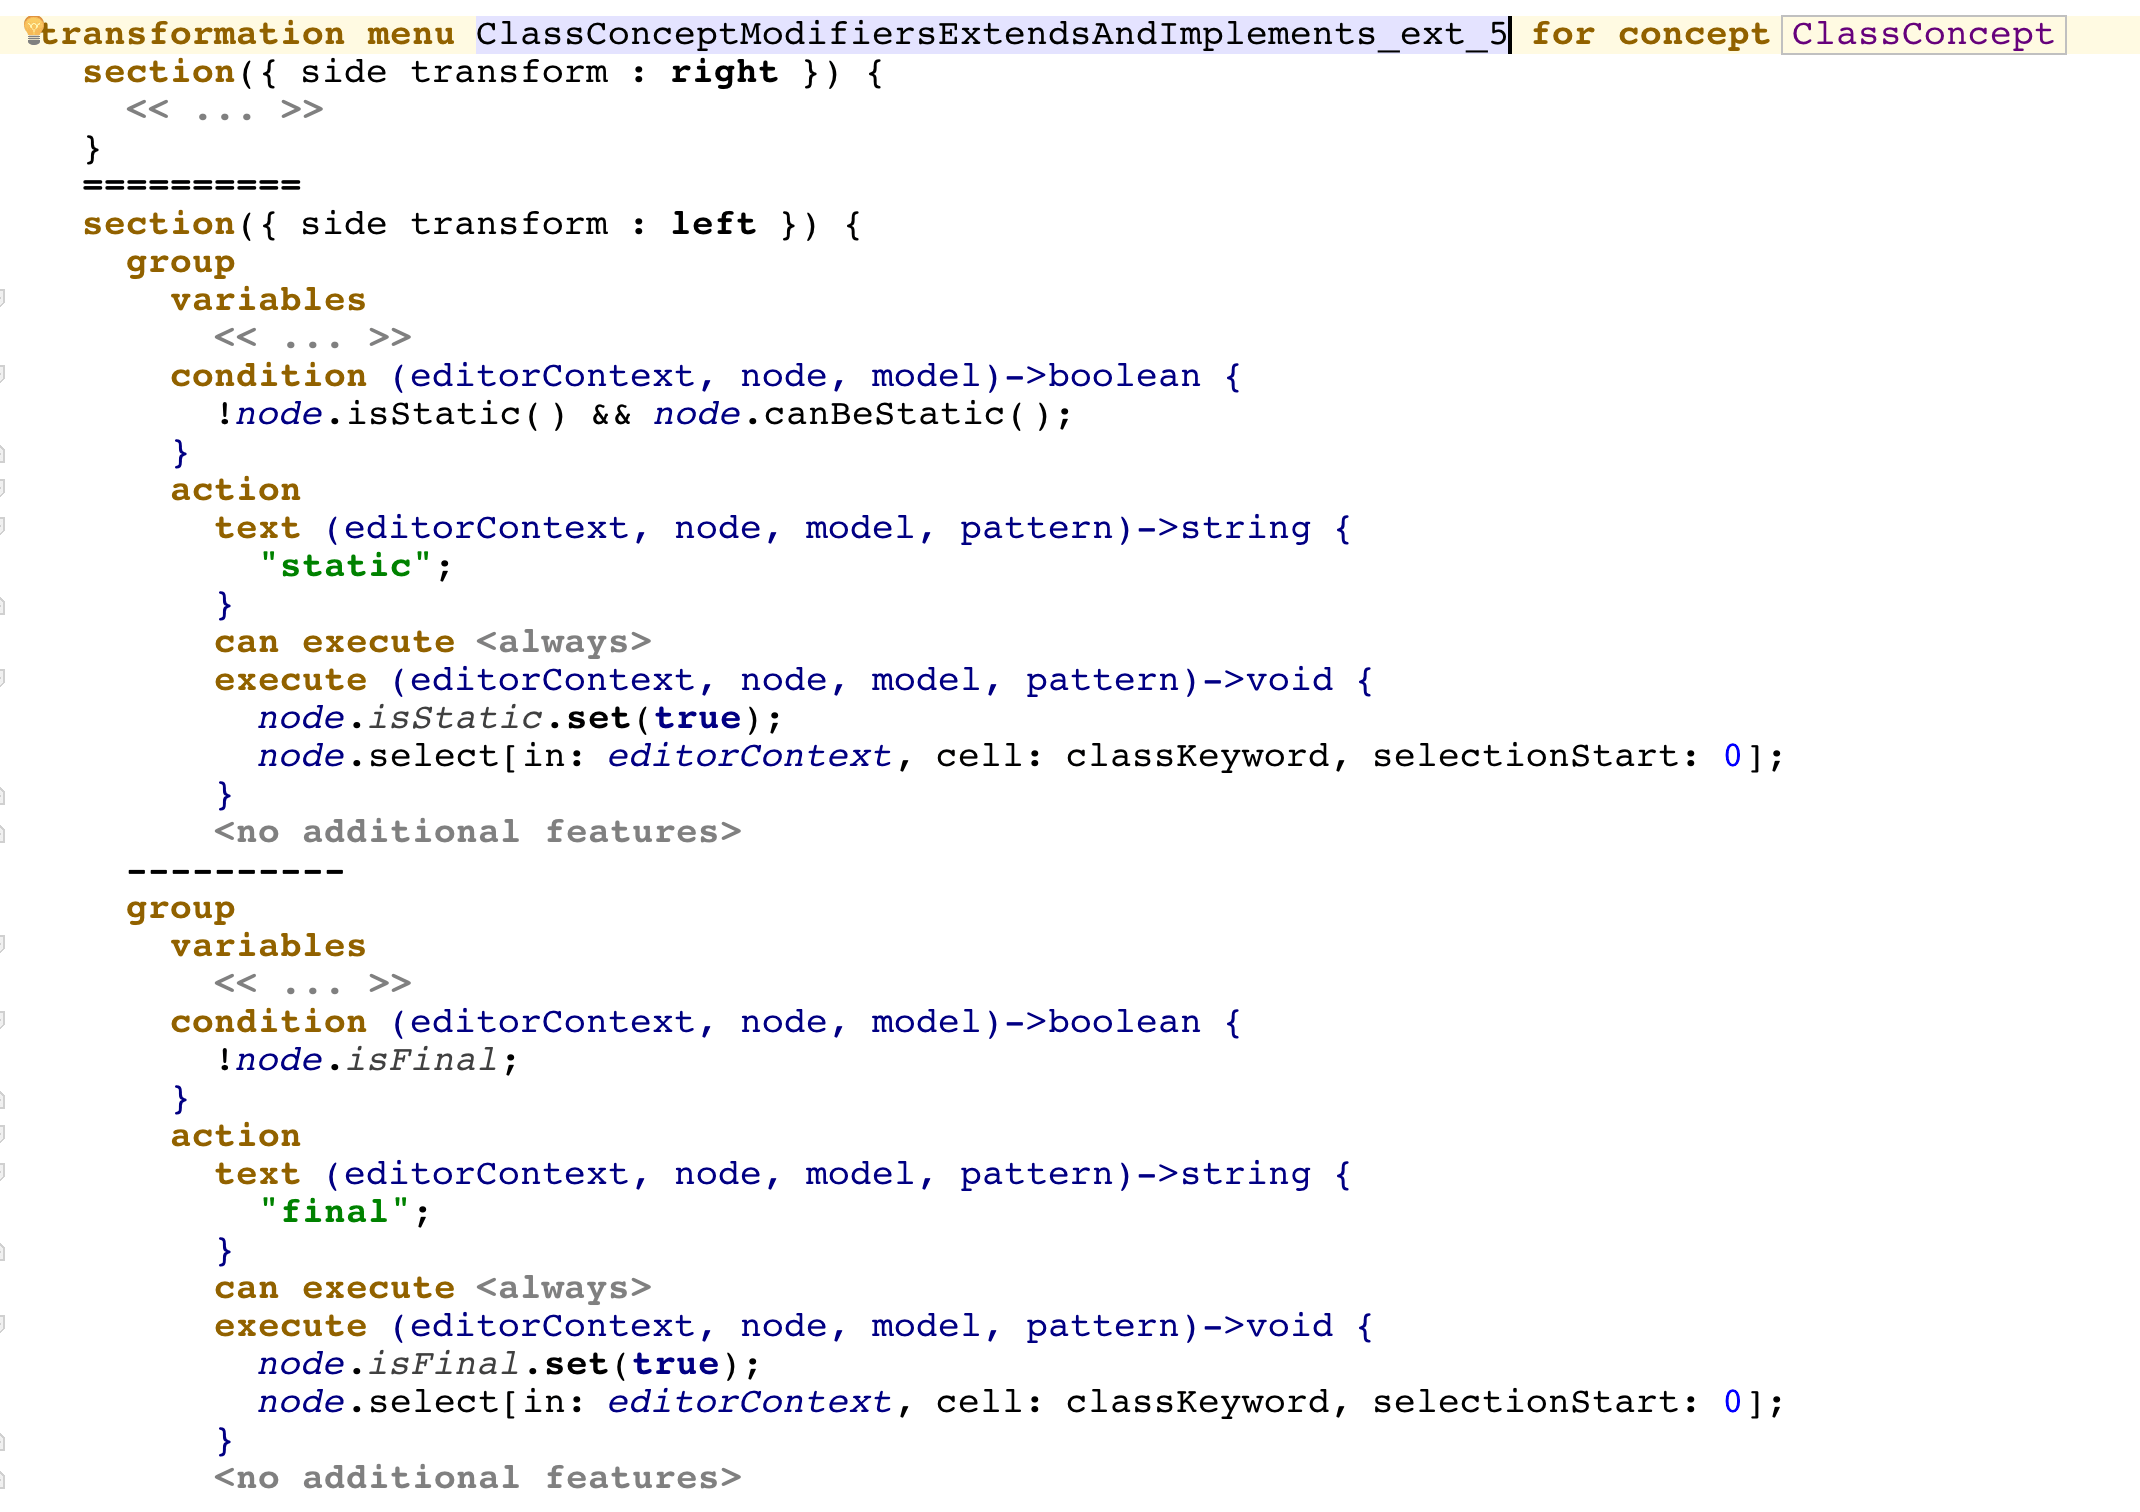
To allow the developers to add the keyword just by typing it, we need to define a left transform action, which, in our example, when applied to a non-final element will make the element final after typing "final" or any unique prefix of it. The Transformation Menu language gives us Transformation Menus, which we can utilize here:
A Named transformation menu can then be attached to the editor cells that precede or succeed our flag cell:
Appending parametrized keywords
Supporting keywords similar to Java's implements is also very straightforward in MPS.

First, the whole implements A, B C part must be optionally visible.
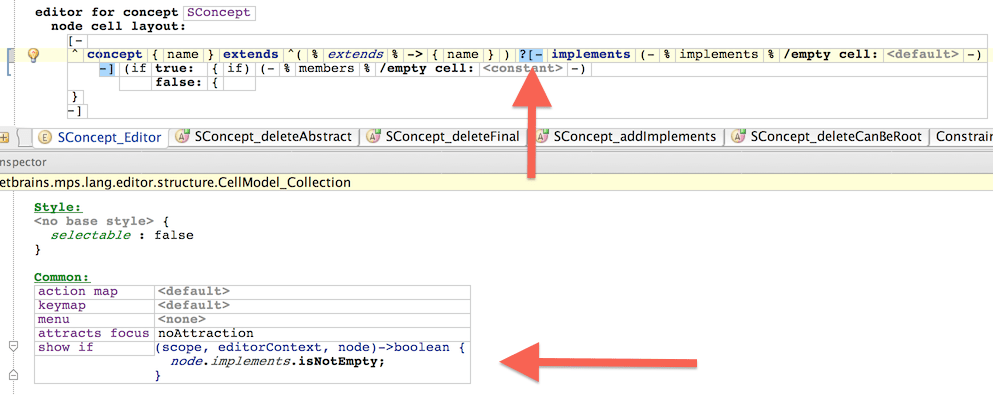
Only when the list of implemented interfaces is non-empty, the collection including the implements keyword is displayed.
Second, we need a right transformation to add a new child into the implements collection, when implements or a part of it is typed right after the class name or after the reference to the extended class. Similarly, a left transformation is needed to add a new child when implements is typed right before the code block's left brace. Again, the Transformation Menu language will let us create named transformation menus and attach them to the cells.
Node substitution actions
Node substitution actions specify how certain nodes can be replaced with others. For example, you may want to change logical and to or and vice versa, yet preserve the boolean conditions specified in the child nodes:

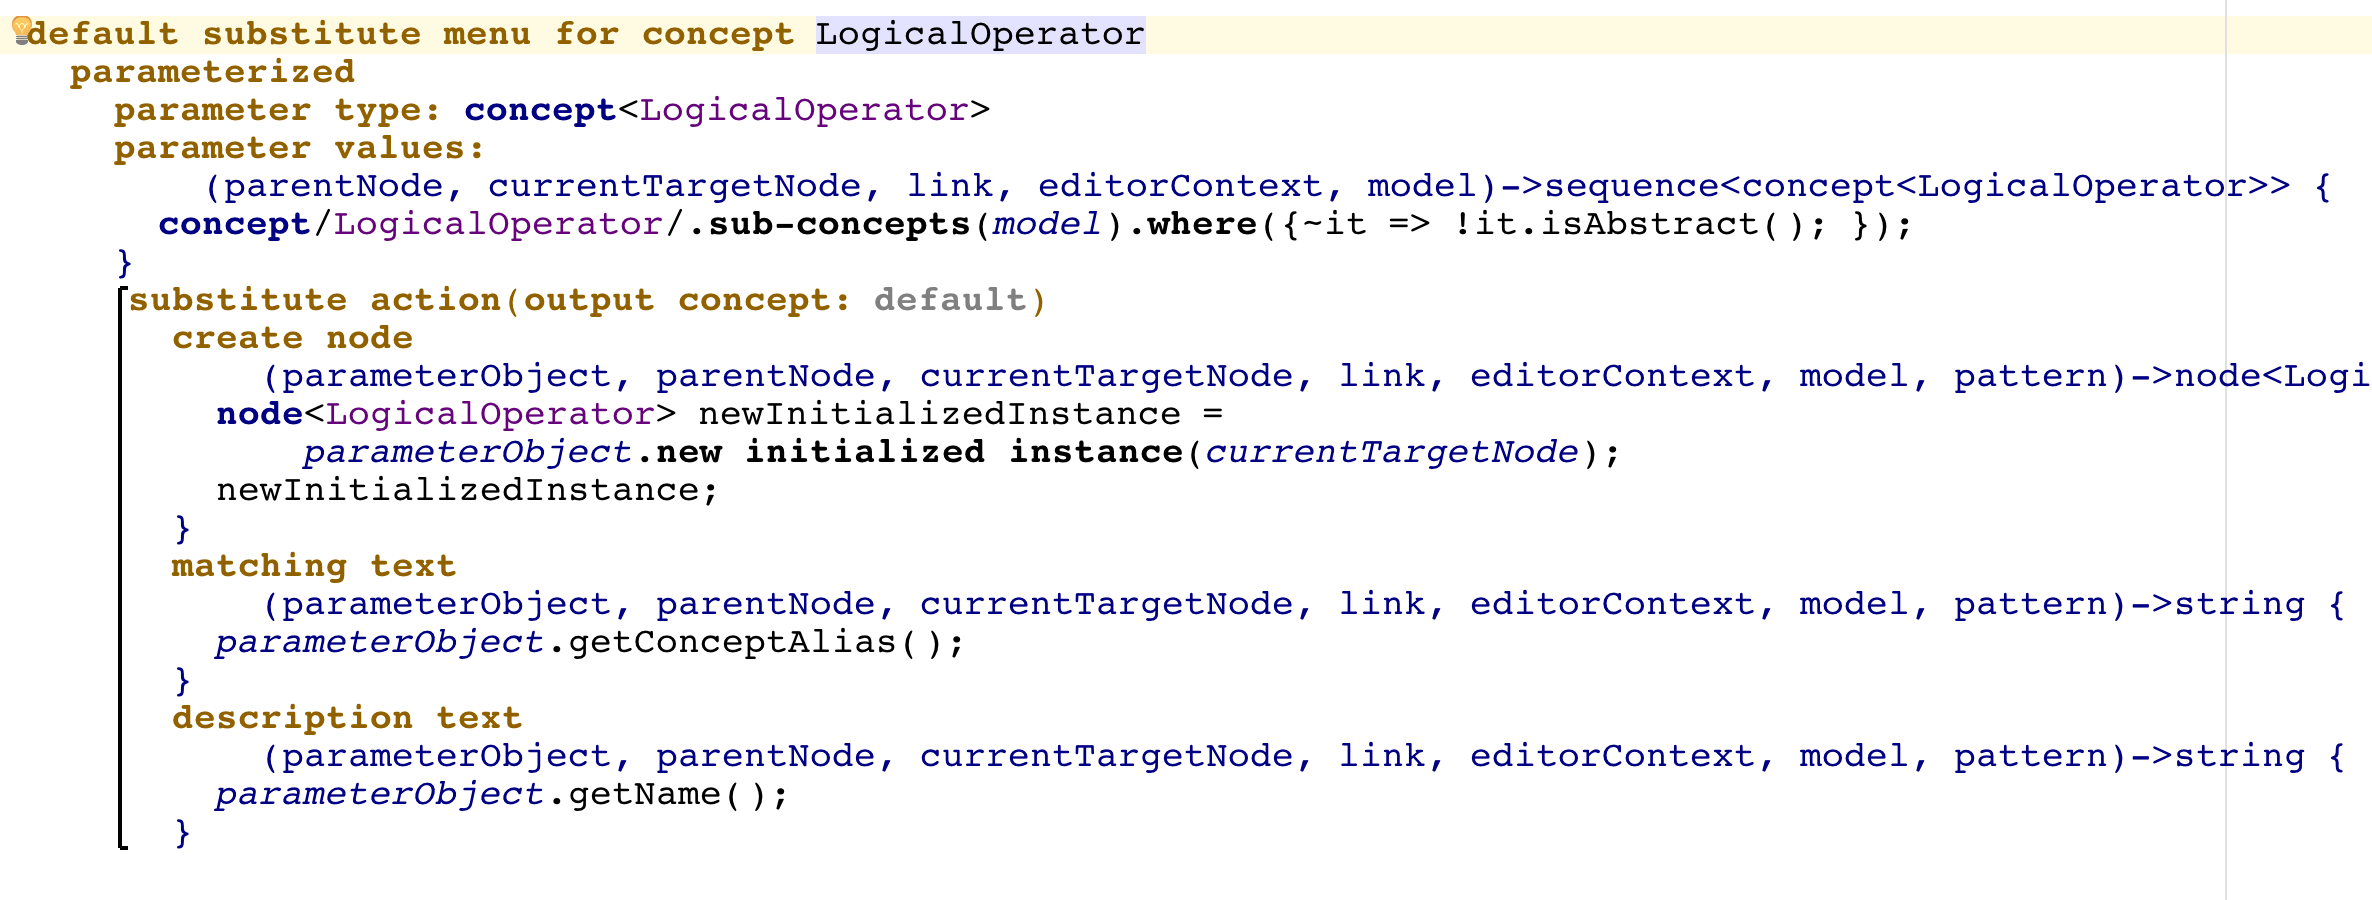
Let's use Default substitute menu from Transformation Menu language:
Since both And and Or concepts inherit from LogicalOperator, we can refer to LogicalOperator in the action. In essence, the action above allows replacing any LogicalOperator with any non-abstract subconcept of LogicalOperator. The replacing concept is instantiated and its left and right children populated from the children of the node that is being replaced.
Substitution for custom string values
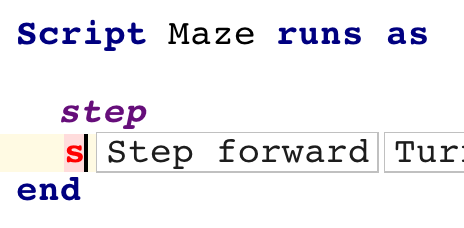
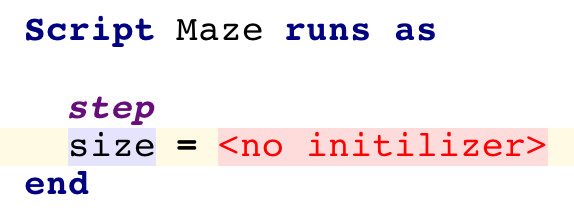
Substitution rules can also be used to convert plain strings into nodes of a desired concept. Imagine, for example, a kind of variable declaration that starts with the name of the variable, like in Python:
To enter such variable declaration, you can always pick the variable concept (by its alias) from the completion menu and then fill in the name:
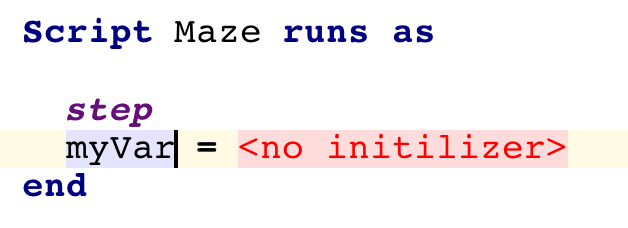
You can, however, add a simple substitution action into the substitution menu that will enable users to simply type the desired name of the variable on the empty line and have the variable created for you automatically:
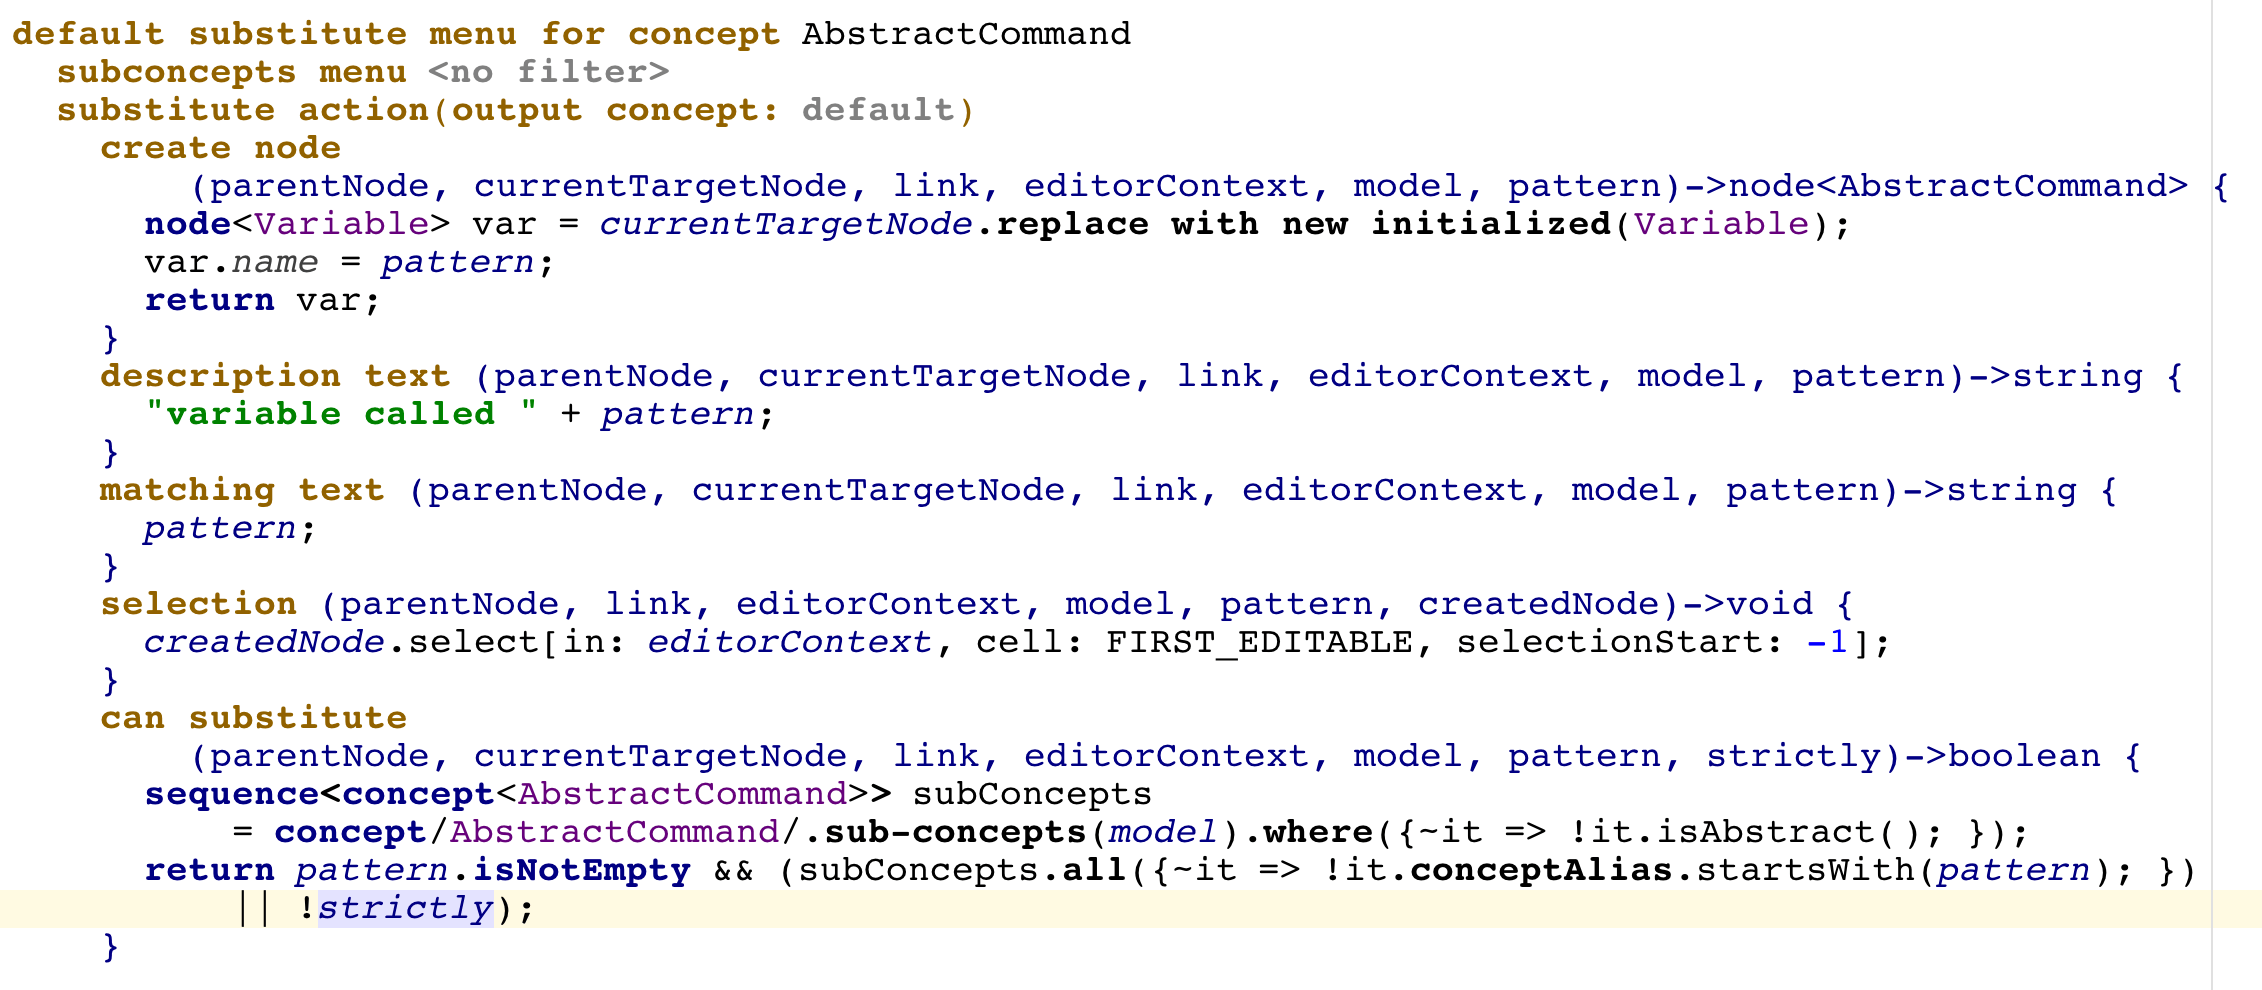
The menu may look something like this:
It can be substituted whenever a non-empty pattern has been typed and it does not match an alias of any of the known sub-concepts applicable in the position
A new node is created when the action is run and the pattern is copied into the name of the variable
The "selection handler" ensures that the cursor stays within the "name" cell after creating the variable so that the user can continue typing the name even after the variable has already been created (it is created as soon as there is no other option in the completion menu (the "selection handler" returns null, since when a non-null node is returned, MPS would set the cursor itself on the returned node and would ignore the "select" command)
You may also experiment with checking the "strictly" flag to further customize the behavior:
Here's the menu:
Changes:
The description provides a customized description message to display in the completion menu alongside the "variable" alias
The pattern ensures the so far typed text is suggested as the name of the variable to be created (when the code-completion menu is visible)
The can substitute handler reacts to the value of the strictly parameter, so that as long as there are other subconcepts available in the menu this action is also available, but only for non-strict matching.
Including parents transform actions
Your nodes can optionally include transform actions applicable to different nodes, e.g. parents. For example, if we allow for appending logical and and or to logical expressions, we may still get into problems when the logical expression is more complex and, for example, the last cell of its editor belongs to a child node.

In our example, heading south is a logical expression, however, south itself is a child of logical expression with a concept Direction. Thus the original right transform action that accepts and and or to be appended to logical expression will not work here. We must include the original right transform (applicable to Heading) action into a new right transform action applicable to Direction specifically.
Conceptual questions
Extending an existing editor
The MPS editor assigns visual cells to nodes from the model and so delegates to the node's concept the responsibility for redering the coresponding values and accepting user input. This mechanism will work irrespective of the language the concepts has been defined in. So an embedded language such as, e.g. a math formula, will render itself correctly, no matter whether it is part of a Java program or an electrical circuit simulation model, for example.
New sub-concepts will by default re-use the editor of their parent concept, unless a specific editor is available. On the other hand extending languages may supply their own editors for inherited concepts and thus override the concrete syntax derived from the inherited editor.
Design an editor for extension
A good strategy is to use Editor components to modularize the editor. This will allow language extensions to override the components without having to redefine the editor itself.
References to properties, such as conceptAlias, from within the editor should be preferred to hardcoded literals, since the reference will allow the editor to adapt to the subconcepts without having the override the editor.
When specifying actions' and intentions' applicability rules, bear in mind that some subconcepts may need to opt out from these actions of their parent. Making these actions check a behavior method in their applicability rules is advisable in such scenarios.
How to add a refactoring to the menu
Use InlineField or IntroduceVariable as good examples. In general, you need to define an Action from the jetbrains.mps.lang.plugin language, which specifies its applicability, collects contextual information and the user input, initializes the actual refactoring procedure and invokes it. The refactoring functionality is typically extracted into a BaseLanguage class and potentially reused by multiple actions.
How to define multiple editors for the same concept
A sample first
The MultipleProjections sample project bundled with MPS provides good introductory guidelines to learn how to define multiple editors per concepts and how to allow switching between them.
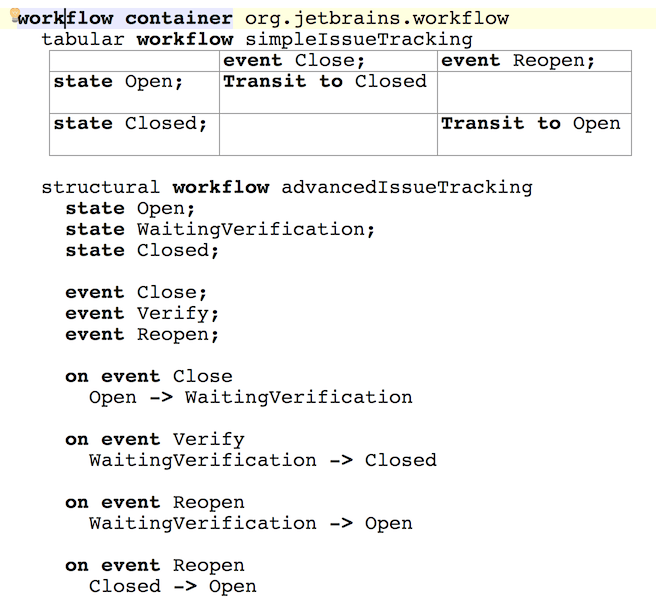
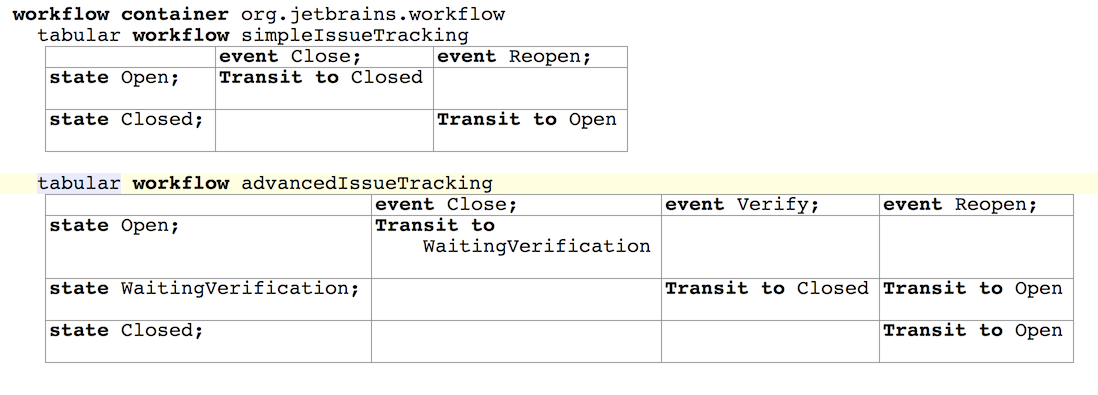
The sample languages allow you to define workflows, which consist of one or more state machines. State machines can be expressed either structurally or as tables. The programmer can switch between notations used for each state machine simply by typing either structural or tabular at the beginning of the corresponding state machine definition:
The sample consists of three languages and a sandbox project.
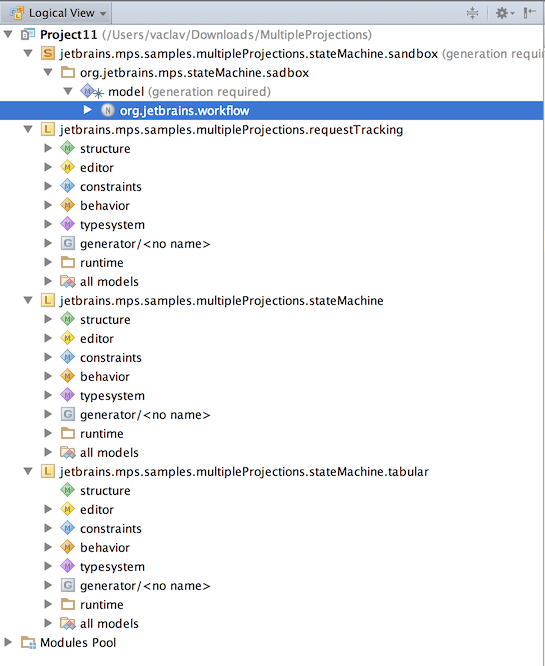
The requestTracking language provides the concepts and root concepts to wrap state machines and use them to define simple workflows. This could serve as an example of language that needs to embed a state machine language and allow for alternative notations for that embedded language.
The stateMachine language defines the basic concepts of the state machine language plus default editors. It has no artifacts specific to multiple projections at all. To illustrate the power of language extension in MPS the alternative editor projections for some of the concepts have been defined in stateMachine.tabular, which extends stateMachine.
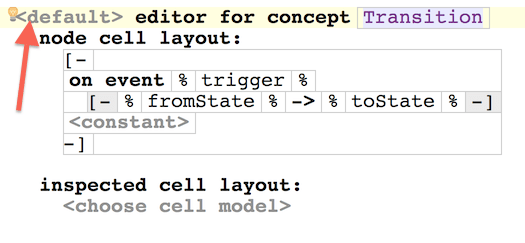
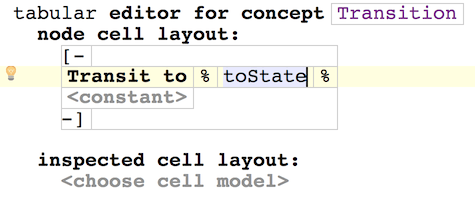
While the default editors specified in stateMachine indicate the fact of being default with the default value in the upper-left corner, the editors in stateMachine.tabular specify the tabular hint. Specifying multiple hints for a single editor is also possible:

Hints
The key element in choosing the right projection are Hints. Editors specify, which hints will trigger them to show up on the screen. Hints are defined using the new ConceptEditorContextHints concept.

This concept lets you define the ID and a short description for each hint recognized in the particular language or a language extension. So in our sample project, stateMachine and stateMachine.tabular both define their own set of hints.

Notice also the Can be used as a default hint flag that can be set in the inspector. When set to true, the hint will be available to be pushed to editors from the IDE. See the details below, in the "Pushing hints from the IDE" section.
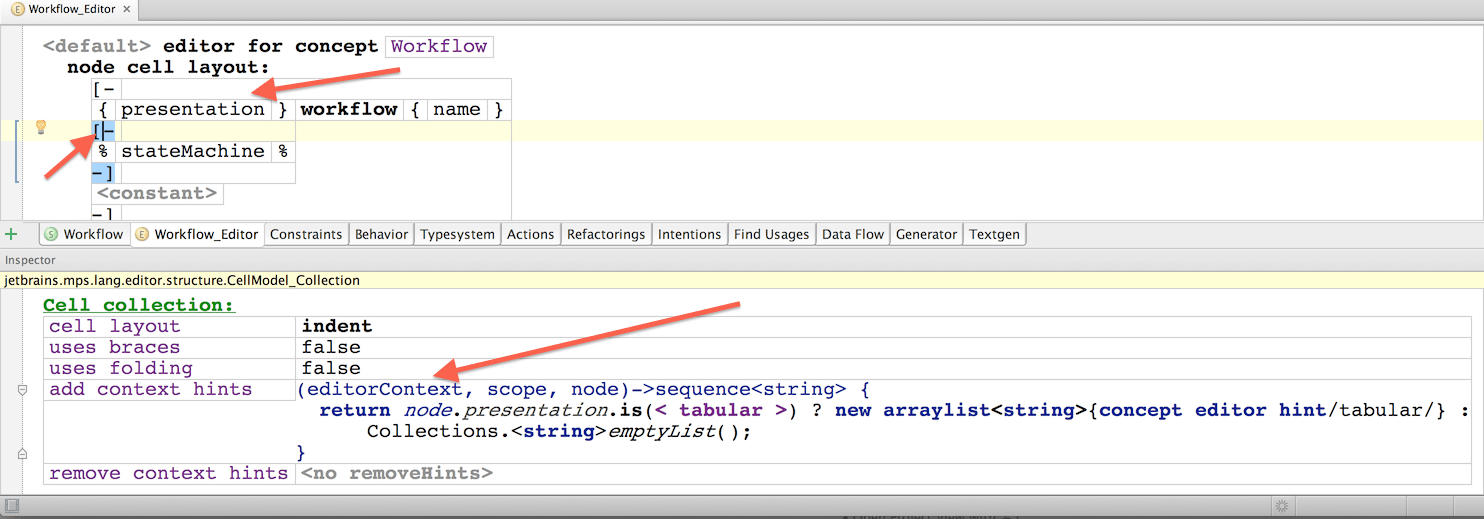
With hints defined, languages can offer the user to switch between notations by adding/removing hints into/from the context. The sample requestTracking language does it by exposing a presentation property of an enumeration type to the user. The property influences the collection of hints passed down into the state machine editor, as specified in the inspector window:
Editor hints for Editor Components
Not only editors can have hints specified. Editor Components that override other editor components have the same capability.
Pushing hints from the IDE
The hints that have the "Can be used as a default hint" flag enabled, can be pushed by the IDE to the editors as the new defaults. This allows the developers to customize the default projection used for different languages in their IDEs.
One way to customize the projection is to use the Push Editor Hints action in the editor context menu and select the hints that you want to be pushed as defaults to the active editor frame:
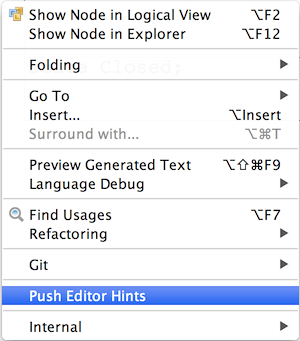
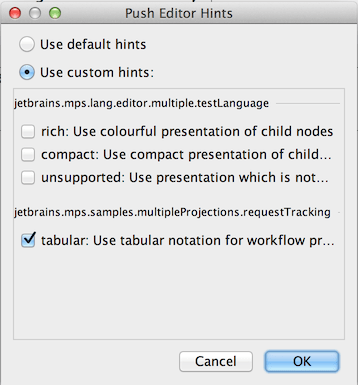
The active editors will then use projections that match the selected hints.
The second option is to make some hints pushed by the IDE through the corresponding Settings panel. These choices are then applied to all editor windows as default preferences.
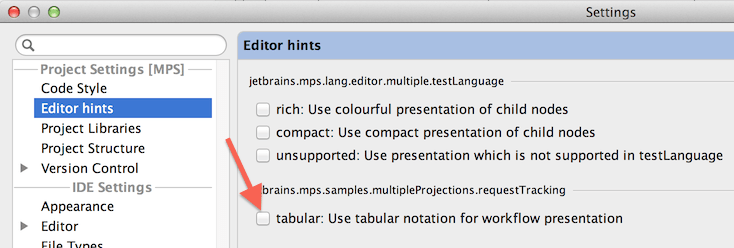
You may consider combining the ability to switch between notations with splitting the editor frame. This allows you to lay several different projections of the same piece of code displayed next to one-another. Your changes in one will be immediately reflected in the other:
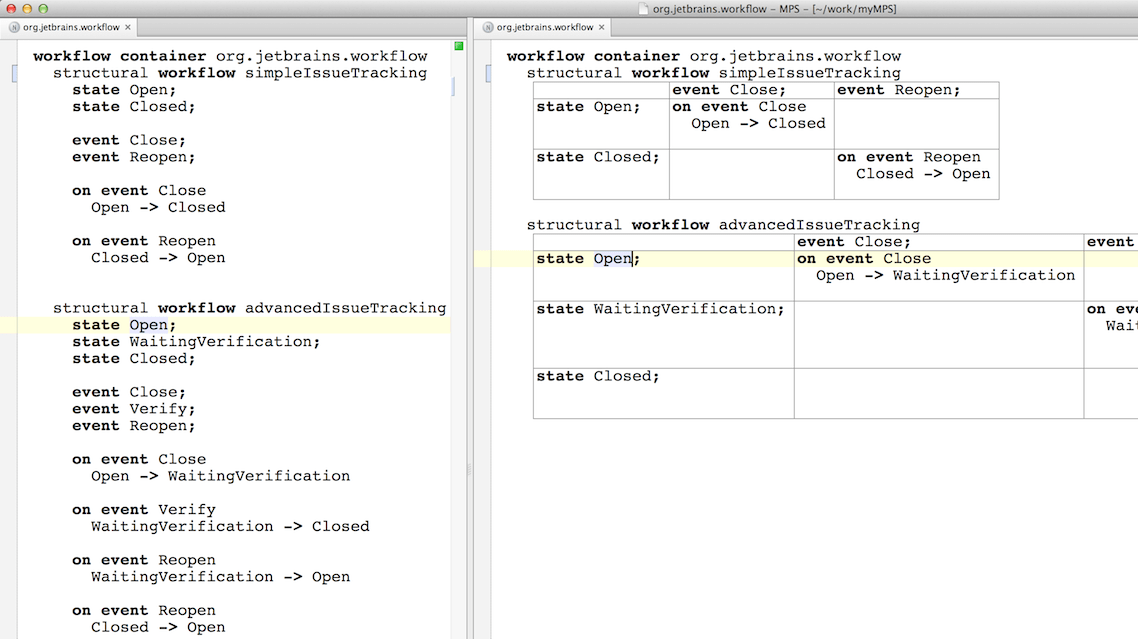
The right panel has the tabular notation pushed as the default, which the left panel does not. Both projections visualize the same code.
How to manipulate and apply editor hints programmatically
If you want to create your own UI elements that will adjust editor hints, you'll need to write code that will manipulate the editor hints applied to editor cells. EditorContext is the entry point for manipulating the hints. You'll need to obtain a jetbrains.mps.openapi.editor.update.Updater interface implementation, most likely using the EditorComponent.getUpdater() method. The Updater interface provides several methods for manipulating hints:
setInitialEditorHints() - sets the hints that the editor will start applying from the top of the editor component hierarchy down to all of the components, unless they explicitly remove these hints from the context, returns true if the hints actually changed as a result of this operation
getInitialEditorHints() - gets the hints the editor applies to all cells, may return null
addExplicitEditorHintsForNode() - adds hints to apply to a particular node's editor and the editors it embeds
removeExplicitEditorHintsForNode - removes the specified hints from the list of hints explicitly applied to the node's editor and the editors it embeds
getExplicitEditorHintsForNode - gets the list hints of hints explicitly applied to the node's editor and the editors it embeds, may return null
clearExplicitHints - clears all explicitly specified hints for all editors
In order to get all hints applied to a particular cell, including the hints added by any of the parent cells, the CellContext must be retrieved, most likely as:
editorContext.getEditorComponent().getUpdater().getCurrentUpdateSession().getCellFactory().getCellContext().getHints()
Also, after changing the hints, the editor needs to be rebuilt in order to reflect the changes. This can be done through the Updater.update() method.
