HowTo -- Integration with the Data Flow Engine
Dataflow
Data flow analysis supports detecting errors that cannot be found easily by "looking at the model" with static constraints or type checks. Examples include dead code detection, missing returns in some branches of a method's body or statically finding null values and preventing null pointer exceptions.
The foundation for data flow analysis is the so-called data flow graph. This is a data structure that describes the flow of data through a program's code. For example, in int i = 42; j = i + 1; the 42 is "flowing" from the init expression in the local variable declaration into the variable i and then, after adding 1, into j. Data flow analysis consists of two tasks: building a data flow graph for a program, and then performing analysis on this data flow graph to detect problems in the program.
MPS comes with predefined data structures for data flow graphs, a DSL for defining how the graph can be derived from language concepts (and hence, programs), a framework for defining your own analyses on the graph as well as a set of default analyses that can be integrated into your language. We will look at all these ingredients in this section.
To play with the data flow graph, you can select a method in a Java program and then use the context menu on the method; select {{Language Debug -> Show Data Flow Graph}}. This will render the data flow graph graphically and constitutes a good debugging tool when building your own data flow graphs and analyses.
Building a Data Flow Graph
Simple, Linear Dataflow
In this section we look at the code that has to be written to create a data flow graph for a language similar to C and Java (in fact, it is for the mbeddr.com C base language).
Data flow is specified in the Dataflow aspect of language definitions. Inside that aspect, you can add data flow builders (DFBs) for your language concepts. These are programs that build the data flow graph for instances of those concepts in programs. To get started, here is the DFB for LocalVariableDeclaration.
Let's inspect this in detail.
The framework passes in the node variable as a way of referring to the current instance of the concept for which this DFB is defined (LocalVariableDecaration here). If the LocalVariableDecaration has an init expression (it is optional!), then the DFB for the init expression has to be executed. The code for statement does this: it "calls" the DFB for the node that is passed as its argument. Then we perform an actual data flow definition: the write node = node.init specifies that write access is performed on the current node (there is also a read statement; this support detection of read-before-write errors). The statement also expresses that whatever value was in the init expression is now in the node itself.
If there is no init expression, we still want to mark the LocalVariableDeclaration node as visited — the program flow has come across this node. A subsequent analysis reports all program nodes that have not been visited by a DFB as dead code. So even if a node has no further effect on a program's data flow, it has to be marked as visited using nop.
To illustrate a read statement, one can take a look at the LocalVariableRef expression which read-accesses the variable it references. Its data flow is defined as read node.var}, where {{var} is the name of the reference that points to the referenced variable.
Here is the code:
For an AssignmentStatement, the data flow is as follows:
Note how we first execute the DFB for the rvalue and then "flow" the rvalue into the lvalue — the purpose of an assignment.
For a StatementList, we simply mark the list as visited and then execute the DFBs for each statement:
Finally, for a C function, at least for now, ignoring arguments, the DFB simply calls the DFB for the body, a StatementList.
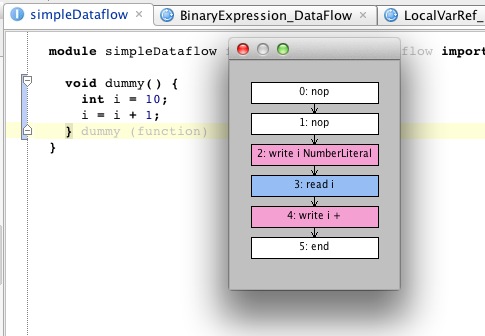
We are now ready to inspect the data flow graph for a simple function. Below is the graph for the function.

Data flow analysis is typically limited to one function, method or similar concept. To signal the end of a one of those, we should use the ret statement. To illustrate this, here is the DFB for the ReturnStatement:
Branching
Linear dataflow, as described above, is relatively straight forward (no pun intended ). However, most interesting data flow analysis has to do with loops and branching. So specifying the correct DFBs for things like if, switch and for is important. It is also not as simple\ldots .
Let us take a step-by-step look at the DFB for the IfStatement.
We start with the obligatory nop to make the node as visited. Then we run the DFB for the condition, because that is evaluated in any case. Then it becomes interesting: depending on whether the condition is true or false, we either run the thenPart} or we jump to where the {{else if parts begin. Here is the code so far:
The ifjump statement means that we may jump to the specified label (i.e. we then execute the {{else if}}s). If not (we just "run over" the ifjmp}), then we execute the {{thenPart. If we execute the thenPart}, we are finished with the whole {{IfStatement — no else if}s or {{else parts are relevant, so we jump after the current node (the IfStatement) and we're done. However, there is an additional catch: in the thenPart}, there may be a {{return statement. So we may never actually arrive at the jump after node statement. This is why it is enclosed in curly braces: this says that the code in the braces is optional. If the data flow does not visit it, that's fine (typically because we return from the method before we get a chance to execute this code).
Let's continue with the else if}s. We arrive at the {{elseIfBlock label if the condition was false, that is the above ifjump actually happened. We then iterate over the {{elseIf}}s and execute their DFB. After that, we run the code for the elsePart, if there is one. The following code can only be understood if we know that, if we execute one of the {{else if}}s, then we jump after the whole IfStatement. This is specified in the DFB for the ElseIfPart, which we'll illustrate below. Here is the rest of the code for the IfStatement's DFB:
We can now inspect the DFB for the ElseIfPart. We first run the DFB for the condition. Then we may jump to after that else if, because the condition may be false and we want to try the next else if, if there is one. Alternatively, if the condition is true, we then run the DFB for the body of the ElseIfPart. Then two things can happen: either we jump to after thoe whole IfStatement} (after all, we have found an {{else if that is true), or we don't do anything at all anymore because the current else if contains a return statement. So we have to use the curly braces again for the jump to after the whole if. Here is the code:
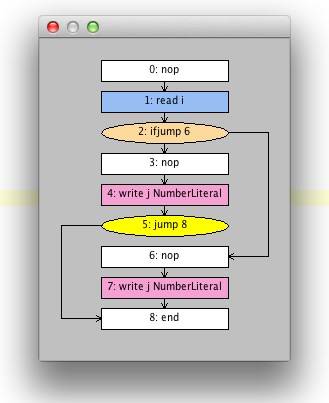
The resulting data flow graph is shown below.

To wrap up data flow graph construction, we can take a look at the for loop. This is related to branching again, because after all, a loop can be refactored to branching and jumps. Here is the DFB for the for loop:
We first execute the DFB for the iterator (which is a kind of LocalVariableDeclaration, so the DFB for it above works). Then we define a label start so we can jump to this place from further down. We then execute the condition}. Then we have an {{ifjmp to after the whole loop (which covers the case where the condition is false and the loop ends). In the ohter case (the condition is still true) we execute the code for the body and the incr} part of the {{for loop We then jump to after the start label we defined above.
Integrating Data Flow Checks into your Language
Data flow checks are triggered from NonTypesystemRules. There is a bit of procedural code that needs to be written, so we create a class DataflowUtil in the typesystem aspect model.
The class constructs a {{Program} object in the constructor. {{Program}}s are wrappers around the data flow graph and provide access to the graph, as well as to a set of predefined analyses on the graph. We will make use of one of them here in the checkForUnreachableNodes method. This method extracts all unreachable nodes from the graph (see comments in the code above) and reports errors for them. To be able to use the error statement, we have to annotate the method with the @CheckingMethod annotation.
To actually run the check, we call this method from a NonTypesystemRule for C functions:
Inspecting the Program class, you can see the set of existing other data flow analyses: uninitialized reads (read before write), unreachable instructions (dead code) and unused assignments. We'll look at what to do if those aren't enough in the next section.
Building your own Analyzers
Data flow analysis is a non trivial topic. To build meaningful analyses you will probably need a background in this topic, or read up on the respective literature.
For the actual integration of custom data flow analyses, we will provide an additional article later.