Foreign keys
Foreign key relationships specify how tables relate to each other and indicate relationships between tables. PyCharm recognizes foreign key relationships in your database schema and uses them to construct JOIN clauses. You can see these relationships in the auto-completion list, data navigation, and diagrams.
In PyCharm, you can use explicit foreign keys or create virtual foreign keys.
A foreign key is a field or a collection of fields in one table that refers to the primary key in another table. When you create or modify a table, you can clearly define those keys:
The table that contains a foreign key is a child table. The table that contains a candidate key is a referenced or target table. If your database contains explicit foreign key relationships, PyCharm automatically uses them in auto-completion, data navigation, and diagrams.
In the following example, activity.activity_id is a primary key, while visitor.activity_id is a foreign key.

Create a foreign key in a database
In the Database tool window (), expand the data source tree until the node of a child table.
Right-click a child table and select .
In the Target table pane, specify the name of the target table.
In the Columns pane, click the Add button
.
In the From field, specify the name of the column in the child table.
In the To field, specify the name of the column in the target table.
Click Execute.

Virtual foreign keys
There are cases when you do not want to use explicitly-defined foreign keys. Reasons for not using foreign keys might include performance issues (in CRUD operations), database characteristics (databases like ClickHouse and Apache Cassandra do not support foreign keys), usage of temporary tables (for testing), personal reasons, and other.
In this case, you can still create foreign key relations without changing your database code. Alternatively to foreign keys, virtual foreign keys are not defined in the database code.
Consider the following example query:
Let's assume that visitor_id is not defined as a foreign key in the database. You can still use this virtual relation between the visitor_id field in the activity table and the id field in the visitor table in this JOIN clause. You can save this relation and use it later or configure rules for virtual foreign keys in settings by using regular expressions.

Create a virtual foreign key
Click the table relation in the ON clause and press Alt+Enter.
Select Store table relation.
The relation is saved in external-data.xml. You can select other name for the XML file and other place to store this file. To change or see the path to the XML document, open data source settings by pressing Shift+Enter, click the Options tab and see the External model data field.
Create rules for virtual foreign keys
You can use regular expressions to create a rule according to which PyCharm will point a column in one table to a column in another table.
Open settings (Ctrl+Alt+S) and navigate to .
Scroll to the SQL section.
In the table, click the Add button (
)
Double-click the Column pattern cell and type the regular expression that will match a column name that you want to use as a virtual foreign key.
Double-click the Target column pattern cell and type the replacement pattern. The replacement pattern uses the match from the Column pattern expression and is interpreted as a regular expression. You can see the result in the Generated pattern field. The resulted expression in the Generated pattern field must match the desired
table.columnpattern.You can check your rules by using the Check button (
). When you click the Check button, the Rule debugger dialog opens.

Debug rules for virtual foreign keys
Open settings (Ctrl+Alt+S) and navigate to .
Scroll to the SQL section.
Click the Check button (
).
In the Rule debugger dialog, fill the following fields:
Column pattern: the regular expression that will match a column name that you want to use as a virtual foreign key.
For example, to describe columns that use the
_idpostfix, use the(.*)_(?i)idregular expression. This regular expression will find columns likevisitor_idorvisitor_Id, and capturevisitorsas the first capturing group ($1).Target column pattern: the replacement pattern that uses the match from the Column pattern expression and is interpreted as a regular expression. You can see the result in the Generated pattern field. Note that the result appears only when you give an example of a column name in the Source column field.
For example, we can use the captured group (
$1) from the Column pattern expression, add a dot (.) andid. This expression will generatevisitor.idreference that we can use as a primary key.Note: the Target column pattern replacement pattern is used to generate a regular expression pattern in the Generate pattern field with captured groups. Ensure that you double-escaped symbols that are translated literally like the dot in the example expression (
$1\\.(?i)id).Source column: an example of a column name that you want to use as a virtual foreign key.
Generated pattern: a generated read-only regular expression pattern that is matched to the Target table.column name. Generated pattern is a result that is generated by the replacement pattern in Target column pattern.
Target table.column: an example of the table and column name that will be used as a primary key for the virtual foreign key in Source column.

Show virtual foreign keys in code completion
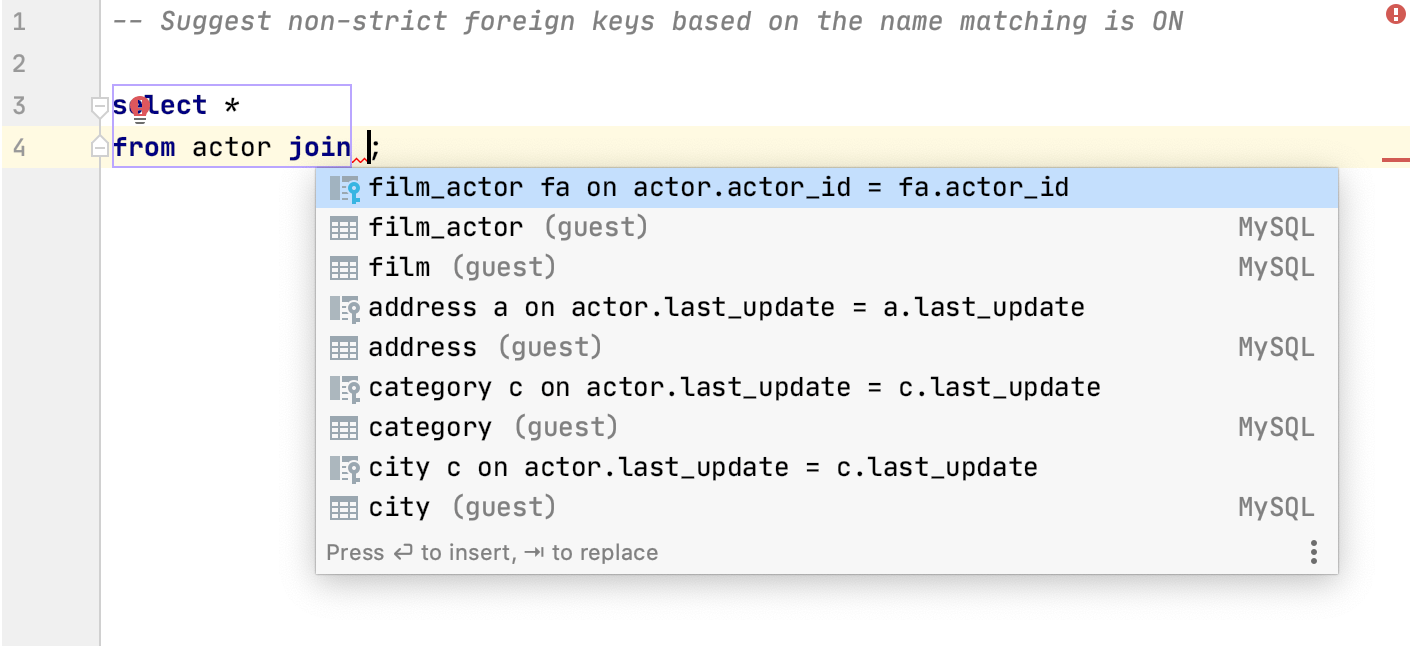
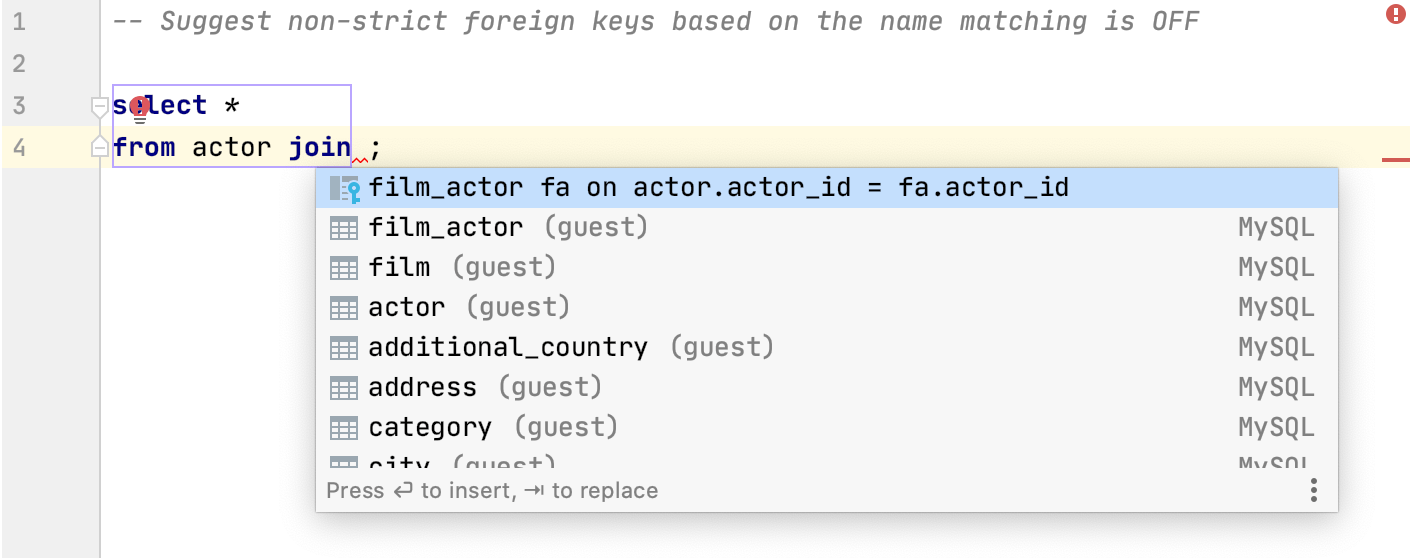
PyCharm can generate you a list of possible code completion suggestions for JOIN statements. The code completion list includes suggestions of columns from other tables that have the same names as columns from the table in the JOIN statement.
For example, consider that the actor table has the following columns: actor_id, first_name, last_name, last_update. In the list of suggestions, you will see possible completions with names of these columns that are presented in other tables.
Open settings by pressing Ctrl+Alt+S and navigate to .
Scroll down to the SQL section, select Suggest non-strict foreign keys based on the name matching.
Checkbox selected
Checkbox cleared


Productivity tips
Modify templates for generated index and key names
When you create indexes, and primary and foreign key constraints, their default names are generated according to corresponding templates. For a primary key, for example, the template is {table}_{columns}_pk.
To view and modify these templates, open the settings Ctrl+Alt+S and navigate to . Click the Code Generation tab.
The templates can contain variables and text. When you generate a name, the specified text is reproduced literally. For example, when you apply the
{table}_pktemplate in theactortable, the generated name of the primary key will beactor_pk.To see information about variables and their usage, click a field and press Ctrl+Q.
{unique?u:}checks if the index is unique and inserts the corresponding sequence of characters. If the index is unique, the template generates a name with the sequence of characters specified between?and:. For the{unique?u:}template, it isu. If the index is not unique, the sequence between:and}is inserted. For the{unique?u:}template, it is nothing.Example
You have the
personstable with columnsFirstNameandLastName. The{table}_{columns}_{unique?u:}indextemplate generates the following name for the not unique index:persons_FirstName_LastName_index.
Navigate between related rows
Right-click the column in the table and select Go To. In the Go To submenu, you can select to which type of related rows you want to navigate.
Referenced Rows: rows that are referenced by the current object.
Referencing Rows: rows that are referencing the current object.
All Related Rows: both referenced and referencing rows.

If the Choose Target popup appears, select a table and a row. The information is divided in the following categories:
Referenced Rows Only/Referencing Rows Only: shows all the rows that are referenced or referencing the selected object.
First Referenced Row/First Referencing Row: shows the first occurrence of the matched row. This option performs multiple queries to calculate an offset of the first value occurrence.
Also, you can watch the Navigate by foreign keys video at youtube.com for another example.
