Template Editor
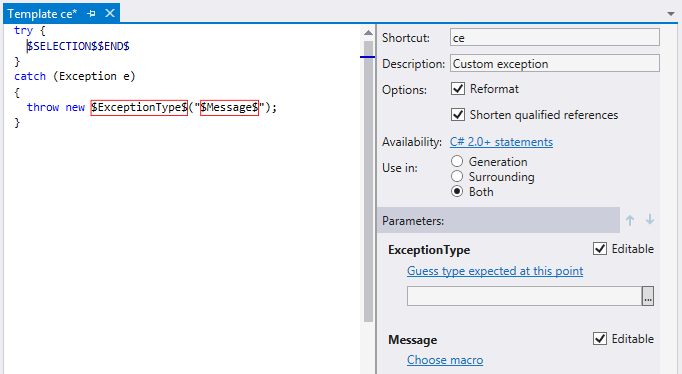
Template Editor helps creating and editing code templates. Template Editor opens in a new document tab so that you can switch between the template and the application code to quickly test the created template.

Template Editor provides basic code highlighting for keywords, comments, and so on. All highlighting colors are configurable.
Configure highlighting colors for Template Editor
Choose from the menu and then go to page.
In the Display items list, find items that start with ReSharper Template Editor.
Use the Item foreground selector to pick a color for the selected item.
The controls in the Template Editor can be divided into two logical groups, which are described in the following two tables:
Template options: general template controls.
Template parameters: Parameters area to the right of the template body.
Template Options
| Item | Description |
|---|---|
| Shortcut | Available for live templates. The shortcut (abbreviation) that you can type in your source code to invoke a live template. |
| Description | For surround templates and file templates, this is the identifier that is displayed in the drop-down lists when you attempt to choose and apply a template. For live templates, this is an optional description string that pops up in the completion list together with the template shortcut. |
| Default file name | Available for file templates. A default name that ReSharper prompts when you apply a file template. |
| File name must be a valid identifier | Available for file templates. This checkbox makes ReSharper check if the filename specified when applying the template is valid as a type identifier. This option is helpful if your template creates a file for a new type and the type name is initialized from the provided filename with the Current file name without extension macro. You can check the predefined file templates to see how it is implemented. |
| Shorten qualified references | This checkbox makes ReSharper automatically insert namespace import directives or remove qualifiers that become redundant after the template is applied. If this checkbox is not selected, ReSharper will not insert any namespace import directives. |
| Reformat | This checkbox makes ReSharper automatically reformats the expanded code fragment according to your formatting preferences settings. |
| Availability | This hyperlink displays and allows modifying the scope of the template. |
| Add new file | Available for file templates. This button adds a new empty file to a multi-file template. |
| Add file from existing template | Available for file templates. This button adds a new file to a multi-file template by the reference to an existing file template. |
Template parameters
| Item | Description |
|---|---|
| Parameter name | Names of template parameters as they are defined in the template body. |
| Choose macro or [name of a macro] | This hyperlink displays or allows choosing a macro that calculates parameter value. By clicking this hyperlink you can choose a macro in the Choose Macro dialog. If the selected macro has a macro-parameter, is displayed in bold in the Choose Macro dialog (for example, format or type). In this case, after you choose a macro, a text field or a selector appears under the template parameter. You can specify the macro-parameter there. |
| Editable or Editable occurrence selector | These controls allow you to make the parameter editable, in one of the following ways:
|
| Move Up/ Move Down | If you select a parameter, you can use these buttons to change the order of parameters. The position in the list of parameters defines the order, in which the parameters are switched during the hot spot session when the template is applied. It affects only editable parameters. |