Organize templates
There are several ways to organize code templates:
For file templates, you can also organize the way they appear in the quick access list.
Use categories
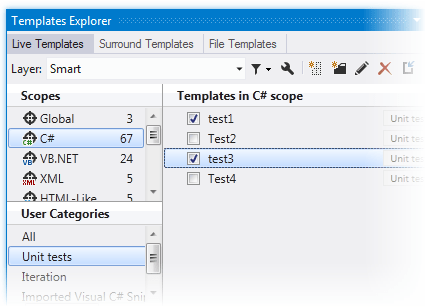
To navigate between code templates in the Templates Explorer window, you can use Template scopes, which group templates automatically. Additionally, for secondary grouping, you can assign any code template to one or more categories. For example, if you have templates for unit tests, it could be convenient to create a Unit Tests category and assign them to it. Later you can select this category and find all your unit test templates. Some of the predefined code templates are already assigned to categories (for example Iteration).

As categories work for secondary grouping, you only see templates that match both the selected scope and category. All is a special category that lists all templates in the selected scope.
Create a new category
From the main menu, choose .
In the Templates Explorer window that appears, click one of the tabs to choose the type of the template: Live Templates, Surround Templates, or File Templates.
Select one or more templates that you want to assign to a new category. Use Ctrl-click for multiple selection. Note that categories work as tags and you need to have at least one template in a category.
Click New Category
.png) on the toolbar.
on the toolbar.In the Create Category dialog that appears, specify a name for a new category and click OK.
To assign other templates to the newly created category, or to an existing category, just drag-and-drop them there.
Categories work as tags and any template can be assigned to several categories simultaneously, so when you drag-and-drop templates from one category to another, templates are not removed from the original category. To remove templates form a category, drag-and-drop them into the All category. As soon as the last template is removed from a category, the category disappears too.
Delete templates
When you delete a user-defined template, it is removed from the settings layer where it was defined. However, when deleting a predefined templates, ReSharper just records the deletion of this template in a specific settings layer, so that you could recover predefined templates by clearing this layer. The deleted predefined template will not be available as long as the layer where the deletion is recorded, is loaded in ReSharper. For more information, refer to Storage of templates.
If you want to record the deletion of a predefined template in a specific layer, before you delete it, choose this layer in the Layer selector, click Filter Templates ![]() and choose Show predefined templates.
and choose Show predefined templates.
Delete a code template
From the main menu, choose .
In the Templates Explorer window that appears, click one of the tabs to choose the type of the template: Live Templates, Surround Templates, or File Templates.
If you need to delete a template from a particular settings layer, choose this layer in the Layer selector.
In the Scopes area, click the scope that corresponds to the target template. You can also use categories to locate it.
Find a template or templates to be removed and select them. Use Ctrl-click for multiple selection.
Click Delete
.png) on the toolbar.
on the toolbar.
Disable templates
All live templates are enabled by default, that is you can apply them in your code. If necessary, you can temporarily disable some templates so that they are not appear in the list of suggested templates when you are applying a live template.
Disable or enable live templates
From the main menu, choose .
Click the Live Templates tab.
If you need to disable or enable templates from a particular settings layer, choose this layer in the Layer list.
Find templates to be enabled or disabled and use checkboxes next to template names to toggle their state.