File type associations
For language-specific features (such as syntax highlighting and code analysis) in files representing different languages and technologies, JetBrains Rider maintains a list of file types, each of which links a language service with one or more filename patterns.
The default list of file types covers all relevant filename patterns, but you can add new file types for your custom language files and change the associated filename patterns for existing file types.
When you open a file in the editor, JetBrains Rider chooses the file type and the corresponding language service according to the filename pattern. If the filename doesn't match any of the patterns registered for file types, you can associate the filename pattern with a specific file type.
Apart from that, you can make JetBrains Rider the default application for opening specific file types from the file manager on your operating system.
Add a custom file type
If you work on a language that is not supported by default and there are no plugins for it, you can configure a simple language service for files associated with this language — you will enjoy syntax highlighting for keywords, comments, and braces and have some basic editor helpers such as adding line/block comments with Ctrl+// Ctrl+Shift+/ and extending/shrinking selection according to the structure with Ctrl+W/ Ctrl+Shift+W.
Press Ctrl+Alt+S to open the IDE settings and select Editor | File Types.
In the Recognized File Types section, click
, specify the name of the new type, and provide a description.
In the Syntax Highlighting section, configure case sensitivity, brace matching settings, and specify ways of defining comments:
Line comment: specify characters that indicate the beginning of a single-line comment.
Only at line start: characters that indicate the beginning of a line comment are recognized as a comment if they are located in the beginning of a line.
Block comment start, Block comment end: specify characters that indicate the beginning and the end of a block comment.
Hex prefix: specify characters that indicate that the subsequent value is a hexadecimal number (for example,
0x).Number postfixes: specify characters that indicate which numeric system or unit is used. A postfix is a trailing string of characters (for example,
e-3, kg).Support paired braces, Support paired brackets, Support paired parens, Support string escapes: select these checkboxes to highlight paired braces, brackets, parentheses, and string escapes.
In the Keywords section, you can specify up to four lists of keywords. Keywords of each list will be highlighted differently in the editor and will be auto-completed.
The Ignore case checkbox indicates whether keywords in files of the custom format are case-sensitive.
You can customize colors for syntax highlighting of language-specific keywords, comments, and other identifiers on the settings page.
Configure associations between filename patterns and file types
Associate a filename pattern with specific file type
In the Solution Explorer, select a file that you want to associate with specific file type.
Press Ctrl+Shift+A or choose from the main menu. In the popup that opens, start typing
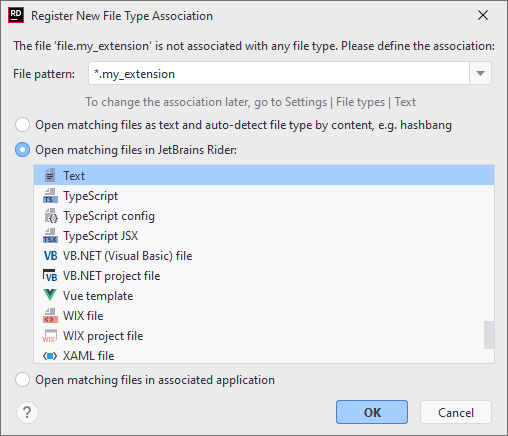
Associate with File Type..., select the corresponding item and press Enter.In the Register New File Type Association dialog, select the necessary options:

From the File pattern list, select whether you want to specify a type for the current file (file.extension) or for all files with this extension (*.extension).
Select one of the following options:
Open matching files as text and auto-detect file type by content: open the file without an extension as a text file and identify its type by the content, for example, by the shebang line.
Open matching files in JetBrains Rider: associate the file with one of the existing file types. You can change this association later in the settings.
Open matching files in associated application: open the file in the default system application configured in your operating system. For example, .pdf files are opened in the default PDF viewer.
If necessary, you can check and configure all filename patterns associated with system applications.
Click OK to apply the settings.
Change filename patterns associated with file type
Press Ctrl+Alt+S to open the IDE settings and select Editor | File Types.
From the Recognized File Types list, select the file type that you want to associate with other filename patterns.
Use the File name patterns section to make the necessary changes. You can add a new pattern (
), remove an existing one (
), or modify an existing pattern (
 ).
).
If your solution contains files in proprietary formats, such as .pdf and .docx, JetBrains Rider will open these files using the default application configured in your operating system. When a specific proprietary file format is not recognized or you just want to open certain files with the system application, you can add the necessary associations.
Configure filename patterns associated with system applications
Press Ctrl+Alt+S to open the IDE settings and select Editor | File Types.
In the Recognized File Types list, select Files opened in associated applications.
In the File name patterns section on the right, click
and specify a filename pattern that should be associated with an external application.
If a file is correctly associated with a specific file type by its filename pattern, but you want to process this file differently, you can override the file type association for this file only — other files matching that pattern will not be affected.
Override file type for specific file
In the Solution Explorer (Alt+1), select one or more files that should have another file type association
, press Ctrl+Shift+A or choose from the main menu. In the popup that opens, start typing
Override File Type, select the corresponding item and press Enter.From the list that opens, select a new file type.
Make Rider the default app for .sln, .csproj, and other file types
You can make JetBrains Rider the default application for opening specific file types from the default file manager on your operating system.
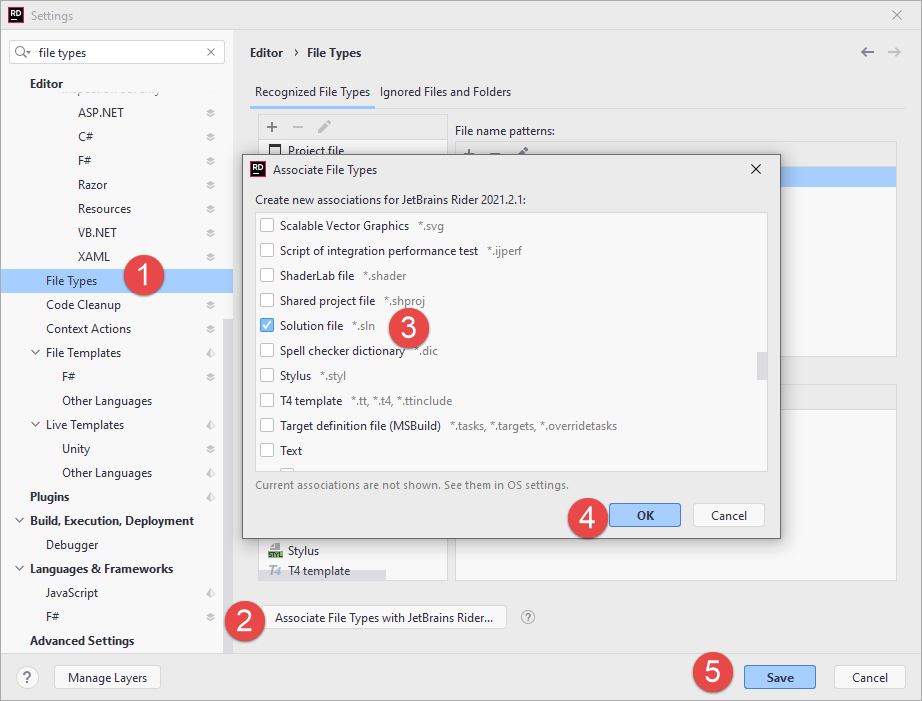
Press Ctrl+Alt+S to open the IDE settings and select Editor | File Types.
Click Associate File Types with JetBrains Rider and select the file extensions you want to open with the IDE.
Click OK and close the dialog.

Ignore files and folders
JetBrains Rider also maintains a list of files and folders that are completely excluded from any kind of processing. Out of the box, this list includes temporary files, service files related to version control systems, and so on:
Modify the list of ignored files and folders
Press Ctrl+Alt+S to open the IDE settings and select Editor | File Types.
Switch to the Ignored Files and Folders tab.
You can add a new extension (
), remove an existing one (
), or modify an existing extension (
 ).
).Apply the changes and close the dialog.
Configure shebang commands for file types
JetBrains Rider can recognize file types by the path specified on the shebang line. A shebang is a combination of characters in a script file followed by a path to the interpreter program that should execute this script. It starts with #! and it's always located on the first line of a script file.
Press Ctrl+Alt+S to open the IDE settings and select Editor | File Types.
From the Recognized File Types list, select the file type for which you want to configure a command.
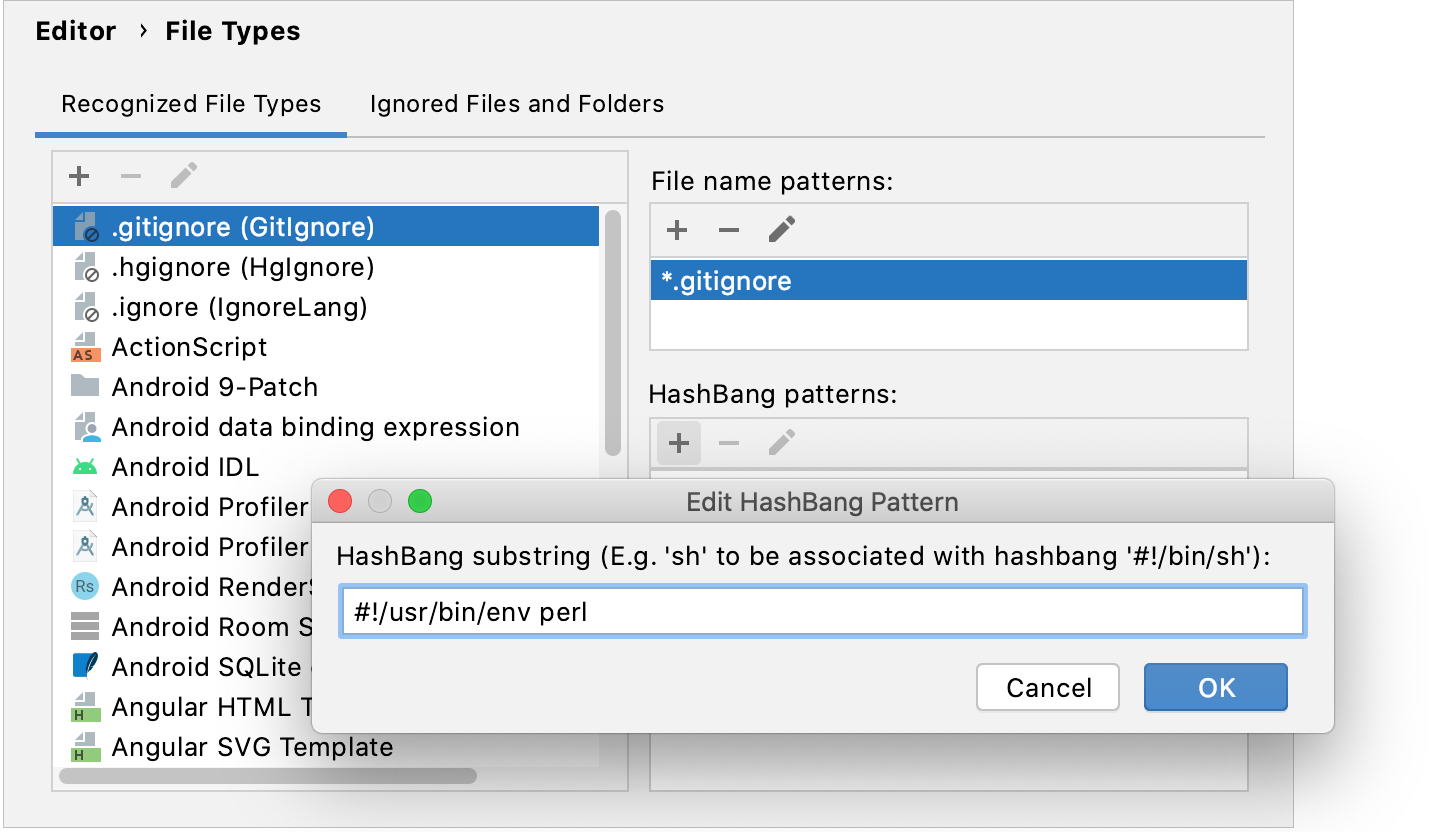
In the HashBang patterns area, click
(Add HashBang Pattern).
In the dialog that opens, specify the path to the interpreter program and click OK.
Apply the changes and close the dialog.
