JetBrains Rider 2022.3 Help

Code Style. JavaScript

Use this page to configure formatting options for JavaScript files. When you change these settings, the Preview pane shows how this will affect your code.

Tabs and Indents

Use tab character

  • If this checkbox is selected, tab characters are used:

    • On pressing the Tab key

    • For indentation

    • For reformatting code

  • If the checkbox is cleared, JetBrains Rider uses spaces instead of tabs.

Smart tabs

An indentation consists of two parts. One part results from nesting code blocks, and the other part is determined by alignment.

  • If this checkbox is selected, the part that results from nesting contains both tabs and spaces (if necessary), while the part defined by alignment consists only of spaces.

  • If this checkbox is cleared, only tabs are used. This means that after reformatting a group of spaces that fits the specified tab size is automatically replaced with a tab, which may result in breaking fine alignment.

Tab size

In this field, specify the number of spaces that fits in a tab.

Indent

In this field, specify the number of spaces to be inserted for each indent level.

Continuation indent

In this field, specify the number of spaces to be inserted between the elements of an array, in expressions, method declarations, and method calls.

Keep indents on empty lines

If this checkbox is selected, JetBrains Rider retains indents on empty lines as if they contained some code. If the checkbox is cleared, JetBrains Rider deletes the tab characters and spaces on empty lines.

Indent chained methods

In declarations of functions, the second and further methods in a chain are displayed on a separate line.

  • When the checkbox is selected, the second and further methods in a chain are aligned with the first call.

  • When the checkbox is cleared, the second and further methods in a chain are aligned with the object on which they are invoked.

Indent all chained calls in a group

The checkbox is available only when the Indent chained methods checkbox is selected.

Spaces

Use this tab to specify where you want JetBrains Rider to insert spaces automatically. Select the checkboxes next to the description of relevant locations and check the results in the Preview pane.

Wrapping and Braces

In this tab, customize the exceptions, brace placement and alignment options that JetBrains Rider will apply to various code constructs on reformatting the source code. Check the results in the Preview pane.

Hard wrap at

In this field, specify the number of spaces required to the right of an element. If you accept the Default option then the value from the global settings is used.

Wrap on typing

In this field, specify how the edited text is fitted in the specified Hard wrap at field.

  • Default: choose this option to use the Wrap on typing value from the global settings.

  • Yes: choose this option to use the value from the Right Margin field.

  • No: if you choose this option a line can exceed the value specified in the right margin.

Visual guides

In this field, specify multiple right margins. You can leave a default value or enter the number of spaces for your margin. If you want to specify several margins, enter numbers separated by comma.

Keep when reformatting

Use the checkboxes to configure exceptions that JetBrains Rider will make when reformatting the source code. For example, by default, the Line breaks checkbox is selected.

If your code contains lines that are shorter than a standard convention, you can convert them by disabling the Line breaks checkbox before reformatting.

Wrapping options

A wrapping style applies to various code constructs, specified in the left-hand pane (for example, method call arguments, or assignment statements).

  • Do not wrap - When this option is selected, no special wrapping style is applied, the nested alignment and braces settings are ignored.

  • Wrap if long - Select this option to wrap lines that go beyond the right margin with proper indentation.

  • Wrap always - Select this option to wrap all elements in lists so that there is one element per line with proper indentation.

  • Chop down if long - Select this option to wrap elements in lists that go beyond the right margin so that there is one element per line with proper indentation.

Alignment options

  • Align when multiline - If this checkbox is selected, a code construct starts at the same column on each next line. Otherwise, the position of a code construct is determined by the current indentation level.

  • <character(s)> on next line - Select this checkbox to move the specified character or characters to the next line when the lines are wrapped.

  • 'else' on new line - Use this checkbox to move the corresponding statements or characters to the next line.

  • New line after <character> - Select this checkbox to move the code after the specified character to a new line.

  • Special else if treatment - If this checkbox is selected, else if statements are located in the same line.

    Otherwise, else if statements are moved to the next line to the corresponding indent level.

  • Indent case branches - If this checkbox is selected, the case statement is located at the corresponding indent level. Otherwise, case statement is placed at the same indent level with switch.

  • Objects - From the list, choose how to align objects:

    • Do not align: the attributes in sequential lines will be not aligned.

    • On colon: the attributes in sequential lines will be aligned against the colon.

    • On value: the attributes in sequential lines will be aligned against the value.

  • Variable declarations - Choose one of the following options to configure alignment for equality signs:

    • Do not align: the equality signs are not aligned.

    • Align when multiline: the equality signs in multiline var statements are aligned by inserting additional spaces.

    • Align when grouped: the equality signs in multiple var statements are aligned by inserting additional spaces.

  • ES6 import/export When the Align 'from' clauses: checkbox is selected, JetBrains Rider aligns import and export statements in ECMAScript 6 code automatically making your code easier to read and maintain. Compare the appearance of a code fragment with alignment and without it in the Preview pane.

    ws_align_import_export_es6.png

    With this option on, JetBrains Rider will align the new code on the fly. Existing import and export statements will be aligned after you reformat the code by pressing Ctrl+Alt+L.

Braces placement options

Braces placement style

Use this list to specify the position of the opening brace in class declarations, method declarations, function declarations, and other types of declarations. The available options are:

  • End of line: select this option to place the opening brace at the declaration line end.

  • Next line if wrapped: select this option to place the opening brace at the beginning of the line after the multiline declaration line.

  • Next line: select this option to place the opening brace at the beginning of the line after the declaration line.

  • Next line shifted: select this option to place the opening brace at the line after the declaration line being shifted to the corresponding indent level.

  • Next line each shifted: select this option to place the opening brace at the line after the declaration line being shifted to the corresponding indent level, and shift the next line to the next indent level as well.

Force braces

From this list, choose the braces introduction method for if, for, while, and do () while statements. The available options are:

  • Do not force: select this option to suppress introducing braces automatically.

  • When multiline: select this option to insert braces automatically if a statement occupies more than one line. Note that JetBrains Rider analyzes the number of lines in the entire statement but not only its condition.

    if (true) return false;

    JetBrains Rider will insert braces automatically:

    if (true) { return false; }
  • Always: when this checkbox is selected, JetBrains Rider always inserts braces automatically.

Blank Lines

Use this tab to define where and how many blank lines you want JetBrains Rider to retain and insert in your code after reformatting. The results are displayed in the Preview pane.

Keep Maximum Blank Lines

In this area, specify the number of extra blank lines to be kept after reformatting.

Minimum Blank Lines

In this area, configure whether to have or not to have extra empty lines after the blocks of import statements and around classes, fields, methods, or functions. In the field next to each option, specify the minimum number of extra blank lines to be left.

Punctuation

Use the lists in this tab to form directives in automatic insertion of terminating semicolons, single and double quotes, and trailing commas.

Semicolon to terminate statements

  • Use semicolon to terminate statements in new code

  • Use semicolon to terminate statements always

  • Don't use semicolon to terminate statements in new code

  • Don't use semicolon to terminate statements always

Quotes

  • Use double quotes in new code

  • Use double quotes always

  • Use single quotes in new code

  • Use single quotes always

Trailing comma

Use this list to configure whether you want to use trailing commas in objects, arrays, and for the parameters in method definitions and calls. The available options are:

  • Keep

  • Remove

  • Add when multiline

Code Generation

On this tab, configure the code style for generated code.

Naming conventions

In this area:

  • Configure or accept default prefixes that will be added automatically to the names of generated fields and properties.

  • Choose the style for the names of generated files. For example, when JetBrains Rider suggests moving a class to a new automatically generated file the suggested name of this file is generated from the class name in accordance with the chosen style. Learn more from Keeping the names of classes and containing files in compliance

Comment Code

In this area, configure code style for generated comments.

  • Line comment at first column: select this checkbox to start line comments at the first column. When the checkbox is cleared, line comments are aligned in the code.

  • Add a space at line comment start: when this checkbox is selected, a space will be inserted between a line comment character and the first character of a commented line.

    Add a space at line comment start off
    Add a space at line comment start on
    Add a space at line comment start on
  • Add spaces around block comments: select this checkbox to add leading and trailing spaces in block comments.

    By default, when you enclose a code fragment in a block comment, the text starts right after the opening /* characters without any spaces. Before the closing */ characters no space is inserted either. This default code style may conflict with some linters' rules, for example, ESLint.

    Add spaces to block comments off
    Add spaces to block comments on

Imports

Merge imports for members from the same module

  • When this checkbox is selected, imported symbols from the same module are listed in one import statement with a comma as separator. The members are listed in the order in which they are imported. To arrange them alphabetically, select the Sort imported members checkbox and run Code | Optimize Imports.

  • When this checkbox is cleared, for each imported symbol a separate import statement is generated.

Use paths relative to the project, resource or sources roots

This option is applied during automatic generation of import statements in JavaScript code.

  • When this checkbox is selected, JetBrains Rider suggests paths relative to the project root, resource root, or sources root.

  • By default, this checkbox is cleared and JetBrains Rider suggests paths relative to the current file.

Use directory import (Node-style module resolution)

Suppose, you have a project with the following structure:

Directory import: project structure
  • With the Use directory import checkbox selected, the file src/lib/index.js will be imported as ./src/lib.

  • When the checkbox is cleared, the file src/lib/index.js will be imported as ./src/lib/index.js.

Use file extension in module name

When this checkbox is selected, JetBrains Rider automatically adds the .js extensions to the names of ES6 modules in import statements. This is important when you use ES6 modules in a browser that requires full file names (for example, in Chrome). JetBrains Rider applies this setting both when it generates an import statement automatically, on code completion, or when you invoke import generation with Alt+Enter.

Use path aliases

In this field, configure the style for paths in import or require statements.

  • Always - with this option, JetBrains Rider always uses aliases from your webpack.config.js, system.js, or jsconfig.json configuration file.

  • Never - with this option, JetBrains Rider always uses relative paths in generated imports.

  • Only in files outside specified paths - with this option, JetBrains Rider uses relative paths when generating imports between the files for which the same alias is defined. In all other files the path mapping will be used.

In the example below, the files Animal.js and Bird.js are stored in the folders under the animated folder for which an alias is specified in webpack.config.js. The file Dog.js is outside the alias.
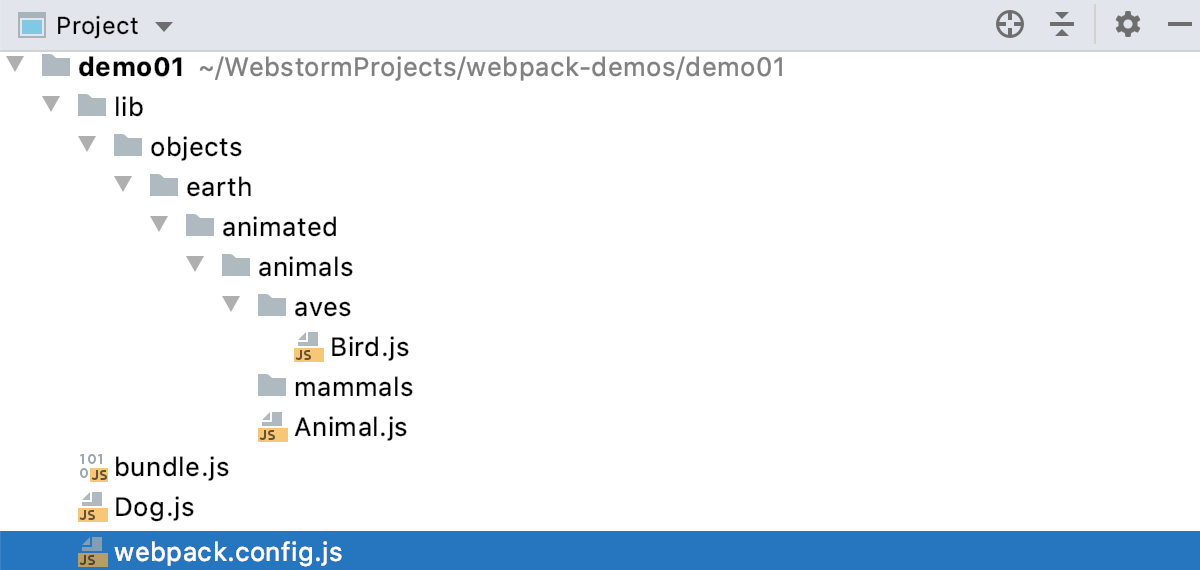
JavaScript: sample project structure

The alias Lib is configured as follows:

resolve: { alias: { Lib: path.resolve(__dirname, './lib/objects/earth/animated/') } }

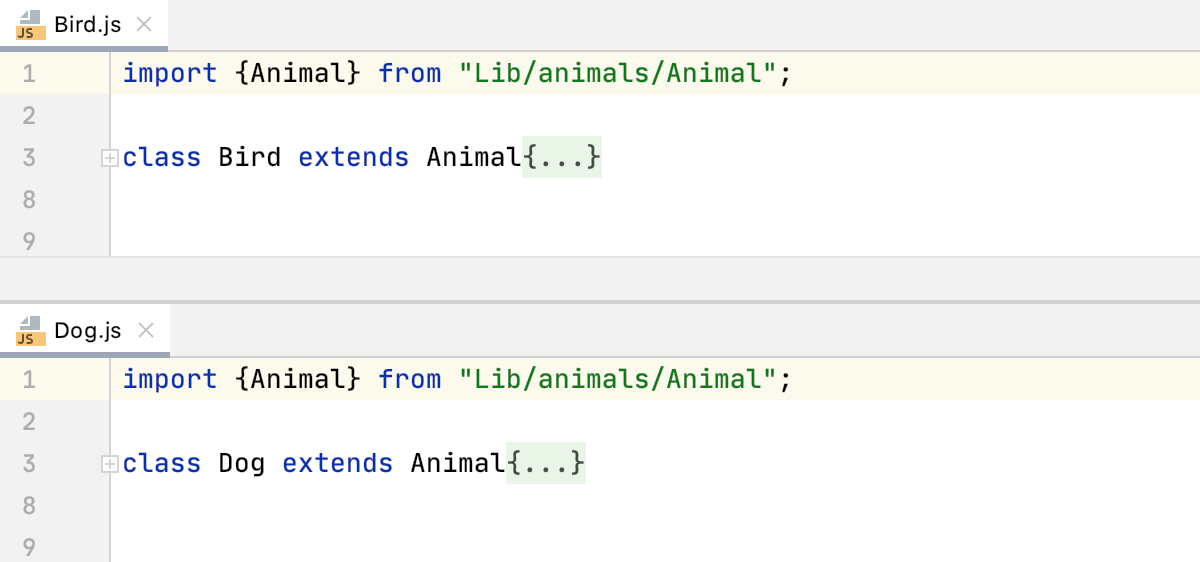
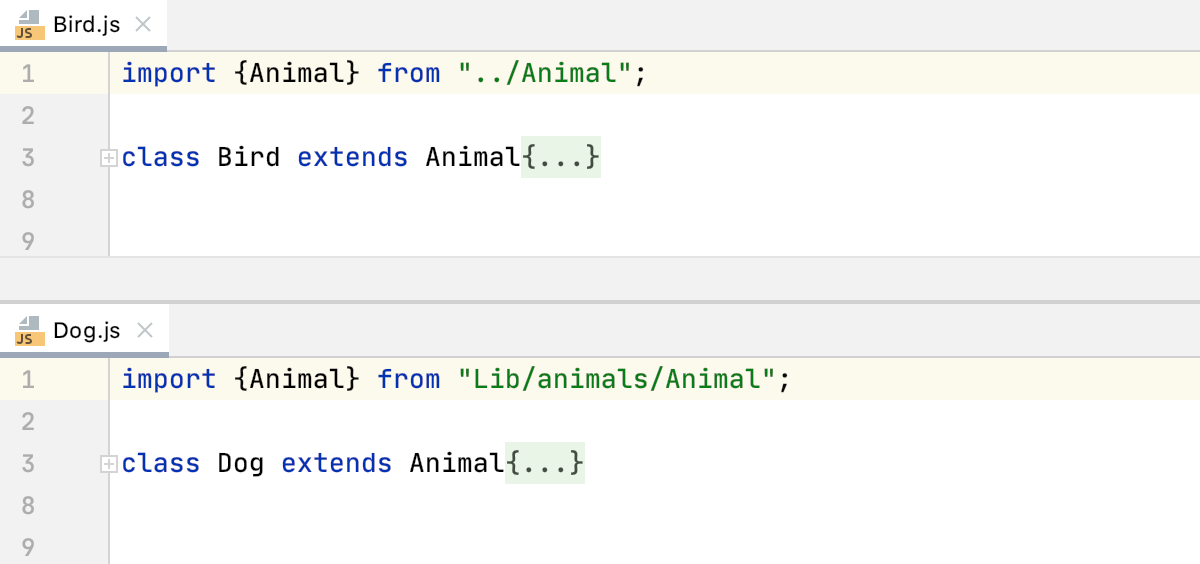
As a result, each of the Always and Never options is applied to both Bird.js and Dog.js in the same way. With the Only in files outside specified paths option selected, JetBrains Rider generates import statements of different styles: with a relative path in Bird.js and with an alias in Dog.js.

Import statements use the Lib alias.

Option Always: the alias is used

Import statements use relative paths.
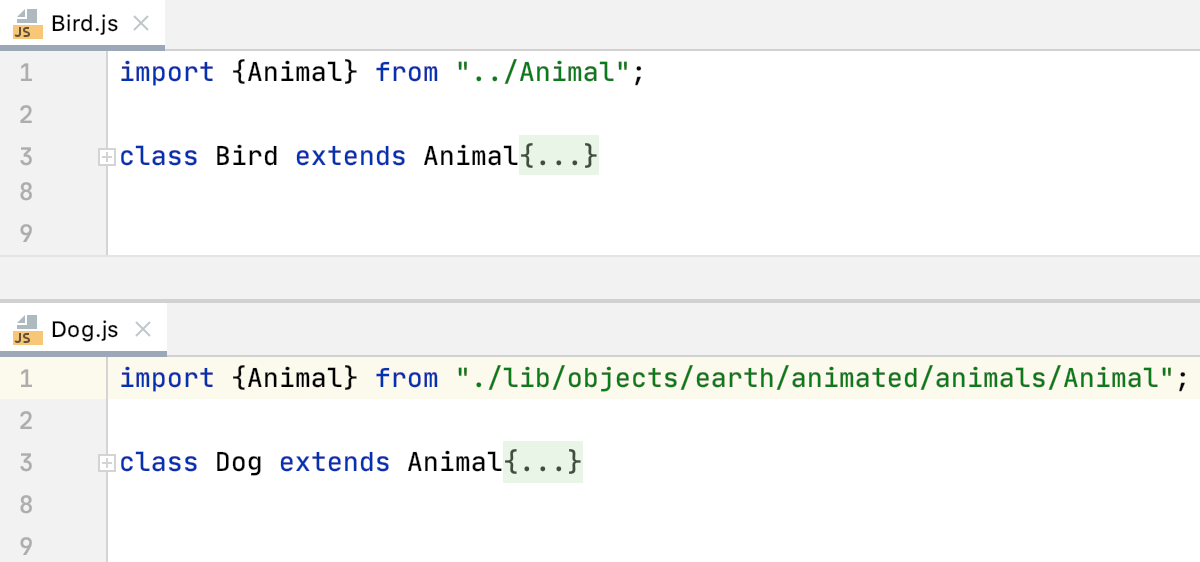
Option Never: relative paths are used

JetBrains Rider generates import statements of different styles: with a relative path in Bird.js and with the Lib alias in Dog.js.

Import statement: alias or relative path used

Do not import exactly from

In this field, specify the exact paths that JetBrains Rider should skip during automatic import of a symbol. Instead, JetBrains Rider will look for alternative paths to import the symbol.

This is particularly useful for modules that allow importing their submodules instead of the entire module. For example, to prefer imports like import {Observable} from 'rxjs/Observable' to a more general import {Observable} from 'rxjs', add rxjs to the list.

To manage the list of modules to skip:

  1. Click App general expand component to the right of the field.

  2. In the Change modules dialog box that opens, click Add icon and specify the module name in the Add module dialog box. To remove a module from the list, select it and click App general remove.

Sort imported members

  • When this checkbox is selected, JetBrains Rider lists the imported members in merged import statements alphabetically. Note that the members are listed comma-separated in the order they are imported and re-sorted only when you run Code | Optimize Imports.

  • When this checkbox is cleared, the members in merged import statements are always listed comma-separated in the order they are imported.

Sort imports by modules

  • When this checkbox is selected, import statements are re-sorted alphabetically by the module names when you run Code | Optimize Imports.

  • When this checkbox is cleared, import statements are always shown in the order they are generated and this order is not changed after you run Code | Optimize Imports.

Arrangement

In this tab, define a set of rules to rearrange your JavaScript code according to your preferences.

Grouping Rules

Use this area to set the grouping rules.

  • Group property field with corresponding getter/setter

  • Group fields initialized with arrow functions with methods

  • Keep overridden methods together

    Select this checkbox to group the overridden methods together by class and interface. In order list, select keep order or order by name options.

Matching rules

Use this area to define elements order as a list of rules, where every rule has a set of matches such as modifier or type.

  • the Add button: use this button to add a rule. The empty rule area opens.

  • the Remove button: use this button to remove the rule from the list.

  • the Edit button: use this button to edit an existing rule. To see this button, navigate to the rule that you want to edit and click the button. In popup that opens, modify the rule fields.

  • the Move up button the Move down button: use these buttons to move the selected rule up or down.

Empty rule

Use this area to create a new matching rule or edit an existing one. You can select from the following filters:

  • Type: use this filter to choose classes or methods for your rule.

    Note that clicking a type keyword twice negates the condition.

  • Modifier: use this filter to select the types of modifiers for the rule.

    Note that clicking a modifier keyword twice negates the condition.

  • Name: use this field to specify entry names in the rule. This filter matches only entry names, such as field names, method names, class names, and so on. The filter supports regular expressions and uses a standard syntax. The match is performed against the entire name.

  • Order: use this list to select the sorting order for the rule. This option is useful when more than one element uses the same matching rule. In this case, selecting Keep order will keep the same order as was set before the rearrangement and selecting Order by Name will sort the elements with the same matching rule by their names.

  • Aliases: this option displays aliases that were defined in the Rules Alias Definition dialog. You can remove the ones you do not need.

the Sort Alphabetically button

This icon appears when you select Order by Name from the Order list. The icon indicates that the items in this rule are sorted alphabetically.

Set from

The link appears in the upper-right corner of the page, when applicable. Click this link and choose the language to be used as the base for the current language code style.

To return to the initial set of code style settings and discard the changes, click Reset.

Last modified: 20 January 2022