Consume NuGet packages
Last modified: 09 August 2022Tools | NuGet | NuGet Quick List
Alt+Shift+N
View | Tool Windows | NuGet
Alt+7
tip
In addition to consuming NuGet packages, JetBrains Rider provides tooling for creating NuGet packages.
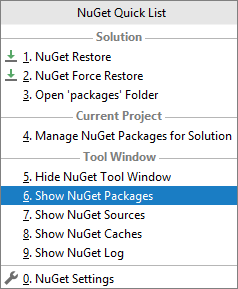
You can install, update, and remove NuGet packages via the NuGet window Alt+7 and NuGet quick list Alt+Shift+N.
Browse installed and available NuGet packages
By default, the Packages tab of the window shows all packages installed in the whole solution, but you can change the view to only show packages of a specific project. To do so, use the scope selector next to the search box:
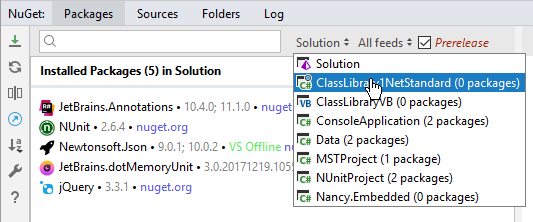
Available packages for the selected scope are always shown below the installed packages.
tip
For each installed NuGet package, you can find code dependent on it — right-click it and choose Find Dependent Code (all projects).
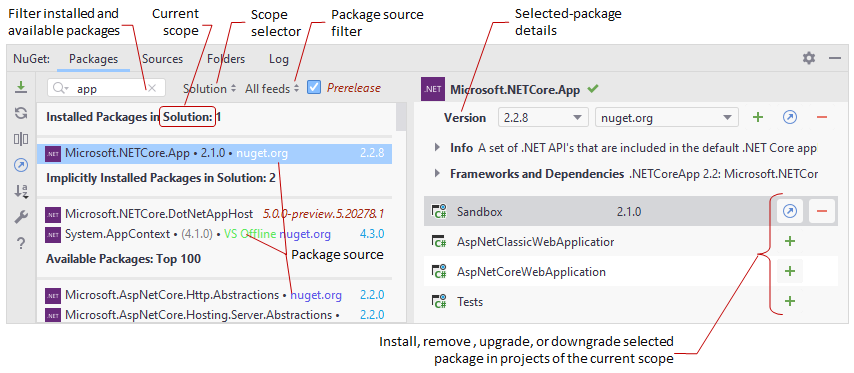
Packages that are referenced from other installed packages are displayed in the Implicitly Installed category. Their versions are shown in brackets because you cannot upgrade or downgrade them. To learn which package references an implicitly installed one, right-click it and choose Quick NuGet Documentation or press Ctrl+K, I.
You can select installed or available packages in the left part of the Packages tab, and use the right part to check package details, as well as to install, upgrade/downgrade, or remove the package in specific projects:
tip
Every installed and available package has a lot of helpful commands in its context menu, which is available with the right-click or Alt+Enter
Restore and Upgrade NuGet packages
Rider provides two algorithms for restoring NuGet packages:
Normal — calls the standard NuGet restore mechanism, which can be slow, especially on .NET projects. It is available in the main menu (Tools | NuGet | NuGet Restore), in the NuGet quick list Alt+Shift+N, and by clicking Restore
 on the NuGet window toolbar.
Force — performs a number of heuristics to determine which packages should be restored. The 'Force' algorithm works almost instantaneously, however there could be cases where it fails to restore some packages.
We recommend using force restore for large projects. It is available in the main menu (Tools | NuGet | NuGet Force Restore) or in the NuGet quick list Alt+Shift+N.
When you open a solution, Rider will automatically apply the 'Light' algorithm to restore missing packages. If necessary, you can change the auto-restore behaviour on the NuGet settings page, which you can also open by clicking NuGet Settings ![]() on the NuGet window toolbar.
on the NuGet window toolbar.
To upgrade the installed packages, click Upgrade Packages in Solution ![]() on the NuGet window toolbar and then choose which packages should be upgraded.
on the NuGet window toolbar and then choose which packages should be upgraded.
Alternatively, you can select one of the installed packages in the left-hand side of the NuGet window choose the desired version in the right part, and then upgrade/downgrade specific projects to this package version.
Find and install NuGet packages
To find a NuGet package, use the search field and the list of Available packages, which appears under the list of Installed packages.
In the search field, you can enter a package name to look for or use prefixes: T: to look for types and N: to look for namespaces.
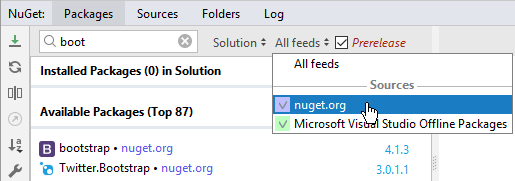
By default, Rider searches all available package sources, but you can limit the search scope using the corresponding selector:
note
If the NuGet window is too narrow in the IDE layout, the search box contents may become partly hidden.
A single click on a package source will select the source and deselect all others. You can Shift-click to select multiple sources or click All feeds to select all.
tip
You can view details of NuGet operations in the Log tab of the NuGet window.
Install or upgrade/downgrade a NuGet package
Find the desired package as described above and select it in the left part of the Packages tab
In the right part of the tab, choose a project where you want to install the selected package. If your solution contains too many projects, you may want to use the scope selector on the toolbar to display specific project and hide all others.
Use the Prerelease checkbox on the toolbar to show or hide pre-release versions of the package.
Use the Version selector in the right tab to choose the desired version of the package.
Before installing the selected package, you may want to check which dependent packages will be installed. To do so, expand Frameworks and Dependencies in the right part:

Depending on the selected package version, and on whether the selected package is installed in the selected project, you will be able to install, upgrade or downgrade the package.
After installing a new package, you will see it's readme.txt file in the editor so that you will be able to check if any additional steps are required after installing.
If config file/XDT transformations are implemented in the package, JetBrains Rider will run them to help in adding required entries, for example to an App.config or Web.config file.
tip
If you use Paket dependency manager, select MSBuild as the .NET restore engine on the Build, Execution, Deployment | NuGet page of the IDE settings Ctrl+Alt+S.
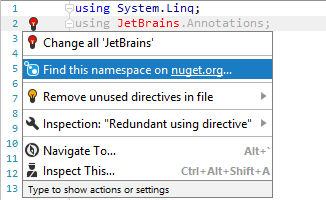
The easiest way to start the search for a NuGet package is to use the corresponding Alt+Enter action that becomes available for unresolved namespaces:
... and types:
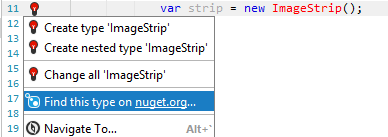
In any case, JetBrains Rider will open the NuGet window, where you will see all packages that contain the desired type or namespace.
Manage package sources
In the Sources tab of the NuGet window, Rider lists all NuGet configuration files discovered on your machine. You can add, remove, or edit package sources for the selected config file on the right panel, or click these files to open them in the editor.
If necessary, you can add or remove package sources manually, by editing the packageSources section of a configuration file. For example:
<packageSources>
  <add key="My online package source" value="https://some.address/"/>
  <add key="My local package source" value="C:\NuGetPackages\"/>
</packageSources>
note
NuGet feeds on blob.core.windows.net are hosted with Sleet, which does not support query parameters and sends the entire index when queried.
If you have such feed among your custom NuGet feeds, there might be memory issues because Rider will get too much data when trying to display packages available in that feed.
Indexing of such feeds is disabled by default, but you can temporarily enable it with the Search in dotnetfeed*.blob feeds checkbox on the Build, Execution, Deployment | NuGet page of JetBrains Rider settings Ctrl+Alt+S
Credential providers for private NuGet feeds
JetBrains Rider lets you authenticate to private NuGet feeds that use with different authentication methods.
Authentication prompt for username/password combination
In the Sources tab of the NuGet window, you can edit or add a feed and add credentials in the form of a username/password combination.
The URL to private feeds is often shared with team members in the NuGet.config file that sits next to the solution file, so that everyone on the team can connect to such private feed. On the first load of such solution where package restore is required, JetBrains Rider will prompt for credentials.
When credentials are correct, they are stored in JetBrains Rider’s password store so that you don’t have to re-enter credentials each time you access a NuGet feed. The password store is configurable on the Appearance and Behavior | System Settings | Passwords page of the IDE settings Ctrl+Alt+S.
JetBrains Rider also has integrated credential providers for MyGet and Visual Studio Team Services (VSTS).
Use authentication plugins
For private feeds that use plugin-based authentication method, such as the one provided by Azure Artifacts, you need to change the Use credential providers preference on the Build, Execution, Deployment | NuGet page of the IDE settings Ctrl+Alt+S to NuGet/.NET CLI plugins or to NuGet/.NET CLI plugins, then Rider integrated (if you use different authentication methods) and then restart JetBrains Rider.
Once authentication plugins support is enabled, the %USERPROFILE%
tip
If you want to build your own credential provider plugin, check out a boiler-plate NuGet credential provider plugin for Rider on GitHub.
NuGet options
You can configure NuGet preferences in the NuGet settings page, which you can open by clicking NuGet Settings ![]() in the NuGet window or by choosing Build, Execution, Deployment | NuGet in Rider settings Ctrl+Alt+S.
in the NuGet window or by choosing Build, Execution, Deployment | NuGet in Rider settings Ctrl+Alt+S.
In the Search section, you can choose:
Include prerelease — lets you search and install pre-release versions of packages. This preference is synchronized with the same preference shown on the toolbar of the Packages tab.
Include unlisted — lets you search and install versions of packages that are at unlisted on the server (for example, at NuGet website). You may want to use this option to see outdated versions of packages.
Preferences in the Install and Update and in Uninstall sections work exactly the same as in Visual Studio package manager:
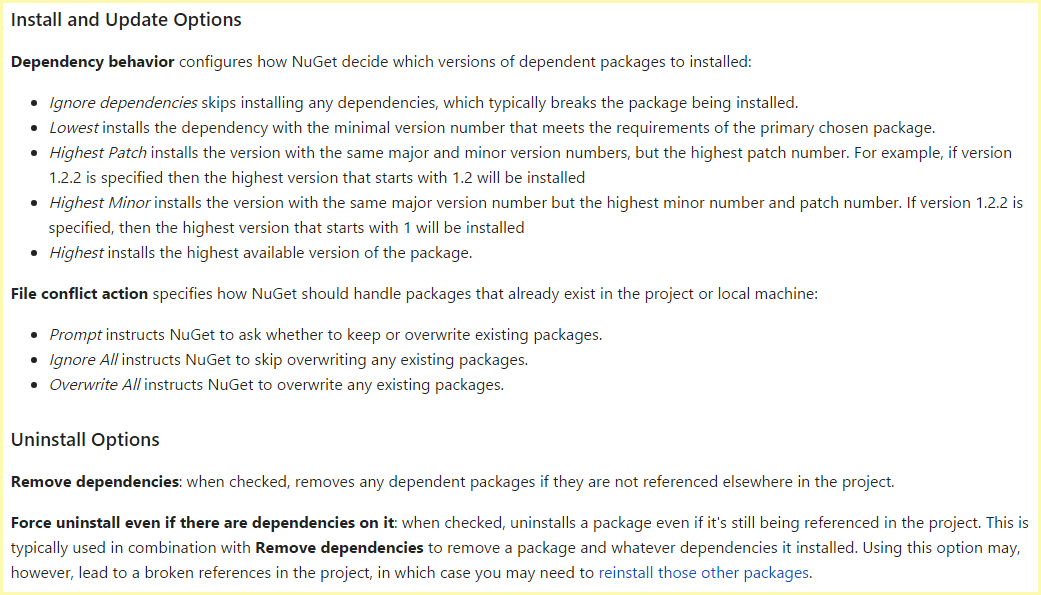
Manage NuGet caches
NuGet caches all downloaded packages to make them available when there is no internet connection and to prevent multiple downloads of the same package.
With Rider, you can view locations of NuGet caches and clear selected locations in the Folders tab of the NuGet window. Clearing NuGet caches is safe, it does not affect packages installed in your projects.
Edit NuGet configuration files
If necessary, you can also manually edit NuGet configuration files — NuGet.Config, packages.config, and *.nuspec. Most of the coding assistance features including syntax validation and Code completion (IntelliSense) are there for you.

NuGet quick list
The most frequently used actions are available in the NuGet quick list — Alt+Shift+N or Tools | NuGet | NuGet Quick List:
