Deploy apps using Deployment configurations
RubyMine provides the capability to deploy applications to remote servers using deployment configurations. In this topic, we'll show you how to set up a remote deployment server, browse its file system right from the IDE, and upload your web application to this server.
Prerequisites
Before deploying your application to a remote server:
Enable SSH access on a server
Add an SSH configuration to the IDE settings for accessing a server
Configure a deployment server
You can configure the deployment server as follows:
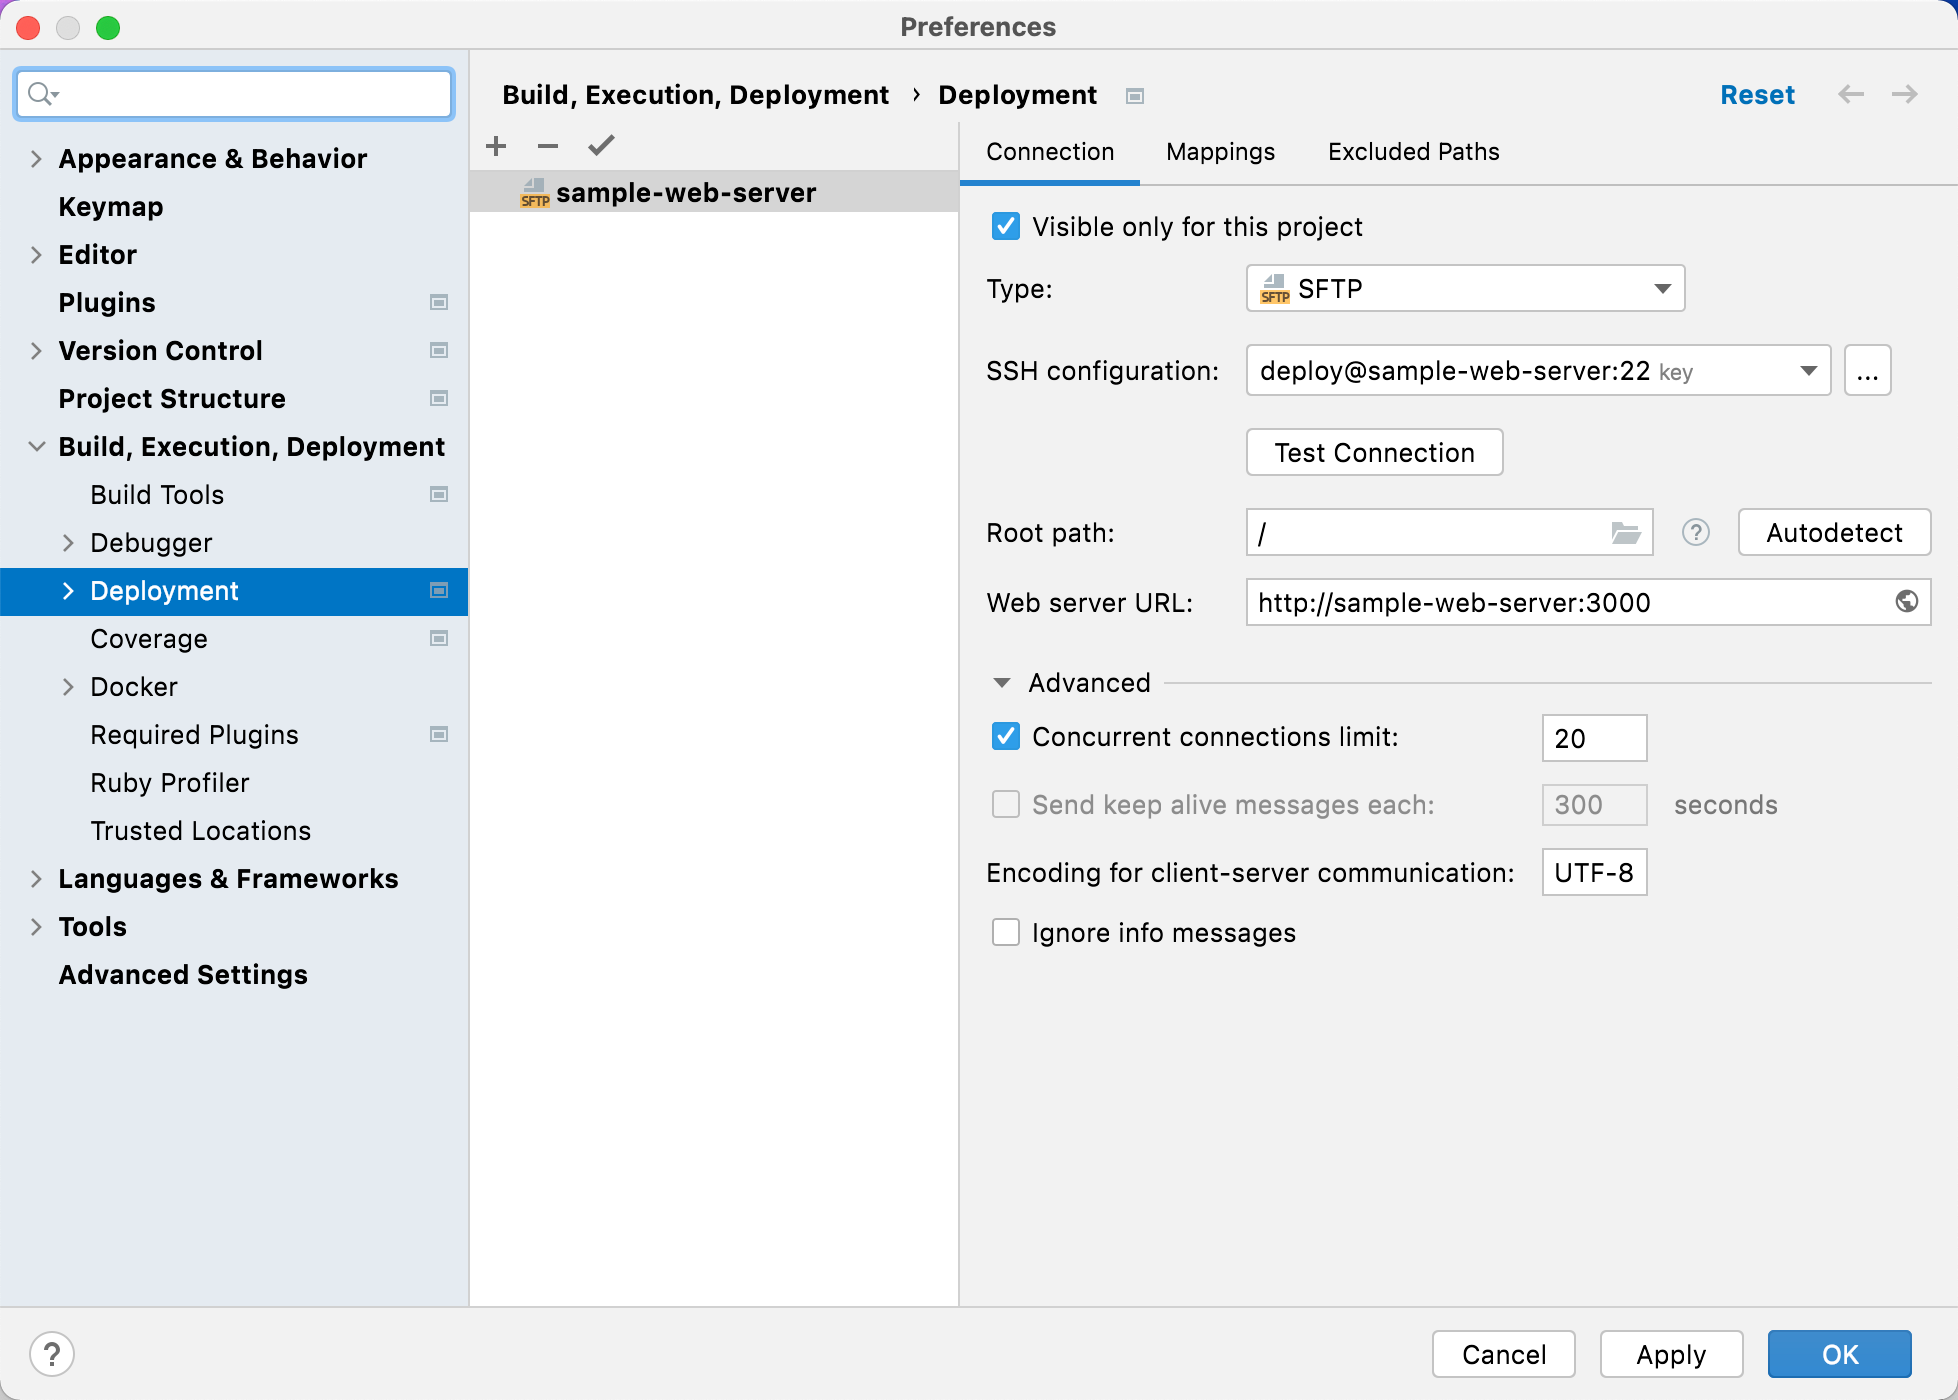
Open Settings/PreferencesCtrl+Alt+S and go to the page.
Click
and select a file transfer protocol, for example, SFTP.
In the Create New Server dialog, specify the configuration name and click OK.
Specify the following settings in the Connection tab:

Visible only for this project: enable this option if you do not want to share the configuration between projects.
Type: specify the way to access the server.
SSH configuration: select the existing SSH configuration used to access the server or click the ellipsis button to add a new one.
Root path: leave the default / path to point at the root folder on the server.
Web server URL: specify the root URL address.
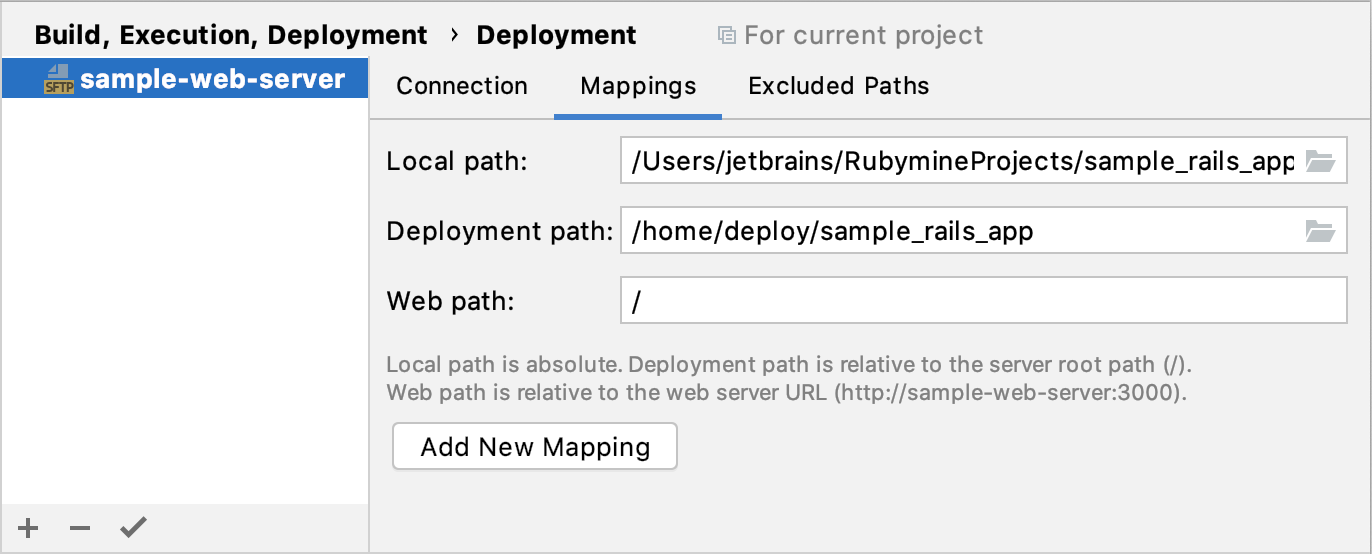
Switch to the Mapping tab to specify where to deploy your application:

Local path: specify the path to the project root on a local machine, for example, /Users/jetbrains/RubymineProjects/sample_rails_app.
Deployment path: specify the deployment folder on your server. In our case, it will be /home/deploy/sample_rails_app.
(Optional) On the Excluded Paths tab, you can configure a list of local and remote folders that you do not want to be involved in upload/download.
Deployment server options
Common settings for all server types
Item | Description |
|---|---|
Visible only for this project | Use this checkbox to configure the visibility of the server access configuration or server group.
For details on setting up interpreters, see Node.js via SFTP and Node.js via SSH. |
Type | In this list, choose the way to access the server. The available options are:
|
Web server URL | In this field, specify the Web server root folder URL address. Click Both the HTTP and the HTTPS protocols are supported. |
FTP and FTPS settings
Item | Description |
|---|---|
Host | In this field, specify the host name of the server to upload the files to. |
Port | In this field, specify the port to use. The default value is 21. |
Root path | In this field, specify the server configuration root relative to the root folder on the server. This folder will be the highest one in the folder structure accessible through the current server configuration. Do one of the following:
|
Autodetect | Click this button to have RubyMine detect the user home folder settings on the server and set up the root path accordingly. |
User name | In this field, type your username for authentication to the server. |
Password | In this field, type your password for authentication to the server. |
Login as anonymous | Select this checkbox to enable anonymous access to the server with your email address as password. |
Save password | Select this checkbox to have RubyMine remember the specified password. |
Test Connection | Click this button to check that the specified settings ensure successful connection. The button is only enabled when you have specified your user credentials. |
FTP and FTPS advanced settings
In the Advanced area, customize upload/download by specifying additional protocol-specific options for the FTP/FTPS server configurations.
Item | Description | Available for |
|---|---|---|
TLS | Choose the method to invoke client security:
| FTPS |
Data channel protection level | From this list, set the protection level for the PROT command:
For more information, see the articles on TLS, SSL 2.0, and SSL 3.0. | FTPS |
Reuse SSL session | Select this checkbox to connect to a server that requires SSL session reuse between the control and data connections. | FTPS |
Disable TLS 1.3 | Select to disable TLS 1.3 features and have RubyMine fall back to connecting via TLS 1.2. Use this option if you experience issues with establishing a connection to a server or uploading certain files. | FTPS |
Passive mode | Select this checkbox to set the client on your machine to passive mode, when it connects to the server to inform about being in the passive mode, receives the port number to listen to, and established data connection through the port with the received number. This mode is helpful when your machine is behind a firewall. | FTP, FTPS |
Show and process hidden files | When this checkbox is selected:
The name of a hidden file or directory starts with a dot .. | FTP, FTPS |
Use LIST command | Use the options in this area to configure the LIST command usage.
| FTP, FTPS |
Concurrent connections limit | Select this checkbox to have RubyMine restrict the number of connections to be supported simultaneously and specify the maximum number of allowed connections in the field. | FTP, FTPS |
Retrieve files timestamps | Use this list to specify the MDTM FTP command calling policy to retrieve the last-modified time of a given file on the remote host. The available options are:
| FTP, FTPS |
Send keep alive messages each | In this field, specify how often you want RubyMine to send commands to the server to reset the timeout and thus preserve the connection. | FTP, FTPS |
Keep alive command | From this list, choose the commands to be sent to the server to reset the timeout and thus preserve the connection. | FTP, FTPS |
Encoding for client-server communication | In this field, specify the encoding that matches the encoding used by your server. Accept the default value if you are not sure that it supports UTF-8 encoding. | FTP, FTPS |
SFTP settings
Item | Description |
|---|---|
SSH configuration | From this list, choose one of the created SSH configurations, or click |
Test Connection | Click this button to check that the specified settings ensure successful connection. The button is only enabled when you have specified your user credentials. |
Root path | In this field, specify the server configuration root relative to the root folder on the server. This folder will be the highest one in the folder structure accessible through the current server configuration. Do one of the following:
|
SFTP advanced settings
In the Advanced area, customize upload/download by specifying additional protocol-specific options for the SFTP server configurations.
Item | Description |
|---|---|
Concurrent connections limit | Select this checkbox to have RubyMine restrict the number of connections to be supported simultaneously and specify the maximum number of allowed connections in the field. |
Send keep alive messages each | In this field, specify how often you want RubyMine to send commands to the server to reset the timeout and thus preserve the connection. |
Encoding for client-server communication | In this field, specify the encoding that matches the encoding used by your server. Accept the default value if you are not sure that it supports UTF-8 encoding. |
Ignore info messages | On some SFTP servers, the SSH banner may be enabled. Every time a connection is established, a popup with an information message may be shown and to continue you would need to click OK. To suppress showing the information popup, select the Ignore info messages checkbox. |
Local or mounted folder settings
Item | Description |
|---|---|
Folder | In this field, specify the server configuration root. The server configuration root is the highest folder in the file tree on the server that can be accessed through the server configuration. The easiest way is to use the document root of your Web server as defined in the Web server configuration file. However you can appoint any other existing folder under the document root. |
Item | Description |
|---|---|
Local Path | In this field, specify the full path to the desired local folder. In the simplest case it is the project root. Type the path manually or click |
Deployment Path | In this field, specify the folder on the server where RubyMine will upload the data from the folder specified in the Local Path field. Type the path to the folder relative to the server configuration root. If the folder with the specified name does not exist yet, RubyMine will create it, provided that you have selected the Create Empty directories checkbox in the Options dialog. The field is not available for In-place server configurations. |
Web Path | In this field, type the path to the folder on the server relative to the server configuration root. Actually, type the relative path you typed in the Deployment Path field. |
Click this button or press Alt+Insert to have a new line added to the list of mappings. | |
Click this button or press Alt+Delete to remove the selected mapping from the list. |
Item | Tooltip and shortcut | Description |
|---|---|---|
Add Alt+Insert | Click this button to have an empty line added to the list. Then select the type of the path from the popup menu:
| |
Remove Alt+Delete | Click this button to remove the selected item from the list. The button is only available when a line is selected. |
Browse a remote host
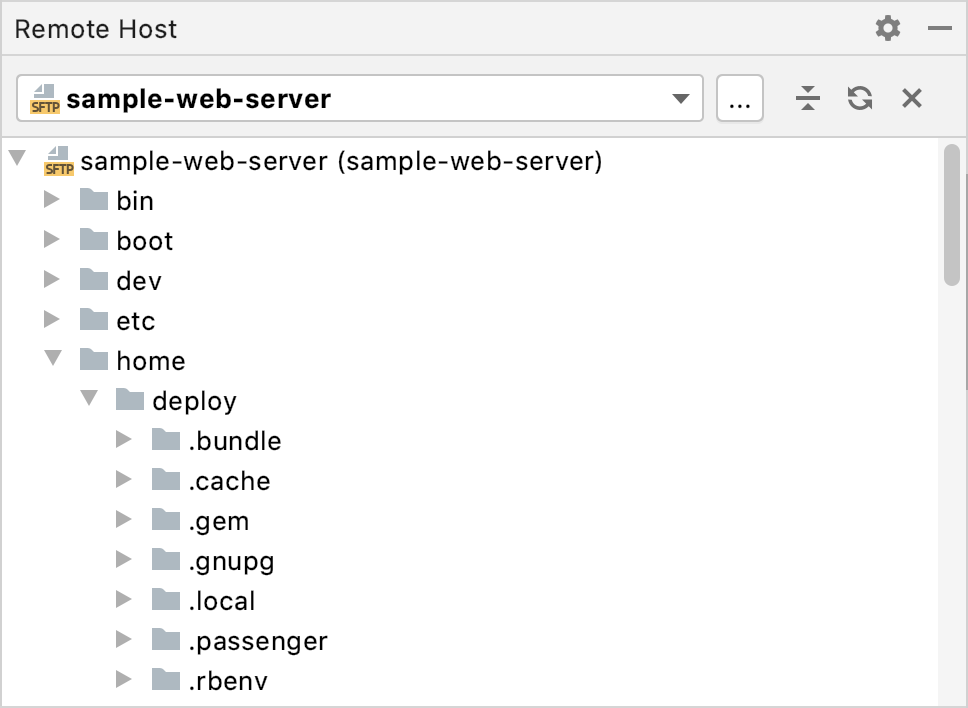
After you've configured the deployment server, you can browse its file system right from the IDE:
Select from the main menu.
In the invoked Remote Host tool window, you can perform various actions, for example:

Drag files between the remote server and local machine (by using the Remote Host and ProjectAlt+1 tool windows).
Create and remove files and directories.
Compare and synchronize files of the local and remote projects.
Upload your app to a server
After you've configured a deployment server, you can upload your project to this server:
In the Project view Alt+1, right-click the root project directory and select .
Wait until RubyMine copies the project files to the remote host. You can see the deployment status in the File Transfer tool window ().

To learn how to synchronize changes between the local and remote projects, see Synchronize changes.
Synchronize changes
After you've made changes in your local project, you need to upload new files to the remote server. RubyMine allows you to compare local and remote files/directories, synchronize changes manually, or enable automatic upload.
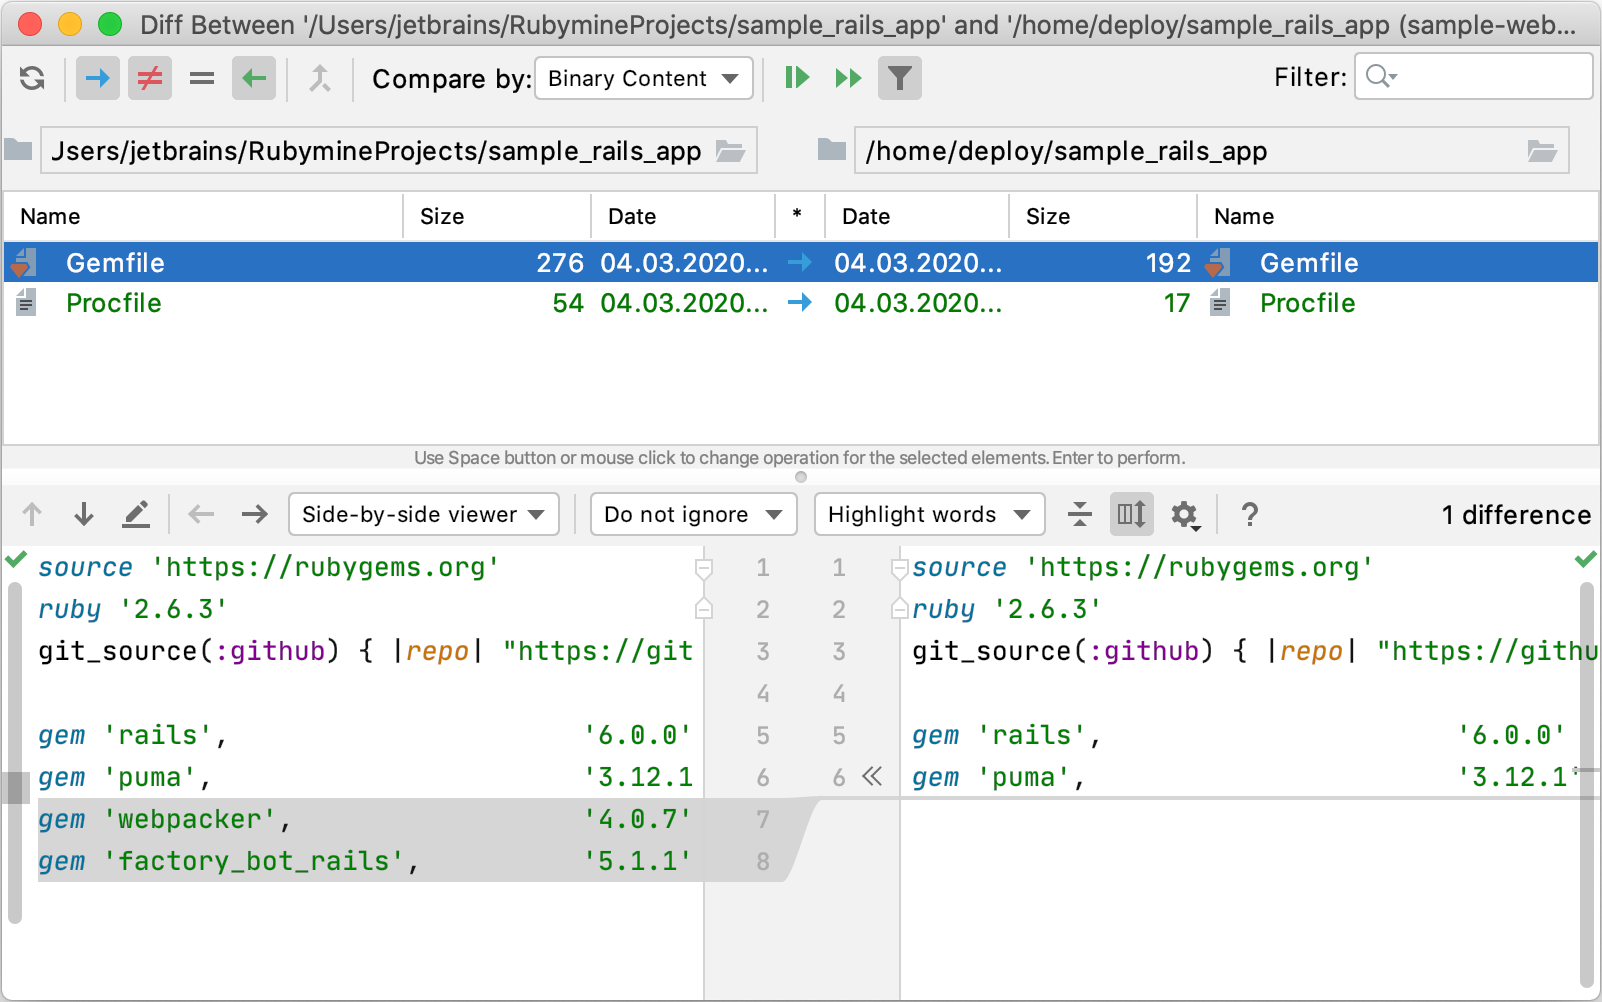
Synchronize changes manually
In the Project view Alt+1, select the required file or directory for synchronizing. For example, if you want to synchronize the entire project, select the project root.
From the main menu, select .
In the invoked dialog, you can select individual files and compare their local and remote versions.

Use the
button Enter to upload changes for the selected file.
Ctrl+Enter allows you to upload all files at once.
Enable automatic uploading
Specify the default upload server. Open , select the desired server, and click
.
Go to the page and set the Upload changed files automatically to the default server option to Always, or On explicit save action.
Disable uploading external changes
By default, RubyMine also uploads the files if they are changed by some external process, such as a VCS branch change, compilation of SASS or LESS, or a File Watcher. To change this behavior:
Open Settings/Preferences and go to the page.
Set Upload changed files to the default server to Always and enable the Skip external changes option.
Configure deployment options
To configure deployment options, open Settings/PreferencesCtrl+Alt+S and go to the page. Use this page to specify additional configuration settings for uploading and downloading project files to and from local and remote servers.
Options
Item | Description |
|---|---|
Exclude items by name | In this field, specify patterns for the names of files and folders that you do not need to be deployed. Use semicolons For example, if you have a folder stylesheets with three files style.css, style1.css, and style2.scss, then Learn more from Regular-Expressions.info. The exclusion is applied recursively. This means that if a matching folder has subfolders, the contents of these subfolders are not deployed either. |
Operations logging | Use this list to specify how much detailed logging you need to have. The available options are:
|
Stop operation on the first error | Select this checkbox to have data transfer stopped as soon as an error occurs. |
Overwrite up-to-date files | If this checkbox is selected, all files will be uploaded uploaded no matter whether they have been changed since the previous upload or not. Otherwise, if this checkbox is not selected, only the files that have been changed since the previous upload will be uploaded. |
Preserve files timestamps | Select this checkbox to prevent resetting timestamps of files on upload. |
Delete target items when source ones do not exist | If this checkbox is selected, any file in the destination directory will be removed if the file with this name is not involved in the current upload. This option is applicable when synchronization if performed from the Project tool window or from the Remote Host tool window. |
Create empty directories | Select this checkbox to have an empty directory on the server created automatically if a new local directory has been created in your project since the last upload in the source folder. |
Prompt when overwriting or deleting local items | Select this checkbox to have RubyMine ask you for confirmation before overwriting or deleting local items for synchronization during download. |
Upload changed files automatically to the default server | From this list, choose when you want RubyMine to automatically upload a file to the default server or server group. The available options are:
The default server configuration or a server group is appointed on the Deployment page by selecting the desired item in the list and clicking the Use as Default toolbar button |
Skip external changes | Select this checkbox to exclude local changes that were made using a third-party tool (a VCS, a script, and so on) from automatic upload. The checkbox is available only when the Always or On explicit save action option is selected in the Upload changed files automatically to the default server list. |
Delete remote files when local are deleted | Select this checkbox to have RubyMine automatically delete remote files during automatic uploads in case the local ones are deleted. The checkbox is available only when the Always or On explicit save action option is selected in the Upload changed files automatically to the default server list. Note that this option serves as an extra safety measure and may result in unwanted files remaining on the remote server. As an example, consider a local file Foo.php, which is renamed to Bar.php. Since renaming a file is technically indistinguishable from deleting the file and creating a new one, the following will happen after automatic upload:
|
Override default permissions on files | Select this checkbox to change the default permissions assigned to uploaded files on remote hosts. Click Browse |
Override default permissions on folders | Select this checkbox to change the default permissions assigned to uploaded folders on remote hosts. Click Browse |
Warn when uploading over newer file | Use this list to define the version-control policy to apply when uploading files to remote hosts. Depending on this choice, RubyMine either checks whether any changes have been made to the corresponding files on the remote host since you downloaded them or just overwrites the remote files.
|
Notify of remote changes | Select this checkbox to receive notifications about changes on the remote host. The checkbox is available only when the Compare timestamp and size: or Compare content: option is selected in the Warn when uploading over newer file list. |
Show warning dialog on moving on Remote Host | If this checkbox is selected, RubyMine will display a confirmation message when you move an item to a different location on a remote host in the Remote Host Tool Window. |