TeamCity Cloud Cost Optimization
TeamCity Cloud provides a quick way to get started with a fully managed CI solution that can be dynamically scaled as the number of builds increase or decrease. However, with this increased flexibility to scale-up comes the risk of additional costs through a higher consumption of build credits.
While TeamCity Cloud provides a number of built-in mechanisms to help optimize the running time of your builds, there are numerous things you can do as a user of TeamCity Cloud to ensure you don't consume more resources and credits than needed.
In this article, we will review tips and suggestions that could help optimize your consumption of build credits and lower your usage costs.
Summary
Here is a high-level summary of the suggestions:
Ensure each user provides a full list of their VCS usernames.
Use the Performance Monitor build feature to show statistics and spot bottlenecks.
Check build agent size suitability.
Use the Matrix view to get insights on the most intensive projects and build configurations.
Define a quiet period for VCS triggers.
Use VCS checkout rules.
Set time limits to prevent long-running or hung builds.
Use self-hosted build agents for some of your builds.
Enable reuse of build results and incremental builds by configuring build chains.
Pass libraries or packages as artifacts to subsequent build configurations.
Prepay for extensively used build agents.
Review resources that are automatically renewed each month.
Choose the right size for your subscription.
We will delve deeper into each of them further in this article.
Ensure each user populates full list of their VCS usernames
TeamCity Cloud subscriptions are based on the number of active committers. An active committer is essentially any developer that makes 10 or more VCS commits in a rolling 30-day period that end up being built by TeamCity (either via an automatic or manually triggered build). Once a user is classified as an active committer, they consume one of the committer slots in the subscription.
Active committers are distinguished by their VCS usernames, so if an individual user has different usernames for multiple version control systems, it is important that TeamCity is aware of those usernames. This helps correctly associate all the user's VCS commits with one TeamCity user. If this isn't done, the individual user will consume one committer slot for each of their usernames.
You can make TeamCity aware of the extra VCS usernames by populating the additional VCS usernames on the user's profile page. TeamCity Cloud allows defining up to 3 different VCS usernames for each TeamCity user.
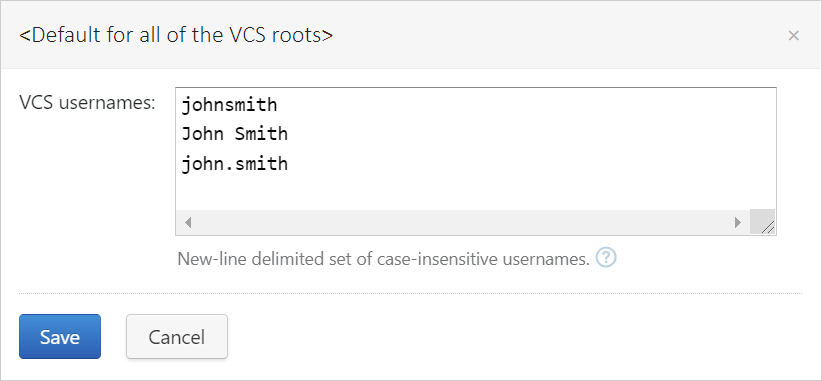
This measure not only ensures you use the minimum number of committer slots, but also allows users to correctly track their changes on the Changes tab and see all of their personal builds on the Projects page.
Use Performance Monitor to show statistics and spot bottlenecks
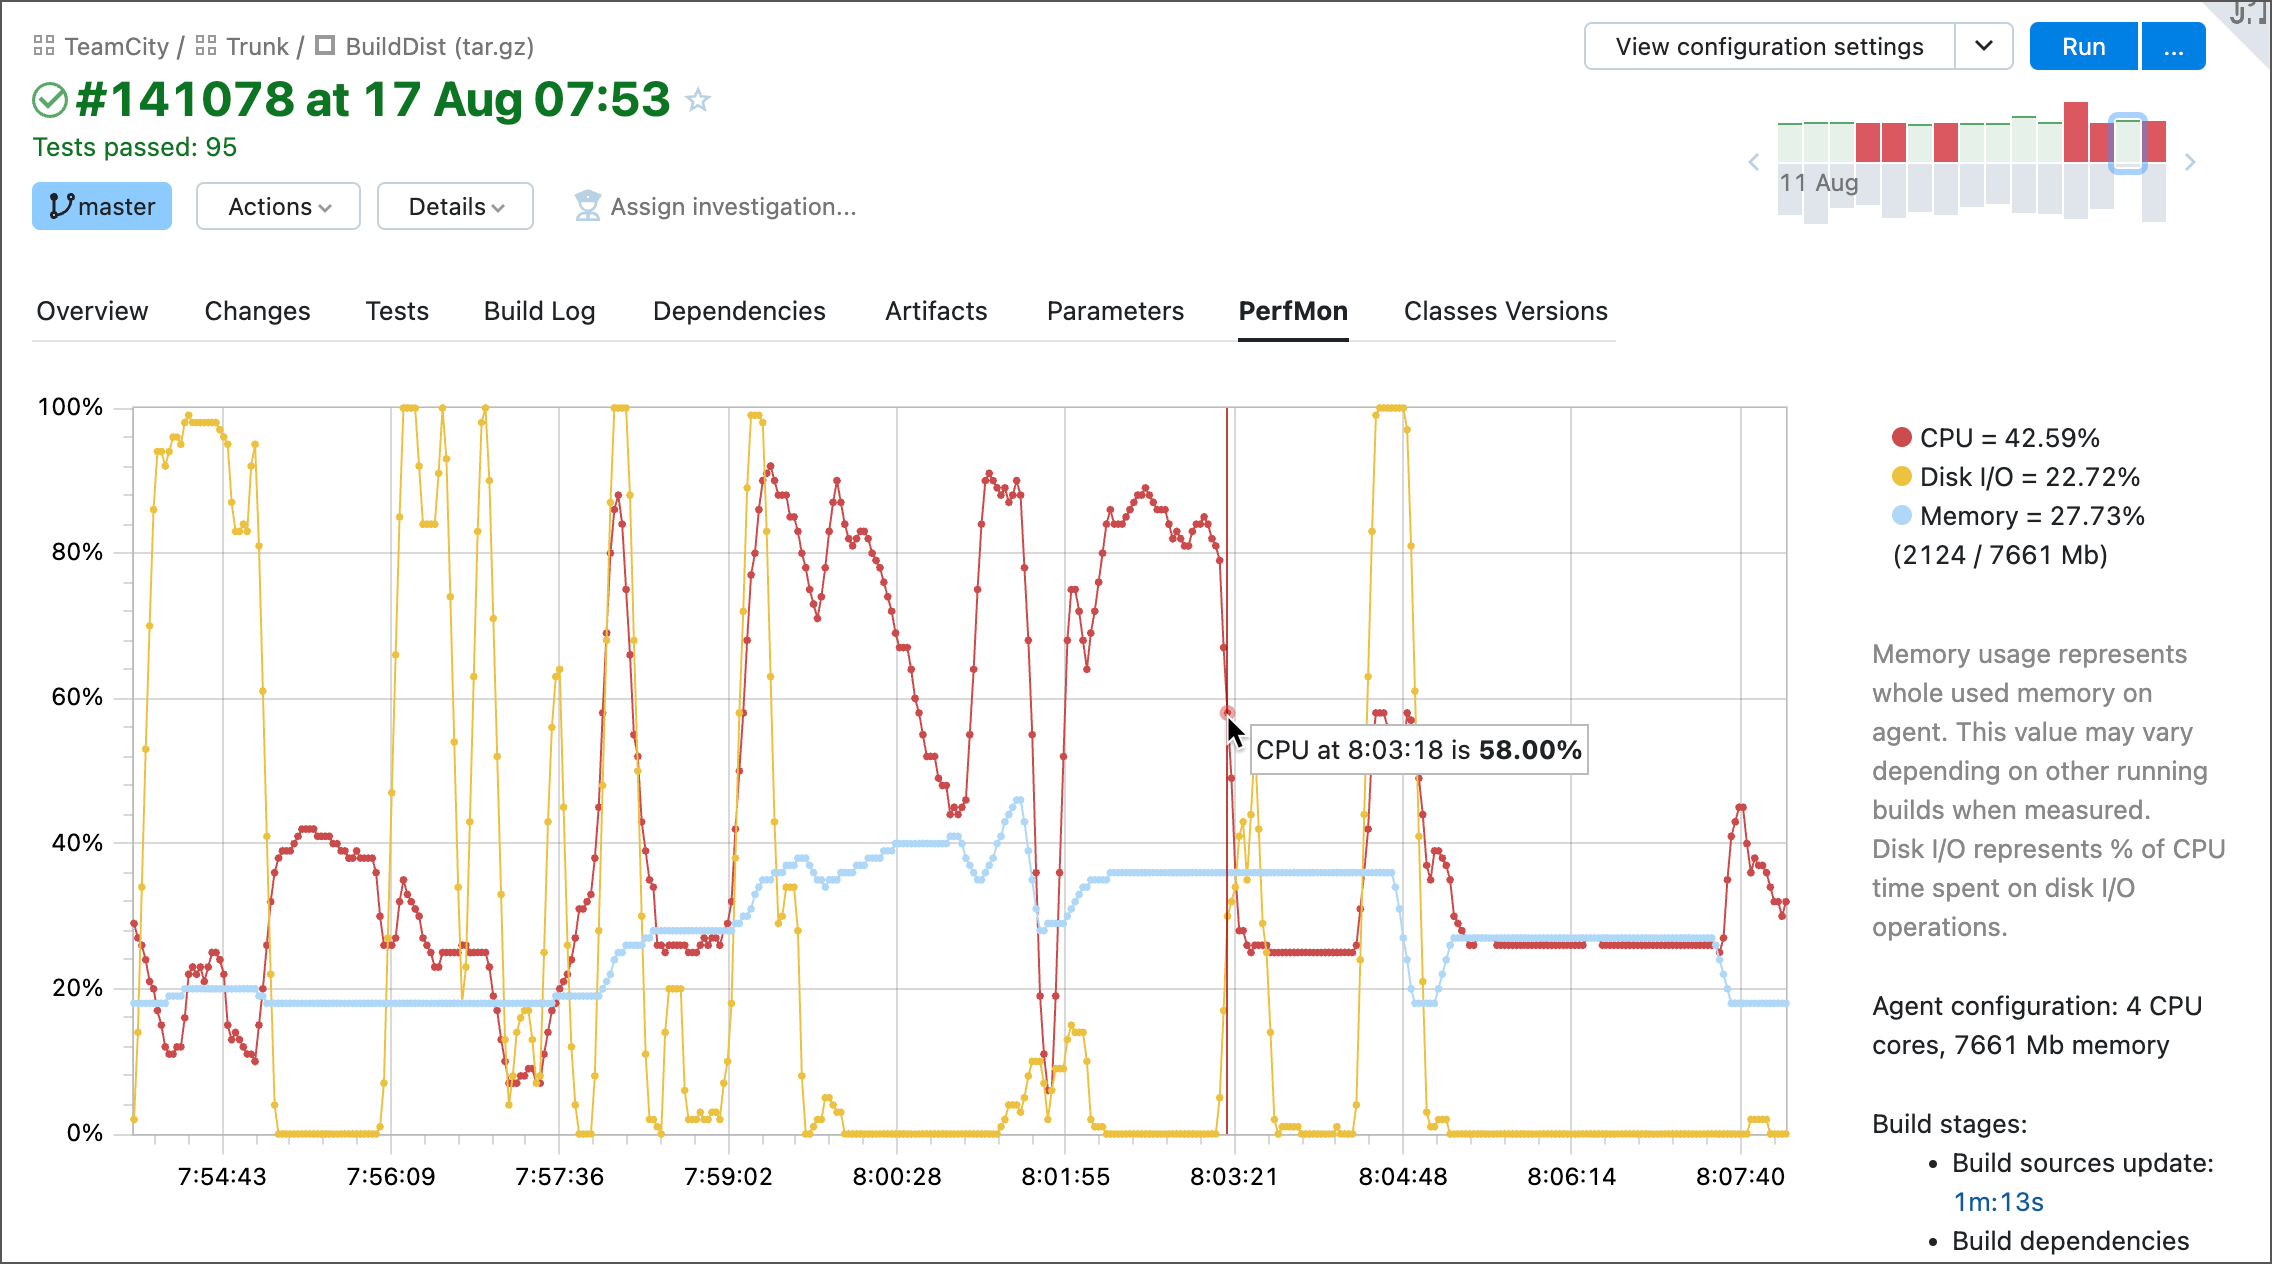
To ensure your builds are running on suitably sized hardware, you can add the Performance Monitor build feature to your build configurations. Various usage statistics will then be captured while the build is running: including CPU, disk I/O, and memory consumption.
This allows detecting potential bottlenecks by analyzing build results. An example of this is shown below, where the build agent's CPU usage peaks at 95% midway through the build. This could indicate a larger build agent may be required.
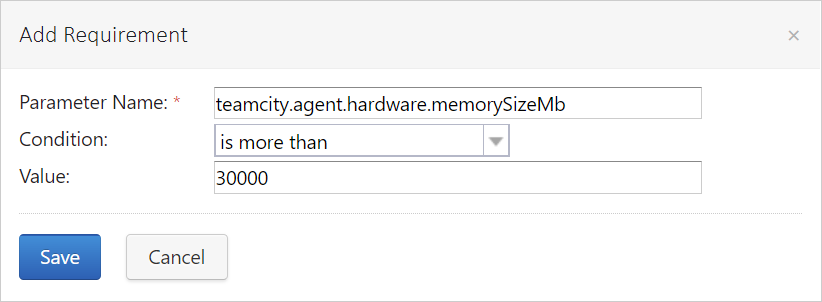
To use a build agent of a more powerful specification, you can define Agent Requirements for the build configuration. For example, to define a minimum amount of memory (RAM), set the teamcity.agent.hardware.memorySizeMb parameter. Builds under this build configuration will only run on a build agent that has a minimum of 30 GB RAM:
Check build agent size suitability
It may be tempting to just assign all of your builds to run on highly performant cloud build agents (for example, Linux Large). In reality, some of your builds may not leverage the full capabilities of the assigned cloud build agent. A good example of this is running a process that doesn't utilize all CPU cores of a large instance. Switching that build to run on a smaller instance with a lower number of CPU cores could help lower your build credit consumption.
If the build steps within a build configuration have minimal CPU and memory requirements, it makes sense to run those parts of your projects and build chains on smaller build agents and reserve larger build agents for more resource-intensive build configurations. If you use a build chain, you can assign each part of the chain to run on different-sized build agents by defining Agent Requirements on each build configuration (as described above).
The Performance Monitor build feature provides insights into the usage of system resources throughout an entire build. This could help you choose the right size of cloud build agents to use for it.
Use Matrix view to identify most intensive projects and build configurations
The Matrix is a tab available from the Agents screen. It offers an overview of all projects and build configurations and shows totals of their overall build time across all build agents during a specific timeframe.
If you have many projects or build configurations, the Matrix view provides a simple way to spot the most build-intensive projects. This can help you decide which types of build agents are best to run your builds.

Define quiet period for VCS Triggers
If multiple commits are made to a repository in a short period of time, this could lead to separate builds being run — one build per each commit. Over time, this can add up to an excessive consumption of build credits, when many of these commits could be combined under a single build.
TeamCity makes this simple to accomplish by specifying a quiet period on VCS triggers. A quiet period is a timeframe that TeamCity maintains between the moment the last VCS change is detected and a build is added into the queue. If new VCS changes are detected in the build configuration within the defined period, the quiet period starts over from the new change detection time. The build is added into the queue only if there were no new VCS changes detected within the quiet period.
In this example, a quiet period of 300 seconds (5 minutes) has been defined for the VCS trigger:
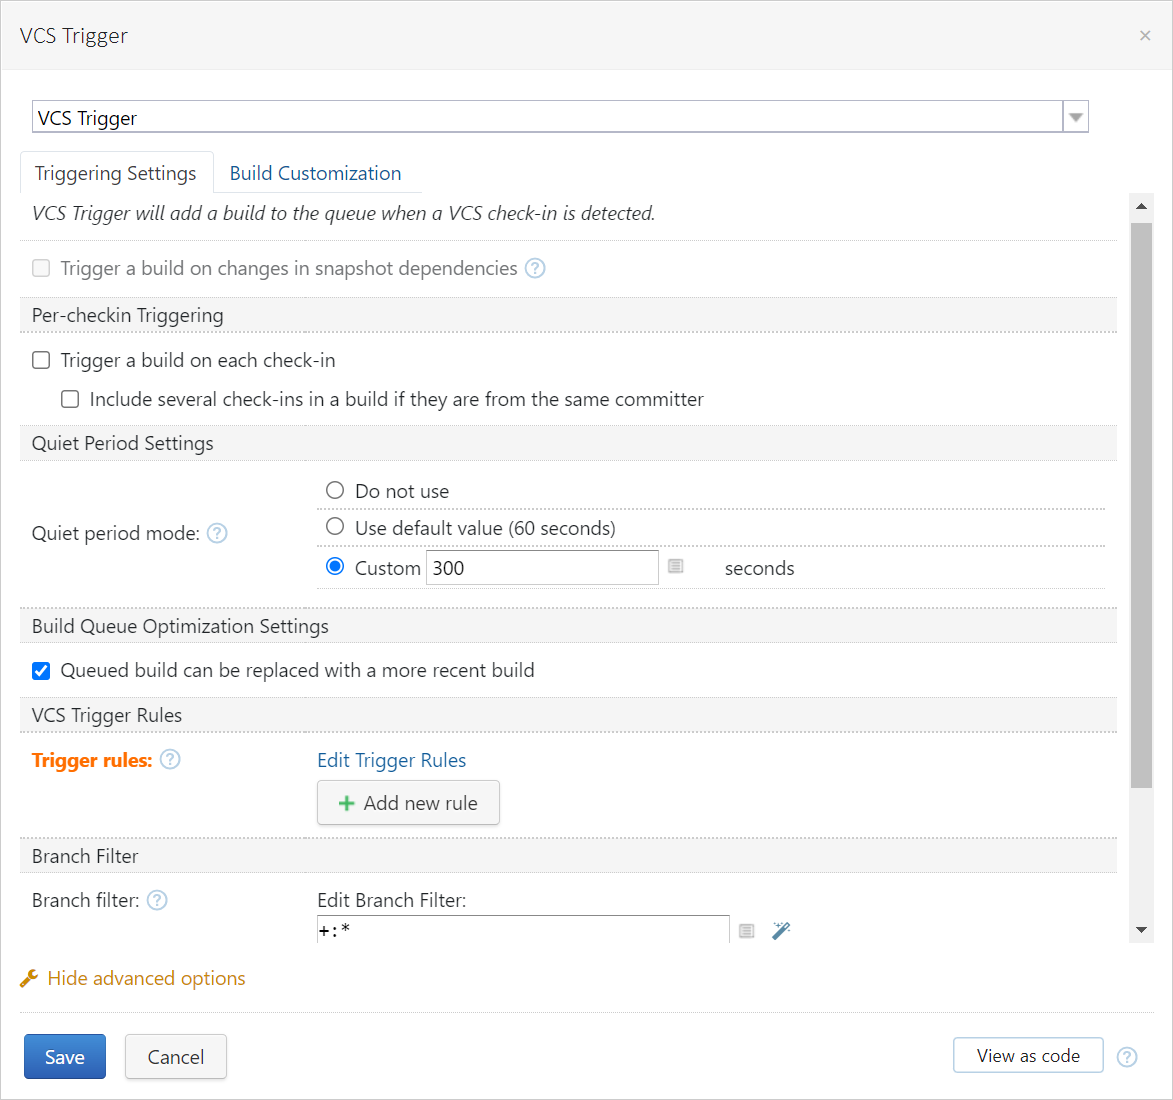
One important note regarding the use of quiet period: if you have selected the option to trigger a build on each check-in, the quiet period settings will be ignored.
When multiple commits are combined in one build, you are still able to see the full list of the changes in the build by going to its Changes tab, even if the commits were made by several developers. In addition, if a build fails, you can cross-reference the error or failure with the list of changes to see who might have contributed to the failure.
Use VCS checkout rules
If a build is only required when a subset of files or directories are changed in your repository, you may want to specify VCS checkout rules to limit unnecessary builds. If a commit does not match any of the checkout rule patterns of the VCS root, TeamCity will ignore it.
Set time limits to prevent long-running or hung builds
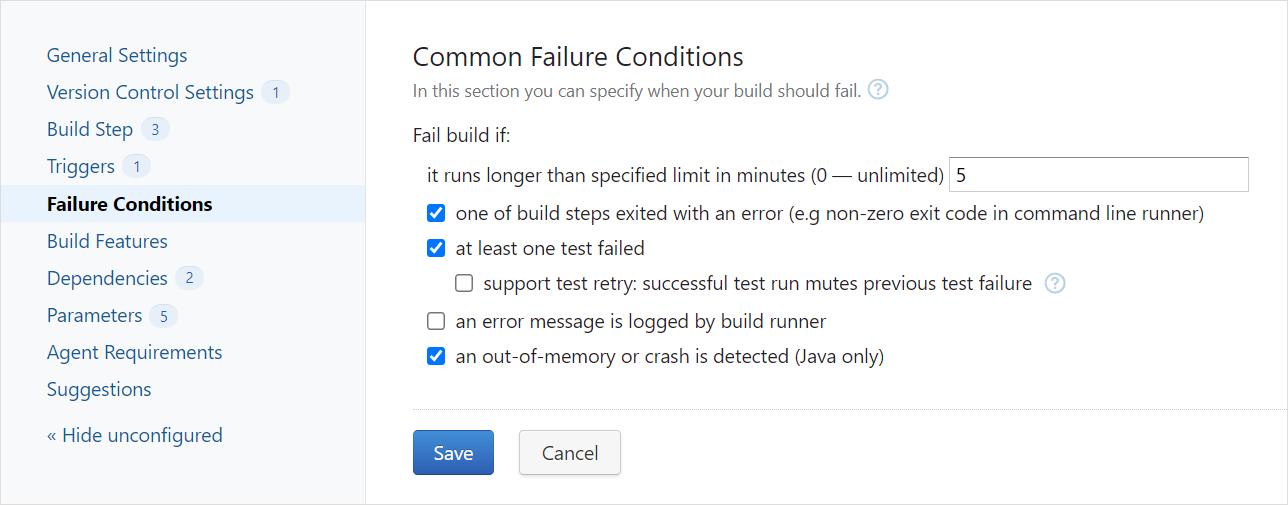
If a build ever hangs for some reason (for example, because of an unhandled exception or a failed process on the cloud build agent), it could be left running until reaching the default TeamCity Cloud server timeout of 120 minutes, causing you to consume build credits for the full 120 minutes.
If you know your build normally takes 3 minutes to run, you may want to configure TeamCity to automatically fail the build if it runs longer than 5 minutes. You can do this easily by configuring build failure conditions. By default, this is set to 0 minutes, which means the global server timeout of 120 minutes would apply.
By restricting the number of minutes a build can run, you can prevent hung builds from excessively consuming your build credits.
Use self-hosted build agents for some of your builds
In addition to the JetBrains-provided cloud build agents, you have the option to connect self-hosted build agents to your TeamCity Cloud server. These self-hosted agents could be machines running in your internal corporate network or private cloud environment. You could also configure TeamCity to use something like AWS Spot instances to benefit from spare EC2 capacity for less than the on-demand pricing.
As long as your self-hosted agents are able to access the internet and resolve your TeamCity Cloud domain, you don't need to open up any inbound ports. TeamCity build agents use a unidirectional agent-to-server connection via the polling protocol, where the build agent establishes an HTTPS connection to the TeamCity Cloud server and polls the server periodically for server commands.
You can connect an unlimited number of self-hosted build agents to TeamCity Cloud and redeem build credits depending on how many concurrent builds you want to run on those self-hosted agents during each month. This means you could connect hundreds of self-hosted build agents: if, for example, you redeemed 100,000 build credits for five self-hosted build agent slots in a month, this would allow you to run builds on any five of those self-hosted build agents concurrently.
There are no per-minute charges for self-hosted builds. If you have very long-running builds or builds that require custom tools not available on our cloud build agents, you can reserve some self-hosted build agents for those more complex builds, and just use the cloud build agents for shorter or less complex builds.
Enable reuse of build results and incremental builds by configuring build chains
Rather than having a single large build configuration with many build steps, the build configuration could be split into separate (smaller) build configurations, and linked together in a build chain (also referred to as a build pipeline). For example, if a single build configuration currently contains steps for building, testing, and deploying a solution to a staging environment, you may choose to create three build configurations: Build, Test, and Deploy to Staging, and move each of the build steps into their own respective build configurations.
Defining snapshot dependencies on each of the build configurations links these build configurations together and sets up a build chain.
A build chain in TeamCity enables incremental builds and reuse of build results. For example, the Build and Test build configurations could complete successfully, but the Deploy to Staging could fail due to a temporary connection issue with the external staging environment. Rather than rerunning the entire build chain from scratch (and consuming more build credits), TeamCity will reuse the results from Build and Test (assuming there are no new VCS changes), and start the build chain from Deploy to Staging. This could reduce build credit consumption while also shortening the overall time it takes to deploy a project.
Pass artifacts to subsequent build configurations
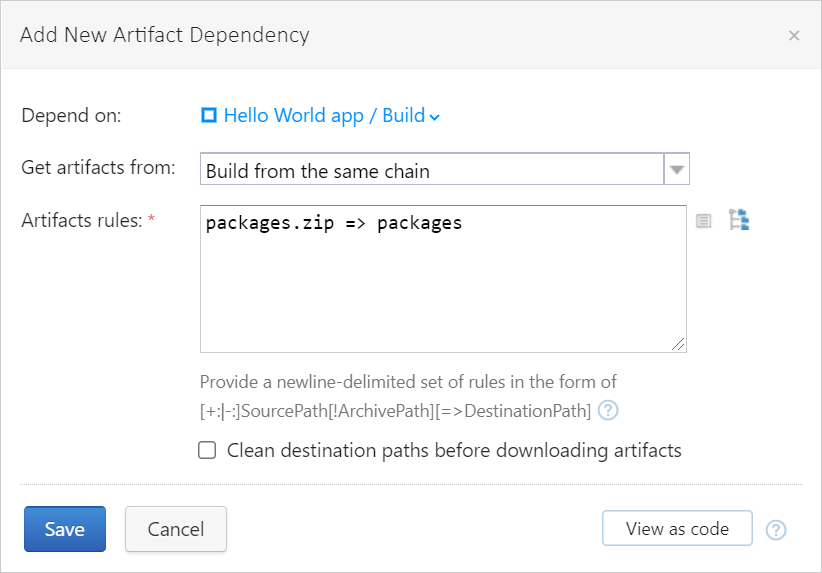
If you have multiple build configurations in a chain that use the same libraries or packages, you can pass them as artifacts throughout the chain. For example, if they use many npm packages, rather than running npm install on each build agent for each of those build configurations, you can archive the npm packages directory in the very first build configuration and store it as an artifact in TeamCity, to be used by subsequent build configurations.
You can also configure a build configuration to have an artifact dependency on itself (specifically on the last finished build), so you could archive the dependencies at the end of the build, upload the archive as a build artifact, and create an artifact dependency on the previous build in the same build configuration. This will enable future builds of the same build configuration to use the previously downloaded dependencies.
This can be accomplished through artifact dependencies. Depending on the number (and size) of the packages, this can help reduce time on subsequent builds in the build chain and prevent future builds from downloading all packages from scratch.
In this example, a new artifact dependency is being added to a build configuration that will automatically transfer the archived npm packages from a previous build in the build chain to the current build agent:
Prepay for extensively used build agents
If you have some particularly long-running builds or find yourself using a single type of cloud build agent for more than 125 hours a month, you can prepay for one or more instances of that type of cloud build agent and avoid any other per-minute fees. This is accomplished by redeeming a batch of credits each month.
While this approach offers a big saving on build credit consumption, it is important to note this comes at the trade-off of decreased concurrency. For example, if you prepaid for 5 build agents of a particular type, only a maximum of 5 of those types of agents can be running concurrently with the prepaid rate. Any further concurrent builds on the same type of agents will revert to the per-minute pricing.
Review automatically renewed resources
The TeamCity Cloud Subscription \& Resources page allows redeeming credits for additional resources: extra committer slots, prepaid agents, data storage, and concurrent builds on self-hosted agents. When you increase any of these resources, a certain number of credits are immediately deducted from your available balance for the current month.
For example, one additional concurrent build on a self-hosted agent costs 20,000 credits per month. If you redeem credits for this extra resource on the first day of the month, a total of 20,000 credits are deducted. Or, if you redeem credits for the extra resource at the middle of the month, the deduction would be prorated at ~10,000 credits for the remainder of the month.
Note: if you don't decrease these additional resources prior to the end of the month, the same resources will be applied the following month, and the applicable credits will be deducted for those resources for an entire one-month period. If you only require extra resources temporarily (for example, during a busier period) and you want to avoid redeeming credits for resources that you may not use the next month, we recommend decreasing the additional resources prior to the end of the current month.
You can even decrease the additional resources right after you've increased them (in case you forget to do it later), and these resources will only stay active through the remainder of the current month.
Choose right size for your subscription
When you acquire a new TeamCity Cloud subscription, or when it's time to renew, it is a good idea to closely review how many resources (build credits) are allocated to your TeamCity Cloud instance based on the number of committers in your subscription. This helps confirm whether you have an excessive amount of resources.
If you have an insufficient number of resources in your subscription, you may need to purchase additional build credits to top-up your account. This is more cost-effective than artificially increasing the committers on your subscription just to gain extra build credits, as you are paying for the committer slot, data storage, and data transfer when adding committers to your subscription. Unlike the build credits included in your subscription which reset at the end of each month, additionally purchased build credits rollover month-to-month if not fully used.
Contact Us
If you have any questions regarding the points raised in this article, or if you would like some assistance to review the structure of your TeamCity Cloud subscription, please reach out to our TeamCity Sales Engineering team who will be happy to advise you.