Cannot connect to a database
Step 1. Check your network settings
Databases can work locally, on a server, or in the cloud. For server and cloud databases, you need a network connection. To verify that the connection is available, use ping and telnet commands.
With the ping command, you can ensure that the destination computer is reachable from the source computer. Open a command line and type the following command: ping -a <host_IP>, where -a is a command option that resolves addresses to hostnames (if it is possible). If you use hostnames with the ping command, a hostname is resolved to the IP address. For example, ping -a example.com resolves to PING example.com (93.184.216.34).
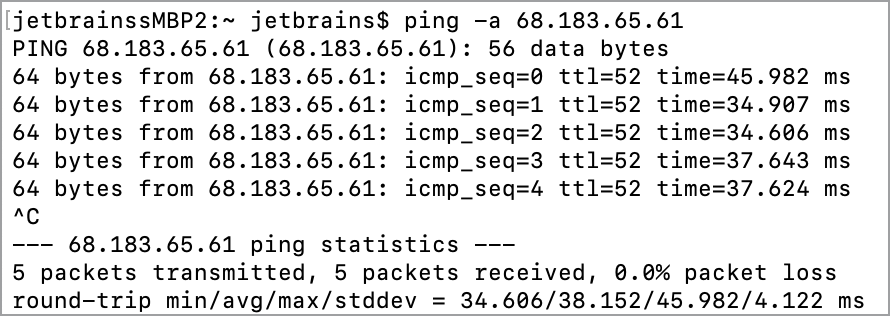
With the telnet command, you can test connectivity to remote computers and issue commands. If you specify a port as a parameter for the telnet command, you can test connectivity to a remote host on the given port. If the connection is successful, you see the message: Connected to <host_IP>.

Step 2. Check your connection properties
Each database (MySQL, PostgreSQL, Oracle, or any other vendor) has its own connection settings. Most databases include the connection settings:
Host: A hostname of a computer or another device that stores a database. It can be an IP address 127.0.0.1 or a domain name localhost.
Database: A name of the database to which you want to connect. You can find the database name in the settings of your database server, or you can ask your database administrator. In some cases, it is possible to run a query in a database command line to see the names of all available databases. For example, in MySQL you can run
SHOW DATABASES;.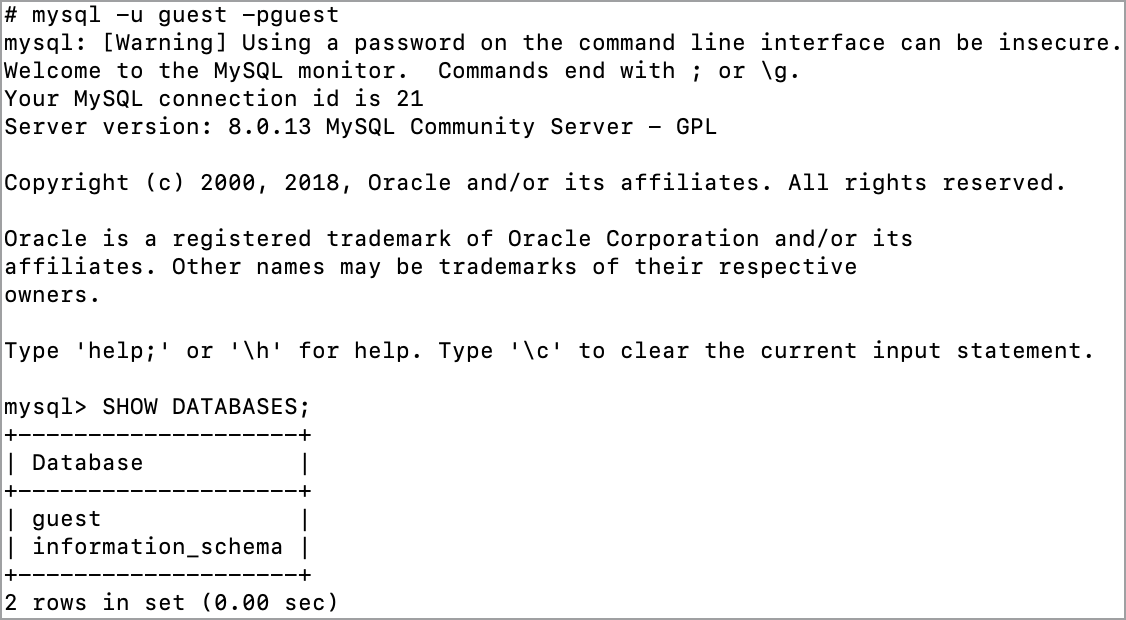
User: A name of a user that has enough privileges to perform actions with a database. Run a query in a database command line to see the names of all available databases. For example, in MySQL you can run
SHOW GRANTS;.
Password: A password of the user.
Port: A number that identifies a connection point between hosts. Hosts use port numbers to determine to which application, service, or process a connection must be established. Different database vendors use different ports for their databases. The following list is a list of default port numbers.
Vendor
Default port
Amazon Redshift
5439
Apache Derby
1527
Apache Cassandra
9042
Apache Hive
10000 (Hive Server2) or 9083 (Hive Metastore)
Azure SQL Database
1433
ClickHouse
8123
Couchbase Query Service Query Service
11210
Exasol
8563
Greenplum
5432
H2
8082
HSQLDB
9001
IBM Db2 LUW
50000
MariaDB
3306
Microsoft SQL Server
1433 (TCP), 1434 (UDP might be required)
MySQL
3306
Oracle
1521
PostgreSQL
5432
Snowflake
443
SQLite
None
Sybase ASE
5000
Vertica
5433
Verify that the connection settings for the selected data source are correct. For more information about creating and changing a data source, refer to Create a data source and Sessions.
Step 3. Check the driver version
With a JDBC driver, you can interact with a database management system (DBMS) from WebStorm. Each DBMS requires its own JDBC driver. Ensure that the driver version and the DBMS version are compatible with each other.
From WebStorm, you can download drivers for all supported vendors. You can check the full list of supported vendors in the Drivers list (). Alternatively, you can add your own driver to an existing vendor, or create a new driver entry for the vendor that is not on the Drivers list.
To open the Drivers list, in the Database tool window (), click the Data Source Properties icon or press Shift+Enter.
Download a driver and select the driver version
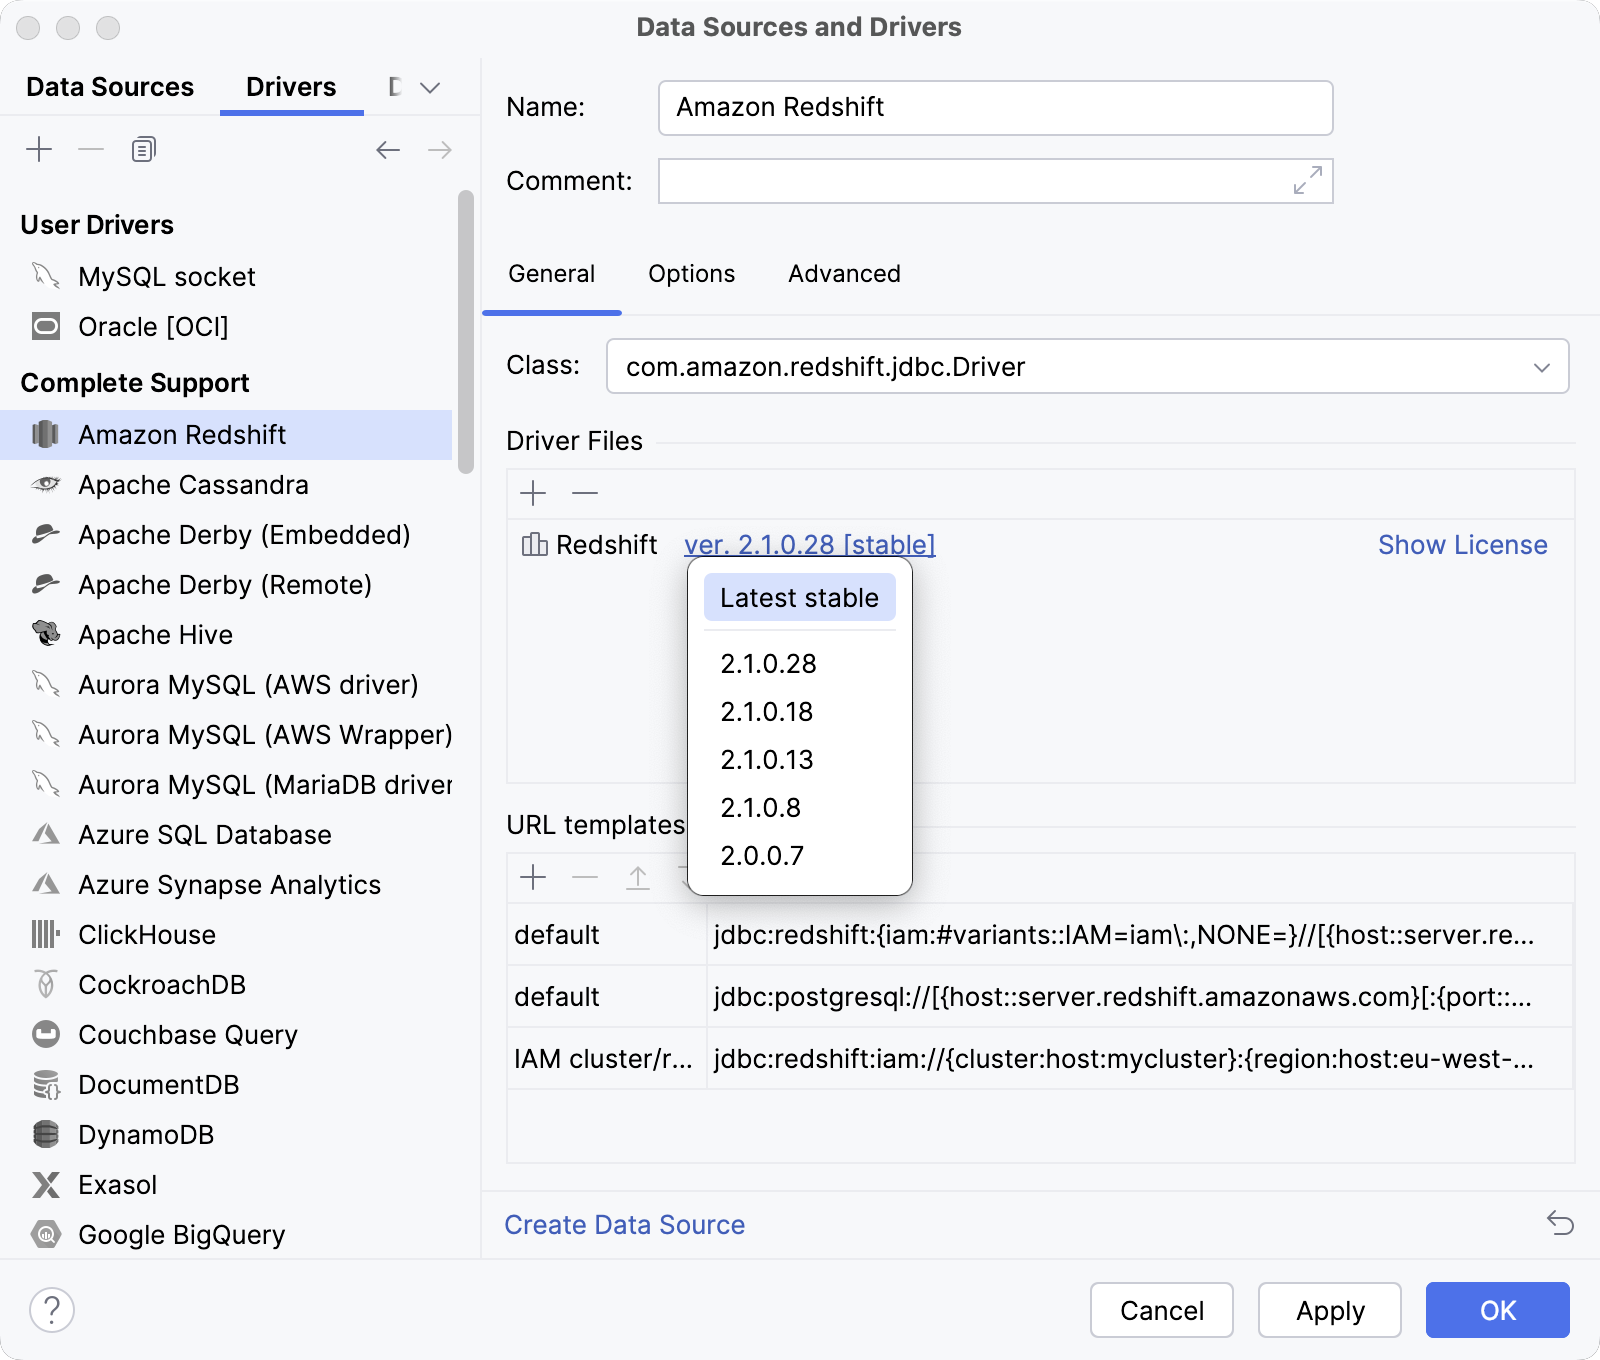
To download drivers from the JetBrains FTP server, select a vendor from the Drivers list, and click the Download ver. <version_number> link in the Driver files pane.
To change the driver version, click the ver. <version_number> link in the Driver files pane and select the driver version that you need.
Using user driver files
Open data source properties by doing one of the following:
On the Database tool window toolbar, click
Data Sources.
Press Shift+Enter.

In the Data Sources and Drivers dialog, ensure that you are on the Drivers tab.
In the Data Sources and Drivers dialog, click the Add icon (
).
In the Name field, type the name of the driver.
In the Driver Files pane, click the Add icon (
) and select Custom JARs.
Navigate to the JAR file of the JDBC driver, select it, and click OK.
In the Class field, specify the value that you want to use for the driver.
Click Apply.
To create a data source from the driver's dialog, click Create Data Source.
Configure a JDBC driver for an existing data source
You can add libraries to the existing driver or replace the driver completely.
To work properly, some JDBC drivers require a path to library files along with the driver. For more information about library paths, refer to Library paths for user drivers.
Open data source properties by doing one of the following:
On the Database tool window toolbar, click
Data Sources.
Press Shift+Enter.

Click the Driver link in data source settings and select Go to Driver.
Click the provided driver entry, and click Remove (
).
To revert changes, click the Roll back Changes icon (
) that is in the lower-right part of the window.
In the Driver Files pane, click the Add icon (
) and select Custom JARs.
In the file browser, navigate to the JAR file of the JDBC driver, select it, and click OK.
In the Class field, specify the value that you want to use for the driver.
Driver class is a driver-specific main class for a JDBC driver. For the proper driver class for the JDBC driver you use, refer to the driver's documentation.
If your custom driver requires an additional property, go to the Advanced tab in the dialog. In the properties pane, enter the additional property's name and value in the last row of Name and Value columns, where <user defined> and <value> are shown.
Click Apply.
Step 4. (Windows only) Check the temp directory path for non-ASCII characters
Currently, the temp directory path should not contain non-ASCII characters. If it does, you can fix the issue by doing one of the following:
Open the Windows Control Panel and navigate to or for Windows 10. In the Language for non-Unicode programs section, change the language to your local one.
For Java to use another temp directory path that contains only ASCII characters, in the IDE, go to and add
-Djava.io.tmpdir=<ASCII_characters_only_temp_directory_path>to the webstorm.vmoptions file.
Step 5. Check if the connection with SSH or SSL is required
To make a connection to a database more secure, some services require SSH or SSL usage.
SSL
The following procedure describes the SSL configuration that suits most databases. For some databases, you need to use another approach for a successful connection. You can see configuration examples for Cassandra and Heroku Postgres in the DataGrip documentation.
Connect to a database with SSL
Open data source properties by doing one of the following:
On the Database tool window toolbar, click
Data Sources.
Press Shift+Enter.

On the Data Sources tab, select a data source that you want to modify.
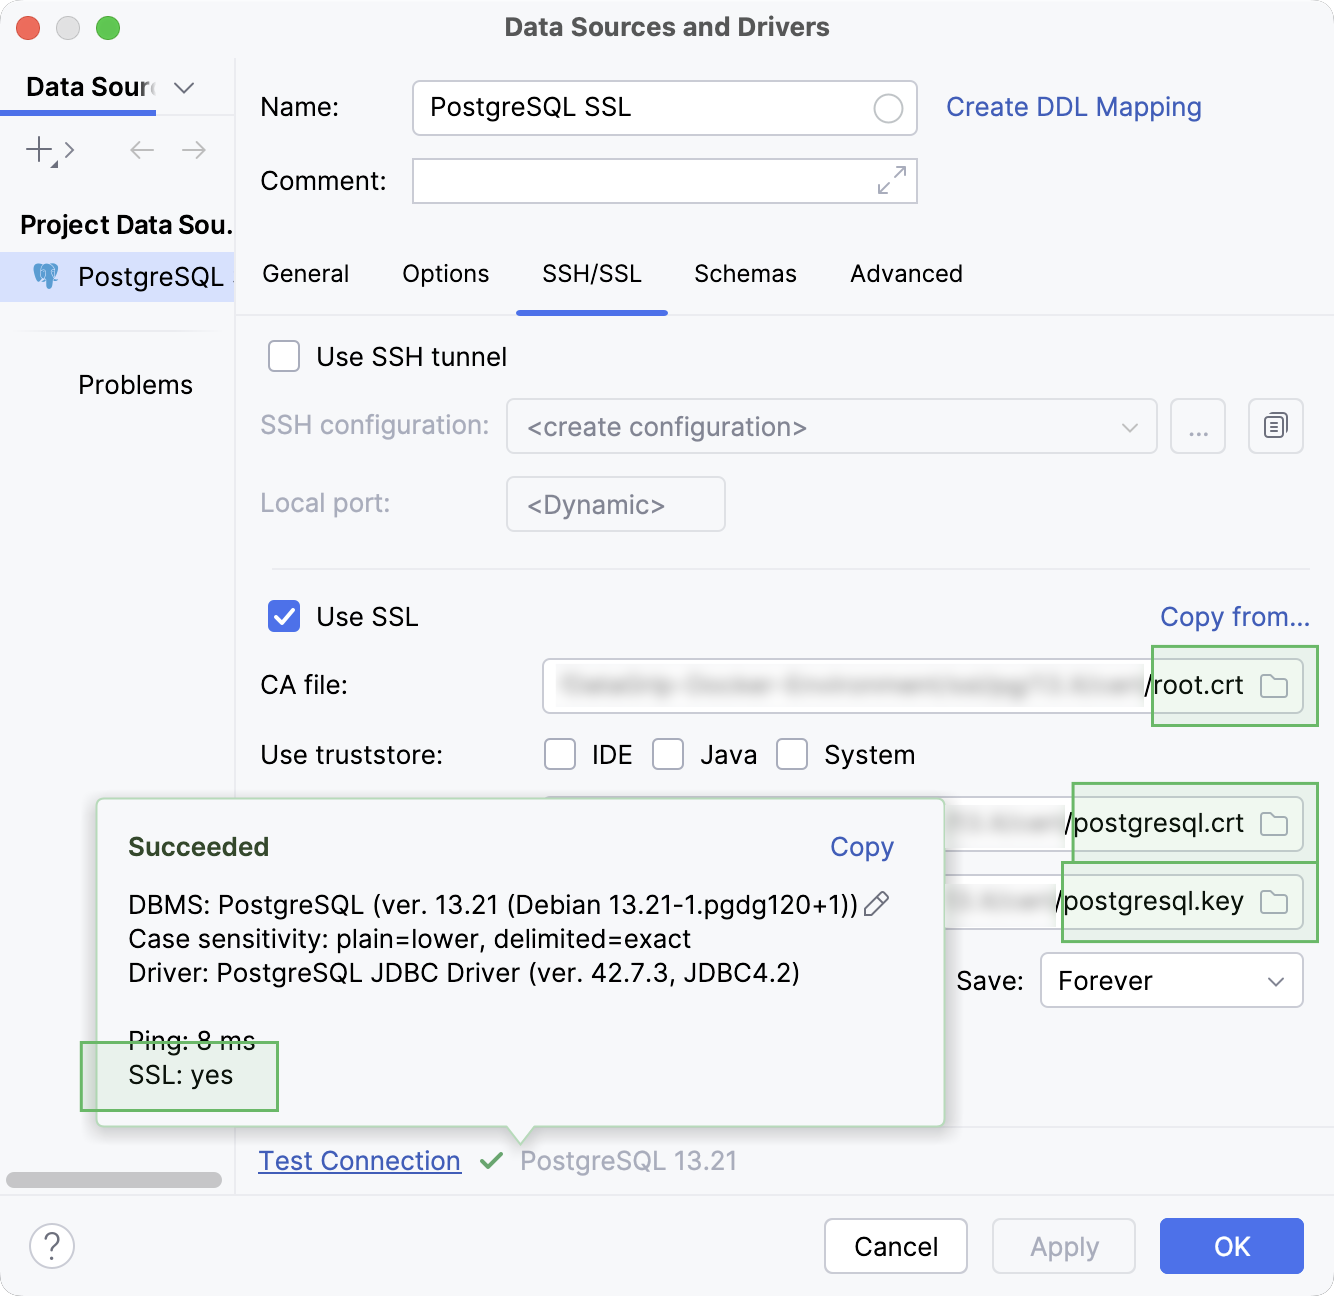
Click the SSH/SSL tab and select the Use SSL checkbox.
In the CA file field, navigate to the CA certificate file (for example, mssql.pem).
You can leave the certificate file fields empty and use a truststore to obtain a required certificate from the certificates that it contains. To do that, tick the Use truststore checkbox and select the truststore that you want to use.
IDE: Use the certificates that are accepted by the IDE. You can add new accepted certificates in .
JAVA: Use JAVA truststore certificates.
System: Use System truststore certificates.
In the Client certificate file field, navigate to the client certificate file (for example, client-cert.pem).
In the Client key file field, navigate to the client key file (for example, client-key.pem).
From the Mode list, select the verification mode:
Require
Verifies that the server recognizes the client certificate, if the certificate is provided.
Verify CA
Verifies that the server recognizes the client certificate, if the certificate is provided.
Verifies the server by checking the certificate chain up to the root certificate that is stored on the client.
Full Verification
Verifies that the server recognizes the client certificate, if the certificate is provided.
Verifies the server by checking the certificate chain up to the root certificate that is stored on the client.
Verifies the server host to ensure that it matches the name stored in the server certificate.
The SSL connection fails if either one of the certificates cannot be verified.
To ensure that the connection to the data source is successful, click Test Connection.
Disable SSL connection to a database
Open data source properties by doing one of the following:
On the Database tool window toolbar, click
Data Sources.
Press Shift+Enter.

On the Data Sources tab, select a data source that you want to modify.
Click the SSH/SSL tab and clear the Use SSL checkbox.
Click Apply.
Copy SSL settings from other data sources
If you configured SSL settings for one data source, you can copy them for another data source.
Open data source properties by doing one of the following:
On the Database tool window toolbar, click
Data Sources.
Press Shift+Enter.

On the Data Sources tab, select a data source that you want to modify.
Click the SSH/SSL tab and select the Use SSL checkbox.
Click the Copy from link and select the configuration that you want to copy.
SSH
Secure Shell or SSH is a network protocol that is used to encrypt a connection between a client and a server.
In WebStorm, you can create an SSH connection one of the following ways:
Using the WebStorm SSH tunnel. The IDE will create an SSH tunnel using the SSH configuration that you set.
Creating an SSH tunnel manually using PuTTy, Pageant, or ssh-client.
WebStorm SSH tunnel
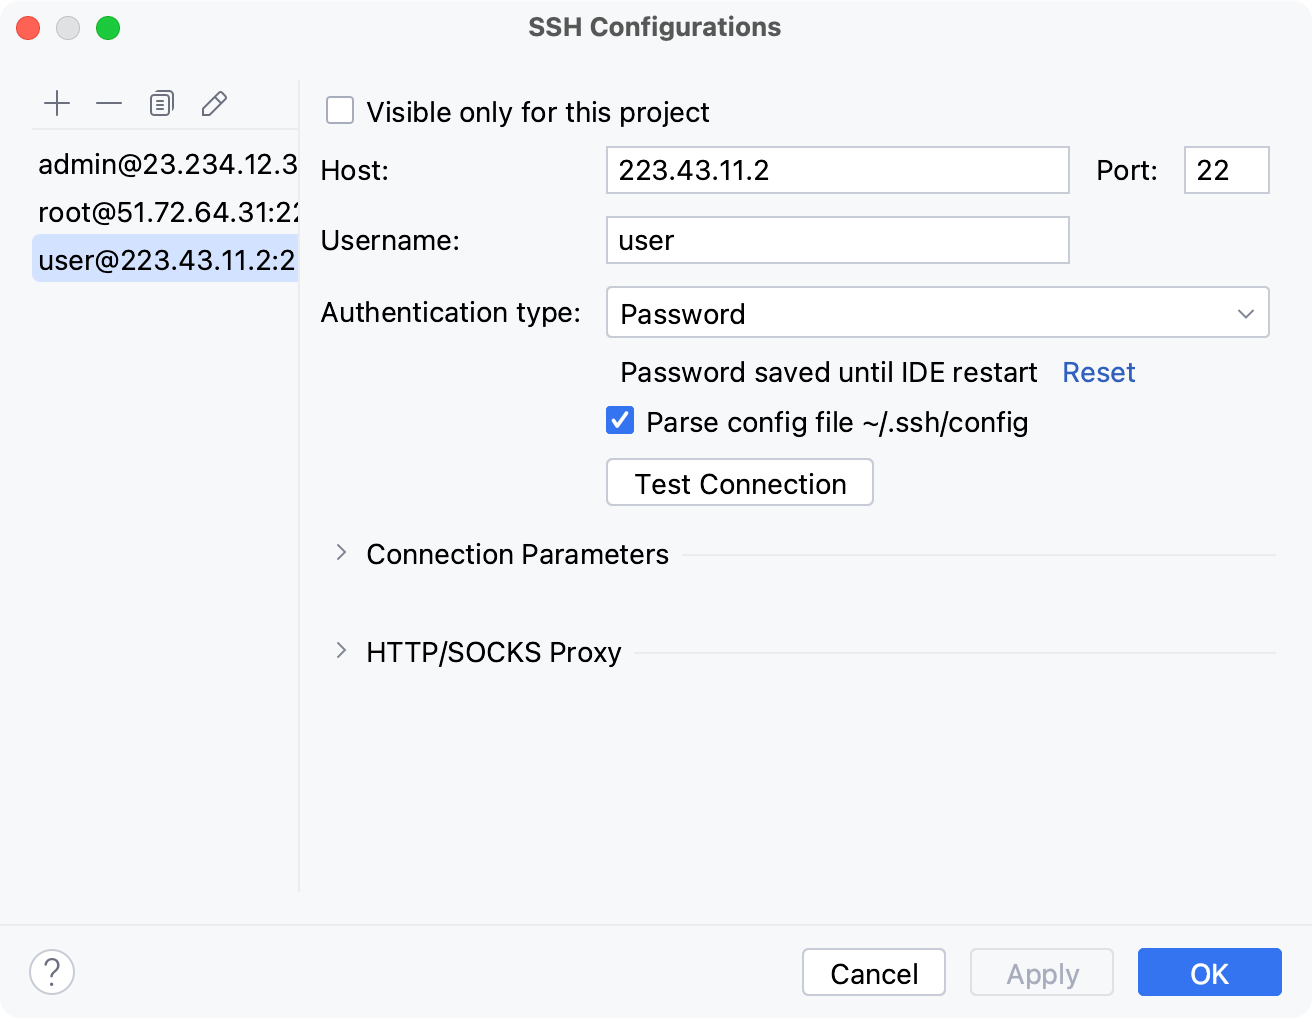
WebStorm can create an SSH tunnel based on the SSH configuration that you set. To access the SSH configuration settings, press Ctrl+Alt+S to open settings and select Tools | SSH Configuration.
To use an SSH tunnel for the data source, select the Use SSH tunnel checkbox in the SSH/SSL tab of Data Sources and Drivers dialog ( Shift+Enter) .
All created SSH connections are shared between all the data sources that you have in a project. If you do not want to share a connection between projects, select the Visible only for this project checkbox in the SSH connection settings.
Connect to a database with SSH
Open data source properties by doing one of the following:
On the Database tool window toolbar, click
Data Sources.
Press Shift+Enter.

Select a data source for which you want to set up an SSH connection.
Click the SSH/SSL tab and select the Use SSH tunnel checkbox.
Click
Add SSH configuration.
In the SSH Configurations dialog, click the Add button.
If you do not want to share the configuration between projects, select the Visible only for this project checkbox.
In the Host and Port fields, specify your connection details.
Enter your username in the Username field.
In this tutorial, we use encrypted private key file and public key file to authenticate. From the Authentication type list, you can select an authentication method:
Password: Access the host with a password. To save the password in WebStorm, select the Save password checkbox.
Key pair (OpenSSH or PuTTY): Use SSH authentication with a key pair. To apply this authentication method, you must have a private key on the client machine and a public key on the remote server. WebStorm supports private keys that are generated with the OpenSSH utility.
Specify the path to the file where your private key is stored and type the passphrase (if any) in the corresponding fields. To have WebStorm remember the passphrase, select the Save passphrase checkbox.
OpenSSH config and authentication agent: Use a credentials helper application that manages your SSH keys, such as ssh-agent or Pageant (Windows only).
Click Test Connection to run a test connection.
In the SSH Configurations dialog, click OK to confirm the new SSH configuration settings.
In the Local port field of Data Sources and Drivers dialog, specify the local port number from which you want to forward the connection. Otherwise, WebStorm selects the port dynamically.
Click the Test Connection link at the bottom of the connection details area to initiate a test connection to your database.

Click OK to create the data source.
Examples
For examples of connecting to databases with SSH, refer to the Connect to a database with SSH topic.
Disable SSH connection to a database
Open data source properties by doing one of the following:
On the Database tool window toolbar, click
Data Sources.
Press Shift+Enter.

Select a data source profile where you want to change connection settings.
Click the SSH/SSL tab and clear the Use SSH tunnel checkbox.
Click Apply.
Create SSH tunnel manually
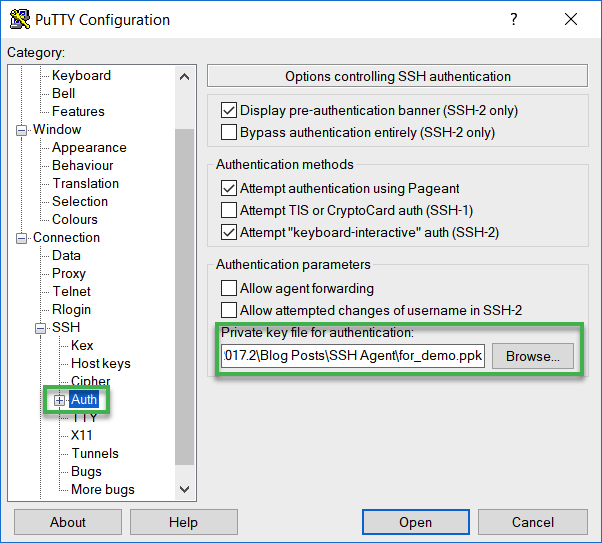
Create the SSH tunnel with PuTTY (Windows)
Download and run the latest version of the PuTTY SSH and Telnet client (download the client from https://www.putty.org/).
In the PuTTY Configuration dialog, navigate to .
In the Private key file for authentication field, specify the path to your private key file and click Open.
In the command line window, specify the username that you use for the SSH tunnel and press Enter. Do not close the command line window.
In the Database tool window, click the Data Source Properties icon
on the toolbar.
Select a data source profile where you want to change connection settings.
Click the SSH/SSL tab and select the Use SSH tunnel checkbox.
From the Auth type list, select OpenSSH config and authentication agent.
In Proxy host, Proxy user, and Port fields, specify connection details.
To ensure that the connection to the data source is successful, click Test Connection.
Create the SSH tunnel with Pageant (Windows)
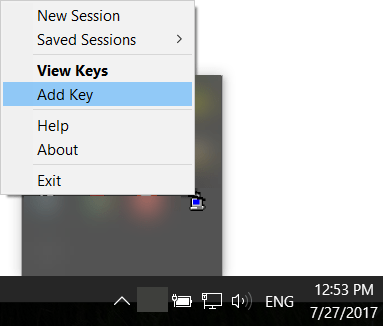
Pageant is an SSH authentication agent for PuTTY, PSCP, PSFTP, and Plink. Pageant stores your private key, and as long as it is running, it provides the unlocked private key to PuTTY or other tools like WebStorm. You can find the Pageant icon in the Windows taskbar.
Download the latest version of Pageant (download the client from https://www.putty.org/).
In the Windows taskbar, right-click the Pageant icon and select Add Key.
In the Select Private Key File dialog, navigate to the private key file (the PPK file) and click Open.
(Optional) Enter the private key passphrase and press Enter.
In the Database tool window, click the Data Source Properties icon
on the toolbar.
Select a data source profile where you want to change connection settings.
Click the SSH/SSL tab and select the Use SSH tunnel checkbox.
From the Auth type list, select OpenSSH config and authentication agent.
In Proxy host, Proxy user, and Port fields, specify connection details.
To ensure that the connection to the data source is successful, click Test Connection.
Create the SSH tunnel with the ssh-agent (macOS and Linux)
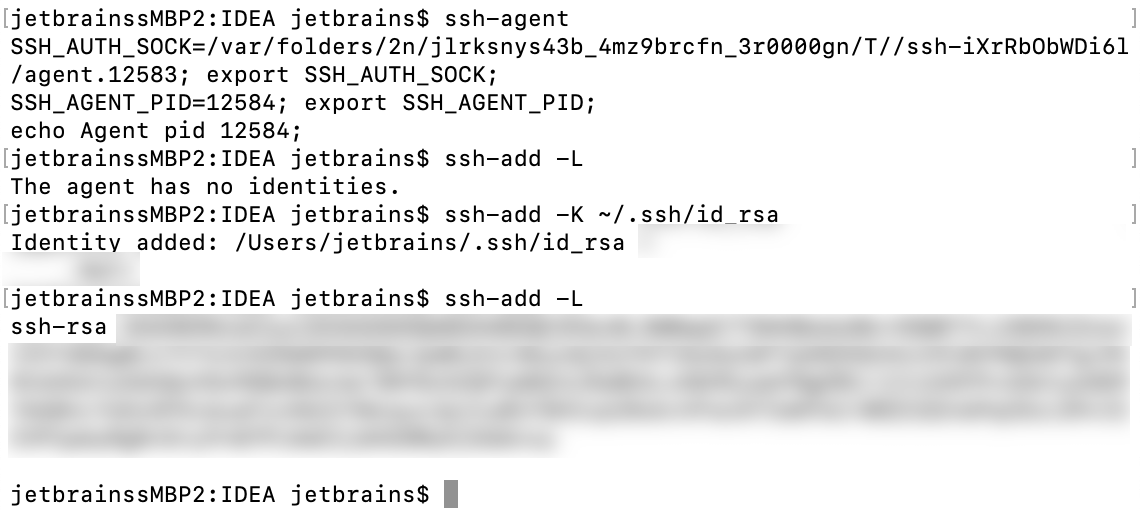
Run all commands for ssh-agent in the command line.
Ensure that ssh-agent is running.
ssh-agentAdd your key to the agent (in the following example, the key path is ~/.ssh/id_rsa).
ssh-add ~/.ssh/id_rsa(Optional) On macOS, you can add
-Koption to thessh-addcommand to store passphrases in your keychain. On macOS Sierra and later, you need to create the config file in ~/.ssh/ with the following text:Host * UseKeychain yes AddKeysToAgent yes IdentityFile ~/.ssh/id_rsaIf you have other private keys in the .ssh directory, add an
IdentityFileline for each key. For example, if the second key has the id_ed25519 name, addIdentityFile ~/.ssh/id_ed25519as an additional line for the second private key.List all added keys.
ssh-add -LIn the Database tool window, click the Data Source Properties icon
on the toolbar.
Select a data source profile where you want to change connection settings.
Click the SSH/SSL tab and select the Use SSH tunnel checkbox.
From the Auth type list, select OpenSSH config and authentication agent.
In Proxy host, Proxy user, and Port fields, specify connection details.
To ensure that the connection to the data source is successful, click Test Connection.
Step 6. Write to us if you still need help
Write to the WebStorm team
Email our team at webstorm-support@jetbrains.com. Describe your problem, and attach all available materials that can speed up troubleshooting (code samples, screenshots, logs, animations, videos, and other materials).
For more information about other troubleshooting sources, refer to Support and assistance.