Mail Server Connections
Mail server connections let you process messages sent to a business email address that is hosted under your own domain.
This option is suitable for companies that already have their own server for processing email traffic. This set up is best performed in coordination with a system administrator.
If you already have a customer-facing email address and want to manage messages sent to this address in this helpdesk project, consider using email forwarding instead. For details, see Email Forwarding.
Set Up a Mail Server Connection
To set up this type of email channel, you need to connect to one or more mail servers.
For YouTrack Cloud, you can set up a connection with a default mailbox. This configuration processes messages sent to a dedicated email address associated with your YouTrack instance.
With the default mailbox configuration, you don't need an external mail server, and the settings are predefined, so you don't need to configure anything.
For details, see YouTrack Cloud.
For Gmail, there are special requirements for the account that you use to connect to the mail service. For details, see Gmail.
For Microsoft Exchange Server and Microsoft Exchange Online (Office 365) mailboxes, additional setup is required. To configure your mail service to be compatible with a helpdesk project, read and follow the instructions for Microsoft Exchange Online or Microsoft Exchange Server.
Google accounts have settings that restrict access to third-party applications that use less secure sign-in technology. By their definition, this applies to connections that authenticate with a username and password, which are vulnerable to hijacking.
The setup requirements are based on the current setting for managing less secure apps. The requirements apply to the Google account that you use to authenticate with the Gmail service.
If you're connecting with a Google account that you manage yourself, generate an application-specific password (App Password) in your Google account and use it for authentication. Leave the option to enable access for less secure apps in your Google account Off.
App Passwords can only be used with accounts that have 2-Step Verification turned on.
If you use a Google account that is managed by your organization as part of Google Workspace, make sure that the option to Disable access to less secure apps is switched on.
The Google account that you store in the channel settings must have 2-Step Verification enabled. To connect to the Gmail service with this account, generate an application-specific password in your Google account.
For the Username, enter the username for your Google account.
For the Password, enter an application-specific password that you generated in Google.
While you may still allow access to less secure apps, Google has indicated that it will eventually discontinue support for this type of authentication. We strongly encourage you to enable 2-Step Verification and use an App Password to authenticate with the Gmail service.
To connect to a Gmail mailbox:
Click the Projects link in the application header.
Locate your helpdesk project in the list.
Open the options menu for the project, then select Channels.
Select the Email channel.
Click the New email channel button.
The New Email Channel dialog opens.
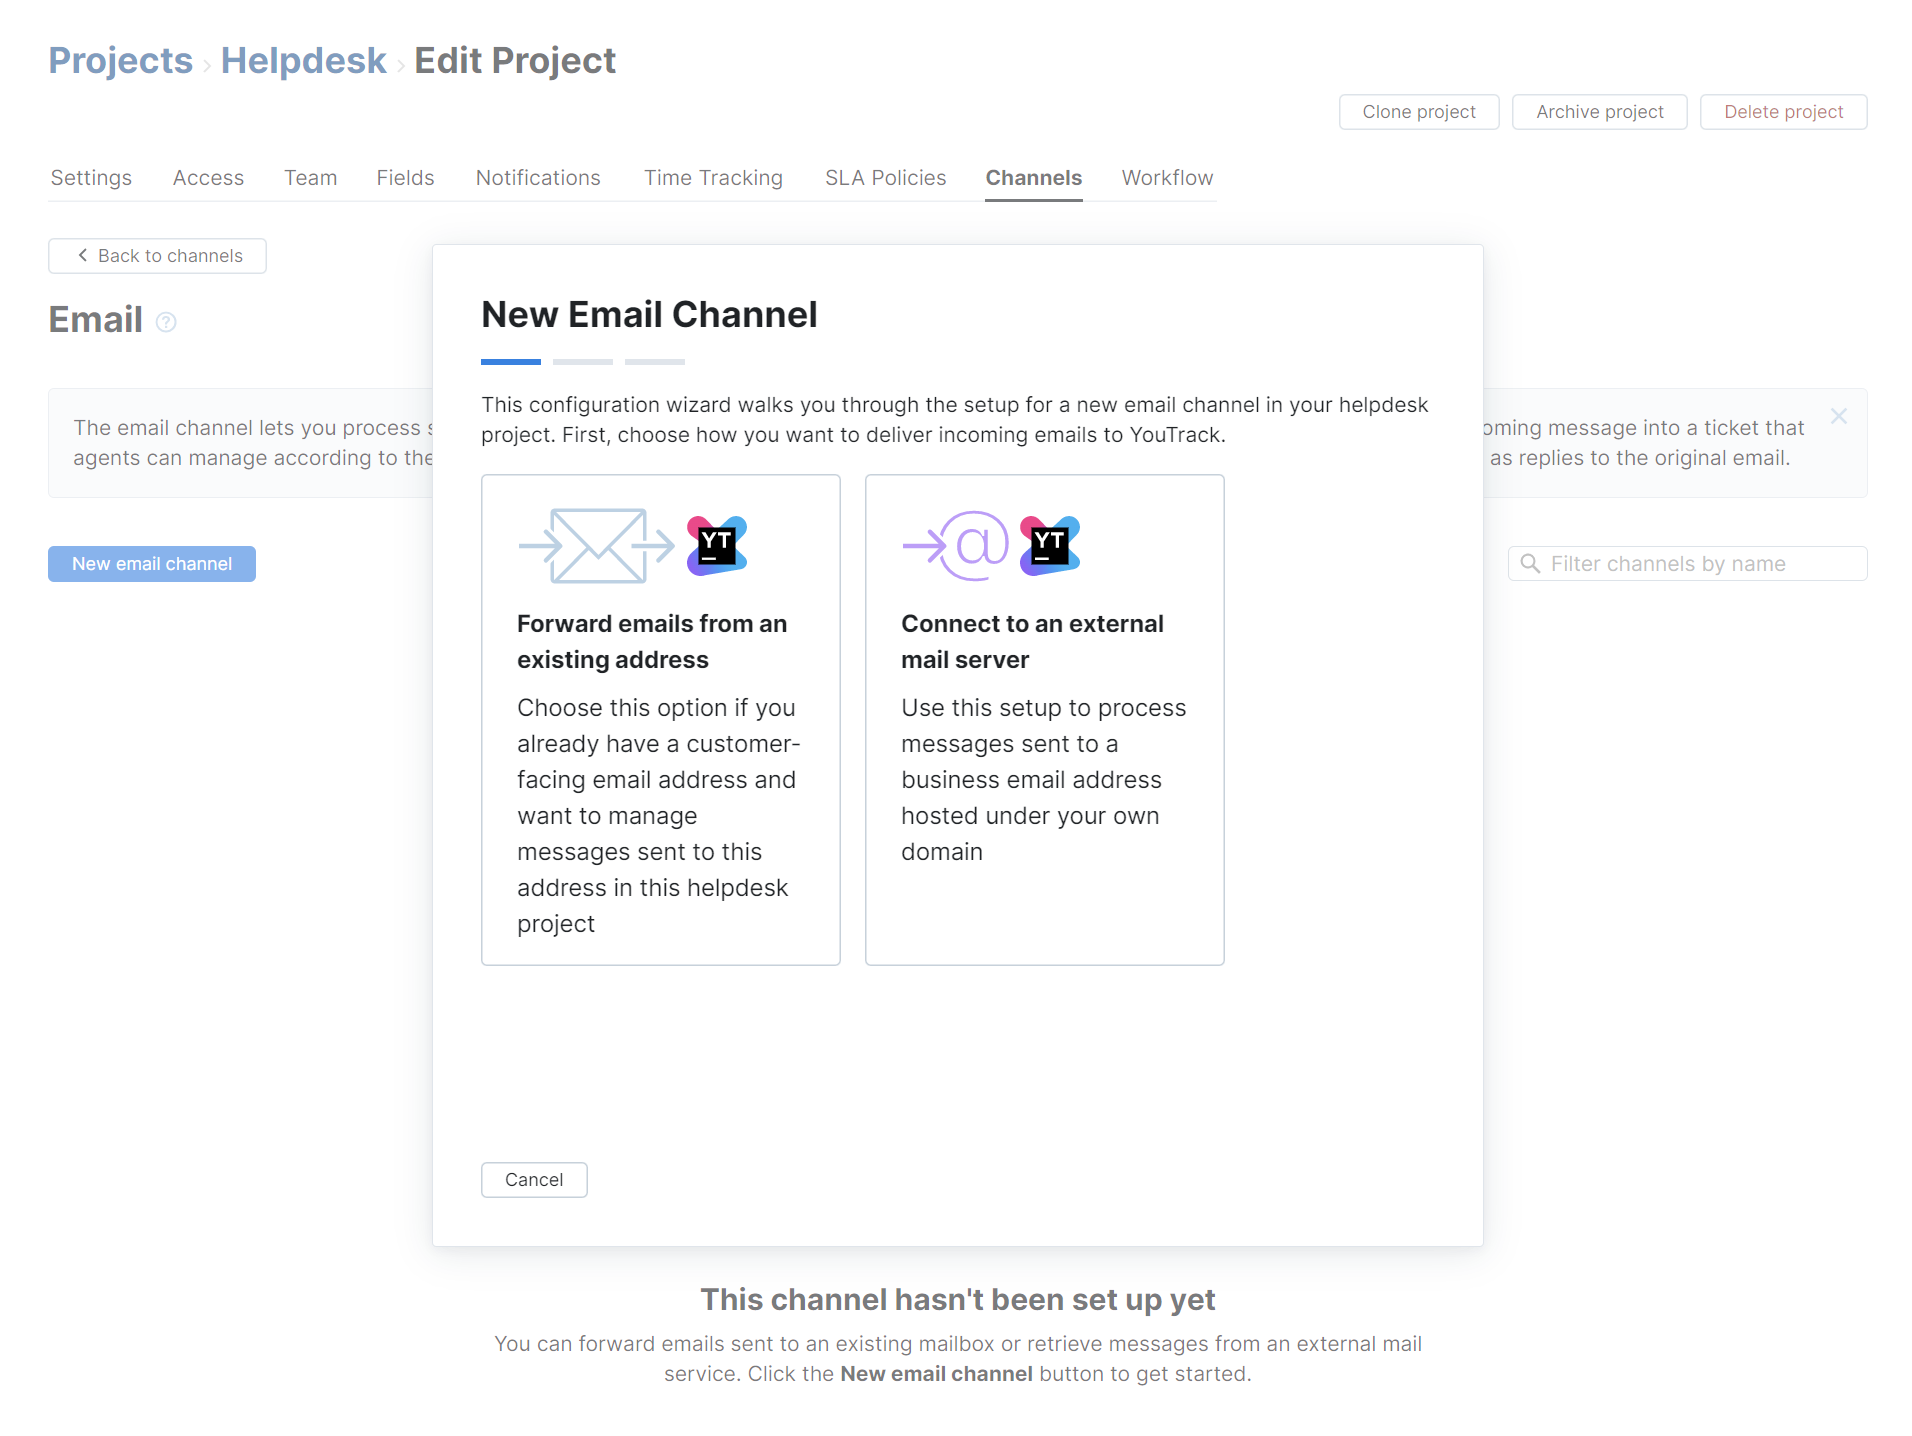
Select the Connect to an external mail server option.
The setup wizard opens to the New Mail Server Connection dialog.
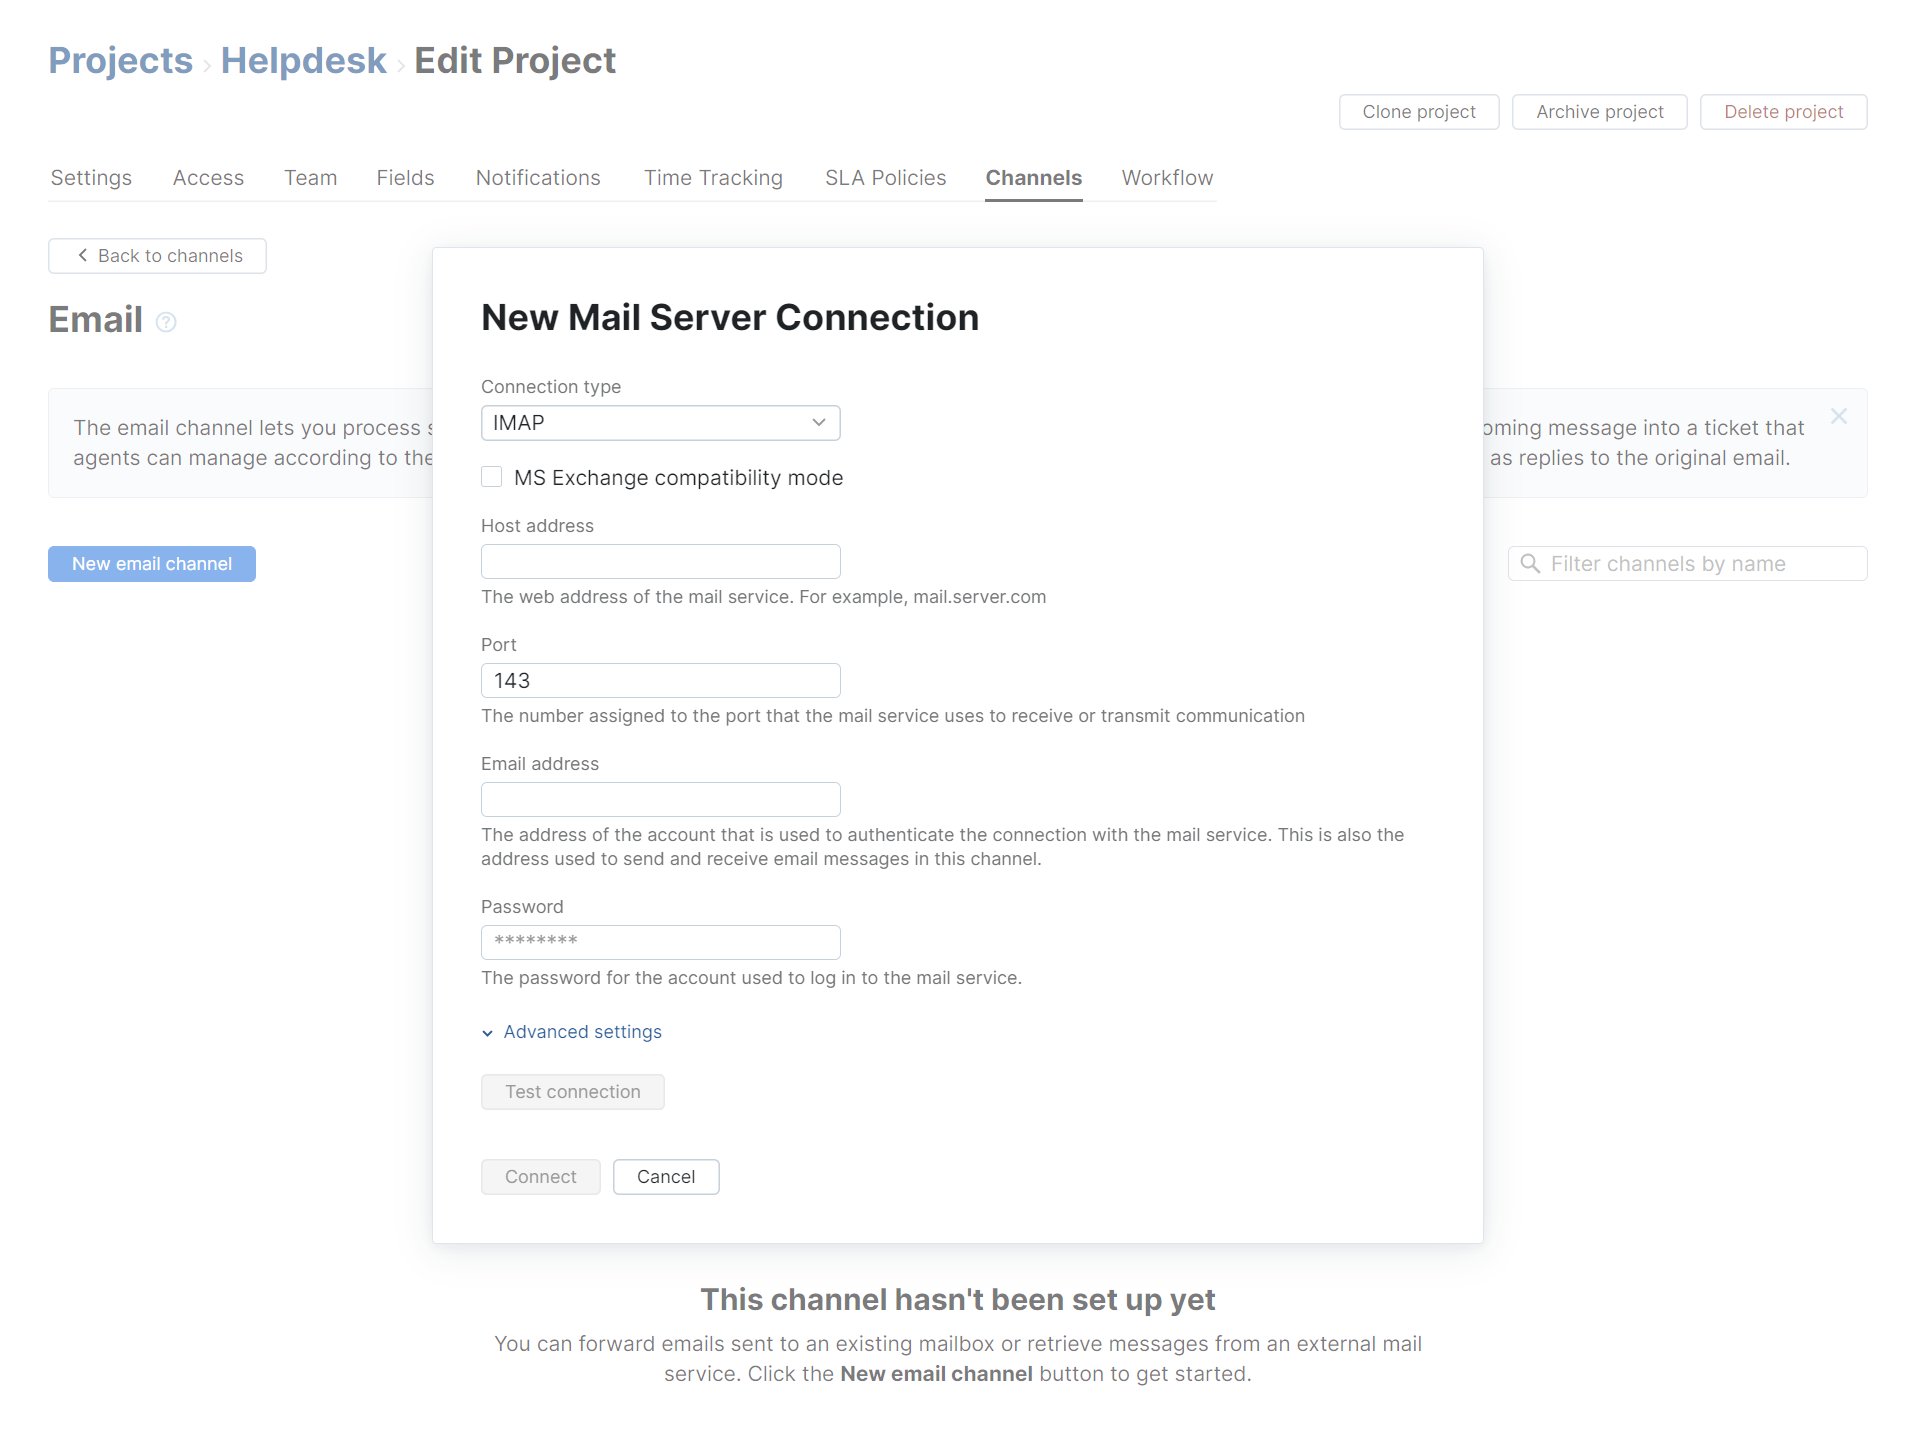
Enter values for the following settings:
Setting
Description
Connection type
Select the protocol that you want to use for the connection. Gmail supports the POP/POPS and IMAP/IMAPS protocols. However, YouTrack has deprecated support for POP3/POP3S connections.
Host address
Enter the URL of the mail service. For example,
imap.gmail.com.Port
Enter the port that the mail service listens to. The default port is set automatically when you select the mail server protocol.
Email address
Enter the email address of the account that authorizes access to the mail service.
Password
Enter the password for the account that you use to log in to the Gmail service.
Expand the Advanced settings section and configure the following optional settings:
Setting
Description
SSL key
For connections with Gmail, you can ignore this setting. Connections with the Gmail service are automatically authenticated using TLS.
Connection timeout
Set the maximum amount of time to wait for complete data transfer from the mail service before closing the connection. The default value is set to 60 seconds.
Socket timeout
Set the maximum amount of time to wait for a response from the mail service before disconnecting the socket. The default value is set to 60 seconds.
Click the Test connection button to verify the configuration. If the connection cannot be established, correct your settings and test the connection again.
Click the Connect button.
The channel settings settings are saved.
Use the following instructions to configure a connection with a generic mail service.
To connect to a generic mail service:
Click the Projects link in the application header.
Locate your helpdesk project in the list.
Open the options menu for the project, then select Channels.
Select the Email channel.
Click the New email channel button.
The New Email Channel dialog opens.

Select the Connect to an external mail server option.
The setup wizard opens to the New Mail Server Connection dialog.

Enter values for the following settings:
Setting
Description
Connection type
Select the protocol that is used by the mail server. The email channel supports IMAP/IMAPS protocols. Support for POP3/POP3S is deprecated.
Host address
Enter the URL of the mail service. For example,
mail.server.com.Port
Enter the port that the mail service listens to. The default port is set automatically when you select the mail server protocol.
Email address
Enter the email address of the account that authorizes access to the mail service.
Password
Enter the password for the account that you use to log in to the mail service.
Expand the Advanced settings section and configure the following optional settings:
Setting
Description
SSL key
If your mail server requires client SSL authentication, select the SSL key that identifies your YouTrack server from the list.
The list only displays SSL keys that have already been imported into YouTrack. To learn how to generate and upload SSL keys, see SSL Keys.
Connection timeout
Set the maximum amount of time to wait for complete data transfer from the mail service before closing the connection. The default value is set to 60 seconds.
Socket timeout
Set the maximum amount of time to wait for a response from the mail service before disconnecting the socket. The default value is set to 60 seconds.
Click the Test connection button to verify the configuration. If the connection cannot be established, correct your settings and test the connection again.
Click the Connect button.
The email channel settings are saved.
A connection with Microsoft Exchange Online (also commonly known as Exchange Online, Office 365, or Microsoft 365) requires that you perform the following actions:
First, you need to register an application in the Microsoft Azure portal. This gives you access to a client ID and client secret that you will use to re-connect to the Exchange Online service. For more information, see Register a Client Application in Microsoft Azure.
Add the requisite API permissions to the client app. For details, see Add the Required Permissions to the Client App.
Configure the email channel in YouTrack to use the settings for Microsoft Exchange Online. For instructions, see Update the Mailbox Integration Settings in YouTrack.
Register a Client Application in Microsoft Azure
This setup requires that you meet the following prerequisites:
A valid license for Microsoft Exchange Online.
Administrative access to Microsoft Azure Active Directory (AD).
To complete the migration, you will need to obtain the following information from the Microsoft platform:
The email address of the mailbox where you want to retrieve incoming messages. This mailbox must belong to the same Azure AD service where you register the app.
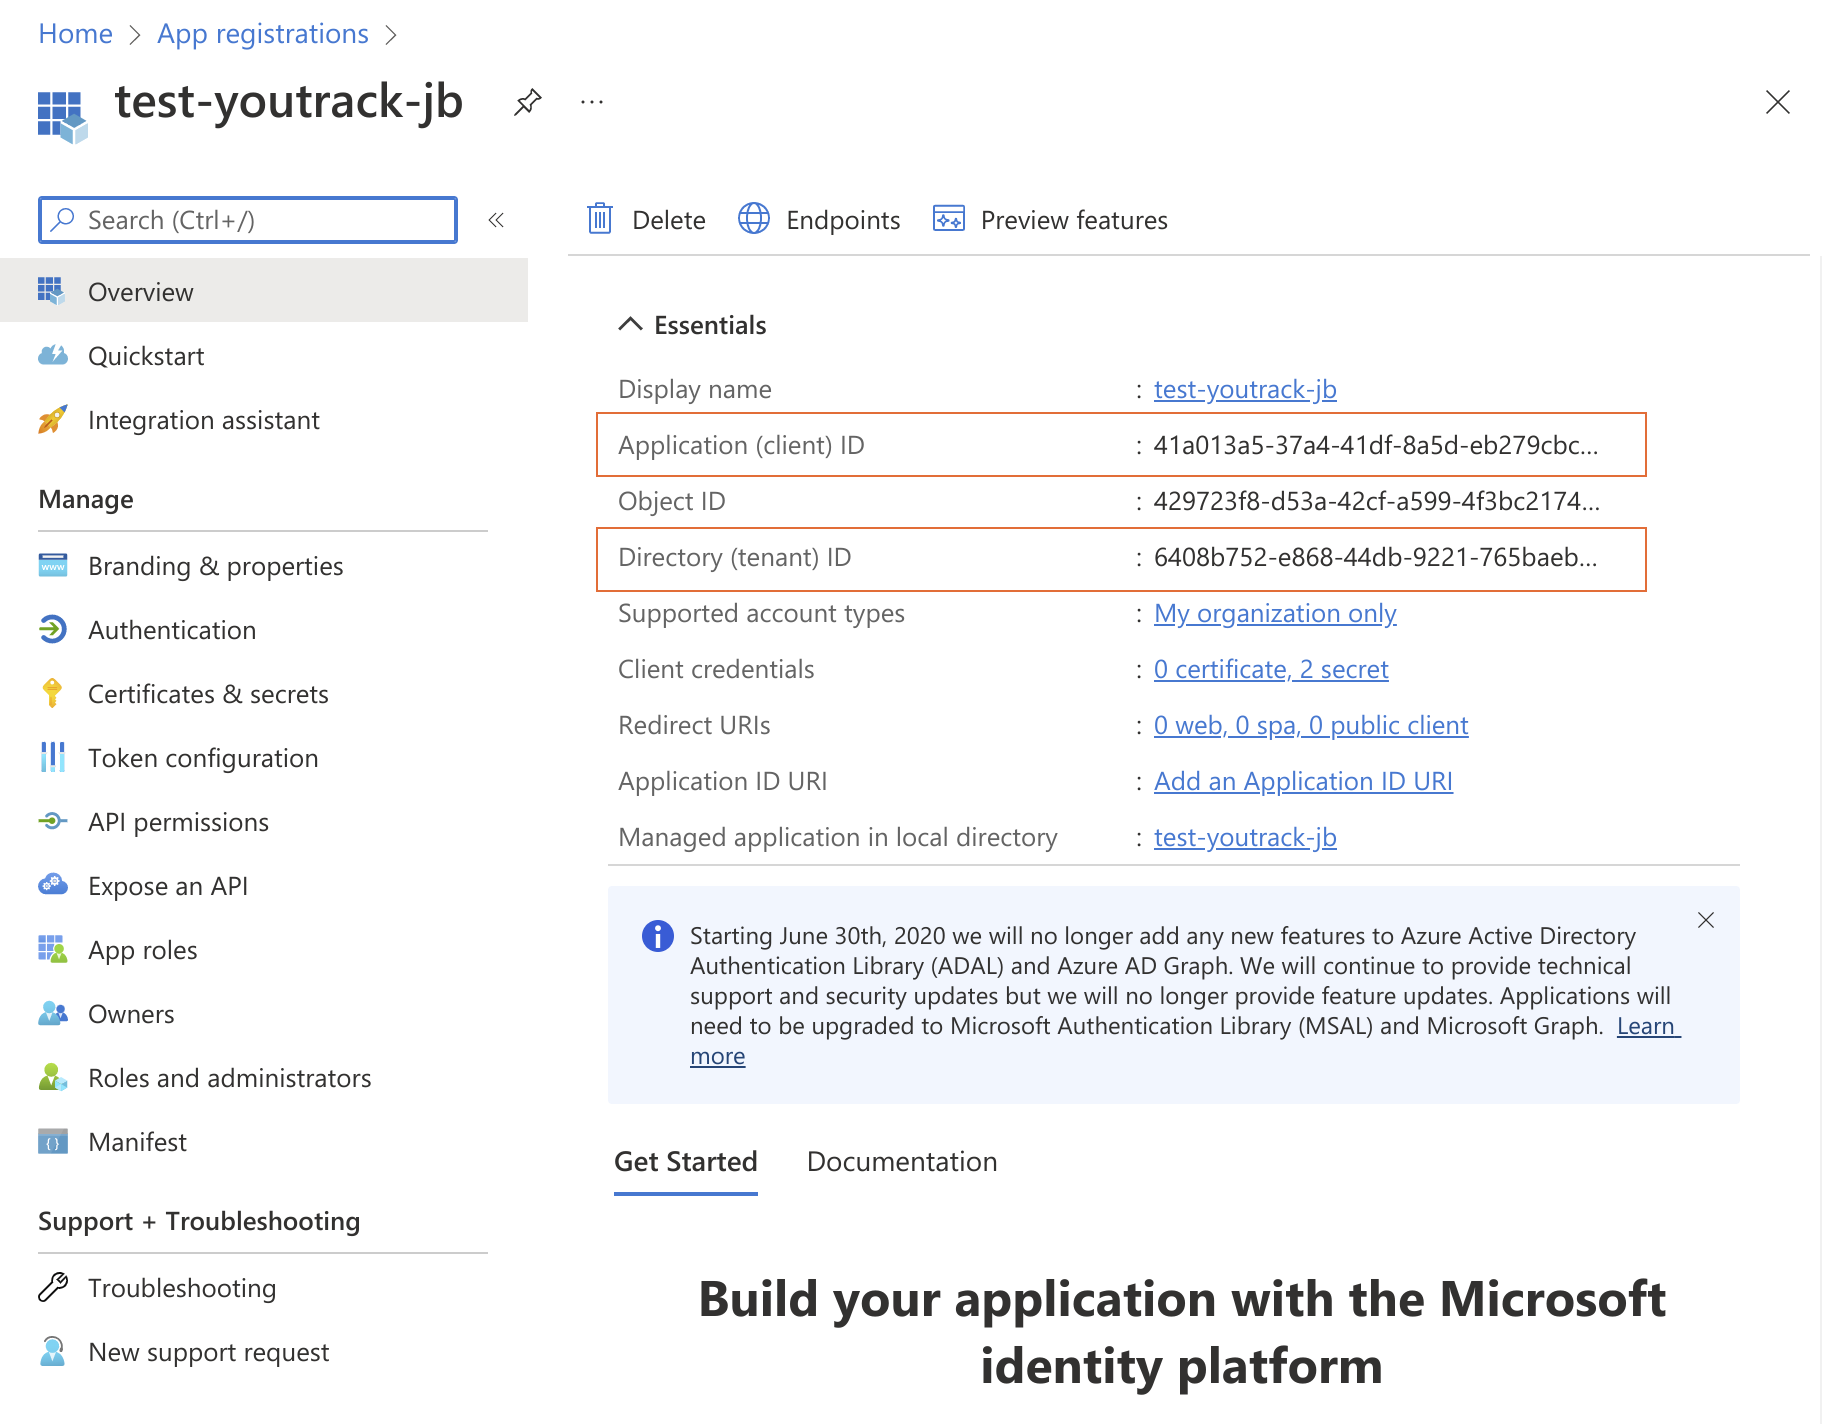
The Application (client) ID of the app that is registered in the Microsoft Azure portal.
The Directory (tenant) tenant ID of your Azure Active Directory tenant organization.
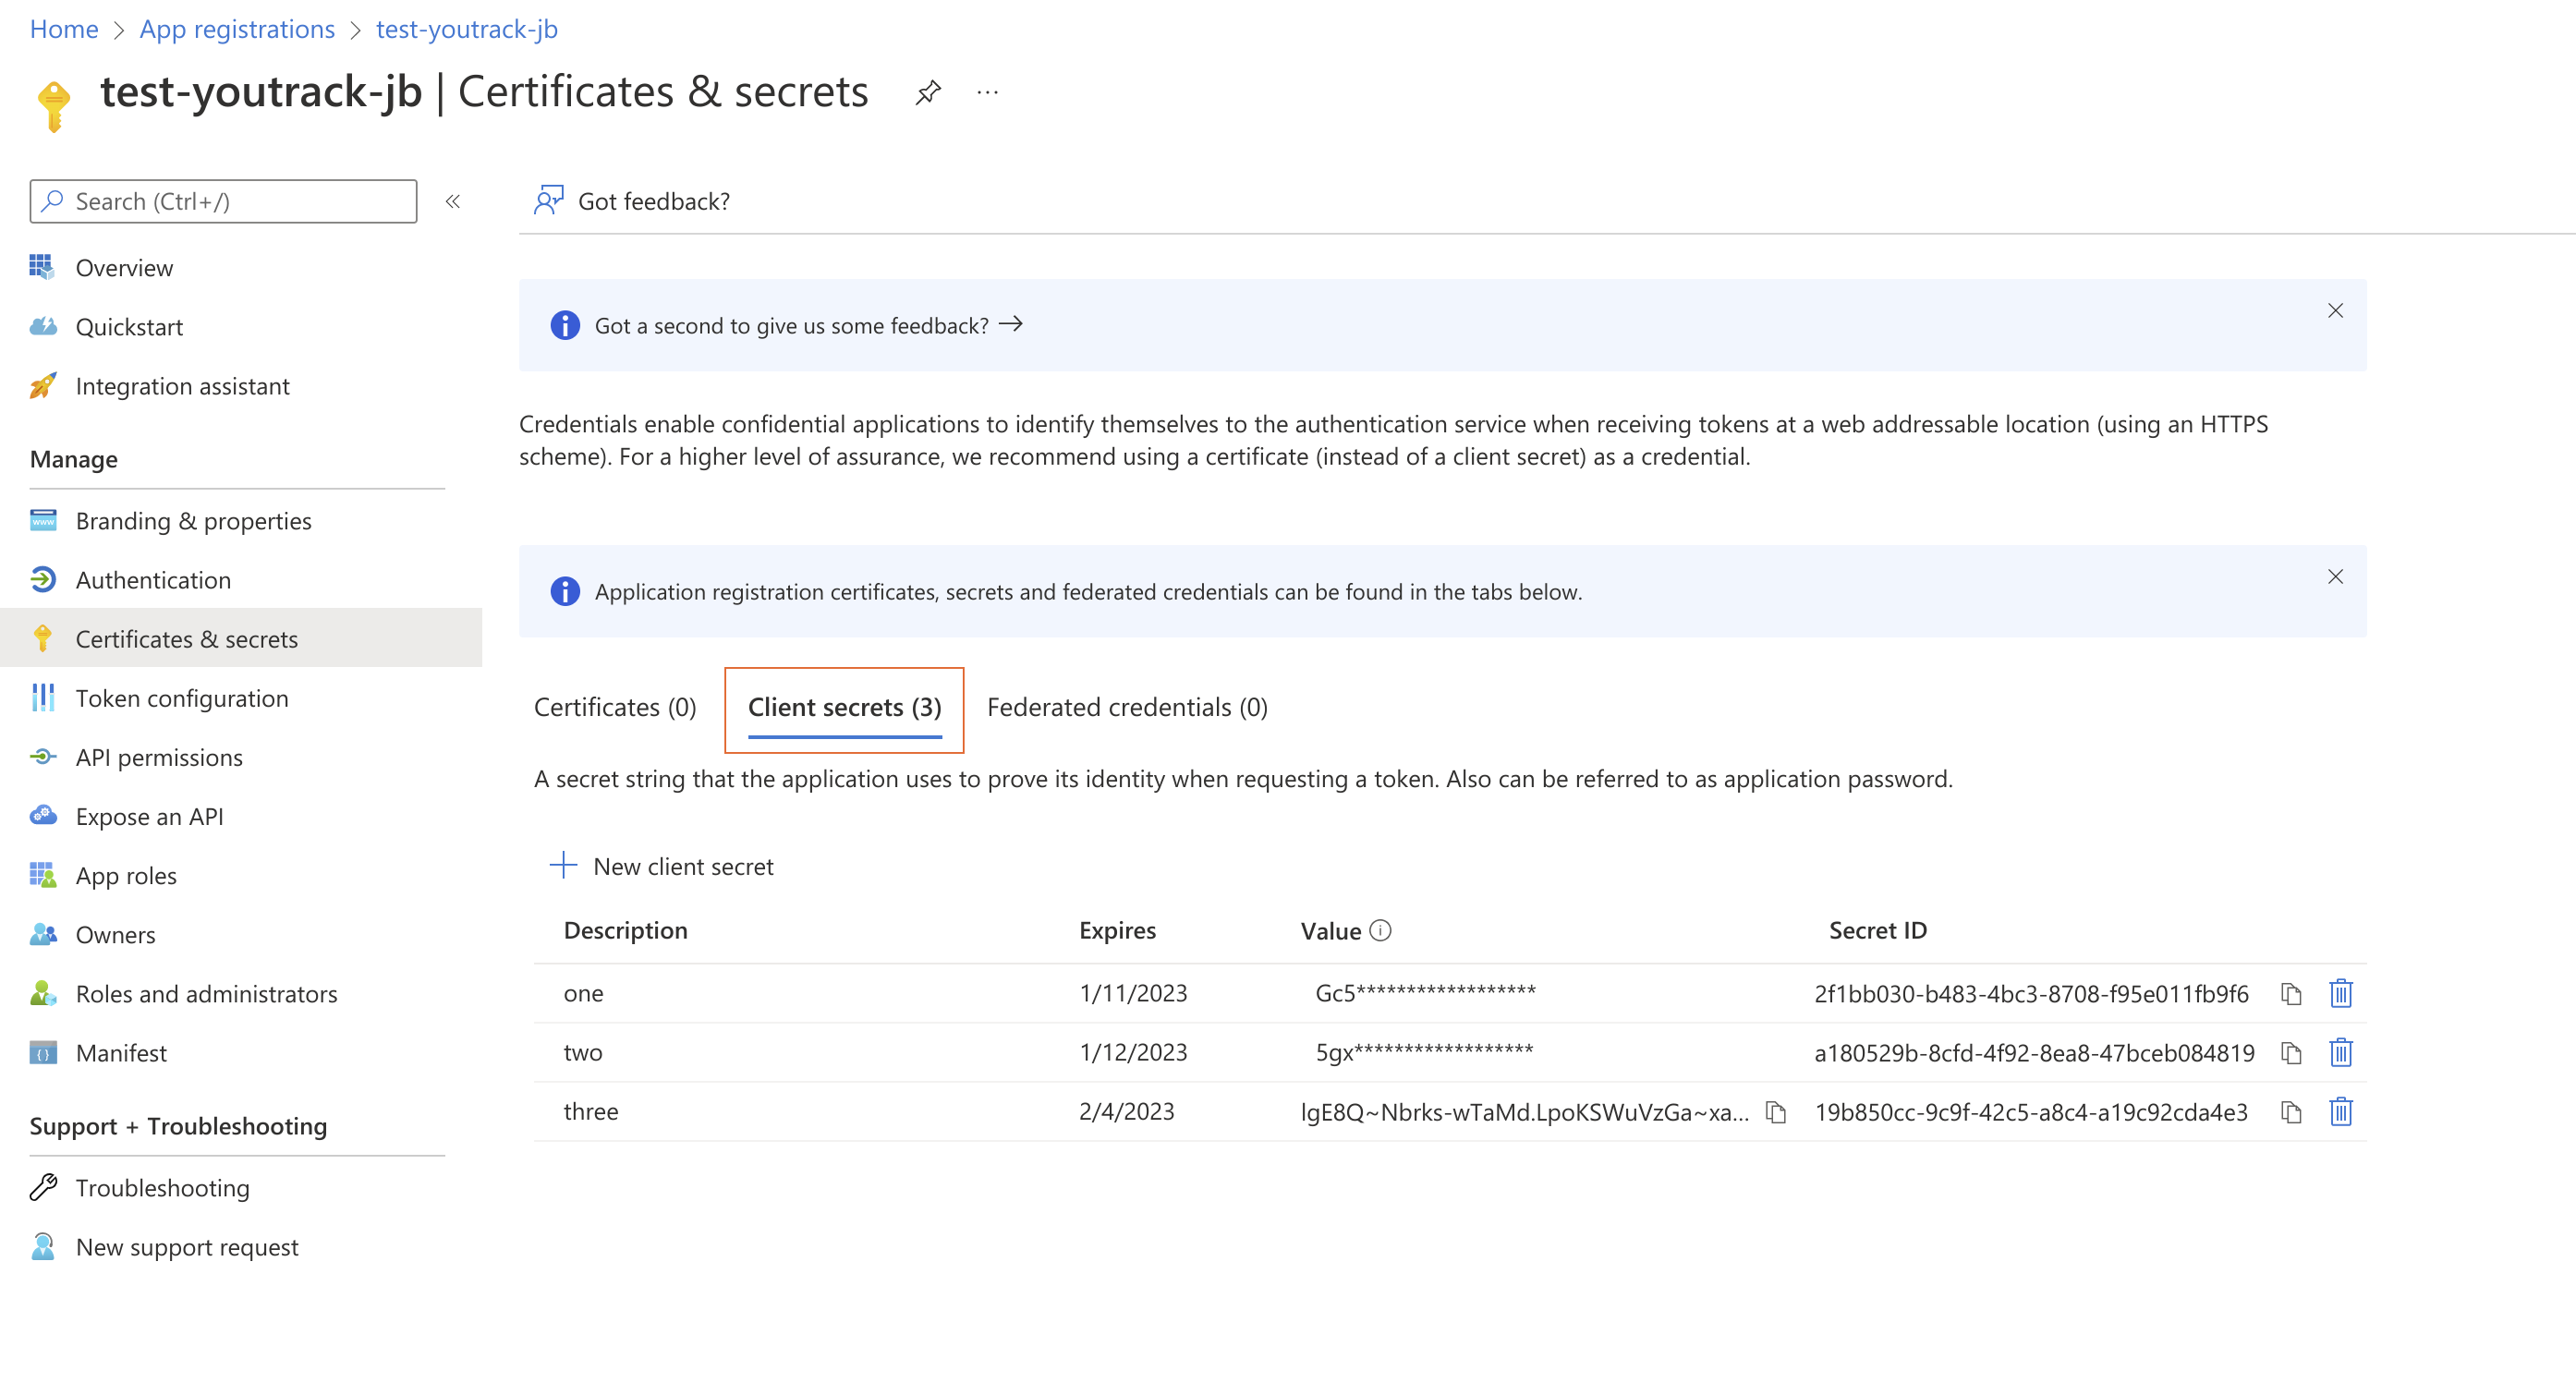
A client secret that you created for the registered app.
The Application (client) ID and Directory (tenant) ID can be found in the Essentials section of the client application as shown below.
The client secret can be generated from the Certificates & secrets < Client secrets section.
To learn how to perform this setup, please follow the instructions in the product documentation for Microsoft Azure.
Add the Required Permissions to the Client App
Next, you need to add the following API permissions to the app:
Mail.ReadWrite must be granted as an Application permission.
User.Read must be granted as a Delegated permission.
The list of permissions can be found in the API permissions settings of the client app.
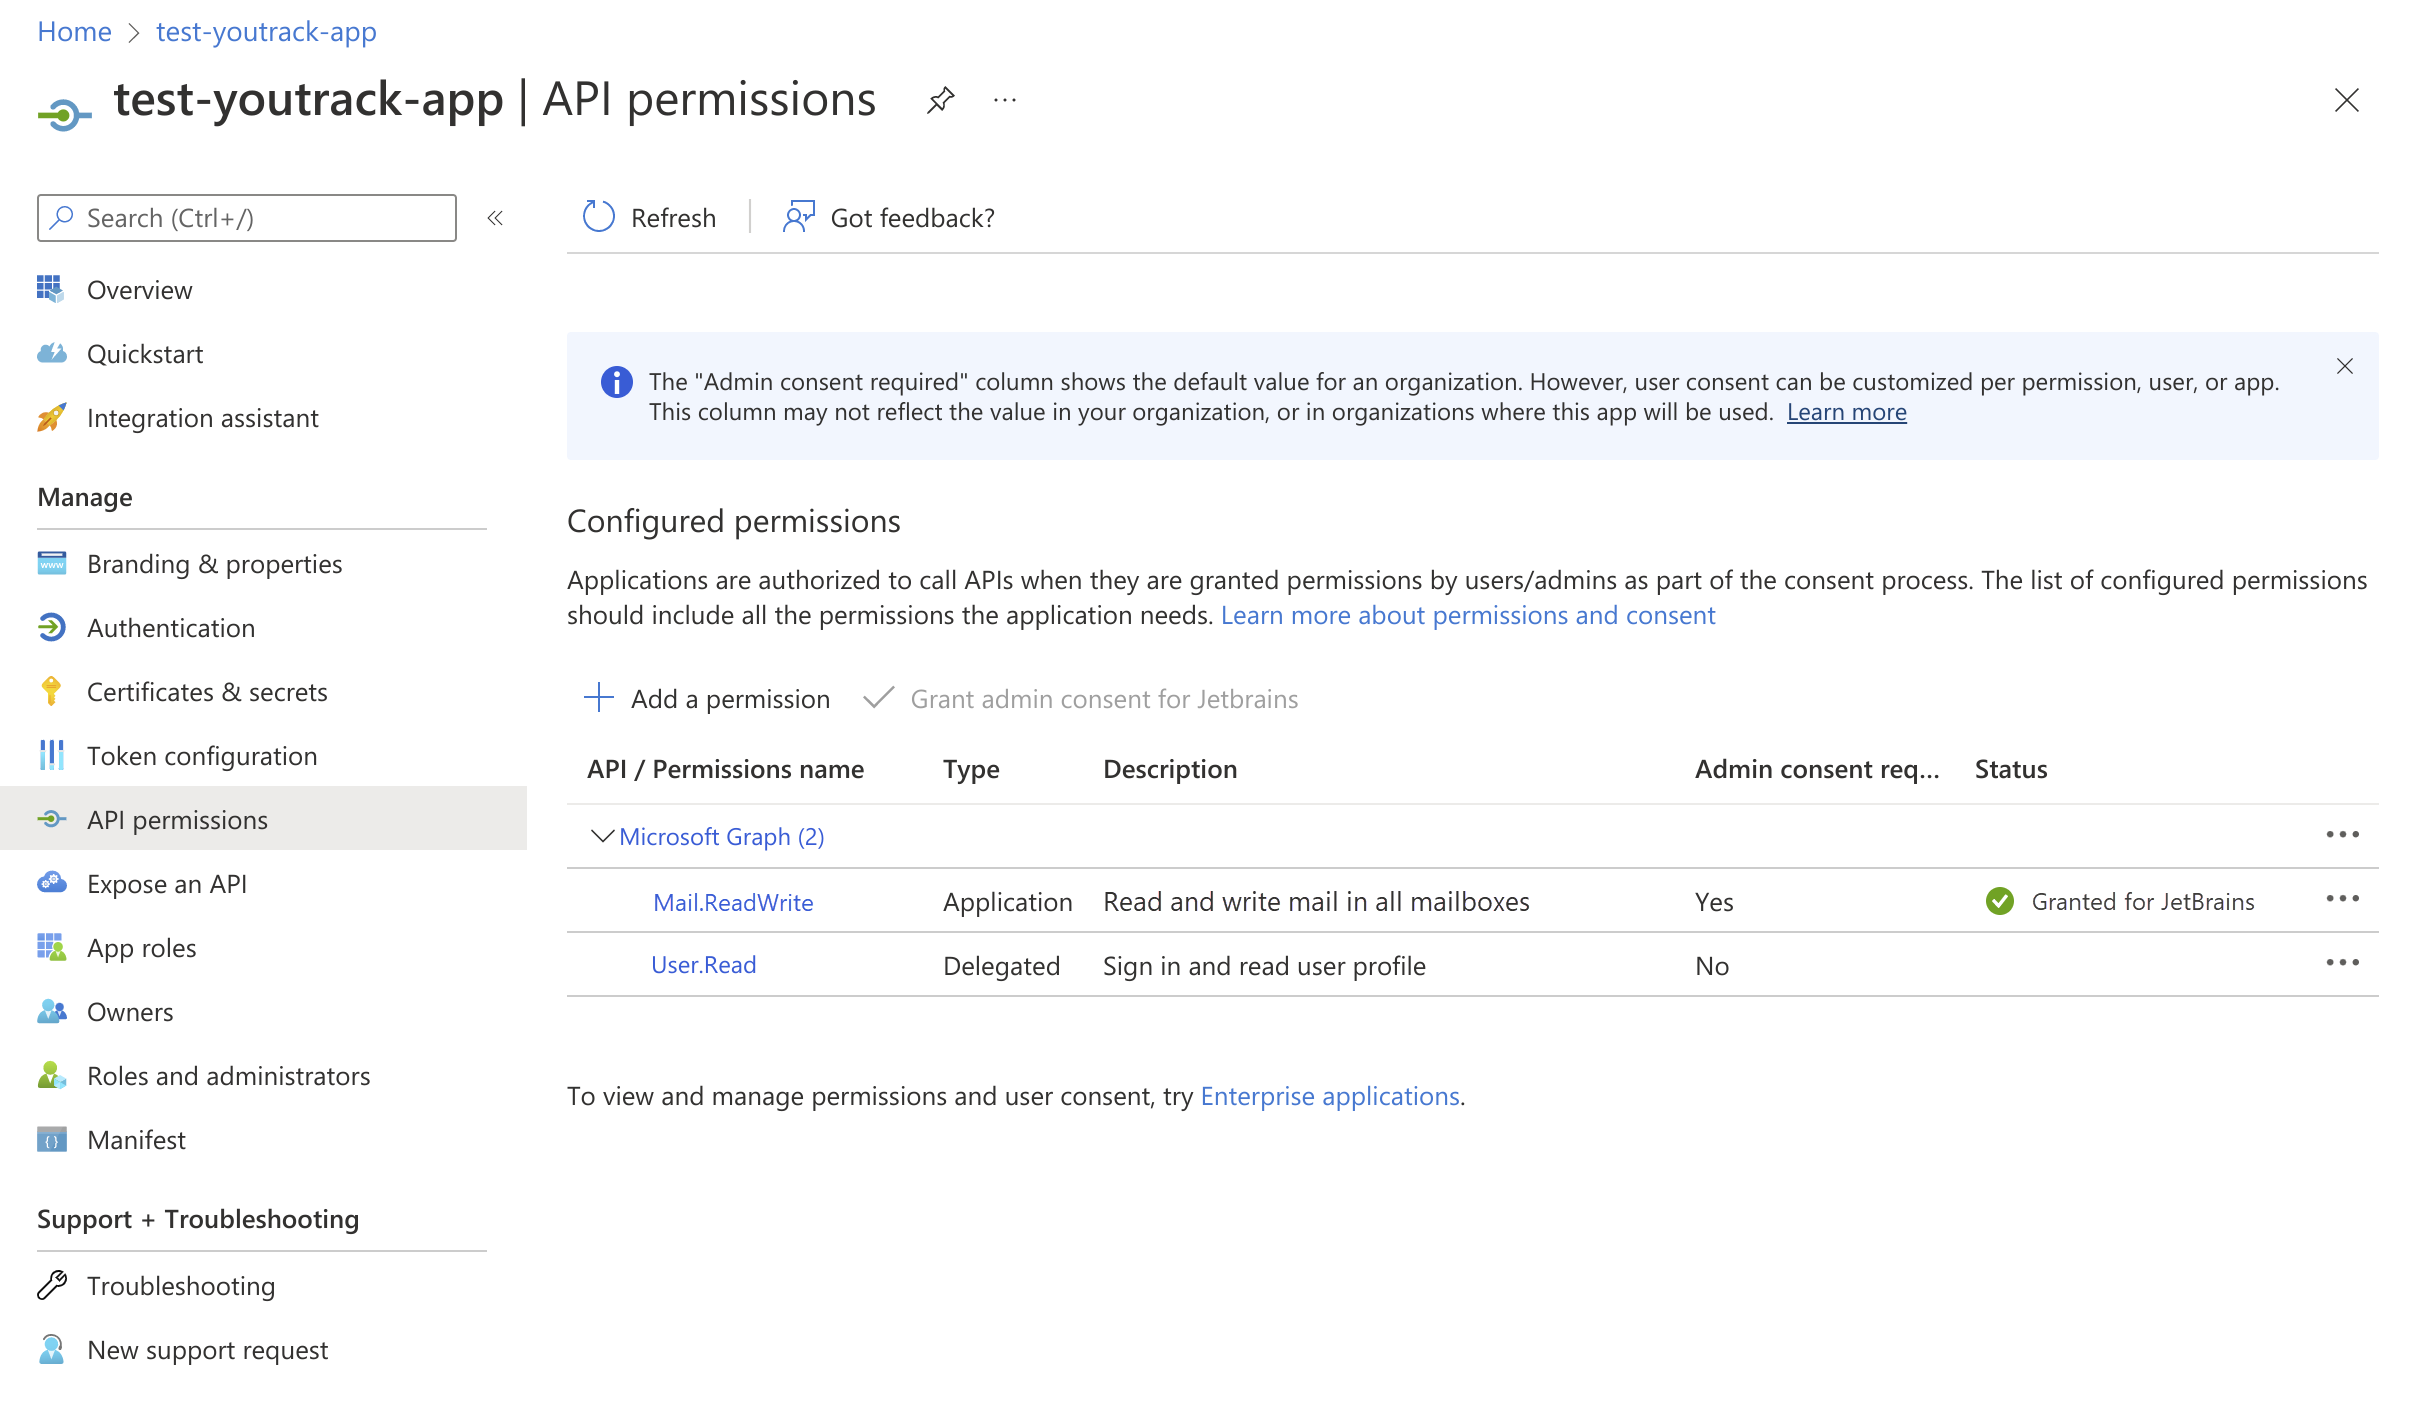
If you are logged in under an administrator account (as listed in the prerequisites), you can grant the application permission Mail.ReadWrite yourself. If not, you will need to ask an administrator to grant admin consent to the permissions configured for the application.
To learn how to configure permissions for a client app, please follow the instructions in the product documentation for Microsoft Azure.
Update the Mailbox Integration Settings in YouTrack
Once you have collected the required information from the Microsoft platform, you can configure the settings for your email channel in YouTrack.
To connect to a Microsoft Exchange Online mailbox:
Click the Projects link in the application header.
Locate your helpdesk project in the list.
Open the options menu for the project, then select Channels.
Select the Email channel.
Click the New email channel button.
The New Email Channel dialog opens.

Select the Connect to an external mail server option.
The setup wizard opens to the New Mail Server Connection dialog.

For the Connection type setting, select Microsoft Exchange Online.
The email channel is updated to show specific settings for this connection type.
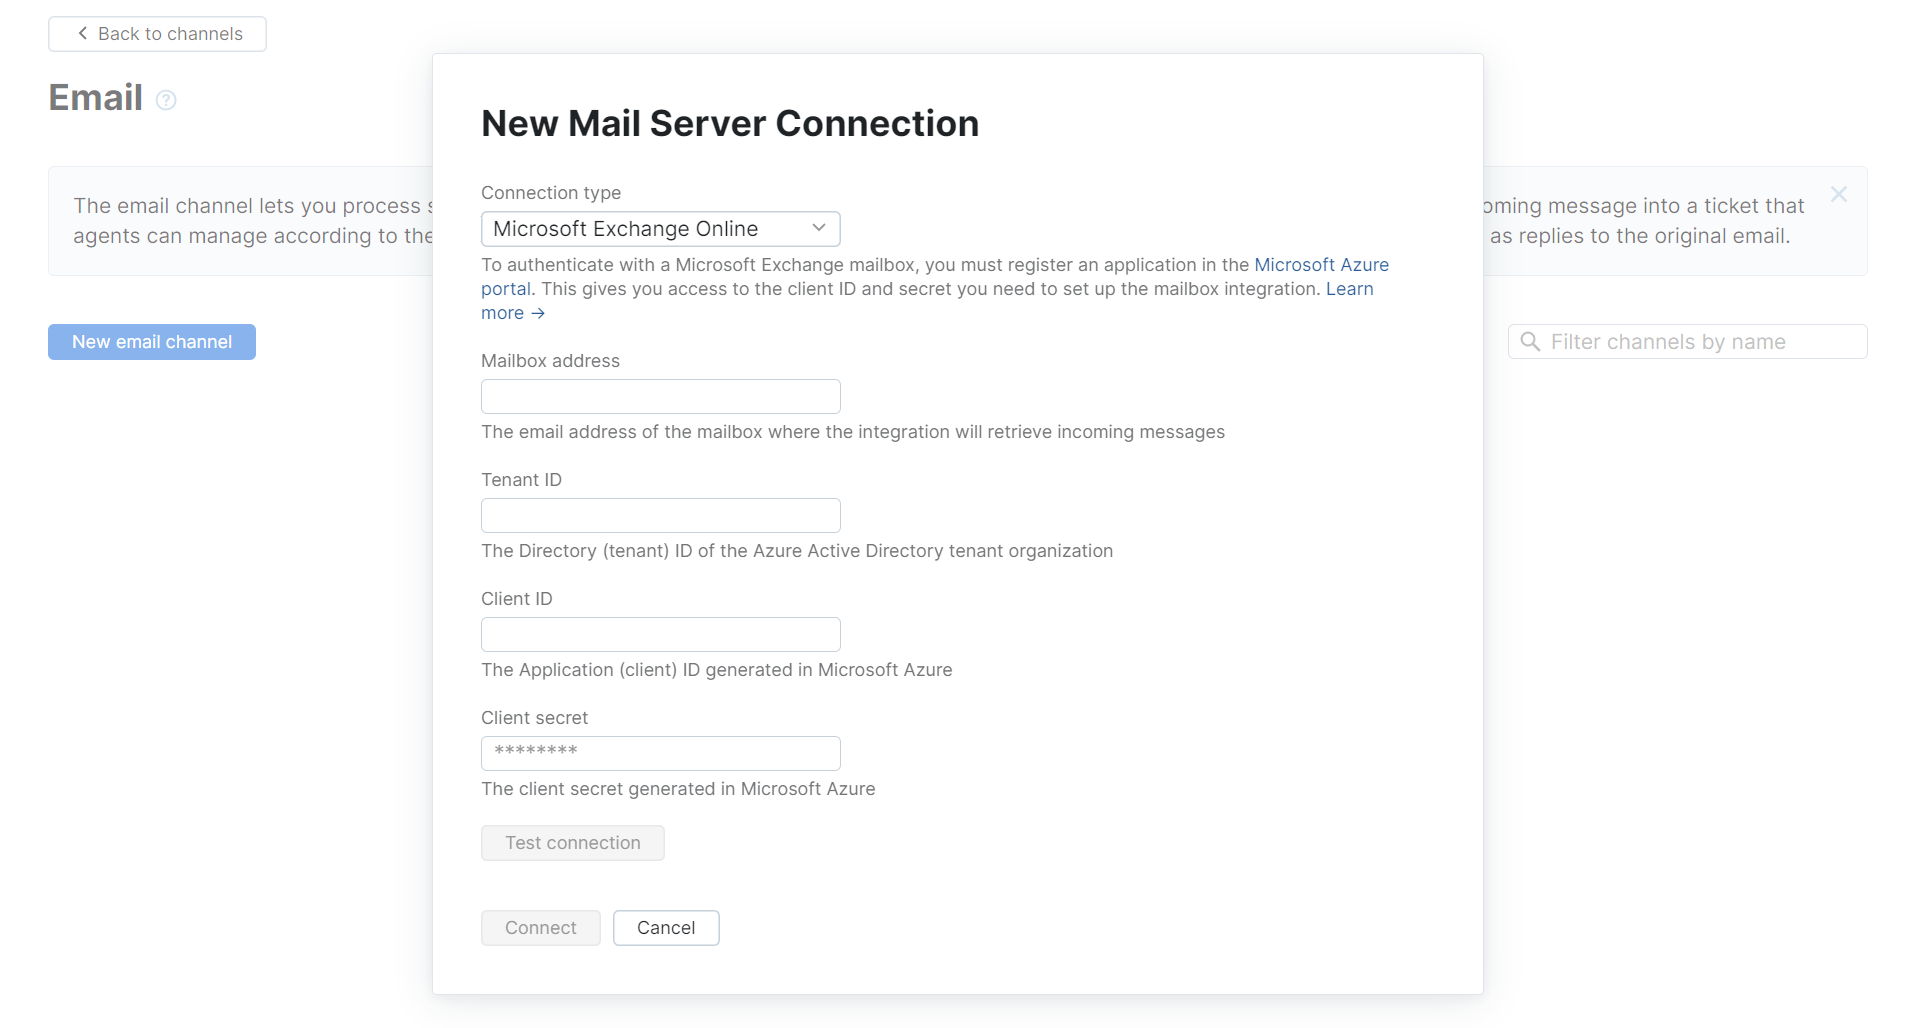
Enter values for the following settings:
Setting
Description
Mailbox address
Enter the email address where the email channel currently retrieves incoming messages.
Tenant ID
Enter the Directory (tenant) ID of the Azure Active Directory tenant organization.
Client ID
Enter the Application (client) ID for the registered client application in Microsoft Azure.
Client secret
Enter the value for the secret that you generated for the client app in Microsoft Azure.
To verify that YouTrack is able to establish a connection with the mail server, click the Test connection button.
If the test is successful, click the Connect button.
The email channel settings are saved.
Email channels in YouTrack should be set up to connect over IMAP/IMAPS. Official support for connections over POP3/POP3S is deprecated. The default protocol for Microsoft Exchange, MAPI, is not supported. If you want to connect to a Microsoft Exchange, you have two options:
Enable and configure IMAP connections in Microsoft Exchange, then configure the authenticated SMTP settings. With these mail connectors enabled, you can follow the instructions below and establish a connection.
Pay attention to the special instructions for Microsoft Exchange mailboxes.
Establish a connection through an intermediate gateway server. This lets you connect to the Exchange Server with POP/IMAP and SMTP disabled. The DavMail exchange gateway, for example, converts proprietary Exchange formats into email protocols that YouTrack understands. For setup instructions, refer to the DavMail Gateway documentation.
With this setup, follow the instructions below to establish a connection to the gateway server.
For Microsoft Exchange Server, the email channel supports connections to shared mailboxes. You can use the username and password of any user who is a member of the shared mailbox to authenticate.
To connect to a Microsoft Exchange server:
Click the Projects link in the application header.
Locate your helpdesk project in the list.
Open the options menu for the project, then select Channels.
Select the Email channel.
Click the New email channel button.
The New Email Channel dialog opens.

Select the Connect to an external mail server option.
The setup wizard opens to the New Mail Server Connection dialog.

Enter values for the following settings:
Setting
Description
Connection type
The email channel supports IMAP/IMAPS protocols. Support for POP3/POP3S is deprecated.
Host address
Enter the URL of the mail service. For example,
mail.exchange.com.Port
Enter the port that the mail service listens to. The default port is set automatically when you select the mail server protocol.
Email address
Enter the email address of the account that authorizes access to the mail service.
Password
Enter the password for the account that you use to log in to the mail service.
Expand the Advanced settings section and configure the following optional settings:
Setting
Description
SSL key
If your mail server requires client SSL authentication, select the SSL key that identifies your YouTrack server from the list.
The list only displays SSL keys that have already been imported into YouTrack. To learn how to generate and upload SSL keys, see SSL Keys.
Connection timeout
Set the maximum amount of time to wait for complete data transfer from the mail service before closing the connection. The default value is set to 60 seconds.
Socket timeout
Set the maximum amount of time to wait for a response from the mail service before disconnecting the socket. The default value is set to 60 seconds.
Click the Test connection button to verify the configuration. If the connection cannot be established, correct your settings and test the connection again.
Click the Connect button.
The email channel settings are saved.
If you don't have an external mailbox, you can still benefit from the email channel and use a default email address provided by YouTrack.
For each YouTrack Cloud instance, YouTrack creates a default mailbox. When the default mailbox configuration is enabled, you can share the address of this mailbox with other people. YouTrack processes messages sent to this address according to the email channel settings.
The default email address is instancename@youtrack.cloud where instancename is the name of your YouTrack site.
Since you don't have access to the actual mailbox with this type of mailbox configuration, if you have any issues, submit a request to the YouTrack support and ask for assistance.
To connect to the default mail service for YouTrack Cloud:
Click the Projects link in the application header.
Locate your helpdesk project in the list.
Open the options menu for the project, then select Channels.
Select the Email channel.
Click the New email channel button.
The New Email Channel dialog opens.

Select the Connect to an external mail server option.
The setup wizard opens to the New Mail Server Connection dialog.

For the Connection type setting, select Default.
Click the Test connection button to verify the configuration. If the connection cannot be established, correct your settings and test the connection again.
Click the Connect button.
A connection to the default mail service for YouTrack Cloud is added to helpdesk project.
Next Steps
After you have set up your email channel to forward emails from an external address, you can fine-tune the settings for this channel.
Add filters to determine which messages are transformed into helpdesk tickets. For details, see Filters.
Use post-processing settings to define how YouTrack handles tickets and comments that are created from incoming email messages. For details, see Post-processing.
Customize the layout and content for email messages sent by YouTrack for update notifications and replies from helpdesk agents. To learn more, see Helpdesk Notification Templates.
Email Server Connection Settings
The settings that you configured when you set up the connection to the email server are shown on the Email Server Connection tab in the sidebar. Use these settings to make minor adjustments to the server connection without having to set up a new connection from scratch.
The following settings are available here:
Setting | Description |
|---|---|
Connection type | Displays the connection type used for this email channel. |
Host address | Displays the URL of the mail service. |
Port | Displays the port that the mail service listens to. |
Email address | Displays the email address of the account that authorizes access to the mail service. |
Password | Stores the password for the account that you use to log in to the mail service. |
The following settings are available in the Advanced settings section:
Setting | Description |
|---|---|
SSL key | For mail servers that require client SSL authentication, this setting stores the SSL key that identifies your YouTrack server. The list only includes SSL keys that have already been imported into YouTrack. To learn how to generate and upload SSL keys, see SSL Keys. |
Connection timeout | Displays the maximum amount of time to wait for complete data transfer from the mail service before closing the connection. The default value is set to 60 seconds. |
Socket timeout | Displays the maximum amount of time to wait for a response from the mail service before disconnecting the socket. The default value is set to 60 seconds. |
Use a Mail Server Connection as a Forwarding Address
Additional settings on the Email Server Connection tab let you use the email address that is used to connect to the mail server as the forwarding address for messages sent to a mailbox that belongs to an external domain.
To enable this feature:
Switch on the option to Use as receiving email for forwarding.
Enter the address that you want to forward from in the External email address field.
Click the Save button.