Manage Custom Fields
As a project administrator, you can customize the fields that are used for issues in your projects. System administrators can modify the properties of custom fields for all projects in the system. For more information, see Custom Fields.
To access and manage the fields that are used for issues in your project, select the Fields tab in the Edit Project page.
Add a New Field
As the project administrator, you can add new fields for the issues in your project.
When you add a field to your project, the custom field is available to other projects in the system. A system administrator or user with global project administration permissions can reuse this field in other projects. For enumerated custom fields, the set of available values can be managed for each project independently.
When you create a custom field, be sure to set the field type that you want to assign to values that are stored in the field. For most field types, the type is set when the field is created and cannot be changed. Converting values from one data type to another is a manual process that takes time and effort. For more information, see Change Field Type.
To add a field:
From the Edit Project page, select the Fields tab.
- Click the Add field to project button.
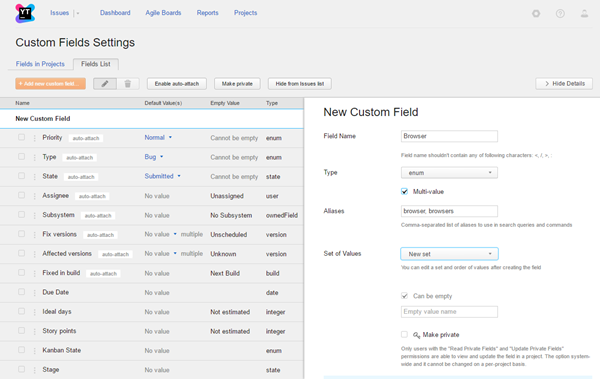
Enter values in the custom field settings. For a detailed description of each setting, see Custom Field Settings.
- If the field is an enumerated type, you have the following options:
Select the New set option. Define the set of values after you create the custom field.
Select a field from the list. The set of values that is used in the select field is added to the new field.
- Click the Add new field button.
The custom field is added to your project.
Attach a Custom Field to Your Project
If you want to use an existing field for issues in your project, you can attach it to your project.
To attach a field to your project:
From the Edit Project page, select the Fields tab.
- Click the Add field to project button.
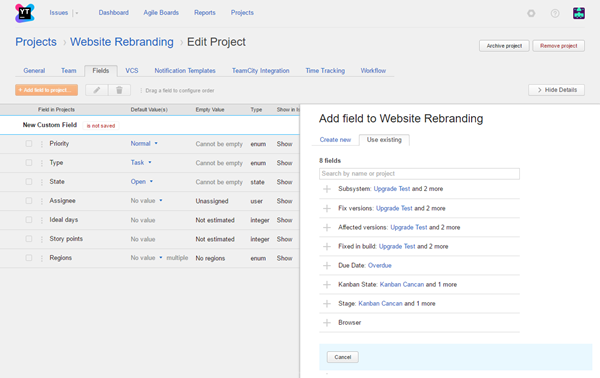
The Add field to project dialog opens in the sidebar.
Select the field you want to attach to the project. Use the search box to filter the list of custom fields.
- Click the + icon next to the field name to attach it to the project.
The settings for the selected field are displayed in the sidebar.
- If the field is used in other projects, you can only modify the set of values for the custom field when you have the Update Project permission for all of the projects that use the set. You can modify the properties of the field in your project without affecting other projects that use the field.
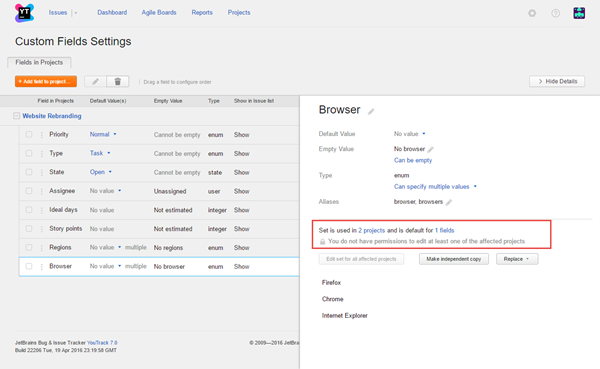
If the current set of values is compatible with your project, you can use the field without making any changes.
- If you want to customize the set of values for the field, click the Make independent copy button.
A copy of the set of values is created in your project.
You can freely edit the set of values without affecting the sets of values for this field in other projects.
Change Field Order at the Project Level
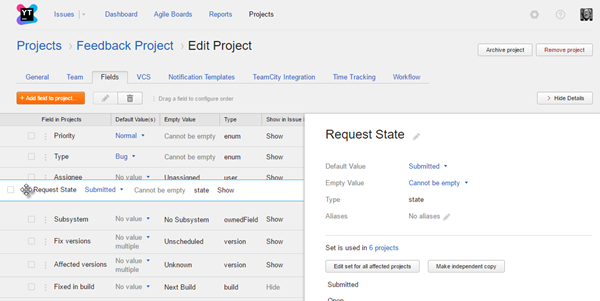
The default order in which fields are displayed on Issues list and full page view is set at the global level by an administrator. If you prefer to order the fields differently, you can set a custom order for your project. Project-level settings override the global settings.
To change the field order:
Edit a Set of Values
You can edit the set of values that are used in a field.
Wherever you can change the value for a field, there is an option to add a new value to the set. As a project administrator, you can add values to fields that are unique to your project or use an independent set of values. System administrators and users with project administrator access in the global project can add values to the set in all projects. When created, the new value is added to the issue. This option is visible in the following locations:
Issues list
Full page view
Agile boards

If the set of values is shared with other projects, you can make an independent copy of the set and edit the values for the field in your project.
To edit a set of values that is shared with other projects:
From the Edit Project page, select the Fields tab.
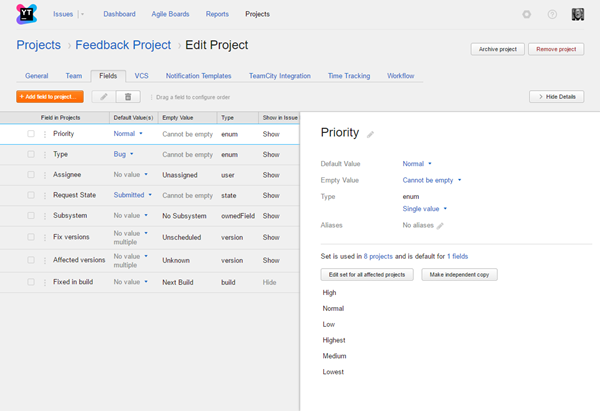
- Select the field that uses the set of values.
The details dialog for the selected custom field opens in the sidebar.
- Edit the set of values. The following options are available:
Click the Add value button to add a new value to the list.
Click the Copy values from button and select a field to copy the values used in the selected field. The values from the selected field are added to the current set of values.
Click the Merge with button and select a field to merge existing values with the values used in the selected field. The values from the selected field are merged with the current set of values.
Replace a Custom Field
You can replace the custom fields that are used in your project with a custom field that is used in other projects. Use this feature if there are custom fields that are used in other projects that you want to use instead of the custom field that is set in your project. You can then use the same custom field, for example, to generate reports or display the same columns and swimlanes for all of the projects on an agile board.
Unfortunately, you can only use the Replace function with custom fields that share the same data type. To convert values from one data type to another, you need to create a new custom field with the desired type and manually update the values in the new field for all issues in the project. For more information, see Change Field Type.
To replace a custom field:
From the Edit Project page, select the Fields tab.
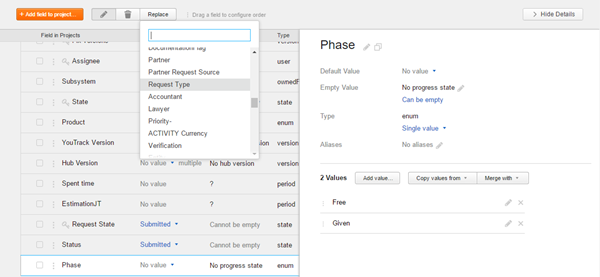
- Select the field that you want to replace and click the Replace button.
- Select the custom field that you want to replace the existing field.
The custom field is replaced with the selected custom field in the project.
The set of values that was used by the previous custom field is added to the set of values for the replacement field in the project.
The values in the original custom field that are assigned to issues in the project are updated to use the same values in the replacement field.
The sets of values that are used in other projects for the replacement field remain unchanged.
Change Field Type
If the custom field stores data as an integer, period, or float, you can edit this property and convert the data to a target format within this set of types. For example, you can convert an integer type to a period type. Here, you have the option to convert the value that is stored as an integer to a number of hours or number of days.
For other field types, the type is set when the field is created and cannot be changed.
If you want to replace an existing custom field with a field that uses a different type, you can't use the Replace function. Instead, you need to add a custom field to the project that stores values in the desired type and migrate the data manually from the original field.
To migrate data from one custom field to another custom field:
From the Edit Project page, select the Fields tab.
Click the Add field to project button.
Use the settings to define a custom field or select an existing field that stores values in the desired type.
If the new custom field stores enumerated values, add values to the new custom field that are used in the existing custom field.
- When finished, update the values that are stored in the custom fields for your project:
From the issues list, enter a search query that finds all of the issues that contain a specific value in the original custom field. For enumerated types, start with the first value in the set. For example:
In #{Project} Status: Submitted.Select all of the issues that are returned by the search query. Use the keyboard shortcut Ctrl + A (⌘ + A on OS X) to select all of the issues that are returned by the query.
Use a command to update all of the selected issues and assign them a value in the new custom field. For example:
Secondary State Submitted. To minimize notification spam, apply the commands silently.Repeat this step until you have migrated all of the data that was stored in the original custom field to the new custom field.
- Return to the page and remove the original custom field from the project.
The field and its related values are deleted from the project.
All of the values that were previously stored in the original custom field are now stored in the new custom field.
Custom Field Settings
Use the following settings to configure fields with simple data types:
Field | Description |
|---|---|
Field Name | Stores the name of the custom field. Field names cannot contain the special characters |
Type | Determines what type of data is stored in the field. For most field types, the type is set when the field is created and cannot be changed. If the field stores data as an When you select an enumerated type, additional settings that define the selected type are displayed. For more information, see . |
Aliases | Assigns the field one ore more keywords that you can use as a substitute for the field name in search queries and commands. For example, the aliases for the default Assignee field are |
Can be empty | Determines whether the field can store an empty value. For fields with simple types, this option is always enabled. |
Empty value name | Assigns a value to show by default in the empty field. This lets you reference the empty value in search queries and commands. When you edit an existing field, use the Empty Value setting to update this property. |
Make private | Restricts the visibility of the field to users with permission to view private fields. This property is set system-wide and cannot be changed on a per-project basis. For more information, see Private and Public Issue Fields. |
Use these additional settings to configure fields with enumerated data types:
Setting | Description |
|---|---|
Multi-value | Enables the option to store multiple values in the field. This option is not available for fields that store a state type. When you edit an existing field, use the Single value and Can specify multiple values toggle to update this property. |
Set of Values | Assigns a default set of values that can be stored in the custom field.
group type. For these fields, the set of possible values is taken from the list of groups in YouTrack. |
Default Value(s) | Assigns a default value to the field. This setting is only available when you select an existing set of values. If the Multi-value setting is enabled, you can select one or more default values. |
Can be empty | Determines whether the field can store an empty value. You can only disable this option when a default value has been set. When you edit an existing field, use the Can be empty and Cannot be empty toggle to update this property. |
Empty value name | Assigns a value to show by default in the empty field. This lets you reference the empty value in search queries and commands. If the Can be empty option is disabled, this setting is disabled as well. |
Value-specific Settings
Enumerated sets of values have properties that are assigned to each value in the set. You can edit a standard set of properties for any enumerated set of values.
To display these settings, click the Edit icon next to a value in the set. The following settings are available for all field types:
Setting | Description |
|---|---|
Name | Assigns a name to the value. |
Description | Adds a description of the value. This property is not visible elsewhere in YouTrack, but can be used to explain the usage of this value to other users who might edit the set of values. |
Color | Assigns a color scheme to the value. This setting changes the appearance of the custom field based on the color that is assigned to the current value. |
Several field types have extended properties for values in the set. These properties are only visible when you edit the set of values that is used for the specified type.
Type | Setting | Description |
|---|---|---|
ownedField | Owner | Stores a reference to the user who is responsible for the subsystem as a user type. Use this setting to associate a specific user with each value in the set. You can then use this field to set values in custom fields that store a |
state | Resolved | Indicates whether the issue is considered to be resolved when it is assigned the corresponding value in this field. This value is stored as a |
version | Release date | Stores the release date as a |
Released | Indicates whether the version is released, stored as a Boolean type. You can update this property directly in the list of values. This property affects the sort order in the drop-down list for the default Fix versions and Affected versions fields.
| |
Archived | Indicates whether the version is archived, stored as a Boolean type. You can update this property directly in the list of values. Values that are marked as archived are not shown in the drop-down list for custom fields. | |
build | Assemble date | Stores the date when the selected build was assembled as a |
Additional Controls for Version Fields
When you view or edit the set of values for a field that stores a version type, these controls let you find and update specific values. These options have no affect on the behavior of the custom field.
Control | Description |
|---|---|
Filter versions | Filters the list of values to match the filter criteria. |
Show released | Toggles the visibility of versions that are marked as released. |
Archived | Toggles the visibility of versions that are marked as archived. |
Sort by | Sorts the list of values by name or release date. |
