Restore an MSI Installation
Before you begin, make sure you have a backup copy of the database that you want to restore. Note the location of the backup copy so you are sure to select the correct file during this procedure.
If you don't have valid backup files or your backup files are out of date, follow the instructions to Restore the Current Version Without a Backup.
If you're rolling back to the previous installation version after an unsuccessful upgrade, use the backup that you created prior to installation. If you ignored this prerequisite, locate an archived backup file in the directory that is set as the Backup location that corresponds with the version of your previous installation.
If you're attempting to restore the current installation, locate an archived backup file in the directory that is set as the Backup location that corresponds with the current version of your installation.
Restore an Installation from a Backup
To restore your database to the current or previous version, you need to reinstall YouTrack and use the backup as the Upgrade Source during installation.
When you restore to a previous version of YouTrack, use a backup that corresponds to the version of the product that you want to restore.
To restore your database from a backup:
Uninstall YouTrack from the Windows Control Panel.
Make sure that the YouTrack service user (
JetBrainsYouTrack, by default) has full access to the directory where you saved the database backup file.- Install a YouTrack build that is the same version or later than the version of your database backup. For detailed instructions, see MSI Installation.
Please note:To troubleshoot errors more effectively, run the MSI installer with verbose logging enabled. In a Command Prompt window, enter the following command:
msiexec /i youtrack-<version number>.<build number>.msi /l*v install.txt
Use the <version number> and <build number> of the installer package.Configuration files from previous installations might be found during the installation. In this case, use the (Recommended) installation option that is selected by default.
In the Configuration Wizard, select the Upgrade option.
On the Select Upgrade Source page, select your backup as the Upgrade Source and click the Next button.
- Confirm or change the locations where YouTrack stores product data. When done, click the Next button.
YouTrack starts with the data from the backup file.
Restore the Current Version Without a Backup
There are a few cases where you are unable to restore you installation from backup.
Your backup files are missing or out of date.
The files on your server became corrupted and are unusable.
You may also want to follow this procedure when, for example, you were able to recover your data following a server crash and there is information that was recorded in YouTrack that is not in your most recent backup files.
You can attempt to restore the current version of your installation using valid copies of your configuration and data files. This restoration procedure is only successful when your configuration and data files are not corrupted. You can restore to an earlier version of YouTrack only when you have copies of files that have never been used to start a later version of the product.
To restore your database without a backup:
Locate the most recent copies of your
dataandconfdirectories. The default location of the directories that are created during installation is%programdata%\JetBrains\YouTrack\.
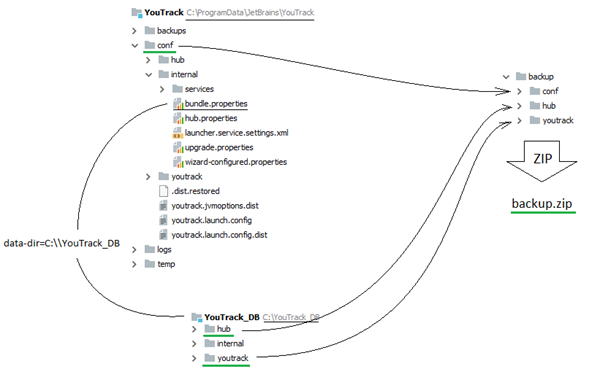
Note that an administrator may have changed the location where YouTrack stores these files. The path to the current location of the database is stored in thedata-dirparameter in the%programdata%\JetBrains\YouTrack\conf\internal\bundle.propertiesfile. You may also use copies of these directories that are stored in another location.- Copy the
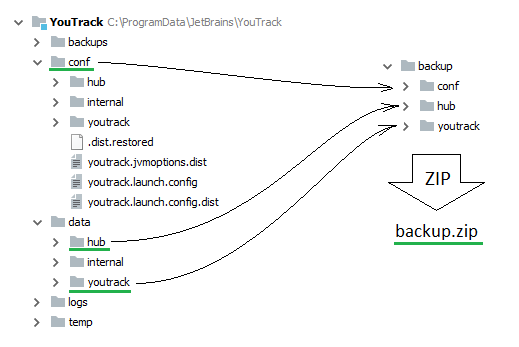
confdirectory and thehubandyoutracksubdirectories of thedatadirectory. Paste them into a single, empty directory.If your database is stored in the default location, you can copy these files from the location shown in the following image and structure the content of the new directory as shown on the right.

If your database is stored in another location, reference the
bundle.propertiesfile to locate the data files and recreate the structure as shown on the right.
Compress the contents of the new directory into an archive file. You can use any filename.
Make sure that the YouTrack service user (
JetBrainsYouTrack, by default) has full access to this directory where the archive file is stored.Uninstall YouTrack from the Windows Control Panel.
Install a YouTrack build that is the same version or later than the version of your database.
In the Configuration Wizard, select the Upgrade option.
On the Select Upgrade Source page, select the archive file that you created in step 3, then click the Next button.
- Confirm or change the locations where YouTrack stores product data. When done, click the Next button.
YouTrack starts with the data from the configuration and data files.