Workflow Tutorial
Workflows in YouTrack help you automate tasks. With workflows, you can easily notify teams about events, enforce policies, execute periodic tasks, and support the processes followed by your organization.
This tutorial shows you how to create a workflow and add workflow rules. The tutorial also introduces you to the language that is used for writing workflow code.
Prerequisites
You have installed and configured YouTrack (or have YouTrack InCloud).
You have permission to create and edit workflows. These tasks require the Low-level Administration permission.
You are familiar with your YouTrack configuration. This means that you know which projects are configured and the fields that are used in issues for each project.
You are familiar with the programming language that is used to write workflows. For a detailed reference, see Workflow Language Reference.
You have verified that the existing workflows do not support your use case. You need to write new rules and attach them to one or more projects.
You have created a backup of your YouTrack database. Errors in custom workflows can lead to the inadvertent removal of important data or corruption of the database. We strongly recommend that you back up your YouTrack database before you update workflows. This task also requires the Low-level Administration permission.
Overview
This tutorial is organized into the following sections:
Set Up and Configure the Workflow Editor — shows you how to set up and configure the YouTrack Workflow Editor.
Create a New Workflow — shows you how to create a workflow and the rules that support a specific use case. Your may want to create a workflow for a different use case, but can follow the same steps as shown in this example.
Activate the Workflow — shows you how to finish the job and activate the workflow in your YouTrack instance.
This tutorial also shows you how to Modify an Existing Workflow.
Set Up and Configure the Workflow Editor
First, you need to set up and configure the YouTrack Workflow Editor.
Download and Install the Workflow Editor
Download and install Workflow Editor from the Workflow Editor tab on the Get YouTrack page. The Workflow Editor is an MPS-based application that you use to create and modify workflows.
When you run the YouTrack Workflow Editor for the first time, configure it by providing your YouTrack Server URL, as well as your username and password. Your account must have the Low-level Administration permission in YouTrack.
Download Workflows from your YouTrack Server
When you start the Workflow Editor, it synchronizes the workflows with your YouTrack server. To use the most recent versions of your workflows, always download them from the server before you create or modify them.
The Workflow Editor also downloads the scheme for your projects. If you change the fields or sets of values used in fields for your project, download the workflows again.

Create a New Workflow
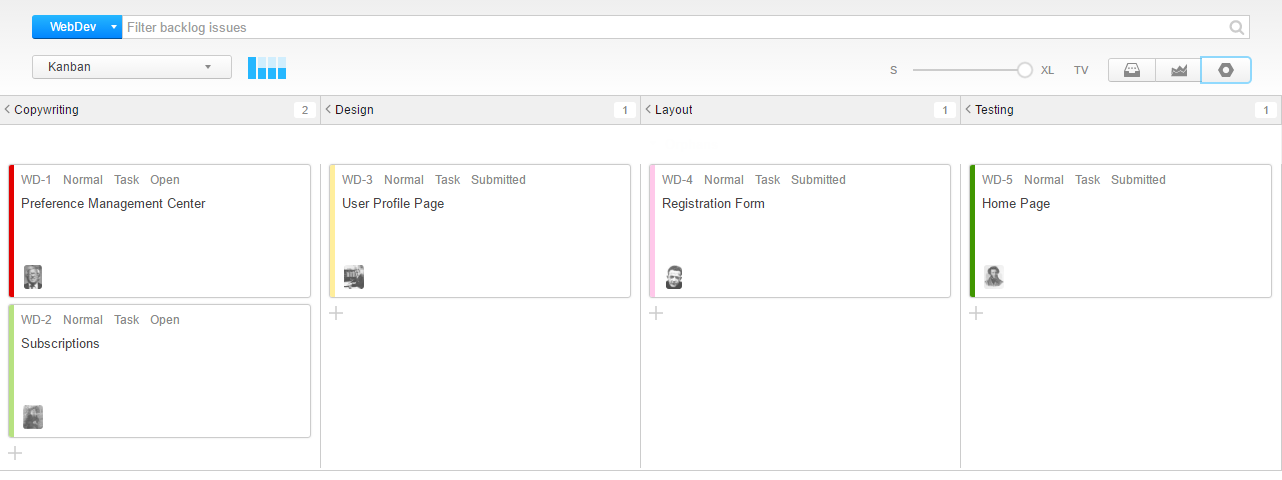
Let's say your team follows a Kanban process and would like to use the YouTrack Agile Board. The columns of the board represent each department. Your team has a set process for moving issues from one department to the next. Team members can see which department is working on an issue at the moment. The color of the issue card represents the time left until the deadline. The card starts out green and then, based on a specific workflow, turns yellow and then red as the deadline approaches.
Your task is to set up the project and create workflows to support the board as described above.

Set Up the Project
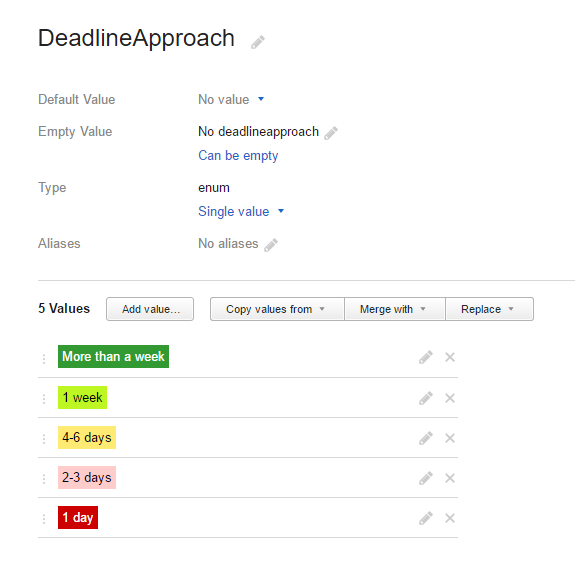
To have colored cards on the board, you need an enumerated field in your project. Let's call the project WebDev and name the field DeadlineApproach. You add this field to your project and add the following set of values:
More than a week
1 week
4-6 days
2-3 days
1 day

You define the colors when you add values to the set of values available for the field.
You also need to add a Due Date field to your project to store the deadline.
Create the Workflow
Workflows consist of rules. First, you create the workflow. Then you add the rules to it.
Open the Workflow Editor and click the Create Workflow button.

Let's name the workflow ColoringOnDueDateApproach.
Create the Rules
You need to add two rules to the workflow:
A stateless rule that runs when an issue is changed, when a new issue is created, and the Due Date field is updated.
A scheduled rule that updates the color of the cards daily.
To add the first rule, click the Create Stateless Rule button and start editing:


Name the new rule and start writing the code. The Workflow Editor provides helpful advice on syntax, names and methods that you can use in your rules. Press Ctrl + Space anywhere inside the rule code to look for completion options. Changes are saved automatically.
You can copy and past fragments of code in the editor, but you cannot copy and paste the whole workflow. This means that you can't copy text from this tutorial and paste it into the editor.
Rule Parts
A rule code begins with the rule name followed by statements. Stateless rules have one or more trigger conditions. For example, in our first rule, ColorOnDeadLineApproach, the rule executes when an issue is created or modified:
Stateless Rule: ColorOnDeadlineApproach
rule ColorOnDeadlineApproach
when <issue created or updated> {
    if (!issue.State.isResolved) {
        if (Due Date >= now + 8 days) {
            issue.DeadlineApproach = {More than a week} ;
        }
        if (now + 7 days > Due Date) {
            issue.DeadlineApproach = {1 week} ;
        }
        if (now + 5 days > Due Date) {
            issue.DeadlineApproach = {4-6 days} ;
        }
        if (now + 3 days > Due Date) {
            issue.DeadlineApproach = {2-3 days} ;
        }
        if (now + 2 days > Due Date) {
            issue.DeadlineApproach = {1 day} ;
        }
    }
}
After you have defined the triggers for the rule, you can decide what happens next.
The example above uses if statements to check how close the Due Date is to the current date. You can use the literal value now to refer to the current date and time in UTC. Field names are pre-defined variables in workflow code, and the fields must exist in the project for the workflow to be attached and executed for project issues.
We defined which DeadlineApproach field value corresponds to which color. Select DeadlineApproach in , and YouTrack sets the color of the cards automatically.
Next you can create the scheduled rule that runs every morning regardless of changes to issues. A scheduled rule also starts with the name in the first line, followed by the schedule for running the rule.

Scheduled Rule: ColorOnDeadlineApproachMorning
schedule rule ColorOnDeadlineApproachMorning
daily at 09 : 00 : 00 [!issue.State.isResolved] {
    if (Due Date >= now + 8 days) {
        issue.DeadlineApproach = {More than a week} ;
    }
    if (now + 7 days > Due Date) {
        issue.DeadlineApproach = {1 week} ;
    }
    if (now + 5 days > Due Date) {
        issue.DeadlineApproach = {4-6 days} ;
    }
    if (now + 3 days > Due Date) {
        issue.DeadlineApproach = {2-3 days} ;
    }
    if (now + 2 days > Due Date) {
        issue.DeadlineApproach = {1 day} ;
    }
}
Notice the guard condition in square brackets: it is necessary because we want this rule to be applied to unresolved issues only.
The code of the rule is similar to that of the stateless rule. It checks the same conditions and makes the same assignments.
With these two rules, your workflow looks as follows:

Activate the Workflow
The last step is to upload the new workflow to your YouTrack server and activate it in your project.
Upload a Workflow to YouTrack
When you are finished editing your workflow, upload it to your YouTrack server. This is required for your changes to take effect.

Attach the Workflow to a Project
To attach a new workflow in YouTrack:
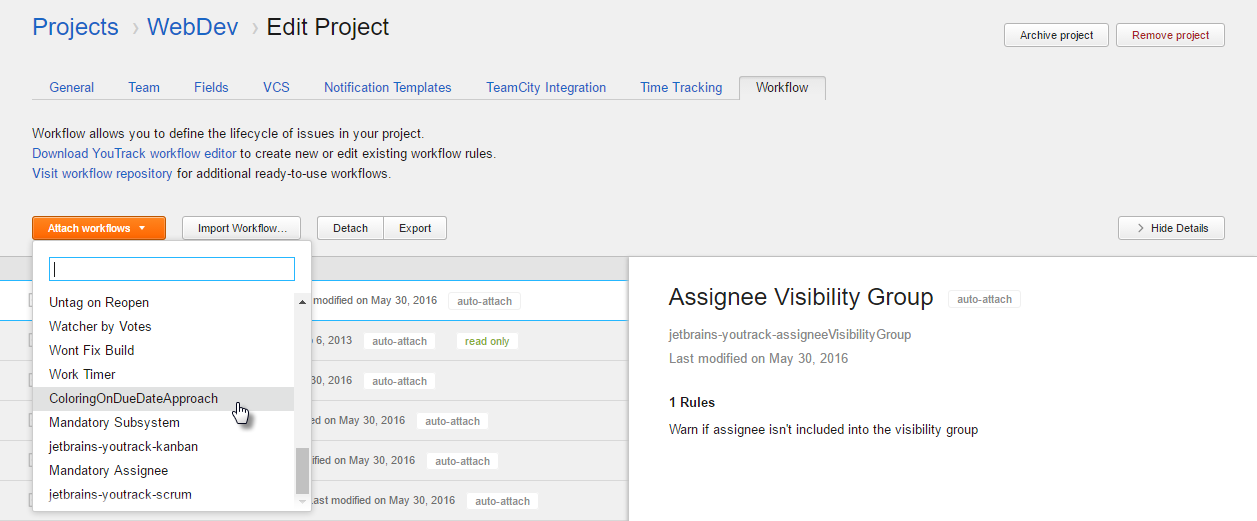
Open the page, open your project and select the Workflow tab.
Click the Attach Workflow button and select the workflow you want to attach.

If you want to attach the same workflow to several projects:
Select Workflows from the Project-related Settings section of the Administration menu.
Select the workflow from the list. Attach next to your workflow.
Click the + sign for Projects in the sidebar and select the projects to which you want to attach the workflow.
The attached workflow starts working immediately. If you modified a workflow that had been previously attached to the project, it remains attached. The changes take effect when you upload the workflow to the server.

Modify an Existing Workflow
When you need to update an existing workflow instead of creating a new one, select it in the Workflow Editor and see the rules it contains. For example, you may want to do this if you realize you made an error in the code of some rule(s).
Choose the rule you want to modify, double-click it and edit the same way you would a new rule.

The only difference is that you don't have to assign a new name to an existing rule.
You may also add new rules to an existing workflow, or delete rules if they are no longer necessary.
Make sure to upload workflows to your YouTrack server after modification, the same way you do after creating a new one.