Add Comments
Comments are a great way to add detail to an issue or ask questions for clarification. You can add comments to an issue after it has been reported. You cannot add comments to an issue draft. You and other users can add comments to reply to a question or provide additional information that helps to resolve the issue.
Add a Comment in the Issues List
You can add a comment to an issue directly from the Issues list.
To add a comment from the Issues list:
Click the comment icon. The number next to the icon displays the number of comments that have already been added to the issue.

If comments are already added, the selected issue expands to display all comments and the input field for adding a new comment.
If there are no comments, the selected issue expands to display the input field for adding a new comment.
If you view the Issues list in One-line view, expand the issue and then click the comment icon.
Enter your comment in the input field. You can use wiki markup to format the text. Hints for common markup tags are displayed below the input field. To view a list of available tags, click the more link.
To restrict the visibility of the comment, select a group from the Visible to drop-down list. For more information, see Visibility for Comments.
To attach a file with your comment, click the Attach link. When the comment is added, the attachment is displayed inline with the comment.
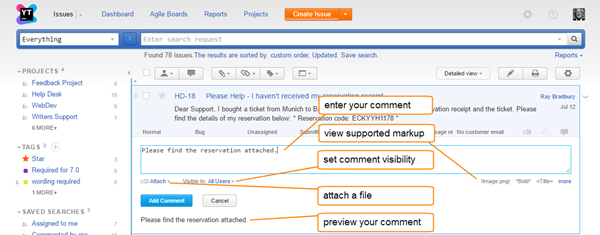
When done, click the Add Comment button. You can also press Ctrl + Enter on the keyboard.
Add a Comment to Multiple Issues
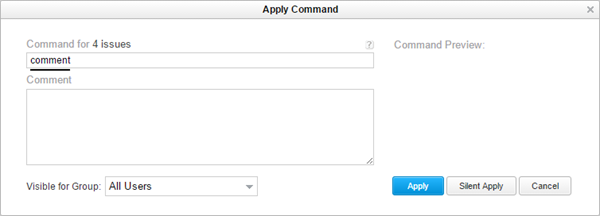
You can add the same comment to several issues simultaneously with a command. Use this feature when there is a batch of issues that you want to update with the same comment.
To add a comment to multiple issues:
Select the issue that you want to update in the Issues list.
Click the Add comment button in the toolbar.
Alternatively, you can just type any letter or press Ctrl + Alt + J to open the Apply Command dialog. In this case, the Command input field is empty.
Enter your comment in the input field.
To restrict the visibility of the comment, select a group from the Visible for Group drop-down list. For more information, see Visibility for Comments.
When done, click the Apply button. You can also press Ctrl + Enter on the keyboard.
The commands are applied and the comment is added to all of the selected issues.
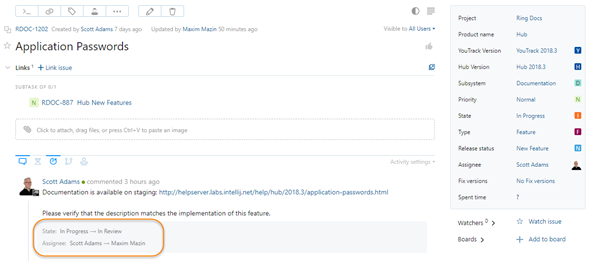
Any commands that apply updates to the issue are shown alongside the comment. For more information, read the Comment-related Updates section below.
Add a Comment in Single Issue View
Adding a comment in single issue view is as easy as it gets: just enter your comment and click the Add comment button.
To add a comment to an issue:
Open the issue to which you want to add a comment.
Enter your comment in the input field.
To restrict the visibility of the comment, select one or more users or groups from the Visible to list. For more information, see Visibility for Comments.
To attach a file with your comment, click the Attach file link. When the comment is added, the attachment is displayed inline with the comment.
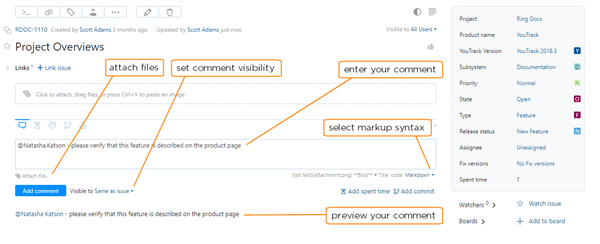
When done, click the Add comment button. You can also press Ctrl + Enter on the keyboard.
Generate Comments from VCS Commits
When you work with issues in a project that has been integrated with a version control system, you have the ability to generate comments when you commit changes to the repository. This feature is supported by the following integrations:
Build Server Integration (TeamCity and Jenkins)
VCS Integrations (GitHub, GitLab, and Bitbucket)
The Upsource integration does not support this feature.
The settings for your VCS or build server integration include an option to parse commits for issue comments.
With the Parse commits for issue comments option enabled, commit message text that starts a new line after a command is copied to a separate issue comment. This behavior lets you mention users in comment text and generate notifications when the commit message is processed. It also lets you choose to make commit-related information visible to external users who don't have permission to view VCS changes.

With this option disabled, issue comments are not generated from commit messages. This behavior ensures that additional messages that are generated by the IDE or VCS are shown together with the VCS change and do not generate redundant comments. For example, messages that indicate changes that were cherry-picked from specific commits in other branches of the repository. If the Parse commits for issue comments option is enabled in the project, these auto-generated messages generate separate comments.
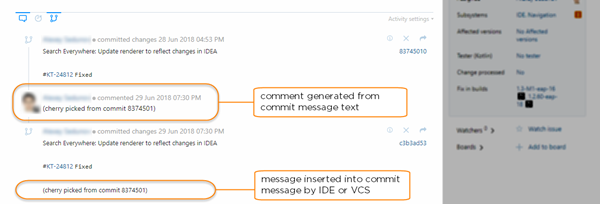
This feature can be enabled or disabled independently on a per-project basis. It's up to project administrators to determine which behavior is most desirable for issues in their projects.
If the feature is enabled, you can use the following syntax to generate a comment from a VCS commit message:
[commit message text] #issueID [command 1] [command 2] ... [command n]
[issue comment text]
...
or
[commit message text] ^issueID [command 1] [command 2] ... [command n]
[issue comment text]
...
The entire commit message, including commands and issue comments, is always shown as part of the VCS change record in the activity stream.

The commit message is broken down into the following components:
Component | Description |
|---|---|
Commit message text | The first string of characters is added to the VCS commit message. This text is not applied as a comment to the issue. The complete VCS commit message is displayed in the list of VCS changes in the activity stream. |
Commands | YouTrack recognizes the number sign (#) or caret (^) as a flag for an issue that is followed by a command. The characters that follow the number sign or caret are parsed to match an issue ID. Any string that follows the issue ID is parsed as a command up to the end of the current line. |
Issue comment text | If the the Parse commits for issue comments option is enabled for your integration, text that is added as a new line after a command is copied from the VCS commit message and posted to the issue as a comment. Otherwise, the text is only shown in the VCS commit message. |
Issue IDs | Any issue ID that is found in the commit message is transformed into a hyperlink. This includes issues that are flagged for a command and issues that are simply mentioned in the commit message or issue comment text. |
Attach Files to Comments
When you add a comment to an issue, you have the ability to attach files directly to the comment itself. Files that are attached to comments are shown in the Attachments section of the issue and are also displayed as thumbnails directly under the comment text.
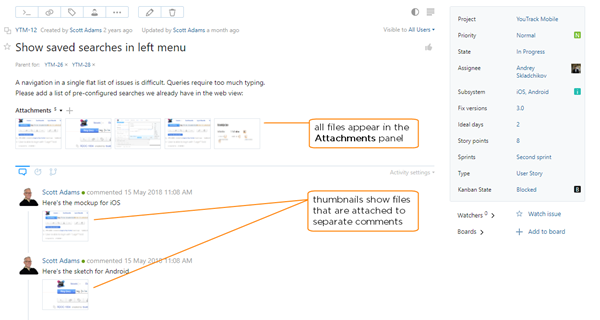
The option to attach files to comments is available on the Issues list, when viewing single issues, and when you open a card in view mode on an agile board. You cannot attach files when you add a comment with a command.
By attaching files to comments instead of merely attaching the file to the issue, teams who work with versioned files can quickly locate the most recently updated copy.
To attach files to a comment:
Click the Attach file option below the input field for a new comment and select one or more files from your local directory. Click the Add comment button to add the comment text and attach the files.
To add a file to an existing comment, click the Attach file icon in the comment toolbar and select one or more files from your local directory.
Drag files to the target comment or the input field for a new comment. The option to drag files to an existing comment is not supported in the old version of the single issue view. In the old version, you can only drag files to a comment draft.
For each file that is attached to a comment, you have access to the same actions that are available in the Attachments section of the page.
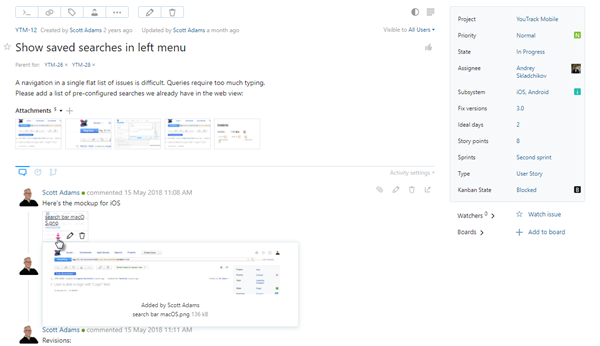
For files with visibility restrictions, move the pointer over the padlock icon to display the list of users and groups who can view the file.
Click the thumbnail to preview images or download other file types.
Click the Download icon to copy the file to your local directory.
Click the Edit icon to update the file.
Images open in the image editor. Here, you can apply changes directly to the image, change the filename, and update the visibility settings for the file. For more information, see Edit Images.
For other files, this action opens the Edit Attachment dialog. Here, you can change the filename and update the visibility settings. For more information, see Edit or Remove an Attachment.
Any change that is applied to a file that is attached to a comment is replicated in the copy of the file that is shown in the Attachments section of the page.
Click the Remove icon to remove the file from the comment. When you confirm this action, the reference to the file is also removed from the Attachments section of the page.
Comment-related Actions
Each issue comment has a toolbar. Use the controls in this toolbar to perform actions that are specific to the selected comment.
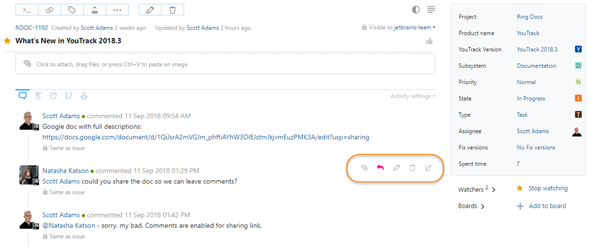
The following controls are available:
Control | Description |
|---|---|
Attach files | Opens a dialog for locating files from your local directory. Use this option to attach files directly to the comment. For more information, see Attach Files to Comments. |
Reply | Inserts the login for the author of the selected comment into the input field for a new comment. This option is only available for comments that were added by other users. Use this option to reply directly to the user who entered the original comment. For more information, see Mention Another User. |
Edit | Opens the selected comment for editing. Depending on your permissions, you can update the comment text or change the visibility setting for the comment. |
Delete | Removes the selected comment from the issue. |
Permalink | Copies a direct hyperlink to the issue comment to the clipboard. |
Comment-related Updates
All of the changes that are applied to an issue within one minute from adding a comment are considered to be related to the comment. When the issue history is enabled in the activity stream, these changes are displayed immediately following the comment.
