Host a YouTrack Instance on Microsoft Azure
Cloud hosting gives you the flexibility to add resources to your network without having to install and maintain your own servers. JetBrains offers YouTrack InCloud, which provides you with a ready-to-use YouTrack instance in the cloud. You can also install YouTrack Standalone on a virtual machine that is hosted on Microsoft Azure.
This guide shows you how to configure a virtual machine and install YouTrack in a Microsoft Azure account. There are a number of different configurations you can use to run YouTrack in a hosted environment. The setup in this guide uses the following components:
Windows Server 2012 R2 Datacenter for the virtual machine
YouTrack MSI distribution for the installation package
If you want to use a different type of virtual machine or installation, you can still follow this guide for general setup guidelines.
Overview
To host a YouTrack instance in Microsoft Azure, perform the following steps:
Prerequisites
This setup requires that you have an active Microsoft Azure subscription.
The amount of storage that you need to host YouTrack varies based on the size of your YouTrack database.
If your subscription does not already include a standalone virtual machine, you will need to create one. The virtual machine must have at least 1 core and 1,5 Gb of RAM.
If you don't have a Microsoft Azure subscription, you can sign up for a free 30-day trial. The trial lets you create and try out any combination of Azure resources. For more information, visit the official Microsoft Azure website.
Create a Virtual Machine
To get started, you need to add a virtual machine to your Microsoft Azure subscription. If you already have a virtual machine that has enough free resources to host YouTrack, skip this procedure and continue with the next step.
To create a virtual machine:
Sign in to the Microsoft Azure management portal.
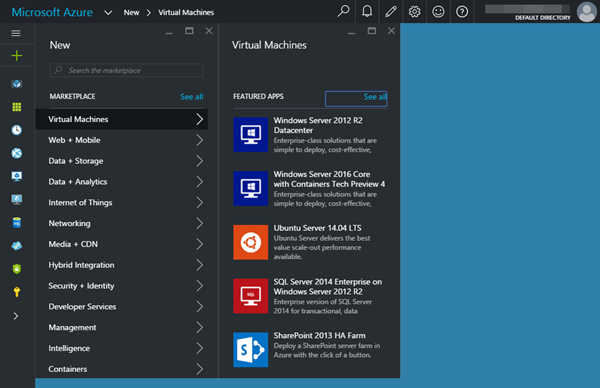
Click the New button and select Virtual Machines.
- Select an image from the list. You can run YouTrack on either a Windows or Linux server. This setup uses a Windows Server 2012 R2 Datacenter.
From the Select a deployment model drop-down list, select Classic.
- Click the Create button.
The Create VM wizard opens.
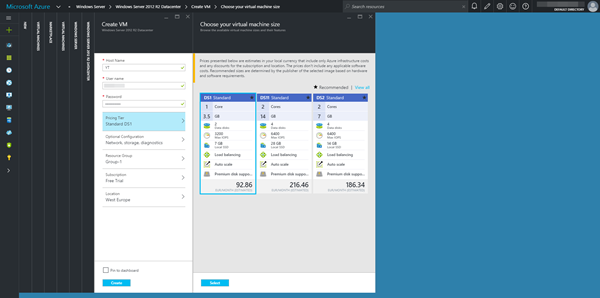
- Enter values for the following settings:
Setting
Description
Host Name
Enter a name for the virtual machine. This value is added as a prefix to the DNS name that you use to access the machine remotely. The virtual machine is assigned a unique DNS name that always uses the subdomain
.cloudapp.net. If you want to use a custom domain name, configure the custom domain name before you proceed with the next step in this setup.User name
Enter a name for the user account that is used to manage the virtual machine.
Password
Set the password for the user account that is used to access the virtual machine.
In the Pricing Tier section, choose the size of the virtual machine.
In the Location section, select a location that is closest to you to reduce latency.
- Click the Create button.
The virtual machine is created and added to your subscription. Depending on the size of the virtual machine, this can take some time. The status of the virtual machine is shown under the Notifications pane in the toolbar.
Once the setup of your virtual machine is complete, you can proceed with the next step.
Add Endpoints to the Virtual Machine
When you create a new Windows virtual machine, the TCP port 3389 is opened to connect with the Remote Desktop. Linux virtual machines use TCP port 22 to allow an SSH connection. To give external users access to your YouTrack service, you need to set the entry point for the service in the virtual machine.
To add an endpoint to the virtual machine:
Select the name of your virtual machine in the Microsoft Azure portal.
Click the Settings button in the toolbar.
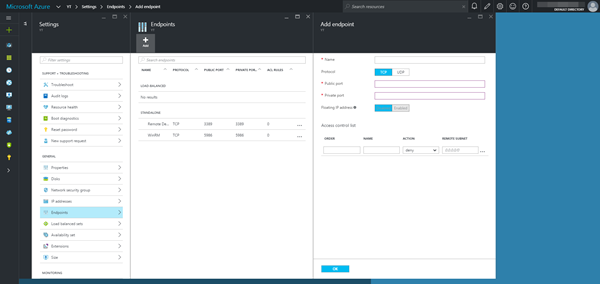
In the General section, click Endpoints.
- In the Add endpoint blade, enter values for the following settings:
Setting
Description
Name
Enter a name for the endpoint, for example,
YouTrack.Protocol
Select TCP.
Public port
Enter
80.Private port
Enter
80. - Click the OK button.
The virtual machine endport is saved. The status of the virtual machine is shown under the Notifications pane in the toolbar.
Now that you have configured the virtual machine, continue with the next step to configure the firewall.
Open an HTTP port in the Firewall
The image for the virtual machine that is used in this setup includes a pre-configured firewall. If your virtual machine has a firewall enabled, you need to open a port to allow access to YouTrack over HTTP.
To open a port in the Windows Firewall:
Select the name of your virtual machine in the Microsoft Azure portal.
- Click the Connect button in the toolbar.
A Remote Desktop Connection to the virtual machine is downloaded to your local directory.
Open the Remote Desktop Connection with the username and password that you entered when you created the virtual machine.
In the Server Manager, select the Local Server.
- In the Properties section, click the link next to the Windows Firewall property.

The Windows Firewall window opens.
- Click the Advanced Settings link.
The Windows Firewall with Advanced Security dialog opens.
- Right-click Inbound Rules and select the New Rule option.
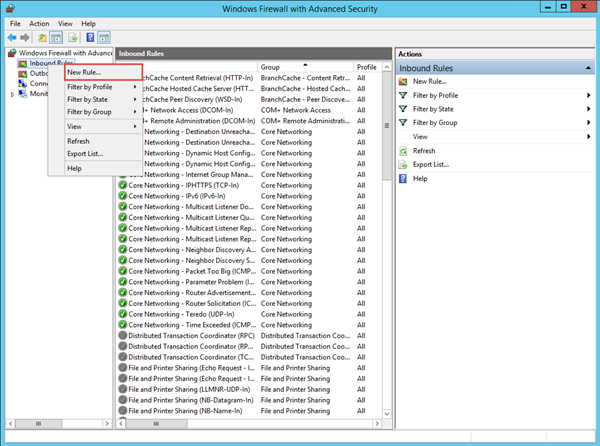
The New Inbound Rule Wizard opens.
- Follow the steps in the wizard to configure the rule as follows:
Step
Option
Rule Type
Select Port.
Protocol and Ports
Select TCP.
In the Specific local ports input field, enter
80.
Action
Select Allow the connection.
Profile
Apply the rule to all firewall modes.
Name
Enter a name, for example,
Allow YouTrack. Enter an optional description. - When done, click the Finish button.
The firewall rule is enabled.
Alternatively, you can open Windows PowerShell and enter the following command:
Now that you have opened the port that will be used by YouTrack, stay logged in to the Remote Desktop Connection and continue with the final step.
Install YouTrack
The procedure for installing YouTrack on the virtual machine is similar to any other YouTrack installation. You can install whichever distribution type you want to use. This setup follows the installation procedure for the MSI distribution.
The Windows virtual machine includes Internet Explorer as the default browser, however, the browser is configured to use the enhanced security configuration. This configuration does not trust any web sites and disables downloads. Before you continue with the installation:
Disable Internet Explorer Enhanced Security.
orDownload and install a different web browser. If you install a different browser, set it as the default browser for your operating system.
To install YouTrack:
- Open the Windows Installer Package (MSI file).
The JetBrains YouTrack Setup Wizard opens.
- Follow the instructions in the setup wizard.
When the installation wizard is finished, the web-based Configuration Wizard opens in your default browser.
In the Configuration Wizard, click Set up.
On the Confirm Settings page, change the Base URL to the full DNS name of your virtual machine. This ensures that notifications that contain links to your YouTrack instance point to the correct URL.
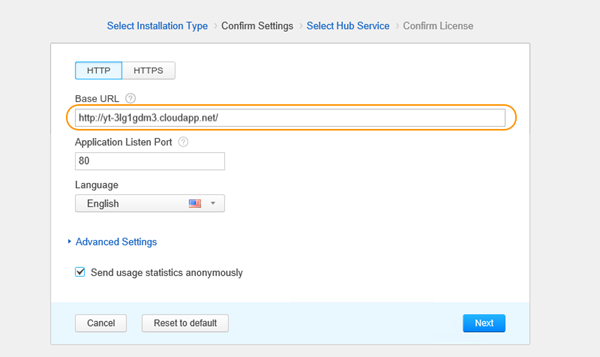
Continue with the remaining steps in the wizard.
- When done, click Finish.
The configuration is applied to your YouTrack Standalone server.
Do not close the page in the browser until the setup is complete. When the YouTrack Standalone server is ready, you are logged in to YouTrack as a guest.
That's it. Your YouTrack Standalone instance is installed and available for use in the cloud.
