Create and Edit Issues
If your project team uses YouTrack, the first thing you'll probably do is create an issue or two. If you've read the quick start guide, you already know how easy it is. On this page, you'll find a little more information about how to create an issue, add an attachment, and update existing issues.
Create an Issue
Any time you need to report a problem or define a task for yourself or another member of your project team, create an issue for it.
To create an issue:
Press Alt + Insert (Control + N for macOS), or click the New Issue button in the header.
YouTrack normally sets the value for the project field to the project where you reported your last issue. If you are currently using a project as a search context, this project is used instead.
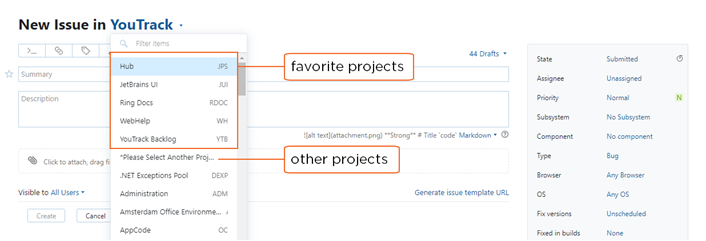
To report the issue in another project, select another value from the project list in the header. Projects that you have marked as your favorites are shown at the top of the list.

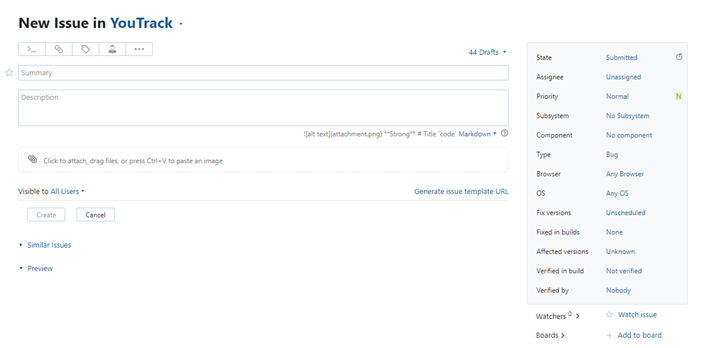
Enter an issue summary and description in the corresponding input fields. When you enter the description, you can use Markdown to format your text. You can also format text in YouTrack Wiki syntax, but Markdown is preferred.
The text below the Description field gives you a few hints for using Markdown syntax. To see a complete list of formatting options, click the Markdown link to open the syntax list, then click the help icon to open the YouTrack Markup Reference page. For more information, see Markdown Syntax.
Assign values to the custom fields. Default custom fields include the issue type, priority, and subsystem. The following options are available:
Select values for each field in the fields panel.
Open the Apply Command dialog and set the values for multiple custom fields in a single command. To open the Apply Command dialog, press Ctrl + Alt + J.
To attach files to the issue:
Click the attachment panel to select one or more files from your local directory.
Drag files from your computer and drop them in the attachment panel.
Press Ctrl + V to paste an image from your clipboard.
For additional options, click the Show more button in the issue toolbar. For details, see Create and Edit Issues below.
Do one of the following:
To report the new issue, press Ctrl + Enter or click the Create button.
To close the New Issue page without reporting the issue, press Esc or click the Close. The current issue is saved as a draft. The next time you create an issue, you can reload the draft from the Drafts list toolbar.
Attach a File or Screenshot
Sometimes, words are not enough. To describe an issue in more detail, you can attach resources such as log files and screenshots to the issue.
To attach a file or screenshot to an issue:
Click the Show more button in the toolbar.
Select one of the following options:
Option
Description
Attach file Select one or more files from your local directory and attach them to the issue.
Attach files privately Select one or more files from your local directory and set the visibility of the attachments. Use this option when the attachments contain information that should be restricted to specific users or groups.
Attach and edit image Select, drop, or paste an image and open it in the image editor. For more information, see Edit Images.
For more information about attaching files or screenshots to an issue, see Attach Files.
Edit an Existing Issue
Nobody's perfect. If you want to rewrite the issue summary or description, you can change these at any time. All changes are recorded and displayed in the issue history. There are a few properties that you cannot update, like the issue ID, reporter, and creation date. These properties are saved by YouTrack and cannot be overwritten.
To edit an existing issue:
Select an issue in the list and press F2 or click the Edit issue button in the toolbar.
The issue opens in editing mode.
Update the project, summary, or description. You can also set new values for the custom fields.
When finished, click the Apply changes button.
You can also apply changes to multiple issues with commands. For more information, see Commands.
