Workflow Tutorial
Workflows are the ultimate option for customizing YouTrack. You can apply sets of rules to issues in a project and automate changes in issue states to make YouTrack adapt to your process.
This tutorial shows you how to create a workflow and define its rules. The tutorial also introduces you to the language that is used for writing workflow code.
Prerequisites
You have permission to create and edit workflows. These tasks require that you have the Read Project and Update Project permissions in at least one project. Users with the Low-level Administration permission can create workflows and edit any workflow in the system.
You are familiar with your YouTrack configuration. This means that you know how your projects are configured and the fields that are used in issues for each project.
You have a basic understanding of JavaScript.
You have verified that the existing workflows do not support your use case. You need to write new rules and attach them to one or more projects.
You have created a backup of your YouTrack database. Errors in custom workflows can lead to the inadvertent removal of important data or corruption of the database. We strongly recommend that you back up your YouTrack database before you update workflows. This task requires the Low-level Admin Write permission.
Use Case
Let's say your team follows a Kanban process and would like to use the YouTrack Agile Board. The columns of the board represent each department. Your team has a set process for moving issues from one department to the next. Team members can see which department is working on an issue at the moment. The color of the issue card represents the time left until the deadline. The card starts out green and then, based on a specific workflow, turns yellow and then red as the deadline approaches.
Your task is to set up the project and create workflows to support the board as described above.
Set Up the Project
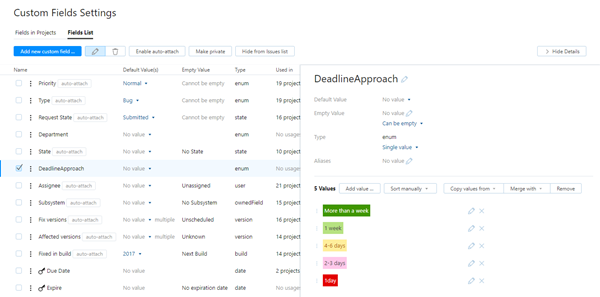
To have colored cards on the board, you need an enumerated field in your project. Let's call the project WebDev and name the field DeadlineApproach. You add this field to your project and add the following set of values:
More than a week
1 week
4-6 days
2-3 days
1 day
You define the colors when you add values to the set of values available for the field.
You also need to add a Due Date field to your project to store the deadline.
Now that you have defined the color scheme for the custom field, you need to apply this color scheme to the cards on your agile board.
To configure your agile board:
Click the Agile Boards link in the header.
Choose your board from the drop-down list.
Click the Board settings button, then select the Card tab.
From the Color Scheme drop-down list, select Deadline Approach.
Create the Workflow
Workflows are really nothing more than a container for the modules that define your rules. First, you create the workflow. Then you add modules that contain the rules to it.
To create the workflow:
From the Core Features section of the Administration menu, select Workflows.
- Click the Create workflow button.
The New Workflow dialog opens.
- Enter a Name and a Title.
Let's name the workflow kanban-color-scheme and give it the title Kanban Color Scheme.
- Click the Save button.
The workflow is added to the list on the Workflows page.
Create an On-change Rule
You need to add two rules to the workflow:
An on-change rule that runs when an issue is changed, when a new issue is created, and the Due Date field is updated.
An on-schedule rule that updates the color of the cards daily.
To add the on-change rule:
- Locate the workflow in the Workflows list and click its name.
The New Module dialog opens in the sidebar.
- Click the On-change button.
The New Module dialog opens.
Enter a Name for the module. We'll call this one
apply-color-by-due-date.- Click the Save button.
The module is added to the current workflow.
The template for an on-change rule loads in the workflow editor.
Now let's define the on-change rule.
You can copy and paste this block of code directly into the editor.
When finished, click the Save button.
Create an On-schedule Rule
The next step is to create the on-schedule rule. This rule checks all of the issues in the project on a set schedule and updates the color scheme that is applied to each card on the Kanban board based on how near each issue is to its due date.
To add the on-schedule rule:
- Click the Add module icon in the sidebar, then select On-schedule from the list.
The New Module dialog opens.
Enter a Name for the module. We'll call this one
change-color-over-time.- Click the Save button.
The module is added to the current workflow.
The template for an on-schedule rule loads in the workflow editor.
Copy the following code block and paste it into the editor, then click the Save button.
Here's a basic explanation of what happens in this script:
First, you set the
searchproperty. This is necessary because you only want this rule to be applied to unresolved issues.Next, you set the schedule. The schedule is determined by the
cronproperty.Then you have a series of
ifstatements that check how close the Due Date is to the current date.The
Date.nowmethod returns a value that corresponds to the current date and time in UTC.As with the on-change rule, we set the requirements for custom fields and their values. These requirements must exist in the project for the workflow to execute properly.
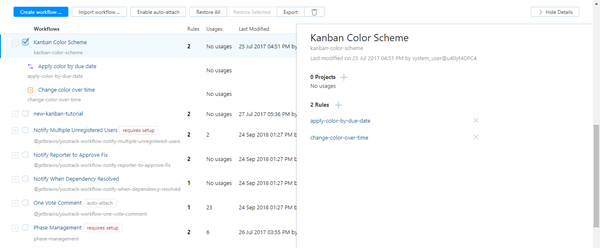
With these two rules, your workflow looks as follows:

Attach the Workflow to a Project
The last step is to attach the workflow and enable the rules in your project.
To attach a new workflow to a project:
From the Core Features section of the Administration menu, select Workflows.
Select the workflow from the list. If the sidebar is hidden, click the Show Details button.
Click the + sign for Projects in the sidebar and select the projects to which you want to attach the workflow. You can attach the same workflow to several projects at once.
If there are projects that do not meet the workflow requirements, the requires setup flag is shown. This can mean that the project does not use the required custom fields, values are missing from the set of values in a custom field, or that there are groups, saved searches, projects or other system-wide entities that do not exist in YouTrack.
To complete the setup:
Expand the workflow in the list.
Select the first rule that is marked with the requires setup flag without opening the module in the workflow editor. Meaning, select the rule without clicking the link for the module name.
- Move the pointer over any of the projects that are displayed in red text.
A tooltip displays the changes that are required to activate the workflow in each project.

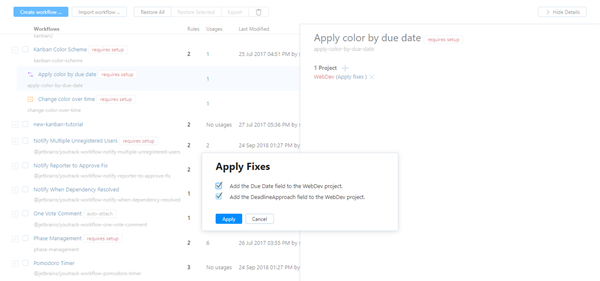
- Click the Apply fixes link.
The Apply fixes dialog opens.

Select all of the required fixes, then click the Apply button.
- Repeat steps x and y for all of the projects that require setup.
When done, the requires setup flag is automatically removed from each rule.
When you refresh the page, the requires setup flag is removed from the workflow.
The attached workflow starts working immediately. If you edit to a workflow that is currently attached to a project, the changes take effect when you save your changes in the workflow editor. However, if you add requirements to the workflow that require additional setup, the workflow will not execute properly until the requirements are met.

