Manage Custom Fields
As a project administrator, you can customize the fields that are used for issues in your projects. System administrators can modify the properties of custom fields for all projects in the system. For more information, see Custom Fields.
To access and manage the fields that are used for issues in your project, select the Fields tab in the Edit Project page.
Add a Custom Field
As a project administrator, you can add new fields for the issues in your project.
When you add a field to your project, the custom field is available to other projects in the system. A system administrator or user with global project administration permissions can reuse this field in other projects. For enumerated custom fields, the set of available values can be managed for each project independently.
When you create a custom field, be sure to set the field type that you want to assign to values that are stored in the field. For most field types, the type is set when the field is created and cannot be changed. Converting values from one data type to another is a manual process that takes time and effort. For more information, see Change Field Type.
To add a field:
From the Edit Project page, select the Fields tab.
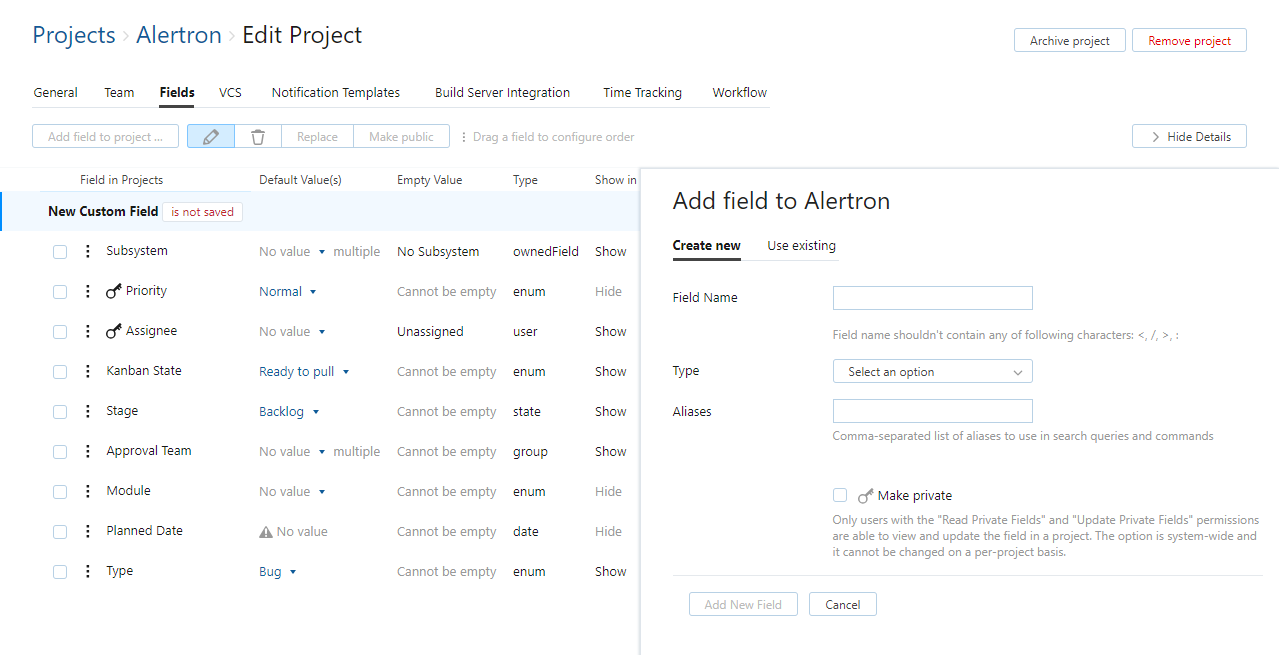
Click the Add field to project button.
When you create a new field, the combination of field name and field type must be unique. If a field with the name and type you want to use already exists, follow the instructions for attaching a field to your project.
Enter values in the custom field settings. For a detailed description of each setting, see Custom Field Settings.
If the field is an enumerated type, you have the following options:
Select the New set option. Define the set of values after you create the custom field.
Select a field from the list. The set of values that is used in the select field is added to the new field.
Click the Add new field button.
The custom field is added to your project.
Attach a Custom Field to Your Project
If you want to use an existing field for issues in your project, you can attach it to your project.
To attach a field to your project:
From the Edit Project page, select the Fields tab.
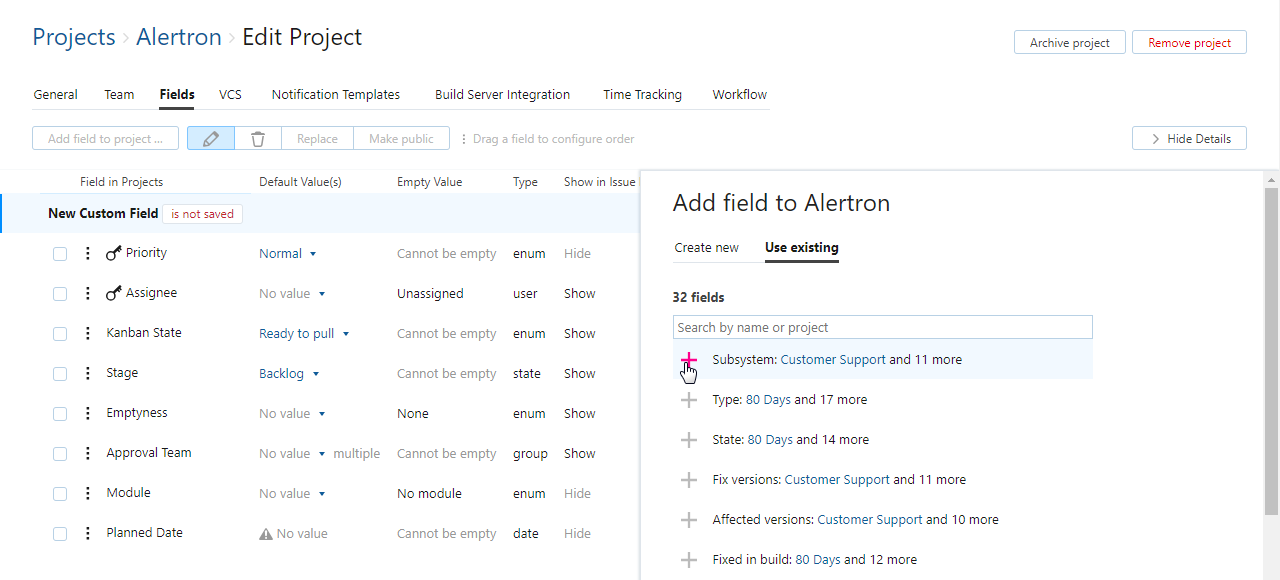
Click the Add field to project button.
The Add field to project dialog opens in the sidebar.
Select the field you want to attach to the project. Use the search box to filter the list of custom fields.
Click the + icon next to the field name to attach it to the project.
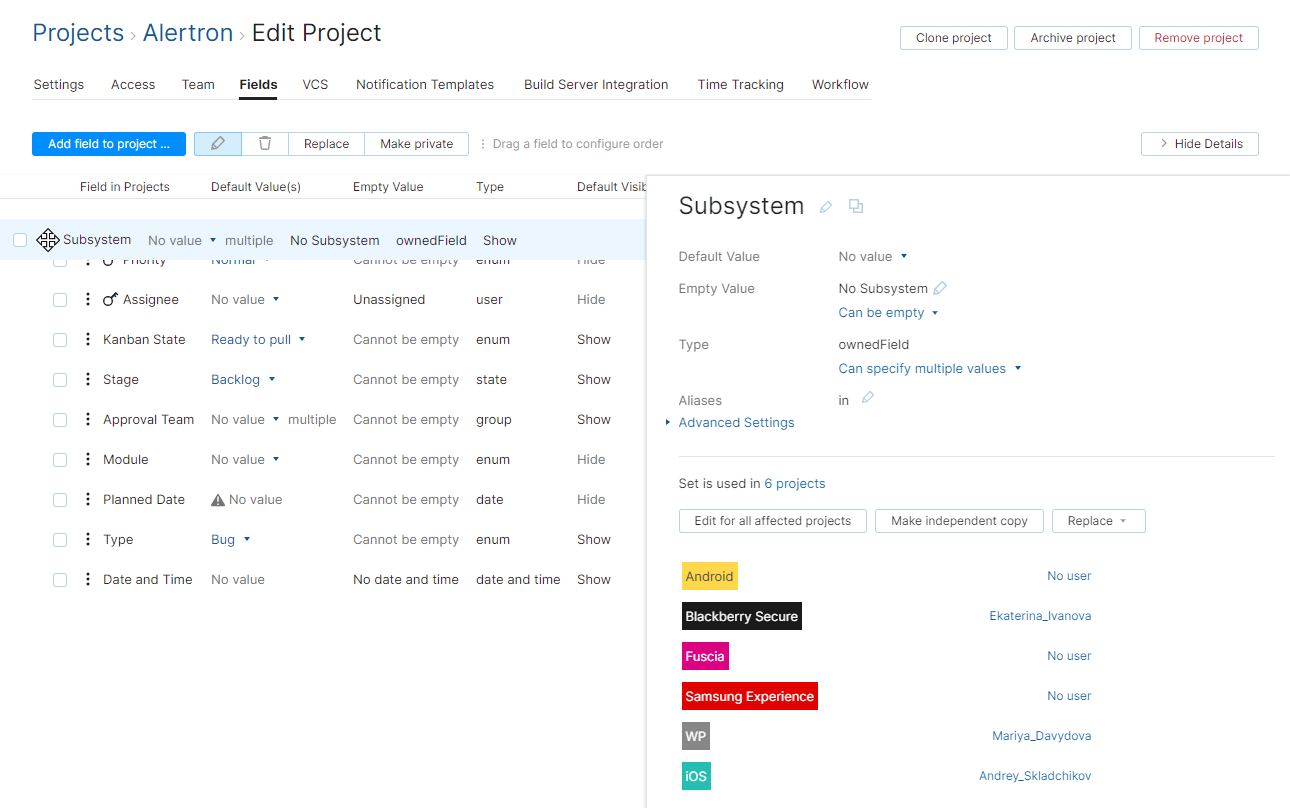
The settings for the selected field are displayed in the sidebar.
If the field is used in other projects, you can only modify the set of values for the custom field when you have the Update Project permission for all of the projects that use the set. You can modify the properties of the field in your project without affecting other projects that use the field.
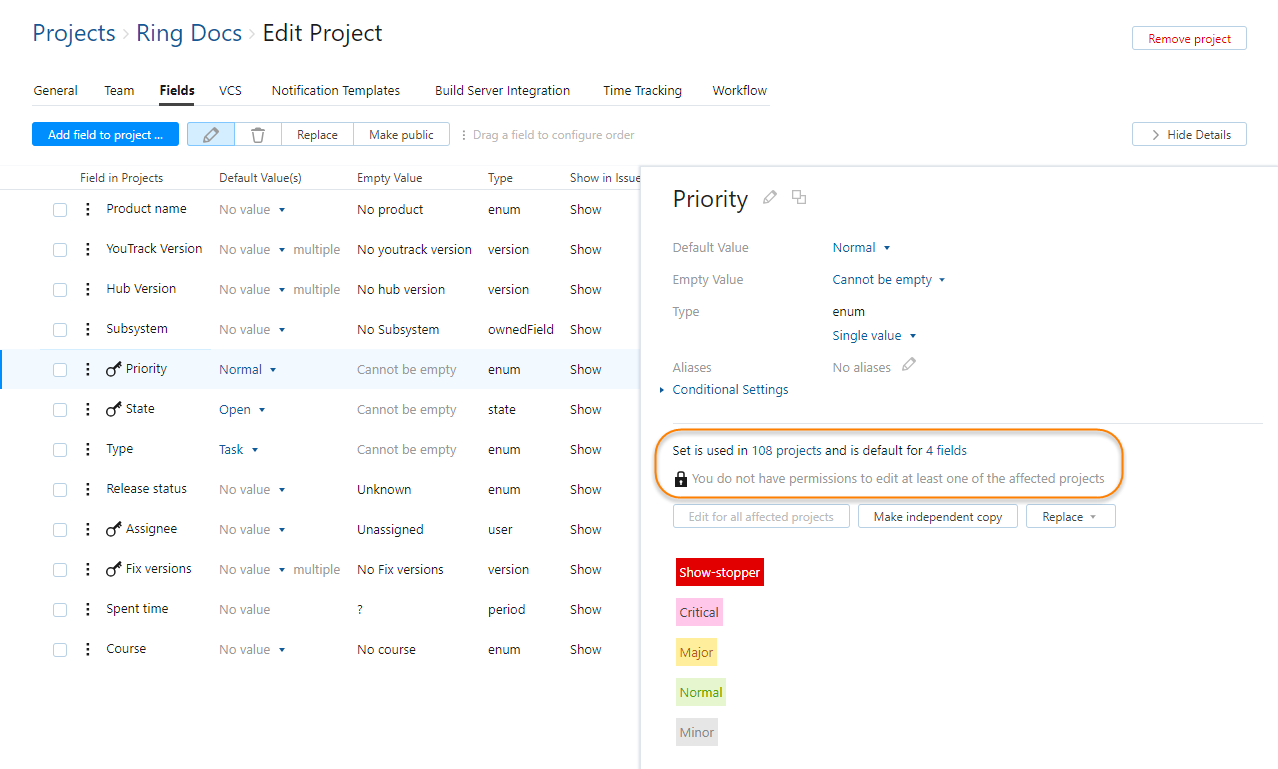
If the current set of values is compatible with your project, you can use the field without making any changes.
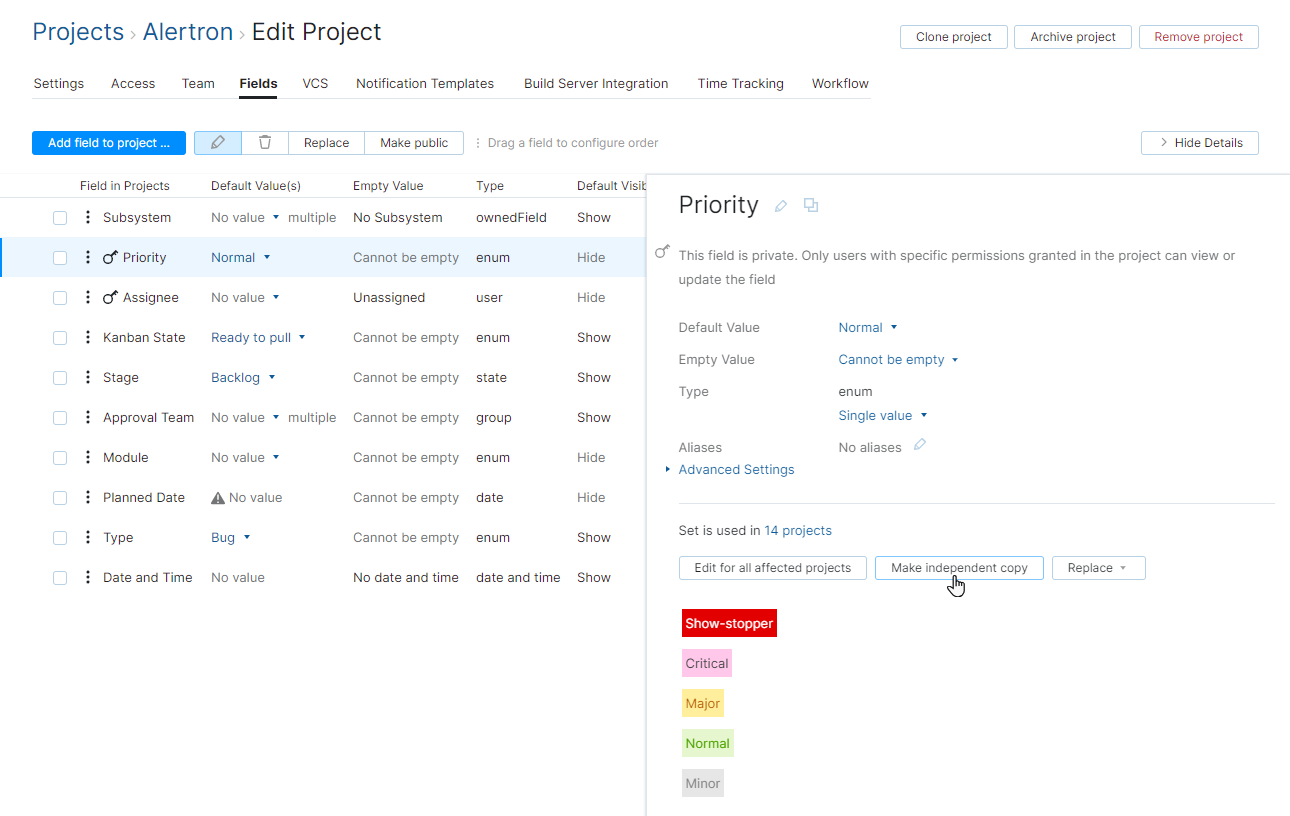
If you want to customize the set of values for the field, click the Make independent copy button.
A copy of the set of values is created in your project.
You can freely edit the set of values without affecting the sets of values for this field in other projects.
Private Custom Fields
You can manage the availability of custom fields in your project by making them private or public. When a custom field is marked as private, only users with the Read Issue Private Fields or Update Issue Private Fields permissions in your project can view or edit the field, respectively.
When a field is public, any user who has the Read Issue or Update Issue permissions in your project can view or edit the field.
This feature can help you restrict access to data in your project in the following ways:
Hide fields that store sensitive information, like personal data.
Limit the number of users who can edit the values in a field. For example, you can configure access in your project so users can view the current assignee, but only managers can reassign issues.
Private fields are an "all or nothing" solution. If a user has permission to view and update one private field in a project, there's nothing that prevents them from viewing and updating values in any of the other private fields in the same project.
If you want to set requirements for viewing and updating field data independently for different fields in your project, use th Advanced Settings. For details, ss Group-based Field Visibility.
To make a field private:
From the Edit Project page, select the Fields tab.
Select one or more custom fields that you want to hide in the fields list.
Click the Make private button in the toolbar.
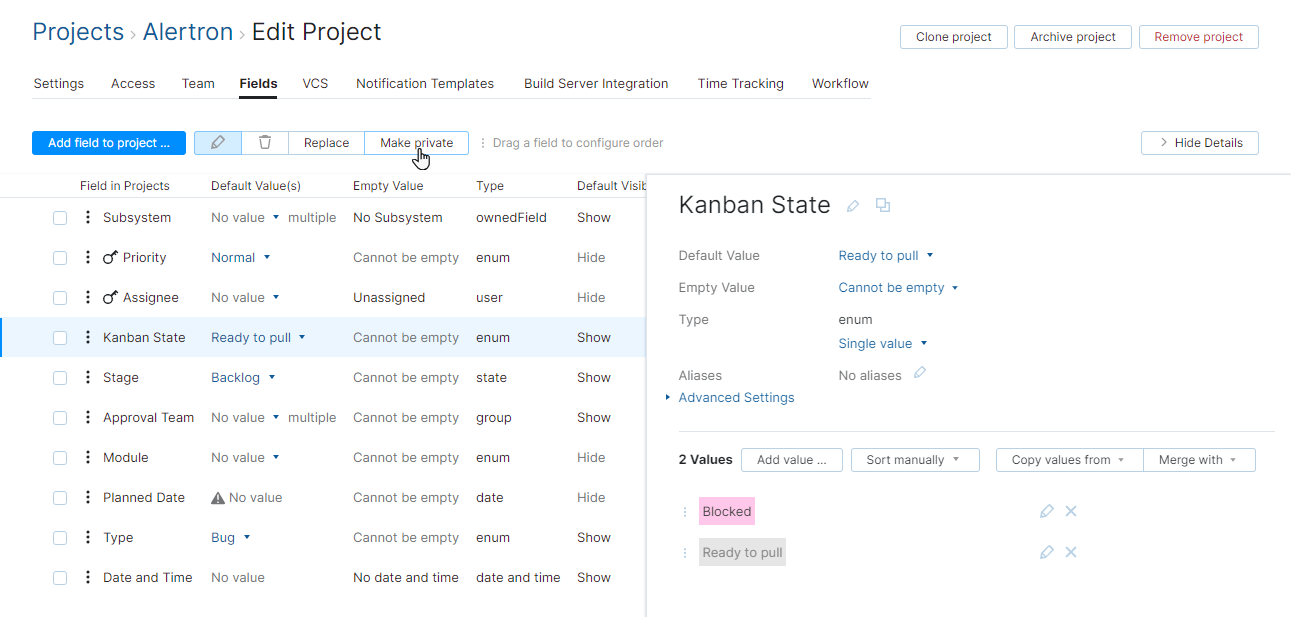
The custom field is only visible to users who have the Read Issue Private Fields permission in your project.
Only users who have the Update Issue Private Fields permission in your project can change the value for the custom field.
The custom field is shown with a key icon before the field name in the list.
The custom fields for Priority and Due Date are marked as private by default. If you want to make these fields available to all users in your project, select the fields and click the Make public button in the toolbar.
Group-based Field Visibility
The Advanced Settings for custom fields limit the ability to view or update field values to members of a specific group or team. These settings let you apply fine-grained restrictions to particular fields without having to rely on privacy settings or writing complex workflows.
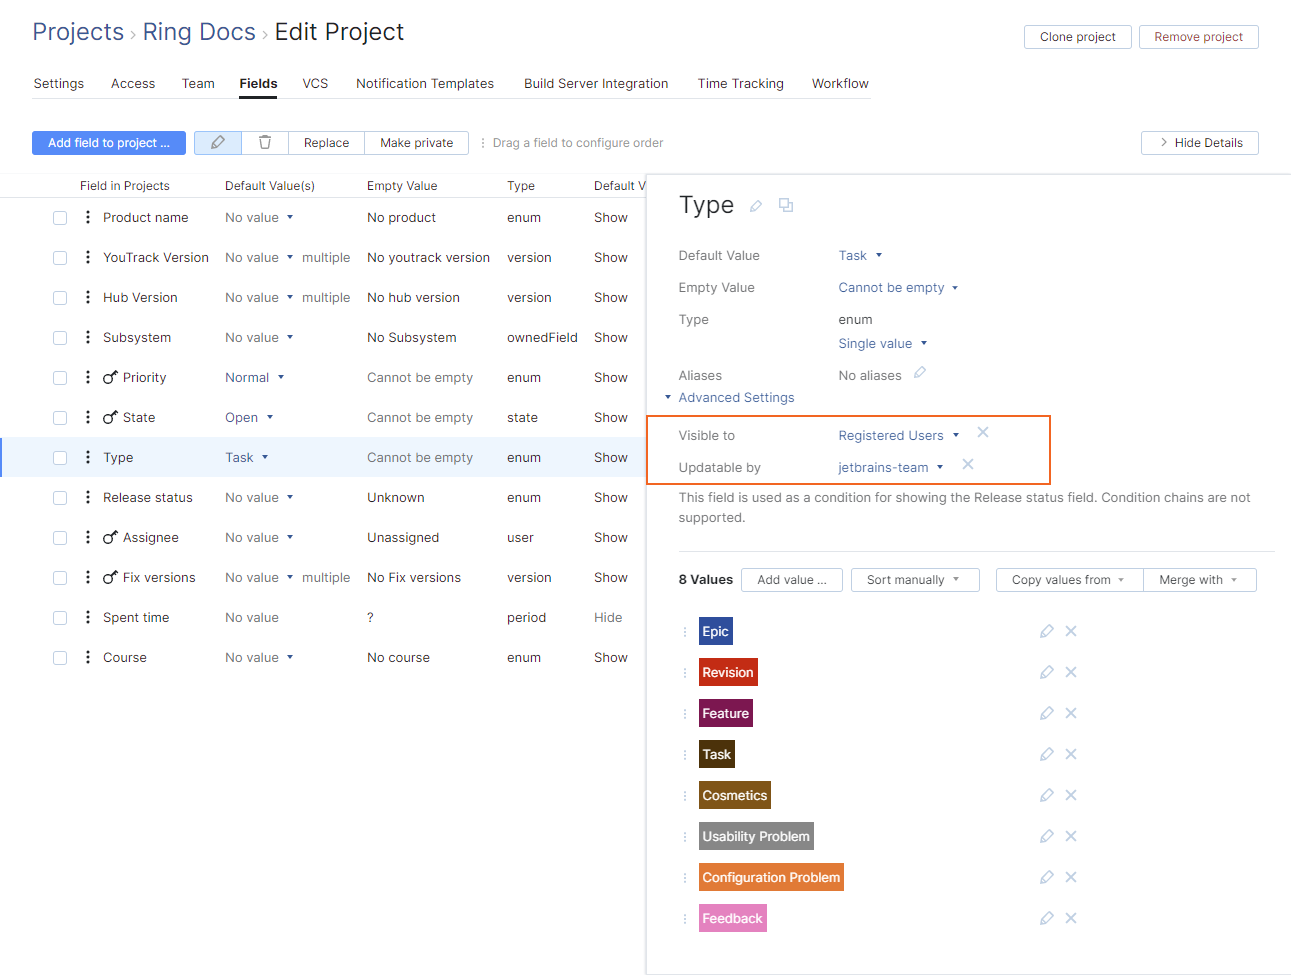
With group-based visibility options, you can set the requirements for viewing and updating field data independently for each of the fields in your project. To learn more about these settings, see Advanced Settings.
In the example shown here, the Priority, State, Assignee, and Fixed versions fields are marked as private. Private fields in this project are visible to registered users, but can only be updated by members of the project team.
If you wanted to fine-tune restrictions for another field in the project, like Type, you could use the group-based visibility settings. These settings would let you preserve the visibility for registered users while giving users who aren't members of the project team the ability to update the field value as well.
Required Custom Fields
You can configure the Empty Value setting for any custom field on a per-project basis. The option that you choose for this setting determines whether the field is required when an issue is reported in the project.
For fields that store a simple type (
string,date,period,integer, orfloat), the field is required when the Empty Value option is set to Cannot be empty.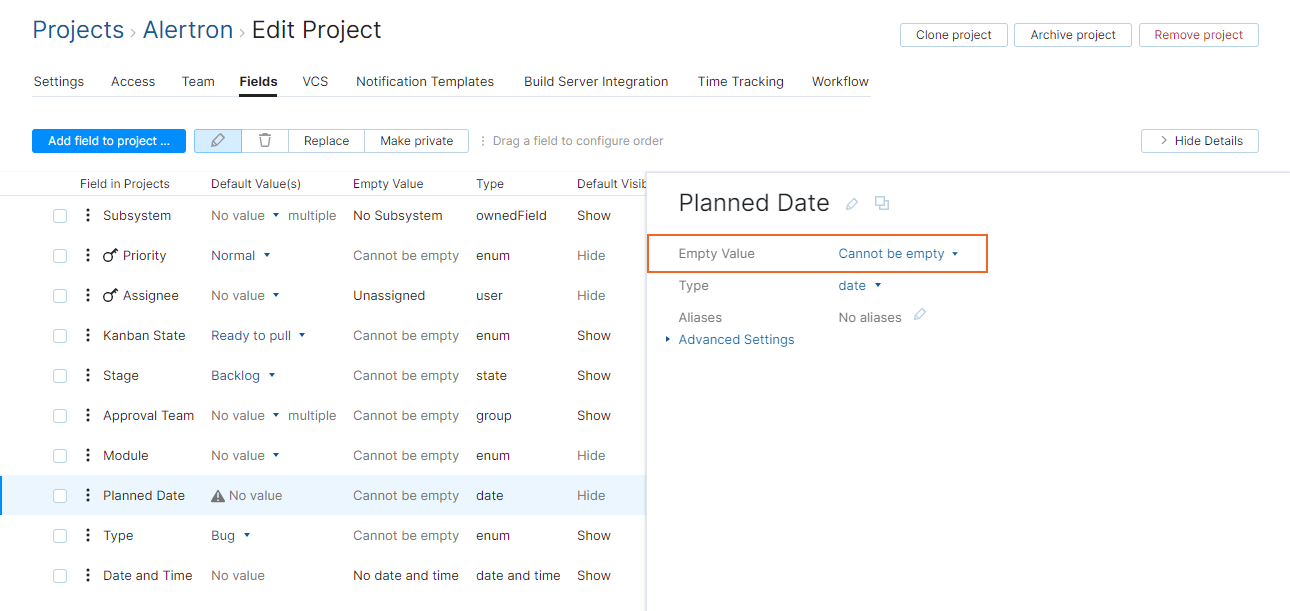
For fields that store an enumerated type, the field is required when Empty Value option is set to Cannot be empty and the Default Value option is set to No value (required).
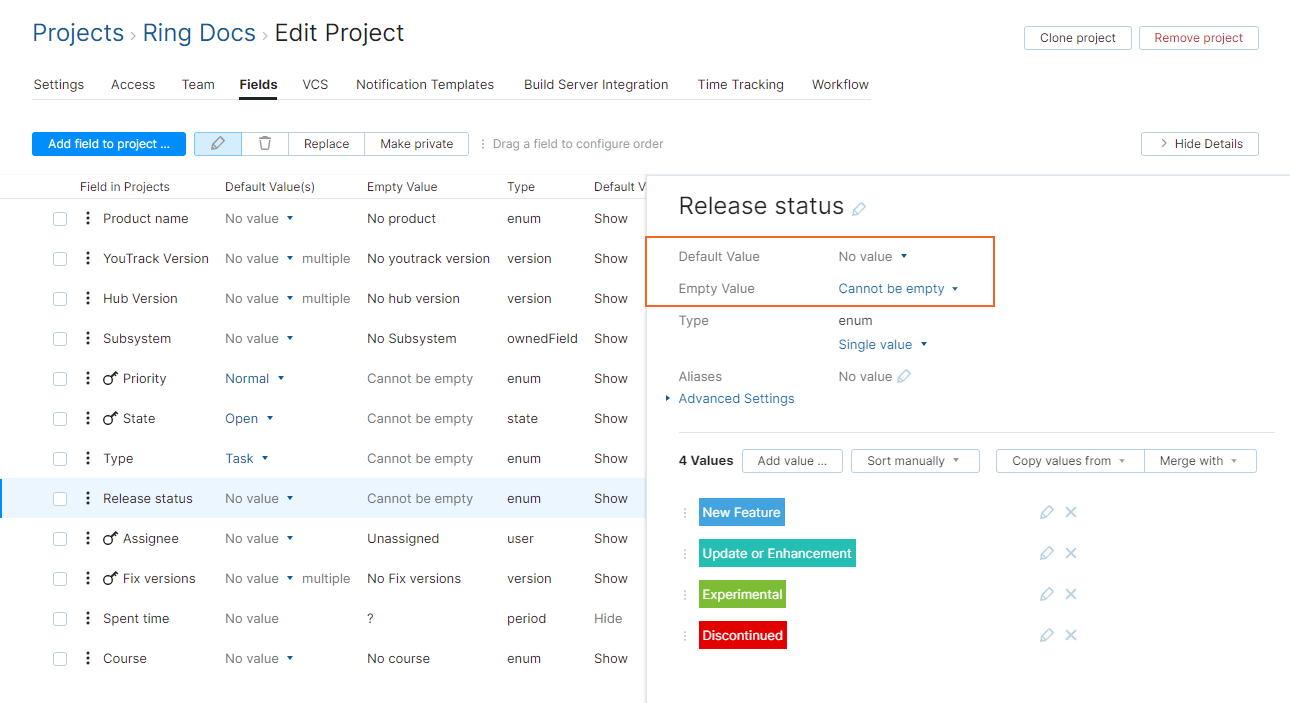
When a user reports an issue in the project, required fields are shown with the message Set value in the input field.
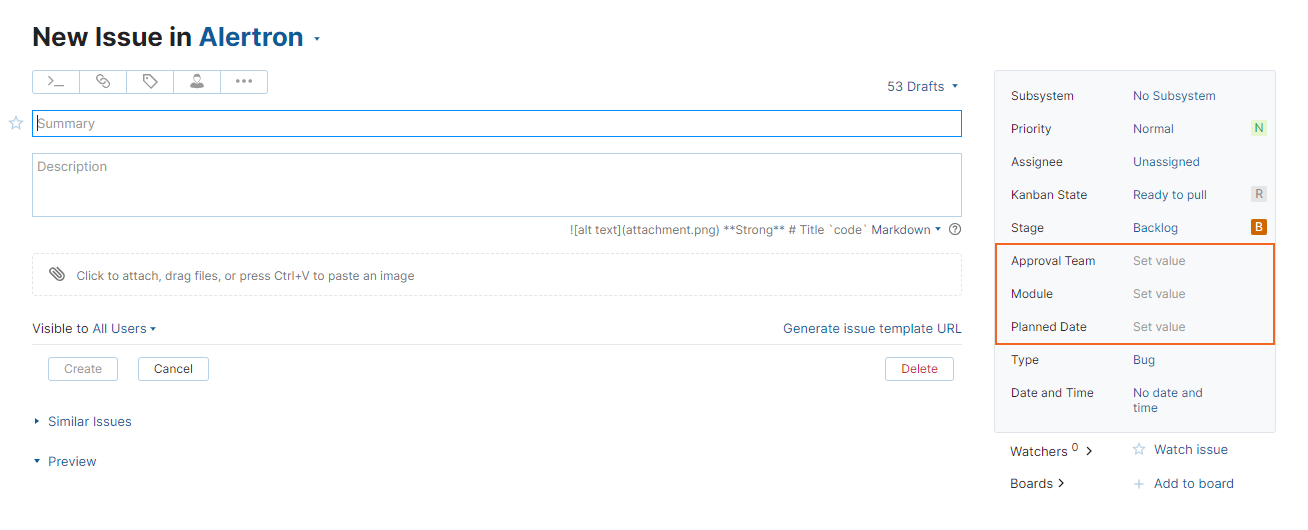
Before you require a field in your project, consider the following consequences:
If you require manual input for a field that is also private, users who don't have permission to read and update private fields are blocked from creating issues in the project.
If you take a field that is shown on a conditional basis and configure it as a required field, the field is only required when the condition for showing the field is met.
Field requirements are only checked when new issues are reported or when a user edits the required field directly. When a user moves an issue to a different project, the fields that are required in the new project can remain empty.
Conditional Custom Fields
In each project, you have the ability to show specific custom fields only when a value is selected in another custom field. The most common use case is to choose which fields are shown for different issue types. However, you can add a condition to show specific fields based on the selection in any enumerated field, not just issue type.
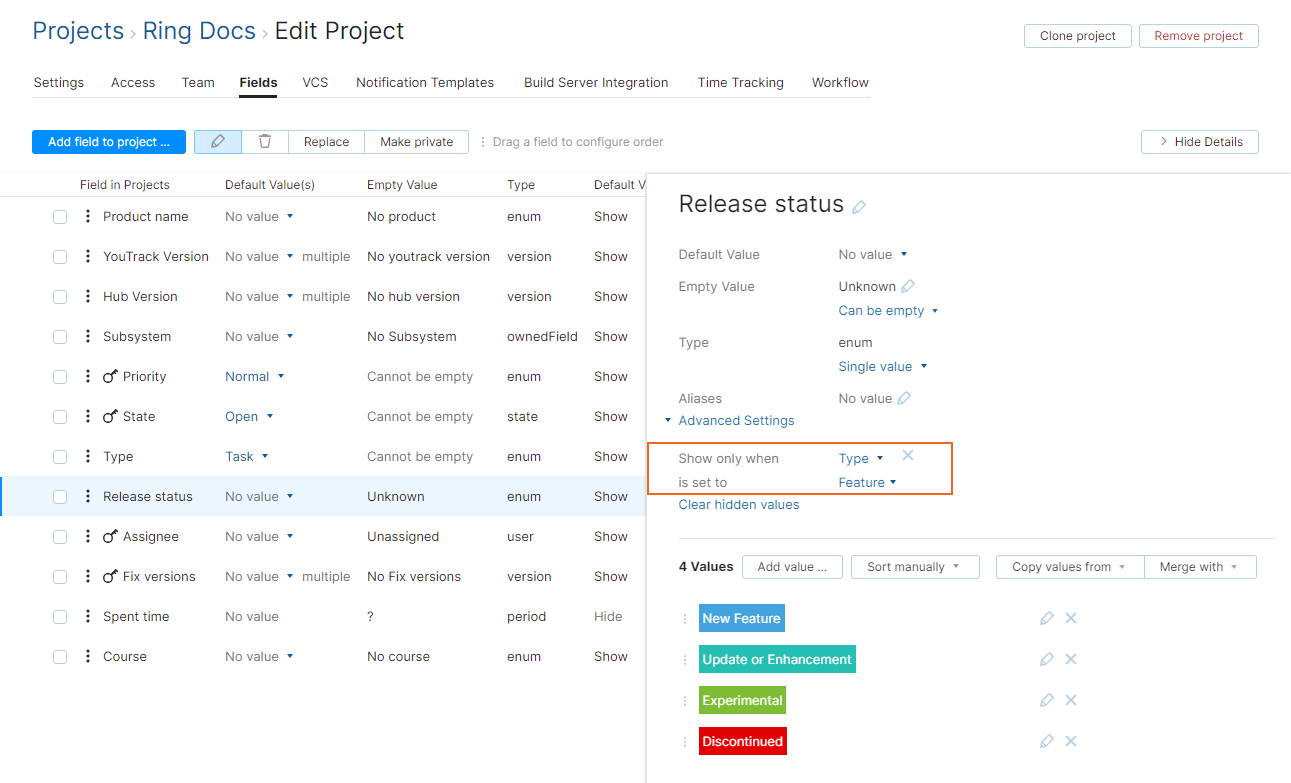
You can add a condition to any field in a project. Conditional custom fields are subject to the following limitations:
You can only set a condition for showing a custom field based on the selection in a custom field that stores an
enum,state,ownedField,version, orbuildas a single value.It not possible to set up chained dependencies. This means that you cannot make the visibility for a custom field dependent upon multiple levels of conditions.
Before you add a condition for showing a custom field, consider the following consequences:
Fields that are hidden behind a condition do not store values. This means that you can't use this feature just to hide sensitive information. If you want to limit access to fields that store personal data or other sensitive information, use a private field instead. For more information, see Private and Public Issue Fields.
When you hide a custom field, its value is cleared. If you add a condition to a field that contains a value in one or more issues, the value is cleared in all of the issues that do not meet the condition. Check the custom field that you want to use to create the condition first and make sure it contains the desired value in all of your issues.
This is especially important when the value that you want to use to hide the conditional custom field is used as the default value. To avoid losing data, set the value for the field that creates the condition to the value that shows the conditional field in all of the issues that store a value. You can then set up the condition and hide the field by default in new issues.
If a custom field is hidden behind a condition, you cannot set the value for the field with a workflow. If you use a workflow to manage the values in a conditional custom field, make sure that your workflows don't update fields that are hidden. You can customize the workflow to check for the condition before the change is applied.
To set up a conditional custom field:
From the Edit Project page, select the Fields tab.
Select the custom field that you want to show on a conditional basis from the list.
Expand the Conditional Settings section in the sidebar.
From the Show only when drop-down list, select the custom field that you want to use for the condition.
From the is set to drop-down list, select one or more values.
When one of the values specified here is selected in an issue that belongs to your project, the conditional field is shown.
Change Field Order at the Project Level
The default order in which fields are displayed on Issues list and single issue view is set at the global level by an administrator. If you prefer to order the fields differently, you can set a custom order for your project. Project-level settings override the global settings.
To change the field order:
Edit a Set of Values
You can edit the set of values that are used in a field.
Wherever you can change the value for a field, there is an option to add a new value to the set. As a project administrator, you can add values to fields that are unique to your project or use an independent set of values. System administrators and users with project administrator access in the global project can add values to the set in all projects. When created, the new value is added to the issue. This option is visible in the following locations:
The Issues list
Single issue view
Agile boards
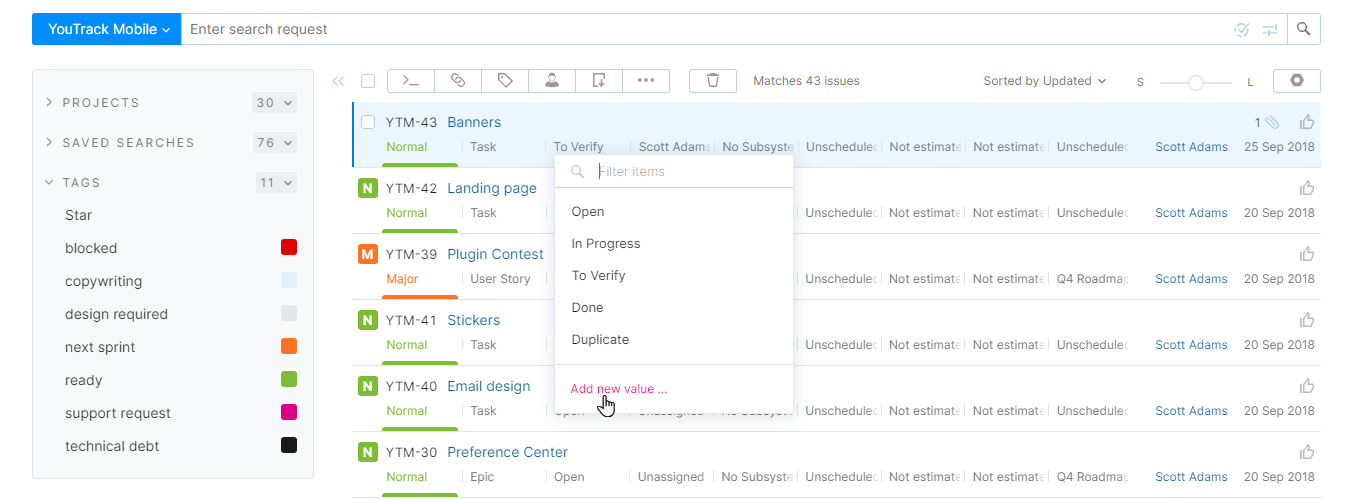
If the set of values is shared with other projects, you can make an independent copy of the set and edit the values for the field in your project.
To edit a set of values that is shared with other projects:
From the Edit Project page, select the Fields tab.
Select the field that uses the set of values.
The details dialog for the selected custom field opens in the sidebar.
Edit the set of values. The following options are available:
Click the Add value button to add a new value to the list.
Click the Copy values from button and select a field to copy the values used in the selected field. The values from the selected field are added to the current set of values.
Click the Merge with button and select a field to merge existing values with the values used in the selected field. The values from the selected field are merged with the current set of values.
Sort Values in a Set
By default, the values in a set are ordered manually in the order that they were added to the field. When ordered manually, each value is assigned an ordinal value that represents its position in the list.
The sort order affects the following behavior in YouTrack:
The values that are displayed in drop-down lists for custom fields are displayed in the specified sort order. For example, the values for the default Priority field are sorted manually from highest to lowest. The value that represents the highest priority (Show-stopper) appears at the top of the list.
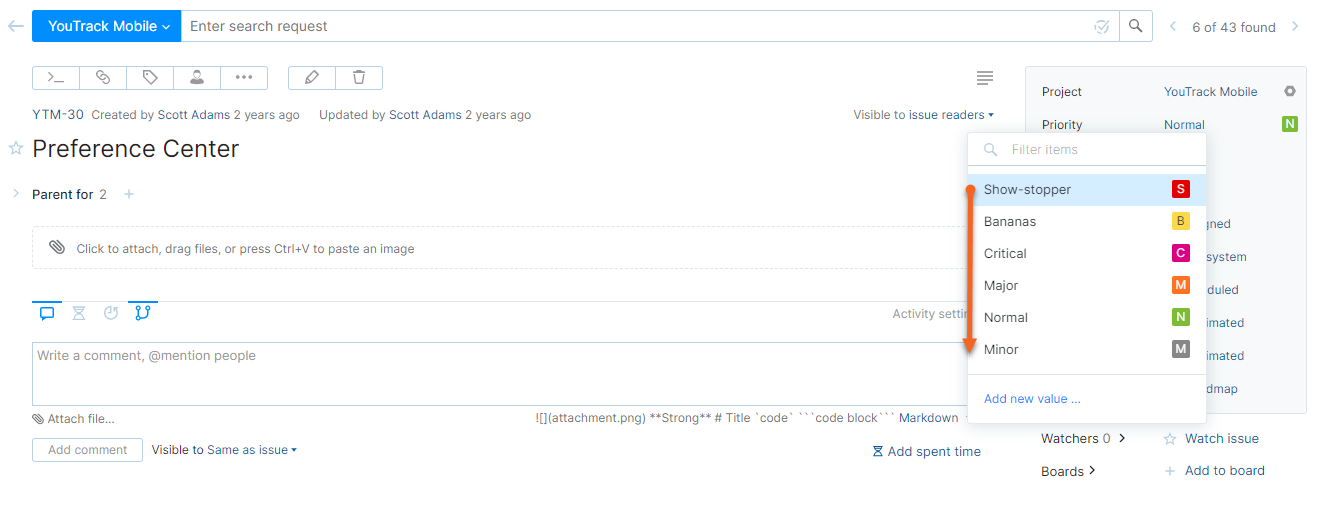
In search queries that specify a range of values, the sort order determines which values match the search request. For example, a search request that includes
Priority: Show-stopper .. Majorreturns issues that are Show-stopper, Critical, and Major.
As a project administrator, you have the ability to determine the sort order for values in fields that are used in your projects. System administrators can set the sort order at the global level for fields that are used in multiple projects. For more information, see Sort Values in a Set.
You can sort values in a custom field on the Fields tab of the Edit Project page. Sort options are available for all fields that store enumerated types except for fields that store a user or group type.
For fields that store a
usertype, the values are automatically sorted alphabetically by full name, with the current user at the top of the list.For fields that store a
grouptype, values are sorted alphabetically by name.
Sort Values Manually
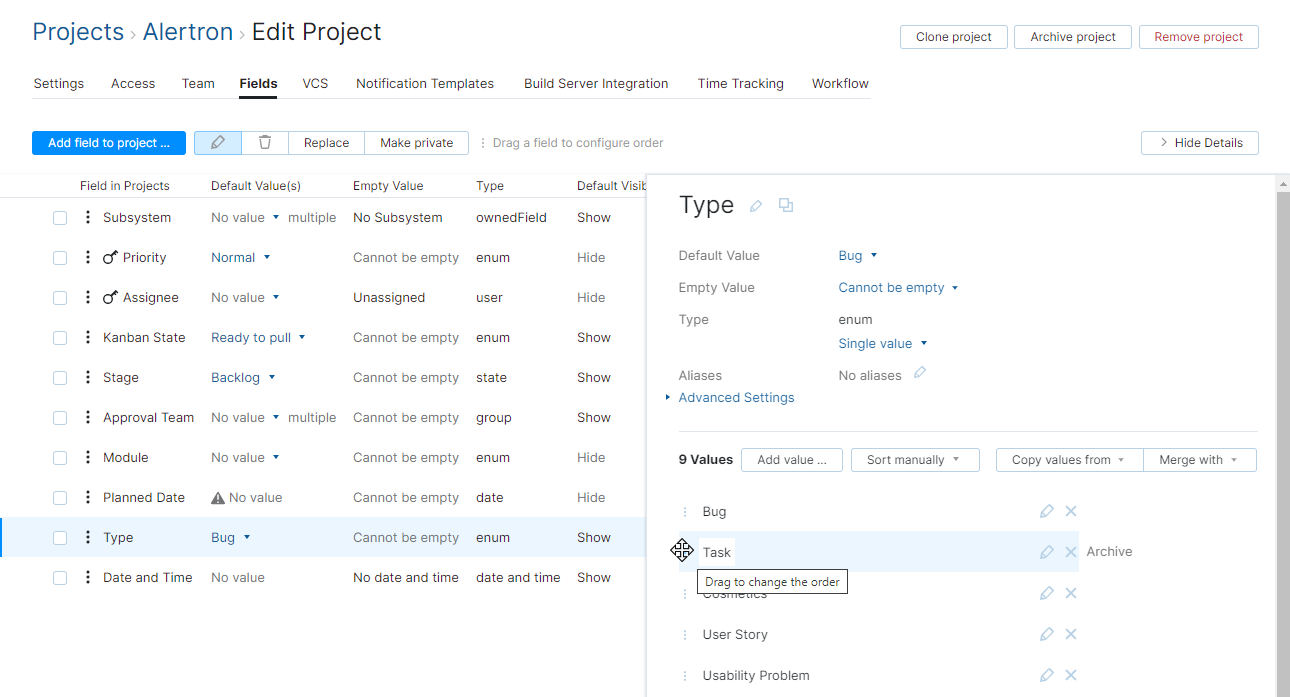
If you want to override the default order in which values appear in a custom field, you can manually resort the values in the list.
To resort values that are sorted manually:
Select a custom field with a set of values that can be sorted.
If the custom field is attached to one or more projects, you have the following options:
Edit set for all affected projects — the custom sort order is applied in all projects that use this set of values. To use this option, you need to have permission to update all of the affected projects.
Make independent copy — the custom sort order is stored in the set of values for the field in the current project.
Select the option that suits your purpose.
Drag the values into the desired order.
The custom order is saved automatically.
Sort Values by Name
For any field that supports manual sorting, you have the option to automatically sort values by name. Values can be sorted by name in ascending or descending order. When sorted by name, new values that are added to the set are shown in alphabetical order. There are two options for sorting by name:
The case-sensitive option sorts values alphabetically from A - Z, then a - z.
The case-insensitive option sorts values alphabetically regardless of which case is used for the first letter.
When you switch from manual sorting to any other sort option, the manual option is discarded. If you revert to sorting values manually, you have to reapply the custom order.
To sort values by name:
Select a custom field with a set of values that can be sorted.
If the custom field is attached to one or more projects, you have the following options:
Edit set for all affected projects — the sort order is applied in all projects that use this set of values. To use this option, you need to have permission to update all of the affected projects.
Make independent copy — the sort order is stored in the default set of values for the field in the current project.
Select the option that suits your purpose.
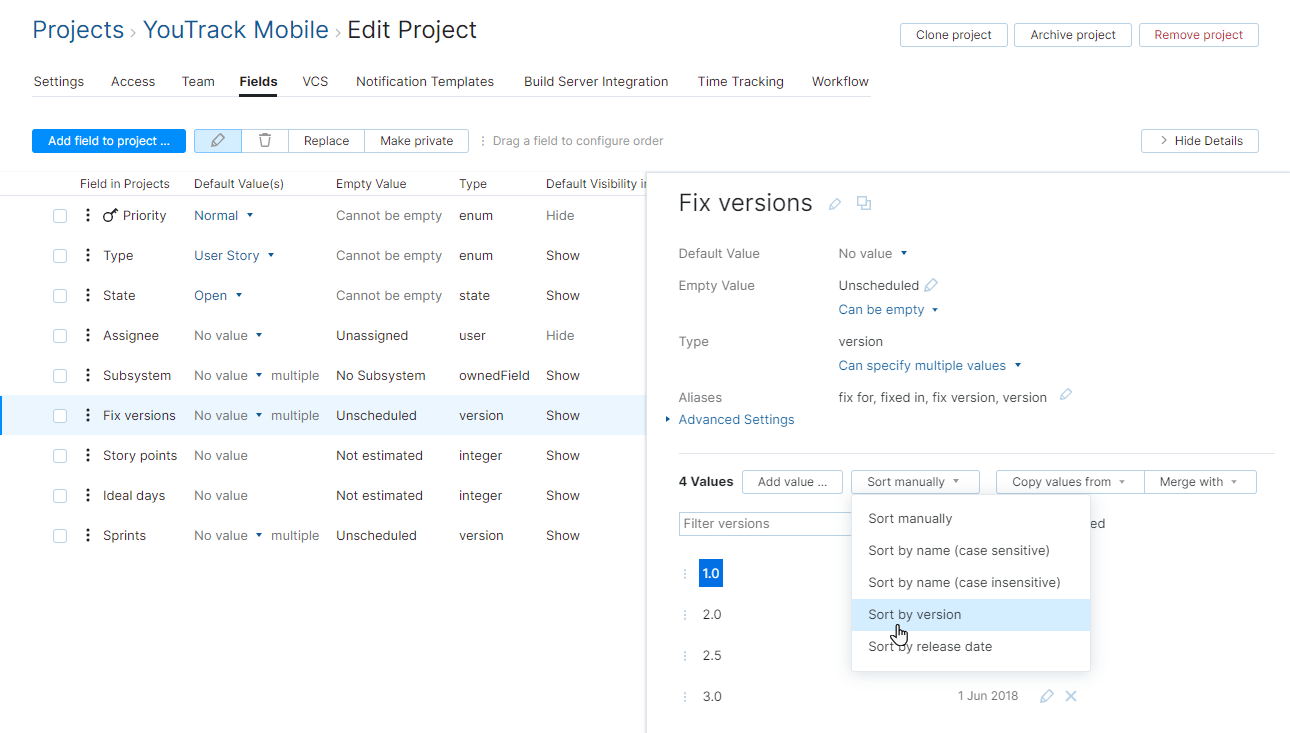
Open the sort menu and select a Sort by name option (either case-sensitive or case-insensitive).
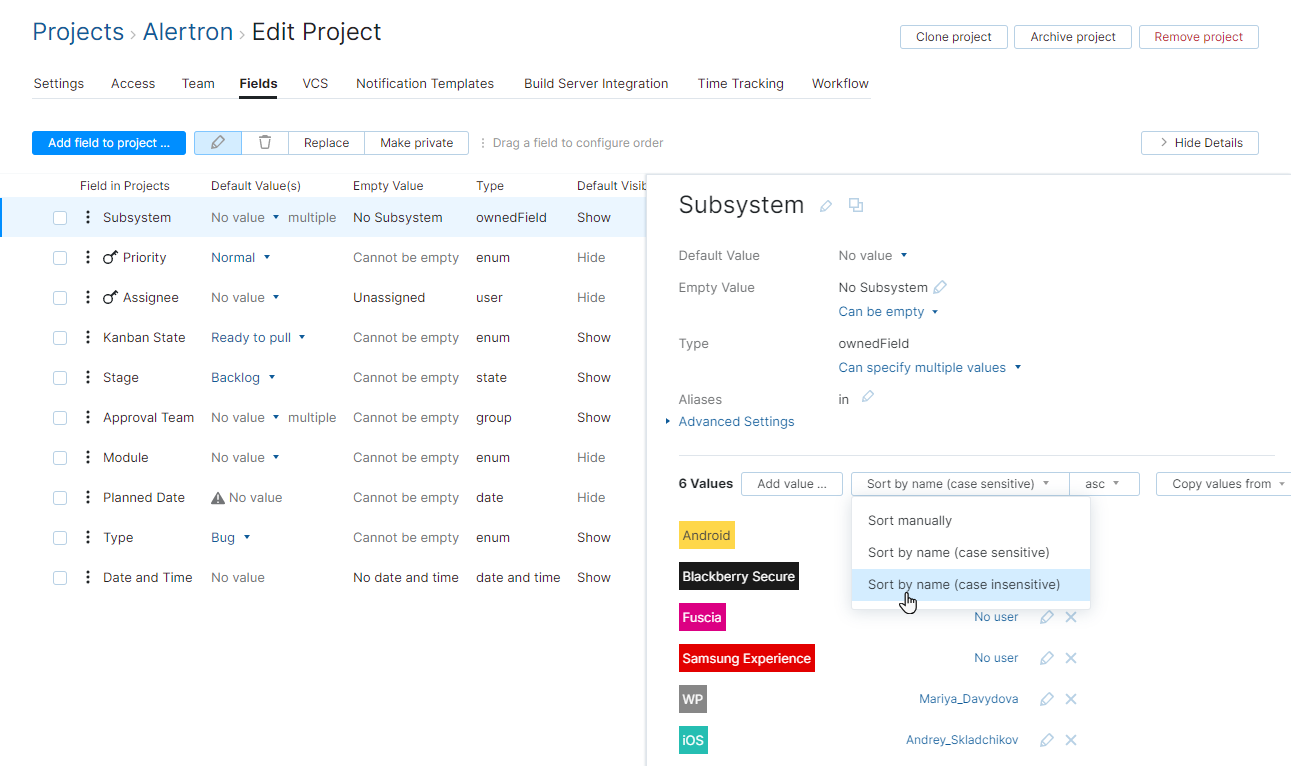
Confirm the action in the Change Sort Order dialog.
If the values were previously ordered manually, the manual order is discarded.
The values in the set are sorted by name in ascending alphabetical order.
If you want to sort the values in descending order, select the desc option from the drop-down list.
Sort Values by Version
For fields that store a version or build, you have the option to sort values by version. Values can be sorted by version in ascending or descending order. With this option, numeric values are sorted automatically according to the Semantic Versioning Specification (SemVer).
The most valuable application of this feature is in a search query. For many teams, the ability to search for issues that were fixed in a specific range of versions or builds helps to generate an accurate list for the publication of release notes.
To sort values by version:
Select a custom field that stores a
versionorbuild.If the custom field is attached to one or more projects, you have the following options:
Edit set for all affected projects — the sort order is applied in all projects that use this set of values. To use this option, you need to have permission to update all of the affected projects.
Make independent copy — the sort order is stored in the default set of values for the field in the current project.
Select the option that suits your purpose.
Confirm the action in the Change Sort Order dialog.
If the values were previously ordered manually, the manual order is discarded.
The values in the set are sorted by version in ascending order.
If you want to sort the values in descending order, select the desc option from the drop-down list.
Additional Sort Options
For fields that store a version or build, you have the option to sort values by the additional properties that are stored for each value. Values can be sorted by these properties in ascending or descending order.
Field Type | Sort Option | Description |
|---|---|---|
version | release date | Values are sorted chronologically by release date. |
build | assemble date | Values are sorted chronologically by assemble date. |
To sort values by either of these properties, follow the instructions for other automatic sort options as described above.
Archive Values in a Set
In most fields that store values from an enumerated set, there is an option to archive specific values. Once archived, users can no longer set the value for the field to this value directly in the user interface.
To learn more about how to work with archived values in issues, see Working with Archived Values.
To archive a value in a custom field:
From the Edit Project page, select the Fields tab.
Select the field that uses the set of values.
The details panel for the selected custom field opens in the sidebar.
Click the Make independent copy button.
Locate the value that you want to archive in the set and click the Archive link.
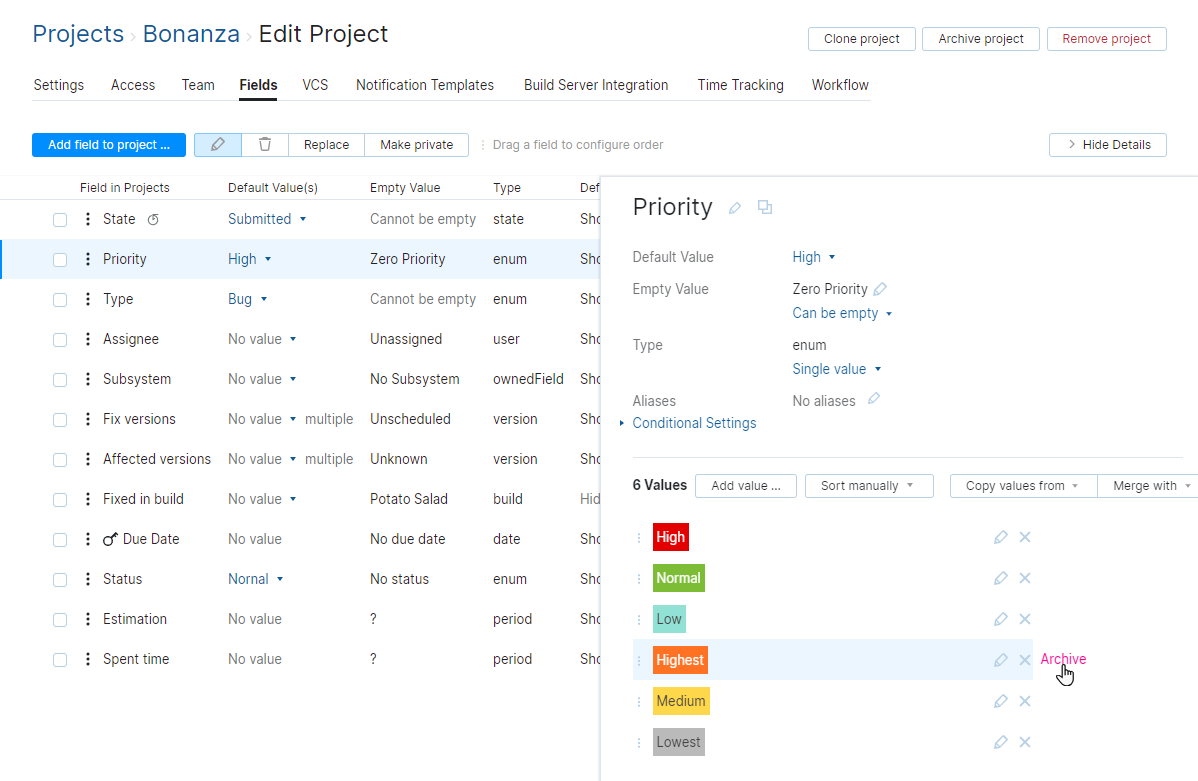
The value is marked as archived.

If you later decide that you want to continue working with a specific value, you can revert this operation by clicking the Unarchive control.
Check Sets for Consistent Values
On very rare occasions, the set of values that is used for a field in a specific project can become inconsistent. This situation can occur when an operation that is intended to update the list of values is interrupted by an unexpected server shutdown or other loss of connection.
In these cases, issues that belong to a single project use separate sets of values for the same custom field. This can result in one or more of the following problems:
Search results that should return issues that store matching values in a specified field only return partial results.
Commands that should update a batch of issues are not applied to the entire selection.
If your users encounter strange behavior like this, you can run a quick consistency check and repair the problem.
To resolve inconsistencies in a set of values for a custom field:
From the Edit Project page, select the Fields tab.
Select the field for which the inconsistencies have been reported.
The settings for the custom field are displayed in the sidebar.
In the section of the panel that displays the set of values for the custom field, click the Check values button.
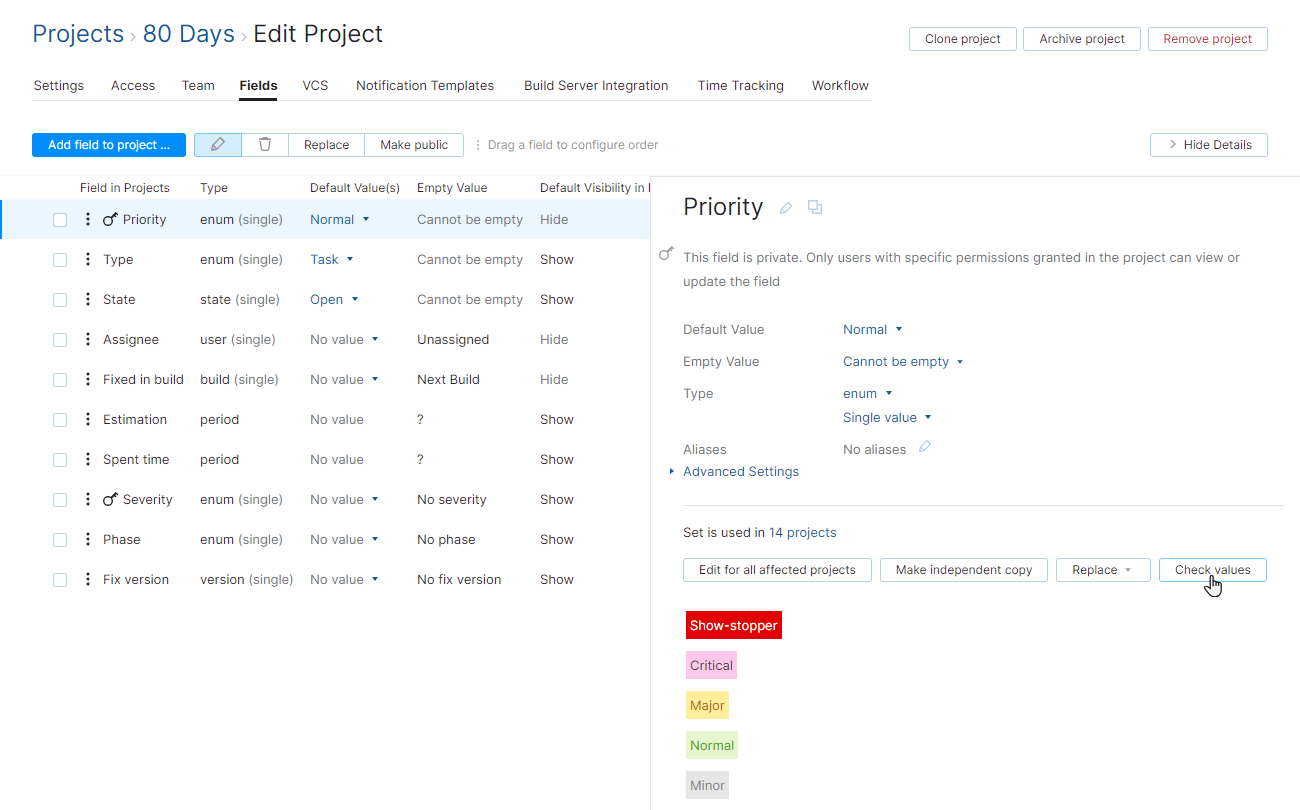
YouTrack cycles through the issues that belong to the project and checks the values that are stored in the selected custom field.
Any values that are not included in the set of values that is currently defined for the selected field are added to the set.
Transfer Data to a New Field
As a project administrator, you can only update fields that are used exclusively in the projects where you have the Update Project permission. For custom fields that are auto-attached or used in other projects, you may find yourself unable to edit the base properties of the field. This includes changes to the field name, the property for the field type that determines whether the field stores single or multiple values, and the field aliases. Changes to these base properties affect all of the projects that use the field.
As an alternative, you can preserve the data that is currently stored in this field for your project and transfer it to a new field. When you transfer data to a new field, you create a copy of the original field with its base properties and assign it a unique name. You can then edit the base properties of the field without affecting the usage of the original field in other projects.
The new field is used in place of the original field in the project. The set of values for the field and the values that are assigned in each issue in the project remain unchanged.
The Transfer data to new field operation is only available for custom fields that meet one of the following criteria:
The auto-attach option is enabled for the field.
The field is used in two or more projects.
To transfer data to a new custom field:
From the Edit Project page, select the Fields tab.
Select the field that you want to modify from the list.
If the sidebar is not visible, click the Show Details button in the header.
Next to the field name in the sidebar, click the Transfer data to new field icon.
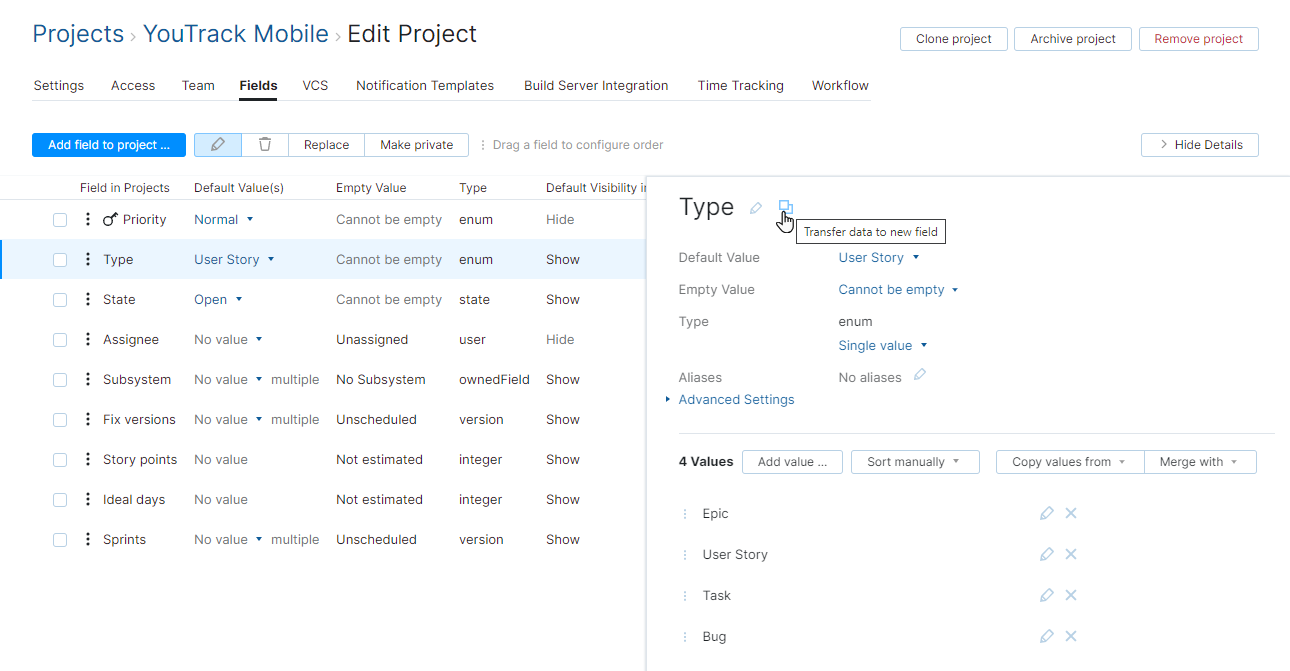
The form for editing field properties opens in the sidebar.
Modify the base properties of the new field. The Field name must be different from the original name.
Click the Save button.
The usage of the original field is replaced with the newly created field in the project.
The set of values that was used in the original field is used as the set of values for the new field.
The values in the original field that are assigned to issues in the project are updated to use the same values in the new field.
The usage of the original field in other projects is not affected.
Replace a Custom Field
You can replace the custom fields that are used in your project with a custom field that is used in other projects. Use this feature if there are custom fields that are used in other projects that you want to use instead of the custom field that is set in your project. You can then use the same custom field, for example, to generate reports or display the same columns and swimlanes for all of the projects on an agile board.
Unfortunately, you can only use the Replace function with custom fields that share the same data type. To convert values from one data type to another, you need to create a new custom field with the desired type and manually update the values in the new field for all issues in the project. For more information, see Change Field Type.
To replace a custom field:
From the Edit Project page, select the Fields tab.
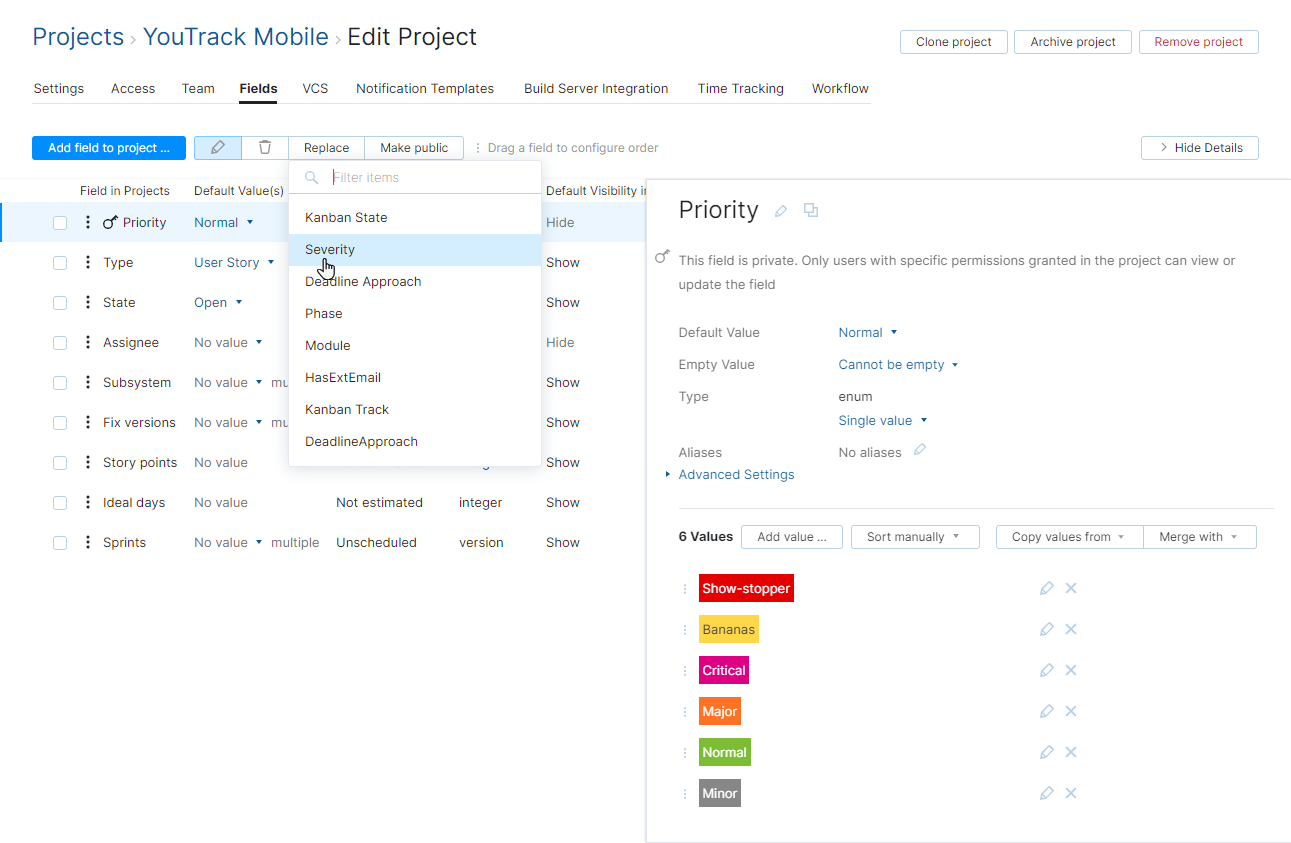
Select the field that you want to replace and click the Replace button.
Select the custom field that you want to replace the existing field.
The custom field is replaced with the selected custom field in the project.
The set of values that was used by the previous custom field is added to the set of values for the replacement field in the project.
The values in the original custom field that are assigned to issues in the project are updated to use the same values in the replacement field.
The sets of values that are used in other projects for the replacement field remain unchanged.
Change Field Type
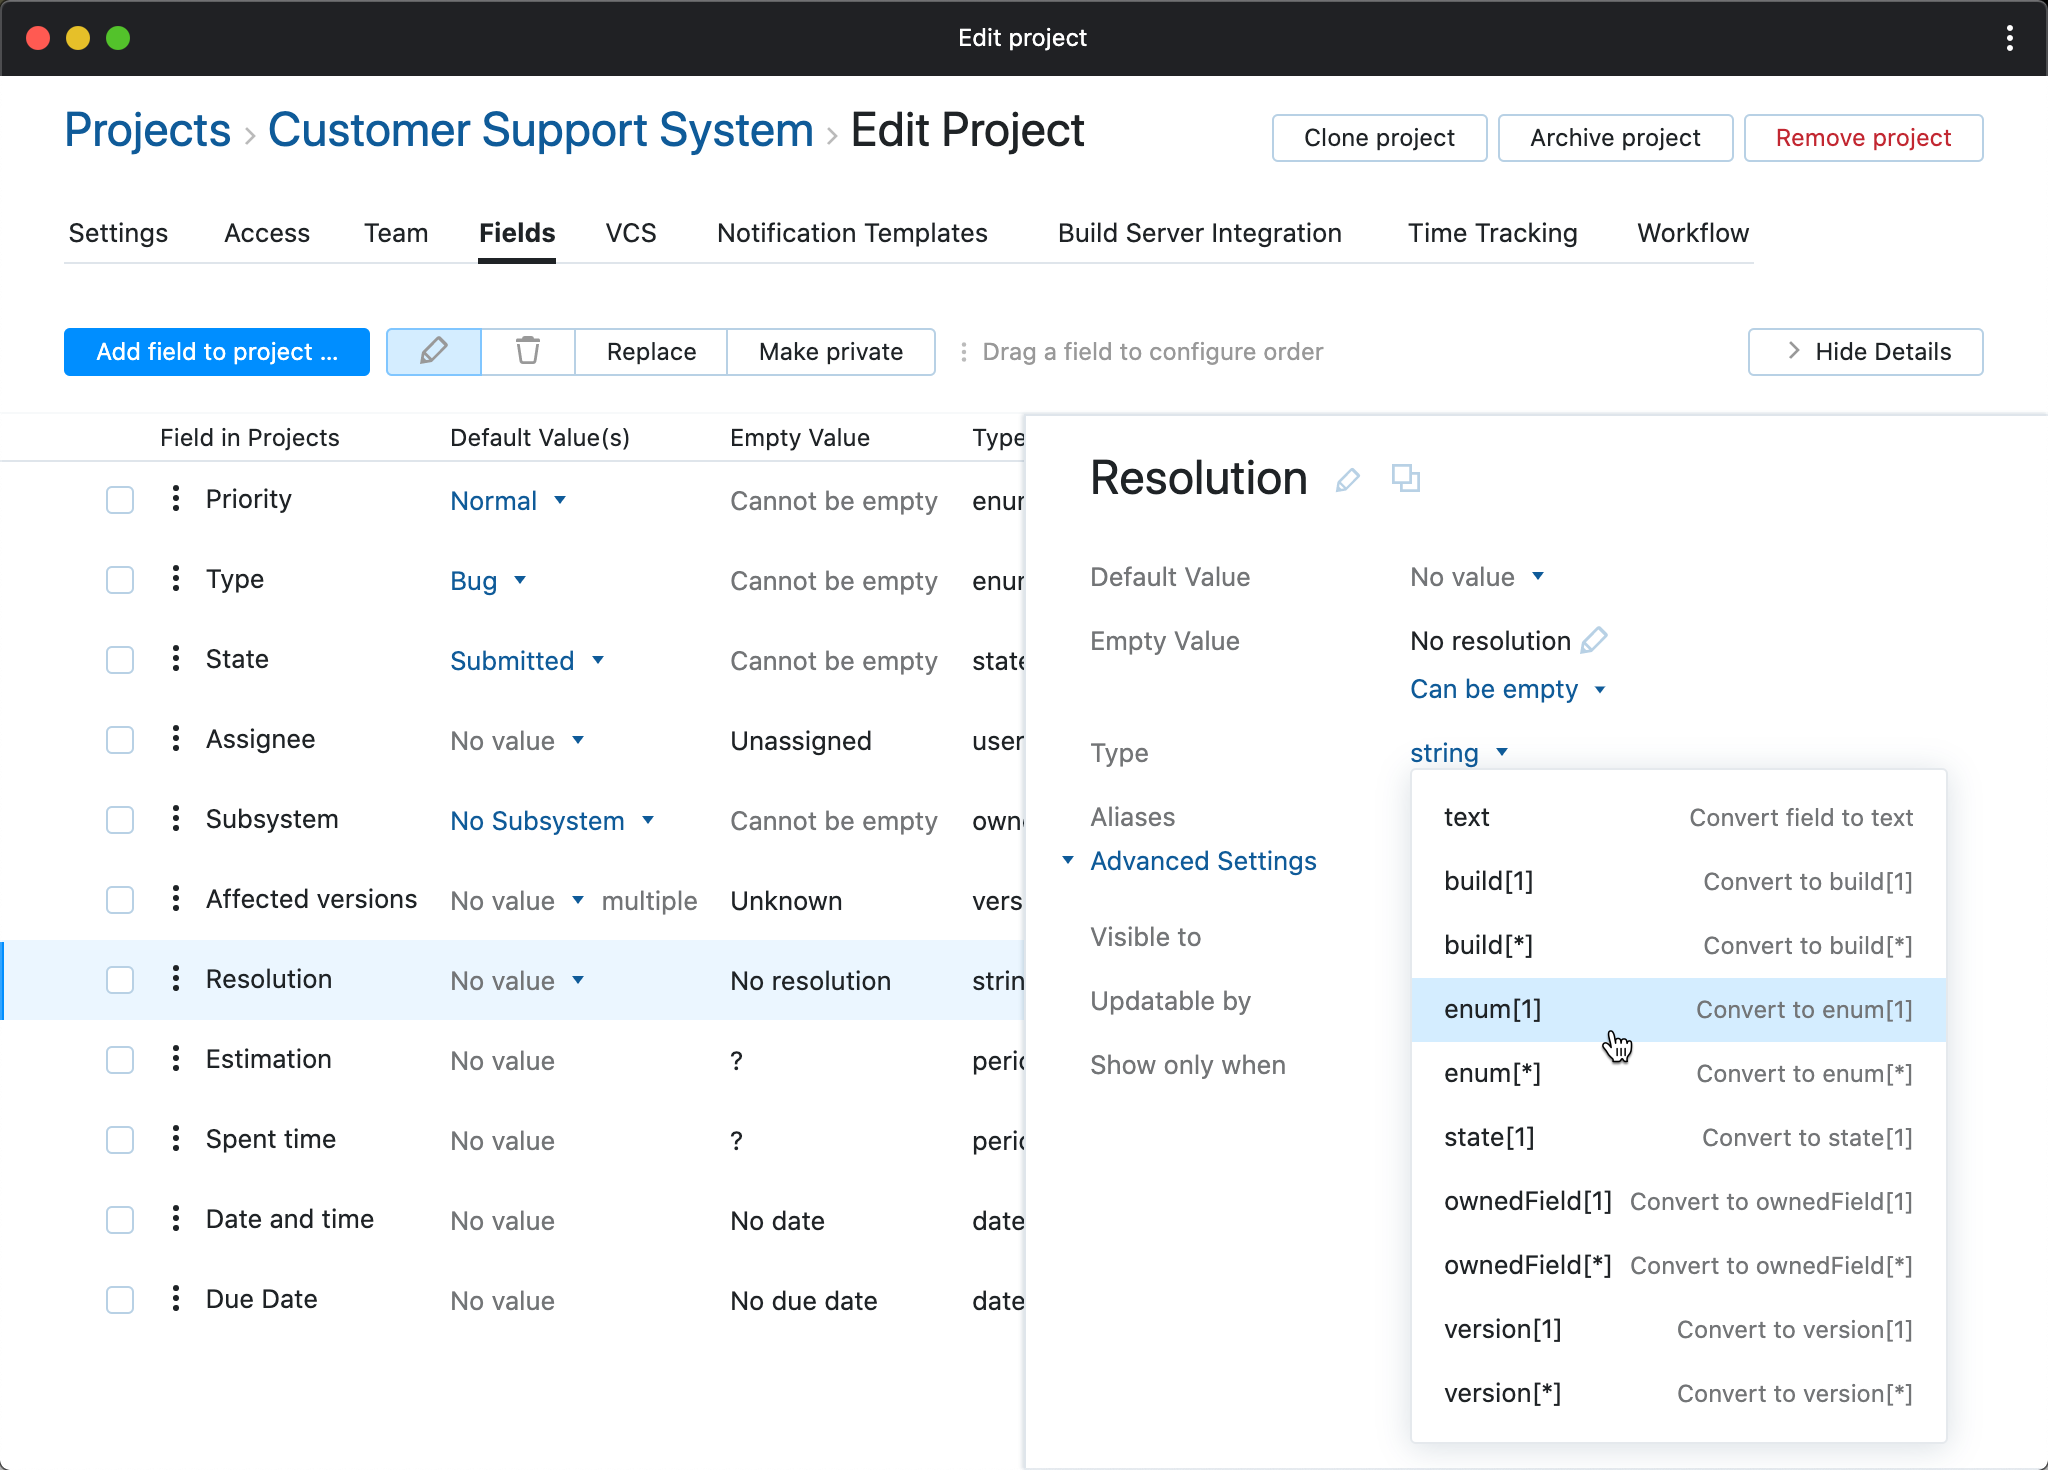
You can convert an issue field type to another type that stores similar data. The following field type conversions are supported:
Fields that store data as a
stringcan be converted to storetextor enumerated types with single or multiple values.You can convert
textfields tostring.Fields that store a
datecan be converted to storedate and time, and vice versa.For fields that store data as an
integer,period, orfloat, you can convert the data to a target format within this set of types. For example, you can convert anintegertype to aperiodtype. Here, you have the option to convert the value that is stored as an integer to a number of hours or number of days.You can convert enumerated types that support single value to
stringor another enumerated type with the single value (enum[1],build[1],ownedField[1],state[1],version[1]).You can convert enumerated types that support multiple values to
stringor another enumerated type with multiple values (enum[*],build[*],ownedField[*],version[*]).
There are a number of cases where data can be lost. For example, if you have a field that stores an enum type (or any other pseudo-enum like build or version) and convert it to string, the enumerated values are converted into a comma-separated string. If you were to convert the type back to the enumerated type, previous enumerations that are not contained in any of the converted strings are not restored to the set of values in the field. Any color coding assigned to specific values in an enumerated set is lost during conversion. Other secondary properties like release date and archive date (for versions) are also discarded.
Please note that the following conditions block changing field type:
The field identifies columns on an agile board.
The field identifies swimlanes on an agile board.
The field is linked to sprints on an agile board.
The field is mapped in build server integration settings.
To change a field's type:
If you want to replace an existing custom field with a field that uses a different type, you can't use the Replace operation. Instead, you need to add a custom field that stores values in the desired type to the project and migrate the data manually from the original field.
To migrate data from one custom field to another custom field:
From the Edit Project page, select the Fields tab.
Click the Add field to project button.
Use the settings to define a custom field or select an existing field that stores values in the desired type.
If the new custom field stores enumerated values, add values to the new custom field that are used in the existing custom field.
When finished, update the values that are stored in the custom fields for your project:
From the Issues list, enter a search query that finds all of the issues that contain a specific value in the original custom field. For enumerated types, start with the first value in the set. For example:
In #{Project} Status: Submitted.Select all of the issues that are returned by the search query. Use the keyboard shortcut Ctrl + A (⌘ + A on macOS) to select all of the issues that are returned by the query.
Use a command to update all of the selected issues and assign them a value in the new custom field. For example:
Secondary State Submitted. To minimize notification spam, apply the commands without sending notifications.Repeat this step until you have migrated all of the data that was stored in the original custom field to the new custom field.
Return to the page and remove the original custom field from the project.
The field and its related values are deleted from the project.
All of the values that were previously stored in the original custom field are now stored in the new custom field.
Custom Field Settings
Use the following settings to configure fields with simple data types:
Field | Description |
|---|---|
Field Name | Stores the name of the custom field. Field names cannot contain the special characters |
Type | Determines what type of data is stored in the field. For enumerated field types, the type is set when the field is created and cannot be changed. Simple types can be converted to another type that stores similar data. For more information, see Change Field Type. When you select an enumerated type, additional settings that define the selected type are displayed. These settings are described in the following table. |
Aliases | Assigns the field one or more keywords that you can use as a substitute for the field name in search queries and commands. For example, the aliases for the default Assignee field are |
Can be empty | Determines whether the field can store an empty value. When this option is disabled, the field is required when new issues are reported in the project. |
Empty value name | Assigns a value to show by default in the empty field. This lets you reference the empty value in search queries and commands. When you edit an existing field, use the Empty Value setting to update this property. |
Make private | Restricts the visibility of the field to users with permission to view private fields. For more information, see Private and Public Issue Fields. |
Use these additional settings to configure fields with enumerated data types:
Setting | Description |
|---|---|
Multi-value | Enables the option to store multiple values in the field. This option is not available for fields that store a state type. When you edit an existing field, use the Single value and Can specify multiple values toggle to update this property. |
Set of Values | Assigns a default set of values that can be stored in the custom field.
This option is not visible for fields that store a |
Default Value(s) | Assigns a default value to the field. This setting is only available when you select an existing set of values. If the Multi-value setting is enabled, you can select one or more default values. |
Can be empty | Determines whether the field can store an empty value. When you edit an existing field, use the Can be empty and Cannot be empty toggle to update this property. |
Empty value name | Assigns a value to show by default in the empty field. This lets you reference the empty value in search queries and commands. If the Can be empty option is disabled, this setting is disabled as well. |
Value-specific Settings
Enumerated sets of values have properties that are assigned to each value in the set. You can edit a standard set of properties for any enumerated set of values.
To display these settings, click the Edit icon next to a value in the set. The following settings are available for all field types:
Setting | Description |
|---|---|
Name | Assigns a name to the value. |
Description | Adds a description of the value. This property is not visible elsewhere in YouTrack, but can be used to explain the usage of this value to other users who might edit the set of values. |
Color | Assigns a color scheme to the value. This setting changes the appearance of the custom field based on the color that is assigned to the current value. |
Several field types have extended properties for values in the set. These properties are only visible when you edit the set of values that is used for the specified type.
Setting | Field Type | Description |
|---|---|---|
Archived | enum, ownedField, state, version, build | Indicates whether the value is archived, stored as a Values that are marked as archived are not available in the drop-down list for custom fields. This means that users cannot set the value for the field to an archived value directly in the user interface. If one or more values that are currently assigned to the field are archived, a user can clear the selection to remove these values from the field. Archived versions are still available to commands, workflows, and the REST API. This means that you can use commands to add or remove archived values or update these values programmatically. |
Assemble date | build | Stores the date when the selected build was assembled as a |
Owner | ownedField | Stores a reference to the user who is responsible for the subsystem as a Use this setting to associate a specific user with each value in the set. You can then use this field to set values in custom fields that store a |
Release date | version | Stores the release date as a |
Released | version | Indicates whether the version is released, stored as a This property affects the sort order in the drop-down list for the default Fix versions and Affected versions fields.
|
Resolved | state | Indicates whether the issue is considered to be resolved when it is assigned the corresponding value in this field. This value is stored as a |
Advanced Settings
Use the following settings to limit the ability to view or edit a custom field to a specific group of users.
Setting | Description |
|---|---|
Visible to | Restricts the ability to view the custom field to the selected group or team. |
Updatable by | Restricts the ability to edit the value that is stored in the custom field to the selected group or team. |
Use the following settings to set the condition for showing a custom field in a project.
Setting | Description |
|---|---|
Show only when | Determines which field is used as a condition for showing the custom field. The selection is limited to custom fields that store an |
is set to | Determines which values from the field must be selected for the conditional custom field to be shown. |
Additional Controls for Version Fields
When you view or edit the set of values for a field that stores a version type, these controls let you find and update specific values. These options have no affect on the behavior of the custom field.
Control | Description |
|---|---|
Filter versions | Filters the list of values to match the filter criteria. |
Show released | Toggles the visibility of versions that are marked as released. |
Archived | Toggles the visibility of versions that are marked as archived. |
Sort by | Sorts the list of values by name or release date. |
