Delete Issues
Deleting issues in YouTrack is not to be taken lightly. Each issue has the potential to contain a wealth of information that, when lost, cannot be recovered easily. In general, we recommend that you avoid deleting issues whenever possible. Here are a few alternatives to deleting issues:
If the issue duplicates an existing issue, link it to the existing issue as a duplicate. In this case, the value for the State field is set to Duplicate, which is a resolved state. The issue is excluded from search results for unresolved issues, but any information contained in the issue is retained.
If the issue is no longer relevant and you don't want anyone to waste time working on it, select an appropriate value for the State field to resolve the issue. Default states like Can't Reproduce, Won't fix, Incomplete, and Obsolete indicate that the issue does not require additional effort. This helps to explain why an issue should not fixed without deleting it from the system.
If you created an issue in the wrong project, don't delete it and create another. Simply update the value in the Project field.
The best reason that you might have for deleting an issue is because you created it by mistake. If you're confident that an issue that you created is unnecessary, you should be able to delete it without disrupting anyone else's work. Just don't assume that this rule applies to issues that were created by other users.
To delete a single issue:
Open an issue in single issue view.
Click the Delete button in the dialog to confirm the action.
The issue is deleted from YouTrack.
The action cannot be undone.
To restore the issue, you have to restore a backup copy that contains the issue and import the issue from the backup to your YouTrack database. For more information, see Restoring Deleted Issues.
You also have the ability to delete multiple issues at once with commands. You should be very careful when performing this action, as you can select more issues than can be displayed on the Issues list and delete them in one go. Proceed with caution!
To delete multiple issues:
Select one or more issues in the Issues list.
Click the Delete issues button in the toolbar.
A confirmation dialog opens.

Click the Delete button to confirm this action.
The issues are deleted from YouTrack.
The action cannot be undone.
To restore these issues, you have to restore a backup copy that contains the issues and import them from the backup to your YouTrack database. For more information, see Restoring Deleted Issues.
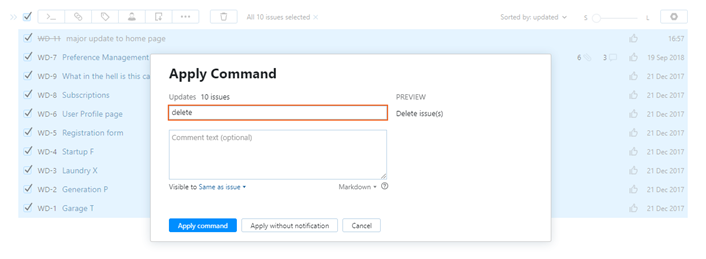
You can also perform this action by applying the delete command to a batch of issues.

To learn more about updating batches of issues with commands, see Apply Commands to Issues.
Restoring Deleted Issues
Once an issue has been deleted, it can only be restored from a database backup.
Even when you locate a backup that contains the deleted issues, you cannot guarantee that the restored issues contain all of the data that was lost. There may be updates that were applied after the backup was created that cannot be recovered.
To restore deleted issues:
Install a copy of YouTrack on another server using a recent backup as the data source. For instructions, see the page that is relevant to your distribution type:
Import issues from the backup copy to your current YouTrack installation. For detailed instructions, see Import from YouTrack.
Deleting Issues Permanently
To maintain the integrity of your database, issues that are deleted from YouTrack are preserved in the database. If you want to delete a batch of issues, you can delete them permanently and reduce the size of your database.
To delete issues permanently, you need to remove the project that they belong to from YouTrack. This action is mostly used to delete old projects that you no longer use. For instructions, see Remove a Project.
If you want to delete older issues, but still want to keep the project open, use this workaround:
Create a new project.
Use a search query that returns all of the issues that you want to delete. For example, search for issues in your project that were resolved six months ago or earlier.
Use a command to move all of these issues to the new project. For example,
move to <new project name>.Remove the new project from YouTrack.
Restricting Delete Issue Permissions
In many issue trackers, the ability to delete issues is restricted to system and project administrators. In YouTrack, this permission is granted to the default Developer role. This means that any member of the project team can delete any issue in the project.
For some organizations, this scheme can be too permissive. If you find that users are deleting issues when they shouldn't be doing so and a stern warning or two doesn't discourage this behavior, consider one or more of the following alternatives. These modifications can be made by a system administrator or another user with the Manage Role permission.
Remove the Delete Issue permission from the default Developer role. In this case, the ability to delete issues is restricted to system and project administrators.
Create a custom role that does not include the Delete Issue permission and assign this role to project teams on a per-project basis. This gives project administrators the ability to decide whether the members of their project teams can be trusted with issue deletion or not.
Create a custom role that includes only the Delete Issue permission. You can then grant this permission on a per-user basis to delete issues in specific projects.
