Markdown Syntax
In YouTrack, you can format text using the Markdown markup syntax. You can format text in issue descriptions, supplemental text fields, comments, and work items descriptions. This type of markup is offered as an alternative to the visual formatting tools in the rich text editor. To learn more about the available options for formatting text, see Rich Text Editor.
The Markdown implementation in YouTrack follows the CommonMark specification with extensions. These extensions support formatting options that are not included in the formal specification like checklists, strikethrough text, tables, user mentions, and issue links.
To see a complete list of formatting options, click the Markdown link to open the syntax list, then click the help icon. This opens the YouTrack Markup Reference page in your browser.
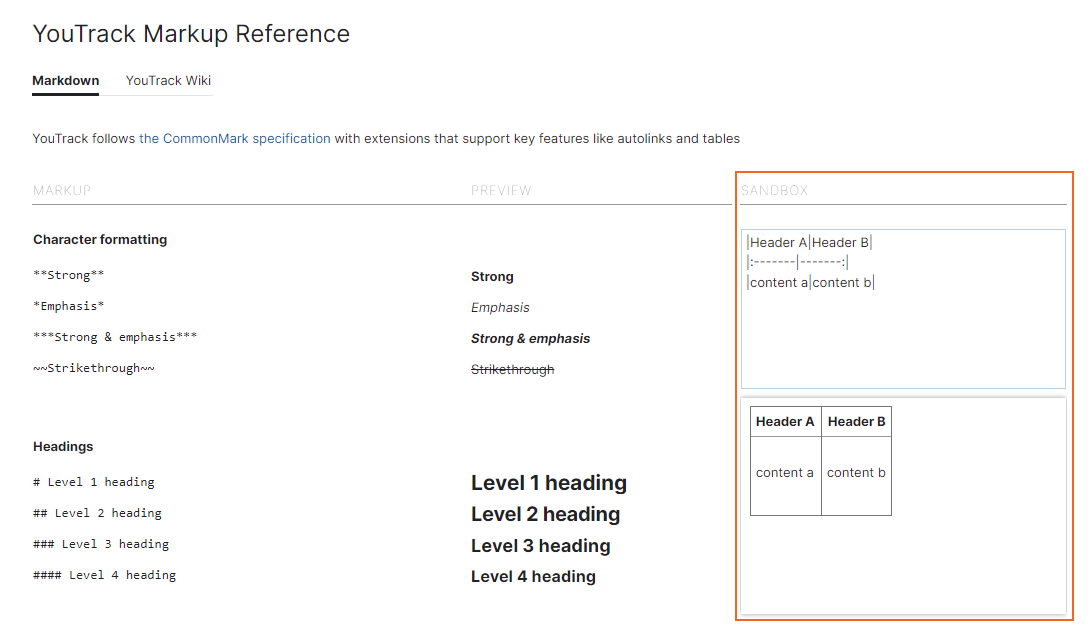
The YouTrack Markup Reference page provides a sandbox. Use the sandbox to preview the formatted output. When the text is formatted to your liking, copy the contents of the sandbox and paste it into the issue description or comment.
Availability
In addition to issue fields, YouTrack supports Markdown in project descriptions, Markdown Notes widgets, user agreements, system-wide banners, and custom messages on the login page. Many of the extensions that are described here are not available in these fields. For example, the extensions that support embedded content from Google apps, embedded video, YouTube video, issue links, article links, and user mentions are only supported in issues and articles. The ability to parse HTML tags is exclusive to issues and articles as well.
To ensure that the content you enter in these fields is formatted correctly, use the preview pane to the left of the input field.
Character Formatting
You can apply character formatting to a range of inline text with the following Markdown syntax.
Style | Syntax |
|---|---|
Strong | Surround text with two asterisks ( |
Emphasis | Surround text with single asterisks ( |
Strikethrough | Surround text with two tildes ( |
Code | Surround text with one or more backquotes ( |
Combinations | Surround text with single underscore characters or two tildes inside two asterisks. Surround text with three asterisks to apply strong emphasis. |
You should read this, it's **very important**.
You _might_ want to read this.
~~Never mind~~ - it wasn't _that_ important.

Let's try a few `combinations`:
**This text is strong, ~~this text is strong with strikethrough~~, and _this text is formatted with strong emphasis_**
***This text is formatted with strong emphasis too.***
Headings
To apply a heading style, start the line with one to six number signs(#). Follow the number signs with a space character and enter the heading text. The number of # signs determines the heading level.
YouTrack also supports an alternative syntax for heading levels 1 and 2:
For heading level 1, enter one or more
=characters on the following line.For heading level 2, enter one or more
-characters on the following line.
# Heading 1
## Heading 2
### Heading 3
#### Heading 4
##### Heading 5
###### Heading 6

Heading 1 - Alternative Syntax
========

Heading 2 - Alternative Syntax
--------
Paragraphs and Line Breaks
Contiguous lines of text belong to the same paragraph. Use the following guidelines to structure your content into paragraphs and enter line breaks.
To start a new paragraph, leave a blank line between lines of text.
To start a new line inside a paragraph, enter two or more trailing spaces at the end of the line of text. For a more visible alternative, enter a single backslash (
\).
Even though this text is written on two separate lines,
it is parsed as a single paragraph.

This paragraph is separated from the previous paragraph
by a blank line.

This text is parsed as a single paragraph.
The two trailing spaces at the end of the previous line start a new line.\
The backslash character also starts a new line.
Thematic Breaks
Create sections in your content with thematic breaks. Use any of the following methods to add a thematic break:
Three or more underscores (
___)Three or more minus signs (
---)Three or more asterisks (
***)
Note that thematic breaks can interrupt paragraphs and can include whitespace characters. You cannot have more than three spaces of indent and you must use the same non-whitespace character.
The underscores on the next line create a thematic break below this paragraph.
___
The minus signs below must be separated from this paragraph by a blank line.
If not, they are parsed as a level 2 heading.

----
Three or more asterisks also create a thematic break.
****
Block Quotes
Use block quotes to call special attention to a quote from another source. You can apply character formatting to inline text inside the quoted block.
To set text as a quote block, start the line with one or more > characters. Follow these characters with a space and enter the quoted text. The number of > signs determines the level of nesting inside the quote block.
If your quote spans multiple paragraphs, each blank line must start with the > character. This ensures that the entire quote block is grouped together.
> Use block quotes to emulate reply text.
> This line is part of the same quote.

This line is not formatted and does not belong to the quote block.

> This block spans multiple paragraphs.
>
> The second paragraph is grouped with the previous paragraph in the same quote block.
> Character formatting is _also_ supported inside the **quote block**.

> Quote blocks can also be nested.
>> When you start a new line with additional > characters,
>>> it simulates a threaded conversation.
Indented Code Blocks
You can format blocks of text in a monospaced font to make it easier to identify and read as code.
To format a code block in Markdown, indent every line of the block by at least four spaces. An indented code block cannot interrupt a paragraph, so you must insert at least one blank line between a paragraph the indented code block that follows. The input is processed is as follows:
One level of indentation (four spaces) is removed from each line of the code block.
The contents of the code block are literal text and are not parsed as Markdown.
Any non-blank line with fewer than four leading spaces ends the code block and starts a new paragraph.
Start an indented code block following a paragraph with a blank line and at least four spaces of indentation:

    This is a code block.

    Blank lines between indented lines do not end the code block.

    Here is some HTML:

        <div class="footer">
            © 2009—2017 JetBrains · All rights reserved
        </div>

This line of text is not indented. It ends the code block and starts a new paragraph.
Fenced Code Blocks
Unlike indented code blocks, fenced code blocks have an info string that lets you specify which language is used for syntax highlighting. Language-specific highlights make the code easier to read.
Syntax highlighting is supported for a range of languages. YouTrack detects and highlights code in C, C++, C#, Java, JavaScript, Perl, Python, Ruby, and SH automatically. To highlight code in other languages, set the language in the info string (the line with the opening code fence). The following languages are supported: apollo (AGC/AEA Assembly Language), basic, clj (Clojure), css, dart, erlang, hs (Haskell), kt (Kotlin), latex (LaTeX), lisp, llvm, lua, matlab, ml, mumps, n (Nemerle), pascal, proto, scala, sql, tcl, tex, vb, vhdl, wiki, xq, and yaml.
When you set the language in the info string, the language tag is shown in the line above the code.
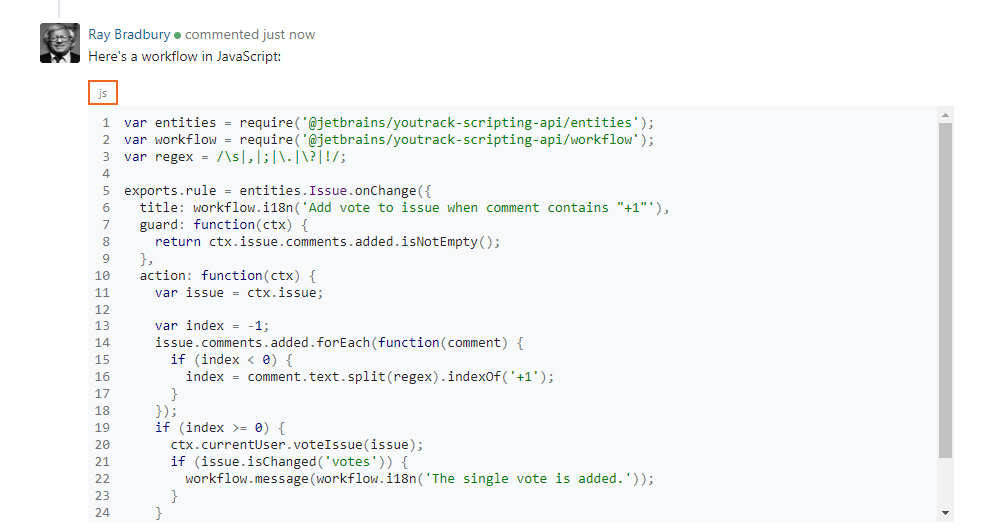
YouTrack recognizes a set of language aliases that are interpreted by the Markdown implementation in GitHub. This includes the following language aliases:
Language Alias | Language Name | Syntax Highlighter Applied by YouTrack |
|---|---|---|
fsharp | F# | fs |
kts | Kotlin Script | kt |
octave | Matlab | matlab |
latex | Latex | tex |
vb.net or vbnet | Visual Basic .NET | vb |
yml | YAML | yaml |
To set a block of text as a block of code with syntax highlighting, follow these guidelines:
To create a fenced code block that spans multiple lines of code, set the text inside three or more backquotes (
```) or tildes (~~~).Open and close the block with the same character.
Use the same number of characters to open and close the code fence.
Specify the language or language alias that you want to use for syntax highlighting immediately after and on the same line as the set of characters that you use to open the fenced code block.
Set multiple lines of code in fenced code blocks.

```
action: (ctx) => {
    workflow.check(!ctx.issue.isChanged('votes'), workflow.i18n('Voting for a resolved issue is not allowed.'));
},
```

The following code block uses syntax highlighting for Haskell:
```hs
-- Point-free style
fib :: Integer -> Integer
fib = (fibs !!)
where fibs = 0 : scanl (+) 1 fibs

-- Explicit
fib :: Integer -> Integer
fib n = fibs !! n
where fibs = 0 : scanl (+) 1 fibs
```
Stack Traces
Fenced code blocks can be formatted as stack traces. To format code as a stack trace:
Open and close a fenced code block with exactly three backquotes (
```) or tildes (~~~). Close the code block with the same character you used to open the code block.Enter
stacktracein the opening line of the code fence to set the language.Paste the stack trace into the fenced code block.
When the stacktrace is formatted, references to source code and other issues are set as links. If the feature is enabled in your development environment, you can click these links to open the target reference in your IDE. For more information, see Open Stack Traces in an IDE.
The following code block is formatted as a stacktrace.
This fenced code block uses tildes, and sets the language as "stacktrace".

~~~stacktrace
java.lang.NullPointerException
at my.stack.trace(Of.java:123)
~~~
HTML Blocks
An HTML block is a group of lines that is treated as raw HTML markup. The block begins wherever YouTrack detects a valid HTML tag end ends with the line where the matching end tag is present. The content between the start and end tags is rendered in HTML without escaping.
There are situations where valid HTML content is not displayed as written.
All markup is matched against a predefined list of allowed tags. Content inside tags and attributes that might be exploited by attackers is filtered out.
You can't have more than three space characters in front of the tag that starts the HTML block. Blocks that start with four or more spaces are formatted as indented code.
With HTML markup, you can use the following features to enhance issue content:
Feature | Description |
|---|---|
Collapsible blocks | Use the |
Custom text color | Use the |
Line breaks | Use |
Easy-mode block quotes | Use the To achieve the same result with the native syntax for block quotes in Markdown, you have to add the |
Inline text is also parsed for HTML markup. Text that is set between an opening angle bracket (<) and a closing angle bracket (>>) is matched against the predefined list of allowed tags. If YouTrack considers it to be safe, the tag is parsed as HTML. The content inside the tags is rendered in HTML without escaping.
If you're pasting content into an issue that's rendered as HTML and want to show the text as written, you need to escape the markup. To learn how, see Escaping HTML.
For collapsible blocks, the text inside the summary is always visible. Users can click the summary to show or hide the details.

<details>
    <summary>
        <font color="red">SPOILER ALERT</font>
    </summary>
            Soylent Green is made from human flesh
</details>

HTML is great for formatting tables. It's a bit more flexible than Markdown syntax.

<table>
    <tr>
        <th>Contributor</th>
        <th>Contribution Type</th>
    </tr>
    <tr>
        <td>Cecilia</td>
        <td>Code<br>Reviewing Pull Requests<br>Answering Questions</td>
    </tr>
    <tr>
        <td>Jakob</td>
        <td>Maintenance<br>Hosting Infrastructure<br>Build Tools</td>
    </tr>
    <tr>
        <td>Sylvia</td>
        <td>Design<br>Documentation</td>
    </tr>
    <tr>
        <td>Rob</td>
        <td>Translation</td>
    </tr>
</table>

Block quotes are a lot easier to format with HTML as well. One set of tags is all you need!

<blockquote>Your time is limited, so don't waste it living someone else's life.

Don't be trapped by dogma – which is living with the results of other people's thinking.
</blockquote>
— Steve Jobs
Lists
Use the following syntax to create lists:
To create an unordered list, start the line with a minus sign (
-), asterisk (*), or plus sign (+).To create an ordered list, start the line with a number followed by a period (
1.) or a close parenthesis (1)). The start number of an ordered list is determined by the number of its initial list item. The numbers of subsequent list items are disregarded.To nest an unordered list inside an unordered or ordered list, indent the line with two spaces. Nesting ordered lists is not supported.
The following list **must** begin with the number 1:
1. Only lists that start with 1 are allowed to interrupt paragraphs.
1. Subsequent numbering is irrelevant.
0. You can start a new line with any number as long as you use the same delimiter character.
2) This item uses a different delimiter and starts a new ordered list, starting with the number 2.

This list can start with any number:

4) The empty line means that the list does not interrupt a paragraph.
1) The ordered list continues to increment the numbering from the previous list item.
123456789) Use any number fewer than ten characters. This number is parsed as the third item in the ordered list.

* Start unordered lists with -, *, or +.
+ You don't even have to use the same character for each list item.
- Pro tip: * and + require the Shift key. - doesn't. Format faster with the minus sign.
  * Nest unordered list items with two spaces.
    * Unordered lists support multiple levels of nesting.
Checklists
Checklists are not supported in the CommonMark specification. This functionality has been implemented with an extension. While similar to the Task list items (extension) in GitHub Flavored Markdown, the implementation in YouTrack is slightly different.
Use the following syntax to create checklists:
Start a checklist just as you would an unordered list. Enter a minus sign (-), asterisk (*), or plus sign (+) at the beginning of the line. This is interpreted as a list item marker.
Follow the list item marker with one or more spaces, a left bracket ([), either a whitespace character or the lowercase letter x, and then a right bracket (]). This is interpreted as a checklist item marker.
If the character between the brackets is a whitespace character, the checkbox is unchecked.
If the character between the brackets is a lowercase letter x, the checkbox is checked.
Enter an arbitrary string of text following the checklist item marker. The text is displayed inline with the checkbox.
TODO:
* [x] This item is marked as complete. The checkbox is checked.
- [ ] This item is incomplete. The checkbox is unchecked.
+ [ ] As with unordered lists, you can start the line with an asterisk, minus sign, or plus sign.
    - [ ] Nest checklist items with two spaces.
        -  [ ] Checklists support multiple levels of nesting.
Tables
Tables are a great tool for adding structure to your content. Use the following syntax to create tables:
To create columns, use vertical bars (
|). The outer bars are optional.Separate the header row from the rest of the table with three or more minus signs (
---).To align column text to the right, add a colon (
:) to the right side of the minus signs in the separator row.To center text inside the column, add colons (
:) to both sides of the minus signs.To align column text to the left, add a colon (
:) to the left side of the minus signs in the separator row.
Note that the columns don't have to line up perfectly in the raw Markdown. You can also add character formatting to text inside the table.
Kitchen Cleanup Rotation

| Month    | Assignee | Backup |
| -------- | -------- | ------ |
| January  | Dave     | Steve  |
| February | Gregg    | Karen  |
| March    | Diane    | Jorge  |

Here's the same text with additional formatting and alternative syntax.
+ The text in the first column is right-justified.
+ The text in the second column is centered.
+ The text in the third column is left-justified.
+ The Markdown is stripped down to the minimum syntax that is required to render the table.

Month | Assignee | Backup
---:|:---:|:---
**January** | Dave | _Steve_
**February** | Gregg | _Karen_
**March** | Diane | _Jorge_
Links
There are several ways to insert links with Markdown.
Style | Format |
|---|---|
Inline | Wrap link text with brackets |
Inline with tooltip | Use inline formatting and add the tooltip in quotation marks after the URL. |
Reference | Replace the URL with an arbitrary, case-insensitive reference, wrapped in brackets |
YouTrack has also extended the standard syntax to include autolinks.
[inline link](https://www.jetbrains.com)
[inline link with tooltip](https://www.jetbrains.com "JetBrains: Development Tools for Professionals and Teams")
[reference link][1]

[1]: https://www.jetbrains.com
Autolinks
Autolinks are absolute URIs and email addresses that are set inside angle brackets (< >). They are parsed as links, with the URL or email address as the link label. Unlike links that let you specify link text and tooltips, this syntax simply converts the URL or email address into a clickable link.
YouTrack supports an extended syntax for URLs. Any string that is parsed as a URL is converted into a clickable link, even without the angle brackets. Email addresses that are not set inside angle brackets are displayed as text.
Both of these URLs are parsed as links:

<https://youtrack.jetbrains.com/issues>
https://youtrack.jetbrains.com/issues

Email addresses are also converted into "mailto" links when set in angle brackets:

<webmaster@jetbrains.com>
Issue Links
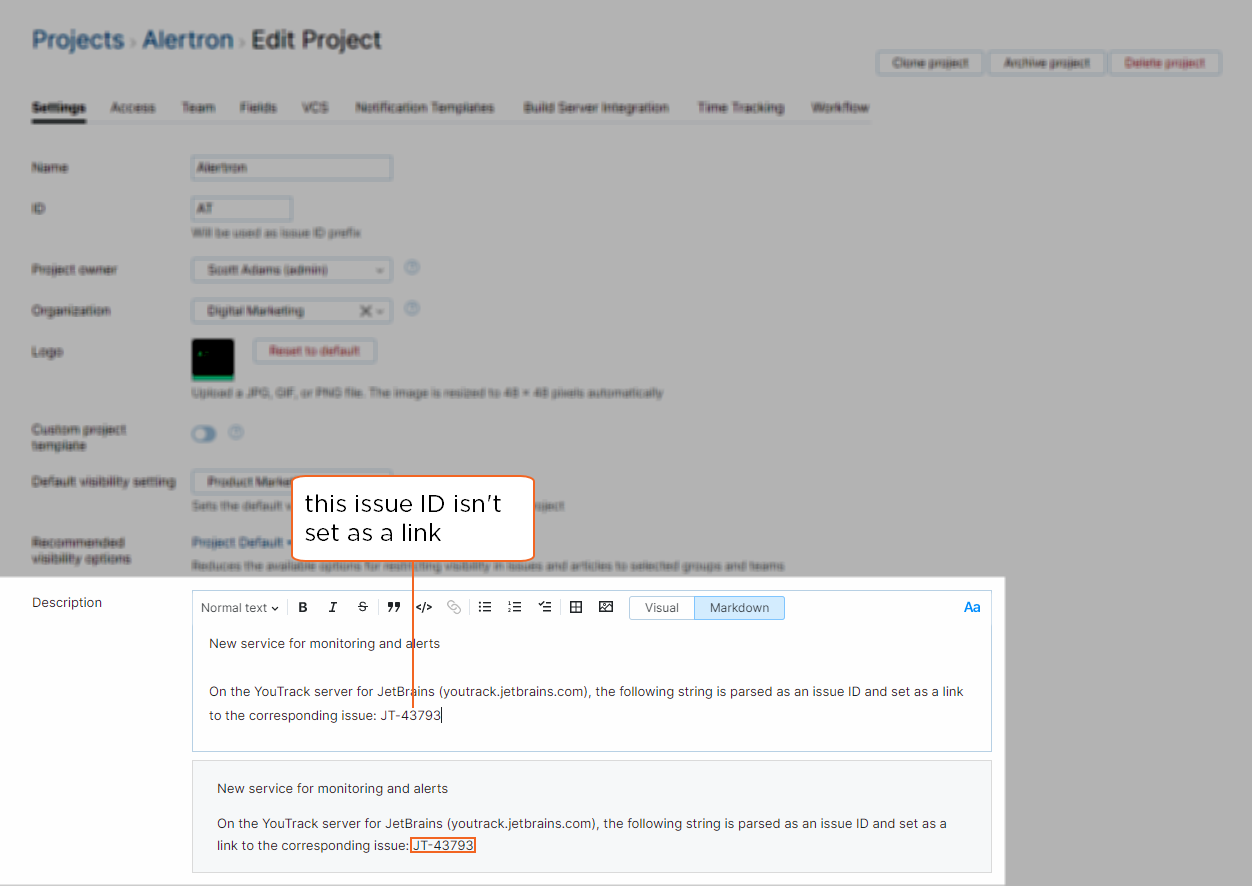
A sequence of characters that matches an existing issue ID is automatically parsed and transformed into a link to the corresponding issue.
On the YouTrack server for JetBrains (youtrack.jetbrains.com),
the following string is parsed as an issue ID
and set as a link to the corresponding issue: JT-43793
Links to Knowledge Base Articles
A sequence of characters that matches an existing article ID is automatically parsed and transformed into a link to the corresponding article in the knowledge base. When users move the pointer over the link, a custom tooltip displays additional information about the article, including its title, author, and creation date.
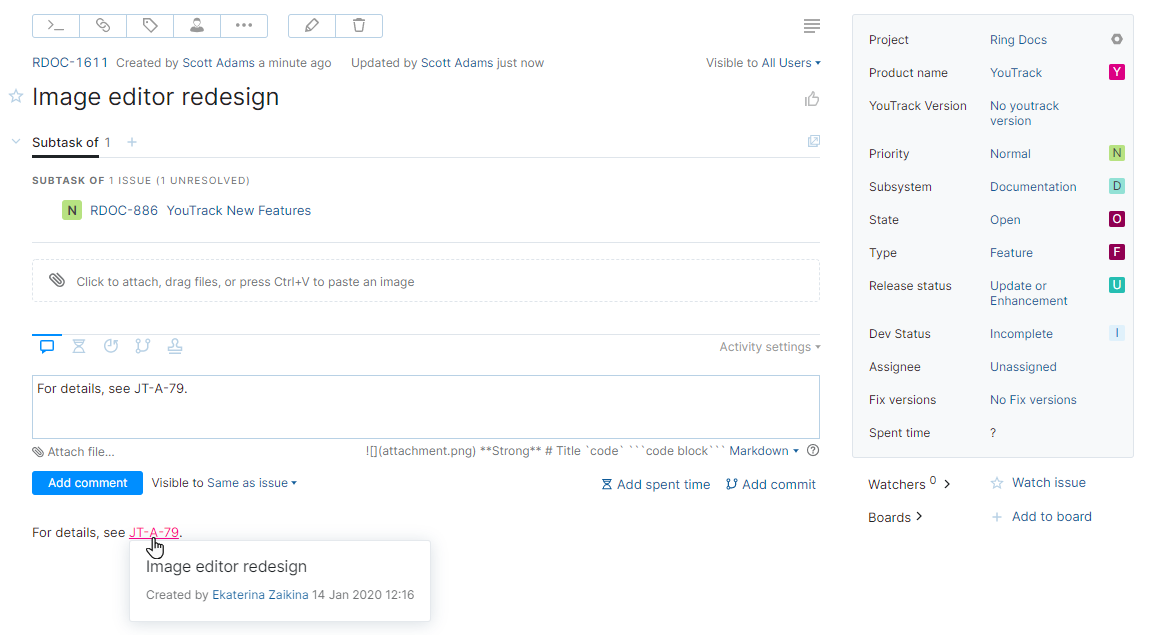
In the screenshot above, the reference in the string is parsed as an article ID
and set as a link to the corresponding article: JT-A-79
User Mentions
User mentions are also set as links. When you enter the @, YouTrack suggest users whose usernames match the input that follows. When you complete the selected user or enter a valid username, the @mention is replaced with the user's full name and set as a link.
Images
The syntax for images is similar to the syntax for links. To insert an inline image:
Start the line with an exclamation point (
!).Wrap the alt text with brackets (
[ ]).Set the image URL and tooltip in parentheses (
( )).
You can also use the reference style for images. To insert an image reference:
Start the line with an exclamation point (
!).Wrap the alt text with brackets (
[ ]).Set the image reference in brackets (
[ ]).Define the image reference in another location with the syntax
[tag]: image URL "tooltip".
Here's an image link to the JetBrains logo on Wikipedia:

This link to the JetBrains logo uses the reference style:
![JetBrains logo][logo]
[logo]: https://upload.wikimedia.org/wikipedia/commons/1/1a/JetBrains_Logo_2016.svg "JetBrains"
Markdown also supports images as links.
Just wrap the entire image reference in brackets then add the target URL in parenthesis after the image reference.
People use this syntax to insert a thumbnail image that links to a video on a video sharing platform.
Here's a reference to the latest video promotion for YouTrack:
[](https://www.youtube.com/watch?v=rhAunB7UQFQ)Image Attributes
You can set custom height and width dimensions for images. These attributes are also available for YouTube videos, embedded video, and embedded content from Google apps.
Use the following guidelines to set custom display dimensions:
Wrap the size attributes in curly braces (
{ }) and put it after the content reference.Specify either
heightorwidthattribute, to scale the image proportionally while preserving the original aspect ratio. Use both attributes to set desired dimensions explicitly.Specify the value of an attribute as an integer to set the absolute size in pixels. For example,
width=250is parsed as 250px.Specify the value of an attribute as a percentage to use it as a relative size modifier. For example,
height=25%resizes an image to 25% of its original height and preserves the original aspect ratio.
Here's an inline reference to the Markdown logo on Wikipedia that has been rescaled to 75% of its original size:
{width=75%}Image Attachments
You can insert an inline reference to an image that is already attached to the issue. The image is displayed in the description, comment, or work item where the reference is placed.
Use the same syntax that is used for images, replacing the image URL with the filename of the attachment.
Start the line with an exclamation point (
!).Wrap the alt text with brackets (
[ ]).Set the filename and optional tooltip in parentheses (
( )).
The following markup inserts an image with the filename `image.png`.
The words "image attachment" are used for both the alt text and the tooltip.
File Attachments
In addition to images, you can add links to any file that’s attached to an issue. Links that reference image files or PDFs open the file directly in the browser. For all other file types, the link lets the user download a copy of the file to their local machine.
The syntax for adding links to files is similar to the format for adding links to URLs:
Style | Format |
|---|---|
Inline | Wrap link text with brackets |
Inline with tooltip | Use inline formatting and add the tooltip in quotation marks after the filename. |
Reference | Replace the URL with an arbitrary, case-insensitive reference, wrapped in brackets |
Here’s an example that uses each of these three styles to add links to a file named `markdown-rocks.html`.

[inline](markdown-rocks.html)
[inline with tooltip](markdown-rocks.html "Markdown implementation in YouTrack is A-M-A-Z-I-N-G !!!")
[reference][1]

[1]: markdown-rocks.html
Embedded Content from Google Workspace Apps
YouTrack supports an extension to the syntax for images that lets you embed content from Google apps into an issue. Supported apps include Docs, Sheets, Slides, and Forms. You can embed content into any field that supports Markdown, including the issue description, supplementary text fields, comments, or work items.
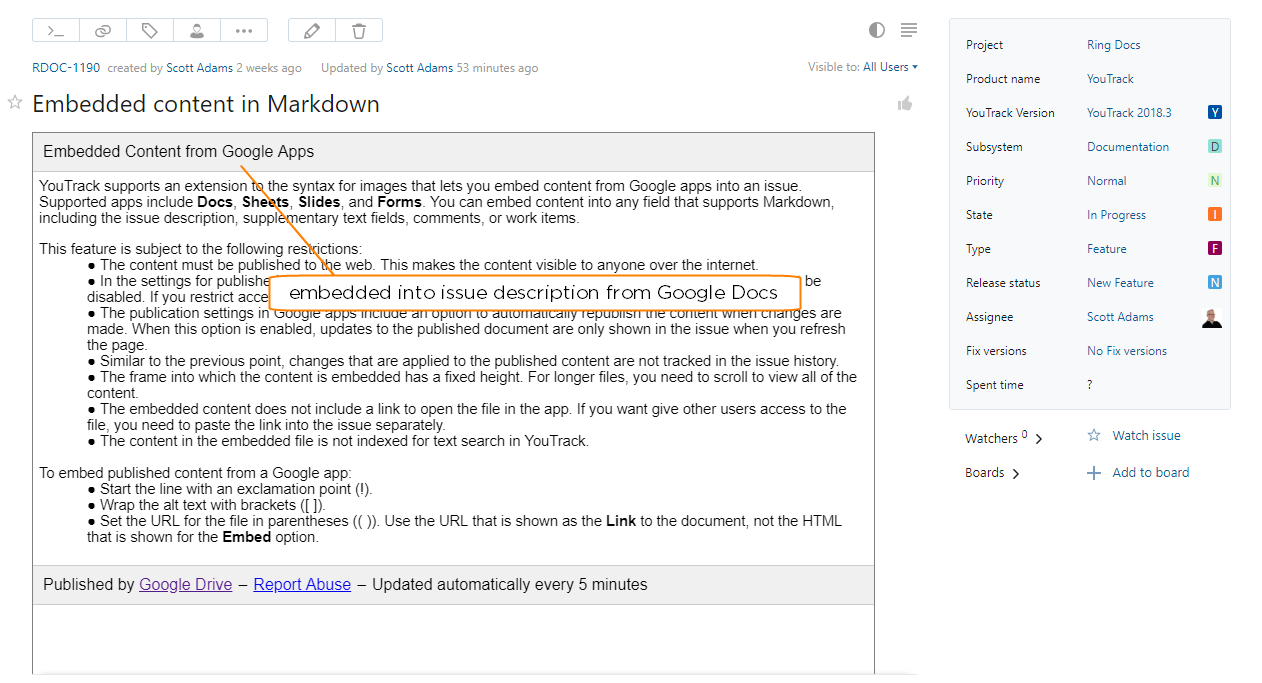
Here's how embedded content from Google works in YouTrack:
The content must be published to the web. This makes the content visible to anyone over the internet. Sharing a file with other members of your organization doesn't publish the content to the web.
In the settings for published content, the option to require viewers to sign in with their G Suite accounts must be disabled.
The publication settings in Google apps include an option to automatically republish the content when changes are made. When this option is enabled, updates to the published content are only shown in the issue when you refresh the page.
Similar to the previous point, changes that are applied to the published content are not tracked in the issue history.
The embedded content does not include a link to open the file in the app. If you want give other users access to the file, you need to paste the link into the issue separately.
The embedded content is not indexed for text search in YouTrack.
To embed published content from a Google app:
Start the line with an exclamation point (
!).Wrap the alt text with brackets (
[ ]).Set the URL for the file in parentheses (
( )). Use the URL that is shown as the Link to the document in the Publish to the web dialog, not the HTML that is shown for the Embed option. Don't use the link that you generate to share the file with other members of your organization — that won't work either.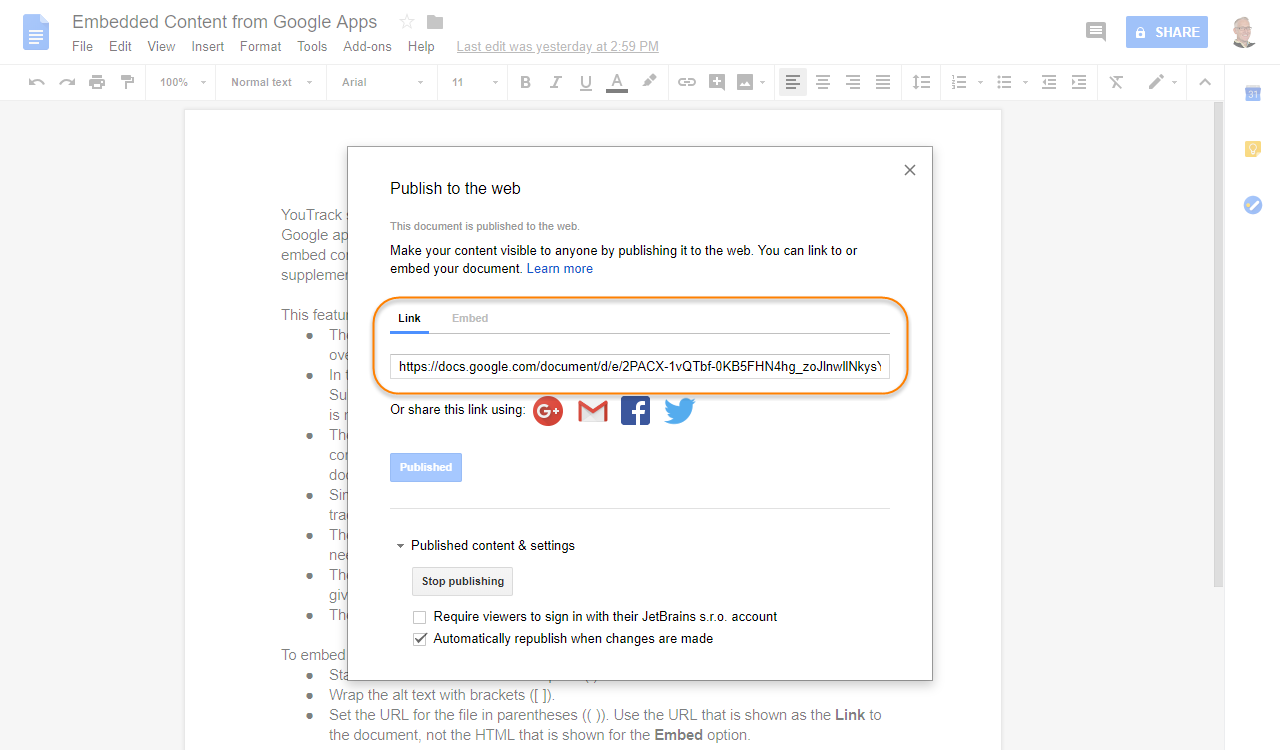
The following markup embeds a file from Google Docs that contains the instructions shown here:
Google Calendars
Similar to the logic that embeds content from Google apps, YouTrack recognizes public URLs for Google Calenders and displays a copy of the calendar in issues and articles. The embedded calendar is completely interactive, which means that users have access to all of the controls that are supported in the calendar view. Users can navigate forward and backward in time, switch between weekly and monthly views, and even add the calendar to their Google account.
To embed a Google Calendar, format the reference as you would for other links:
Start the line with an exclamation point (
!).Wrap the alt text with brackets (
[ ]).Set the Public URL for the calendar in parentheses (
( )).
To find the public URL, check the settings for the Google Calendar that you want to integrate into your issue or article content.
The following markup embeds the calendar that displays scheduled maintenance for our YouTrack Cloud instances:
Embedded Videos
Using the syntax for image attachments, you can embed a video file that is attached to the issue. The video player is shown inline with the surrounding text. You can play the video directly in the embedded player.
Start the line with an exclamation point (
!).Wrap the alt text with brackets (
[ ]).Set the filename in parentheses (
( )).
This functionality is only available for files in MPEG-4, Ogg, and WebM format.
The following markup embeds a video with the filename `MP4-video.mp4`.
YouTube Video
YouTrack supports an extension to the syntax for images that embeds YouTube video. You can embed a video that is hosted on YouTube into any field that supports Markdown, including the issue description, supplementary text fields, comments, or work items.
The video player is shown inline with the surrounding text. The thumbnail image for the video is displayed automatically. You can play the video directly in the embedded YouTube player.
Start the line with an exclamation point (
!).Wrap the alt text with brackets (
[ ]).Set the URL for the video in parentheses (
( )). Reference the video with the formathttps://www.youtube.com/watch?v=<YouTube video ID>.
This functionality is only available for videos that are hosted on YouTube. The availability of the video is based on the privacy settings that are configured for the file in YouTube.
The following markup embeds a reference to a recent video promotion for JetBrains:
Figma Designs
You can embed a design from Figma into an issue or article just as easily as you can with other online content. When you embed a design into an issue or article, the following options are available in YouTrack:
Use the controls in the lower-right corner of the image to zoom in or out.
Drag the image to show a specific section of the design in the content area.
Click the footer for the embedded image to open the design in Figma.
To embed a design from Figma, format the reference as you would for other links:
Start the line with an exclamation point (
!).Wrap the alt text with brackets (
[ ]).Set the URL for the design in parentheses (
( )).
Diagrams from diagrams.net
You can embed diagrams made with the diagrams.net service (previously draw.io) into YouTrack issues, articles, and comments.
To embed a diagram into an issue or article:
Make sure the diagram is shareable and accessible to its viewers in YouTrack.
Obtain the diagram URL. There are two options:
Copy the URL of your diagram on diagrams.net from the browser tab.
Create an IFrame view of the diagram. On the page of the diagram, click . Configure the options and click the Create button. From the generated HTML code, copy the diagram URL.
Paste the diagram URL into an issue, comment, or article in YouTrack. Format the reference as you would for other links:
Start the line with an exclamation point (
!).Wrap the alt text with brackets (
[ ]).Set the URL for the design in parentheses (
( )).
When you embed a diagram into an issue or article, the following options are available:
Use the toolbar in the lower part of the diagram to zoom in or out, print or export the diagram, or open it on diagrams.net.
Drag the image to show a specific section of the diagram in the content area.
LaTeX Mathematical Notation
When you have a mathematical formula formatted in LaTeX, and you need to show it in an issue or an article, you can put it into a fenced code block and specify the latex language there. YouTrack recognizes the LaTeX markup and renders the formula.
When you edit an issue in YouTrack Classic, you can see the rendered formula in the preview. When you save your changes, the issue displays the rendered output.
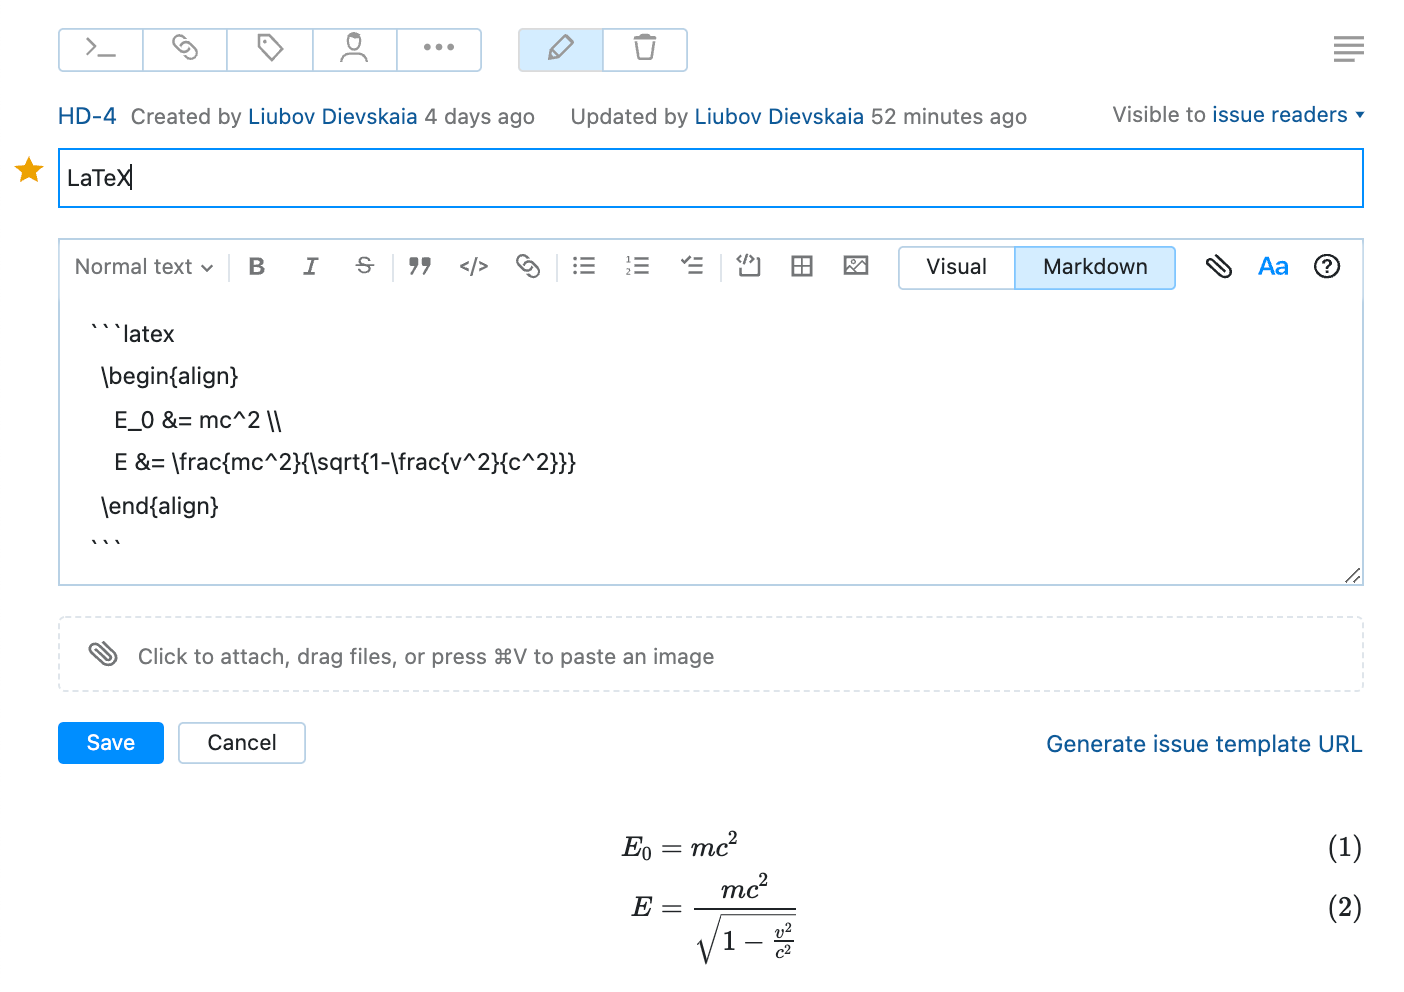
When you edit an article or an issue in YouTrack Lite, you can see a preview of the rendered formula in Visual mode.
YouTrack uses the KaTeX library for processing LaTeX formulas. For the full list of supported symbols and functions, see the library reference.
Backslash Escapes
When you have characters that are parsed as Markdown that you want to show as written, you can escape the character with the backslash (\).
Backslashes before non-markup characters are shown as backslash characters.
Escaped characters are treated as regular characters. Their usual meaning in Markdown syntax is ignored.
Backslash escapes do not work in fenced code blocks, inline code spans, or autolinks.
Here are a few examples of backslash escapes:

\*not emphasis*
\`not an inline code span`
1\. not an ordered list
\* not an unordered list
\# not a heading

\This is not a backslash escape - the escaped character is not a markup character.
Escaping HTML
If you’re pasting code into an issue and you don’t want it rendered as HTML, use one of the following techniques to escape the markup:
Make some space — any line of text that is indented with four or more spaces is automatically formatted as an indented code block in Markdown.
Fence it in — set the code inside three or more backquotes (
```) or tildes (~~~), forming a "code fence." Fenced code blocks even let you specify the language (likehtml) to enable syntax highlighting.Slash it back — any time you have characters that you want to show as written, escape the character with a backslash (
\).