Import from Jira
YouTrack lets you connect to a Jira instance. This integration lets you perform the following tasks:
Import existing projects, users, groups, and group memberships from Jira.
Update previously imported projects to apply changes to issues that were made in Jira. New issues and changes that are applied to issues in the Jira project since the last import are added to YouTrack.
The visibility setting for issues that are imported from Jira with a configured Security Level is set to the Project Admins group.
Prerequisites
Before you import projects from Jira to YouTrack, check the following requirements:
If you are importing from Jira Cloud, you have exported a copy of the user data for your Jira instance as a CSV file.
The projects that you want to import were created in Jira version 5 or later.
Your Jira instance allows remote API calls.
Your user account in Jira has administrative permissions. If you connect to the Jira instance with an account that is not assigned an administrator role, you cannot import groups and related data.
Import Details
If the Jira database contains references to entities that do not exist in YouTrack yet, they are created. The YouTrack user account you use to run the import should have enough permissions to create all imported entities. We recommend using an account with a System Admin role or the Low-level Admin Write permission to run the import.
Imported Entities
Here is the list of entities that are imported from Jira and their mapping to YouTrack entities:
Entity in Jira | Entity in YouTrack |
|---|---|
Projects | Projects |
Users | Users |
Groups and memberships | Groups and memberships |
Issues | Issues |
Issue links | Issue links |
Attachments | Attachments |
Issue types, statuses, resolutions, priorities | Custom fields and their values |
Custom fields | Custom fields |
Labels | Tags Note that YouTrack imports only those labels that are marking issues in Jira. |
Logged work | Work items |
Comments | Comments |
Issue history | Issue history |
Watchers | Watchers |
Voters | Voters |
Importing User Data
This integration also imports user accounts that are stored in the Jira instance. The same values for users who created, updated, added comments to, and are assigned issues in Jira are set to the corresponding user accounts in YouTrack.
Jira Cloud limits the amount of user data that is accessible through a programmatic interface. In order to successfully map user activity in Jira to imported issues in YouTrack, you need to upload a copy of the dataset for Jira users to YouTrack before you start importing issue data.
During setup, you are asked to upload a CSV file that contains information about the user accounts that are currently stored in your Jira database. If you don't have access to download this information, you will not be able to import issues from your Jira instance.
Self-hosted Jira Server installations are not subject to this limitation. This means that you don't have to manually export and upload user data before you can import your issues into YouTrack.
To export user data for your Jira instance:
Navigate to the Directory section in Atlassian Administration and open the Users page.
From the More menu in the upper-right corner of the header, click the Export users button.
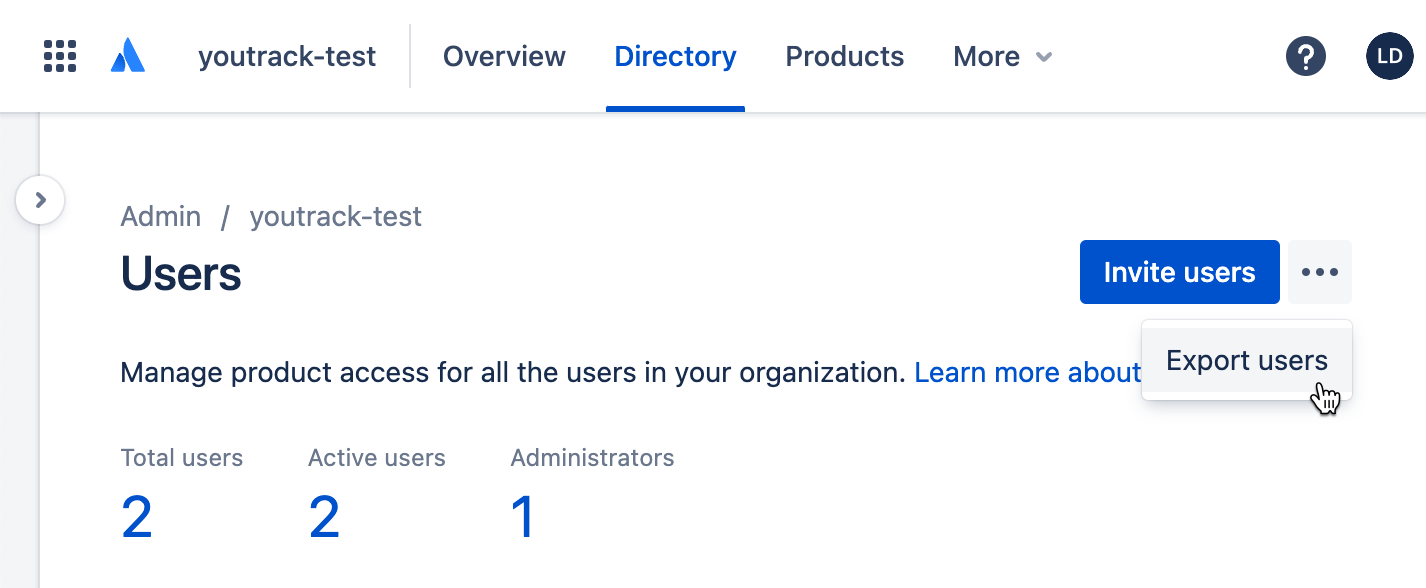
The Export users to CSV page opens.
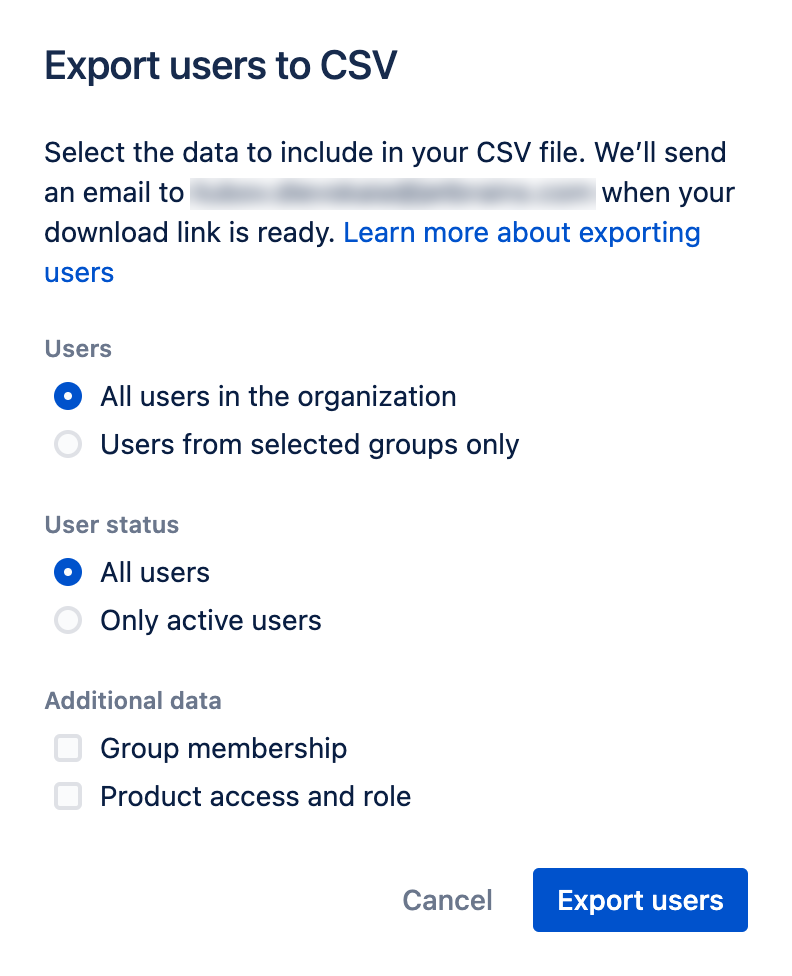
Use the following guidelines to configure the user selection for export:
Setting
Description
Users
Choose whether you want to export all users on the site or only from selected groups. Your selection should include all users who are associated with any issue-related events in the imported projects.
User Status
Choose whether you only want to export active users or all users. For best results, we suggest exporting all users.
Additional Data
Choose whether to export group membership and product access data. The data that is included in the user export file when these options are enabled are not required for importing issues into YouTrack.
Click the Export users button.
Jira generates a CSV file that contains user data from your Jira instance and sends it to your email.
Open your mailbox and download the CSV file with the user data.
Jira Account Authentication
When you import data from a Jira Server installation, YouTrack automatically creates and enables a Jira authentication module. The authentication module uses the same credentials that are used to authenticate the connection to the server and import issues.
This means that imported users can use their Jira account credentials to log in to YouTrack. To learn more about this authentication module, see Atlassian Jira Auth Module.
User Data Synchronization
YouTrack only supports continuous import from Jira Server installations. Automatic synchronization of user data between YouTrack and Jira Cloud is not supported.
If you activate continuous import from a Jira Cloud instance, you risk importing changes that were made by users who were not included in the original dataset that you used to import your first batch of issues. If a user account that was not included in the original user dataset reports activity in an imported issue, this activity is assigned to an undefined user account in YouTrack.
Continuous issue import from Jira Cloud is only recommended when the user base in the Jira instance is relatively static. If you want to import issues from a Jira Cloud instance on a continuous basis, we recommend that you leave the Continuous import setting switched off and follow this procedure instead:
Whenever you're ready to synchronize the Jira Cloud instance with YouTrack, export a fresh copy of the user dataset from the Atlassian Administration site.
Upload the dataset to the integration settings in YouTrack.
Use the Resume option to synchronize the data.
Inconsistent synchronization of user data can quickly cause enormous problems. Before you import your issues from Jira Cloud, we strongly suggest that you wait until you are ready to switch completely from Jira, transfer your user data, and migrate all of your issue-tracking activity to YouTrack. As much as we would like to support continuous import, the current limitations of the API for Jira Cloud make it difficult to set up a seamless integration.
Set up an Import from Jira
Before you add a new import configuration, prepare the credentials that will grant access to your Jira instance. You will need these credentials for authorization when setting up the import in YouTrack.
To configure an import from Jira Cloud, you will need an API token. For details on creating an API token, see Create an API Token for Jira Cloud.
If you're using Jira Cloud, export user data before configuring an import. For details on processing user data, see Importing User Data.
Create an API Token for Jira Cloud
To set up an import of articles from Jira Cloud, first, you need to create an API token for your Atlassian account.
To create an API token for the Atlassian account:
Log in to the Atlassian account settings with an account that is granted administrative permissions.
Click the Create API token button and provide a label for the token.
Click Create.
The new API token is added to the list.

For more details on creating API keys for Atlassian products, refer to the Atlassian documentation.
Configure an Import from Jira in YouTrack
The setup wizard guides you through the setup process.
To set up an import from a Jira instance:
From the Administration menu, select .
Click the New import button.
The New Import dialog opens.
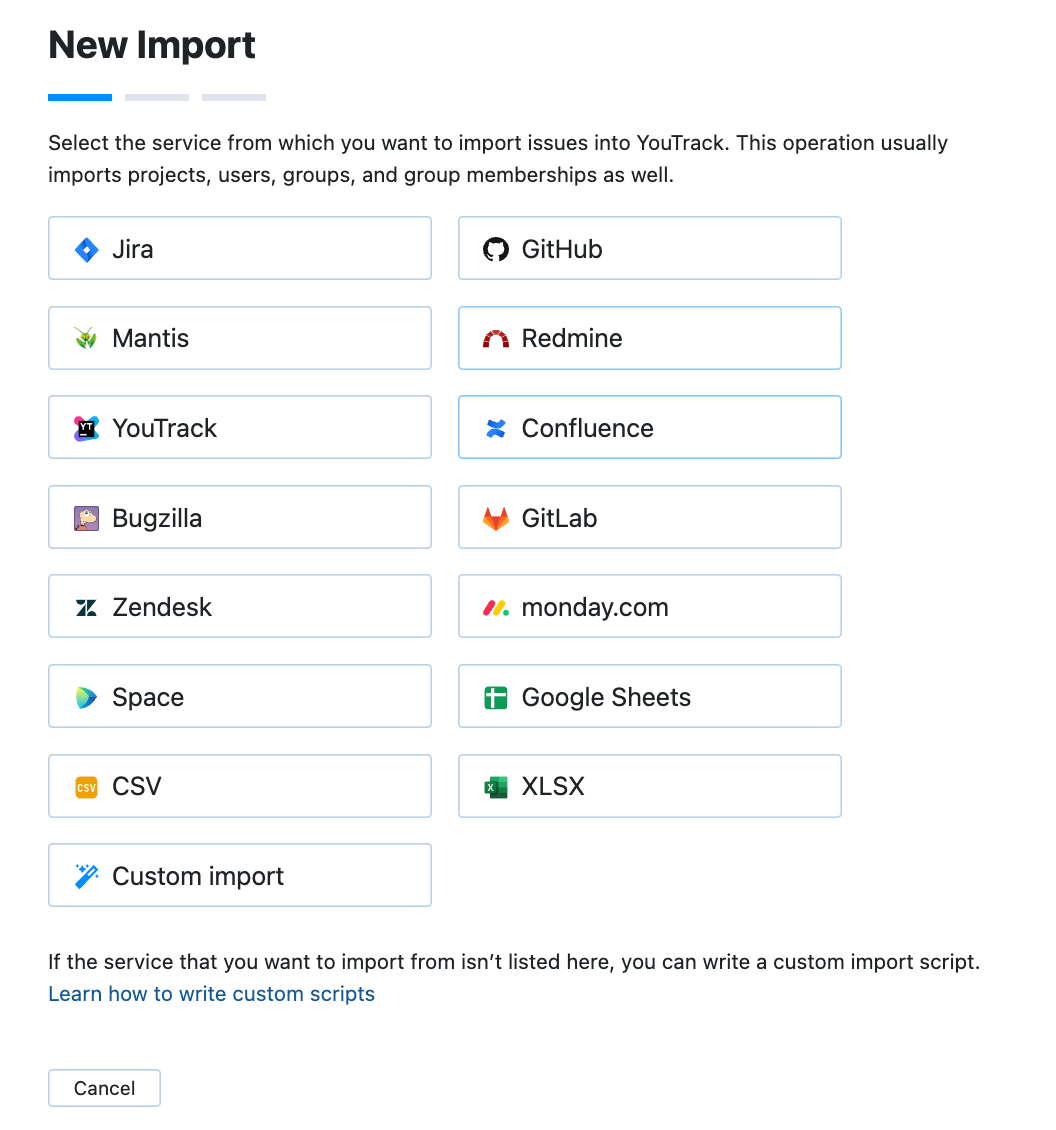
Select Jira.
Settings for a New Import from Jira are displayed.
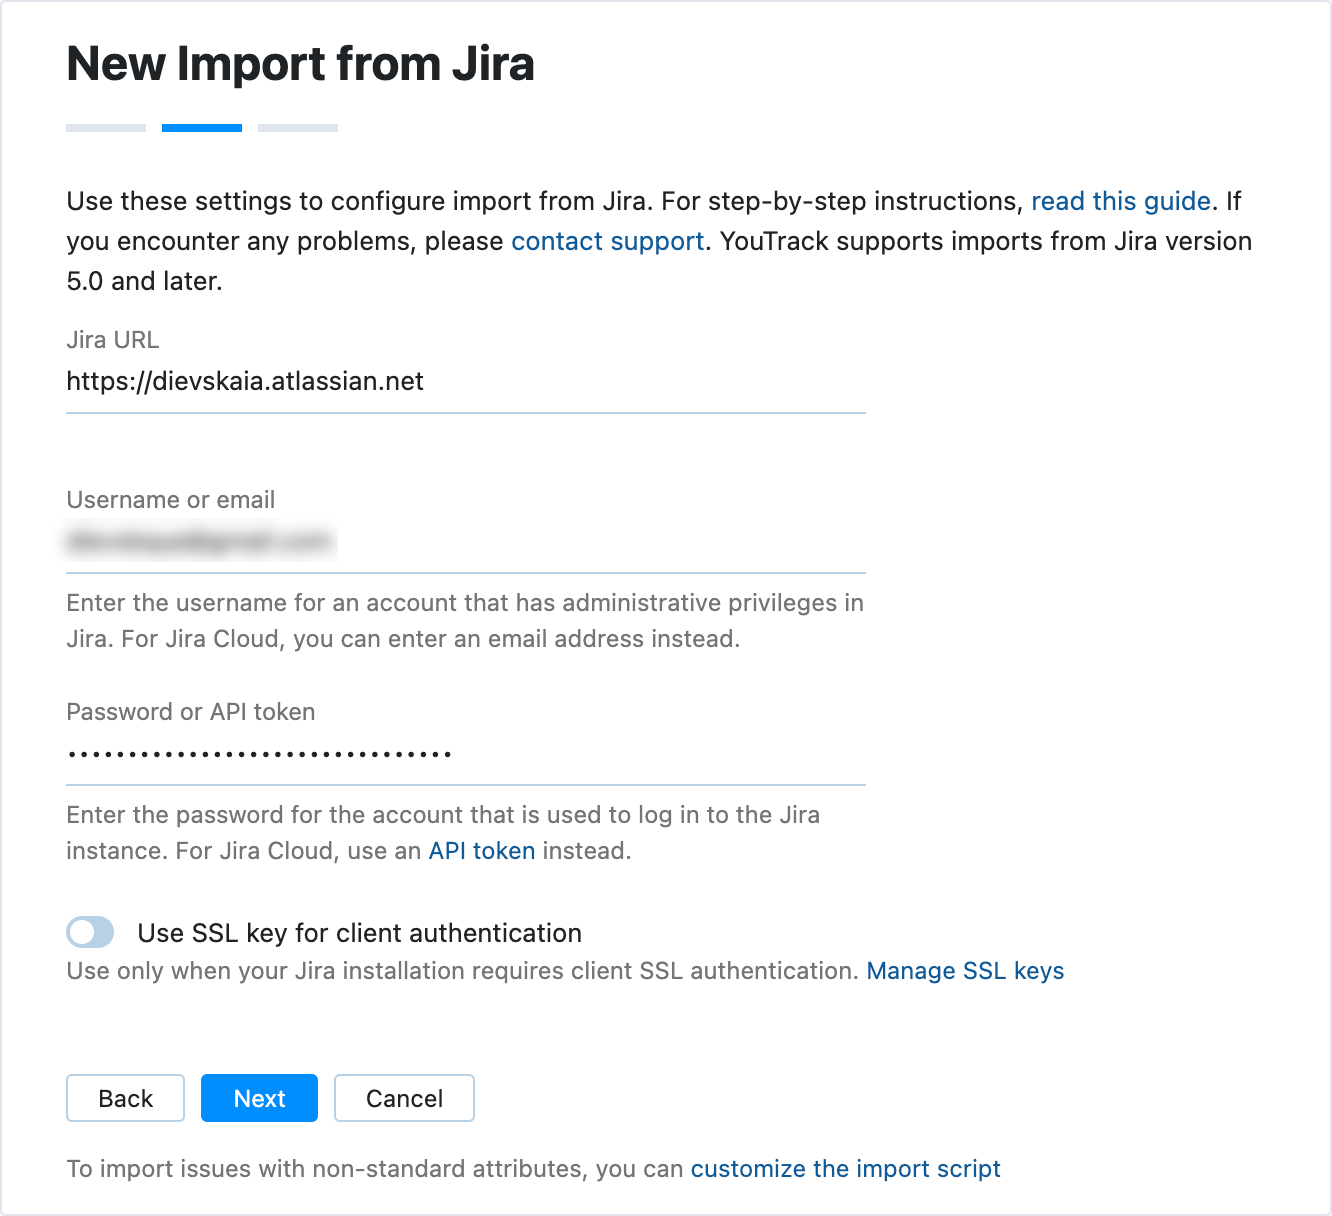
Enter values for the following settings:
Setting
Description
URL
Enter the base URL of the Jira instance.
Username or email
Enter the username of the account that is used to log in to the Jira instance. This account must have administrative privileges in Jira to import projects, users, groups, and related data.
For Jira installations, enter the username. Do not enter an email address.
For Jira Cloud, you can use an email address as the username.
Password or API token
Enter the password for the account that is used to log in to the Jira instance.
For Jira Cloud, create an API token for your Atlassian account and paste it into the input field. For details, see Create an API Token for Jira Cloud.
SSL key
If your Jira instance requires client SSL authentication, activate the Use SSL key for client authentication switch. You can then select the SSL key that identifies your YouTrack server from the list.
The list only displays SSL keys that have already been imported into YouTrack. To learn how to generate and upload SSL keys, see SSL Keys.
When done, click the Next button.
The second set of import settings is displayed.
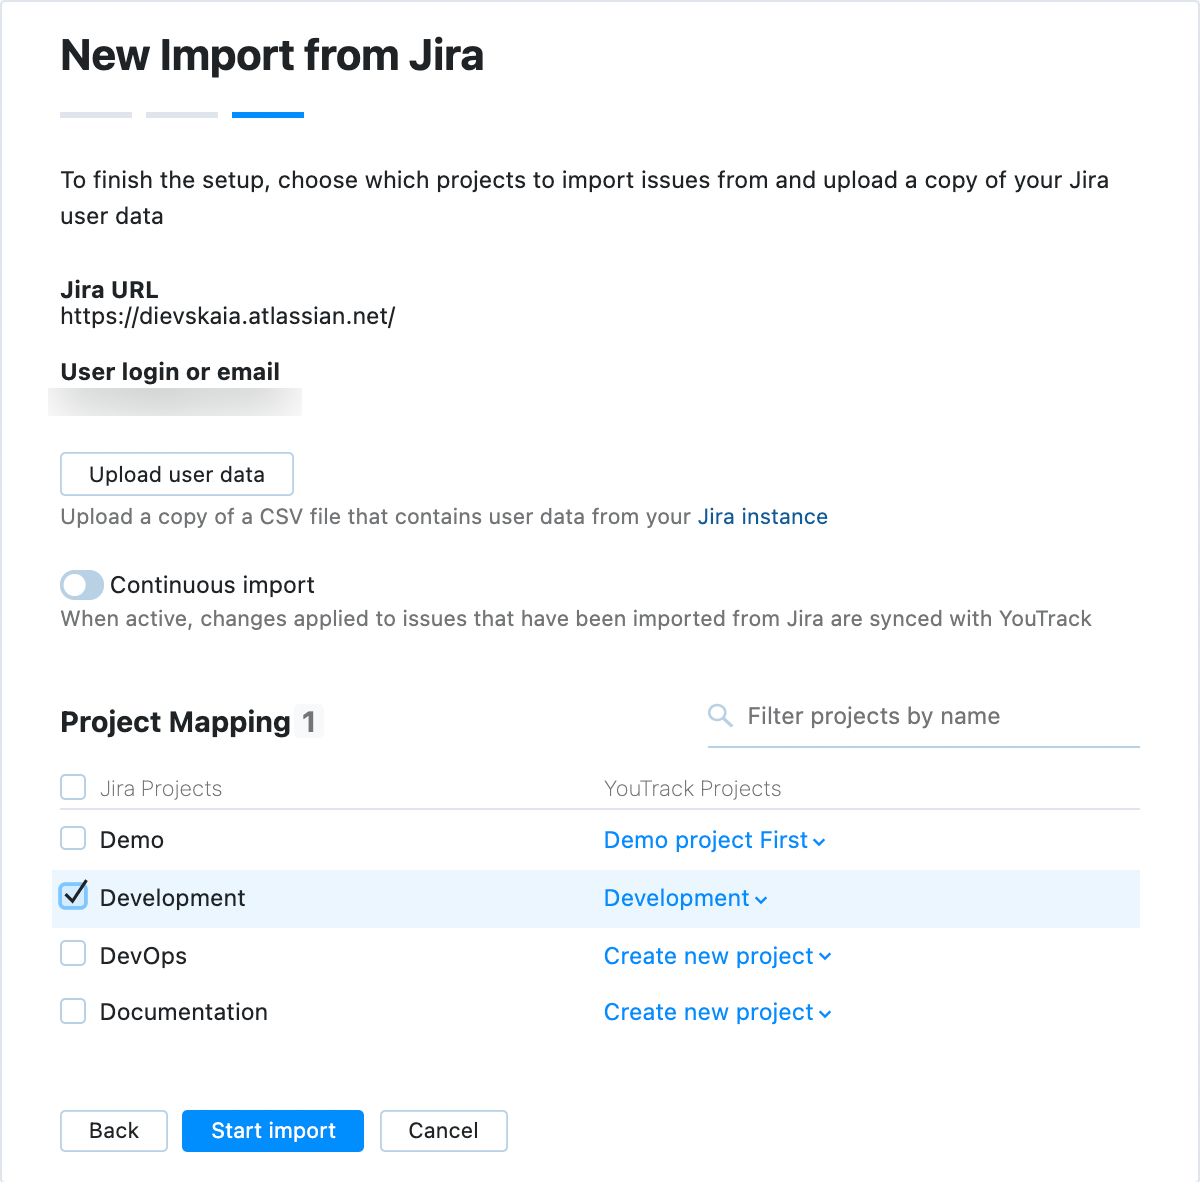
Enter values for the following settings:
Setting
Description
Project mapping
Select source and target projects for import. For details, see Project Mapping.
User data
(Jira Cloud only) Click the Upload user data button and select the CSV file that contains a copy of the user data from your Jira instance.
To learn more about exporting user data from Jira, see To export user data for your Jira instance:.
Continuous import
If you want to synchronize changes applied to issues in Jira instance with issues that have been imported into YouTrack on a regular basis, activate this switch.
When this option is enabled, YouTrack checks the Jira instance for changes in the selected projects every 10 minutes. Issues that are added or updated since the previous import are processed and updated in YouTrack.
Continuous import from Jira Cloud can lead to inconsistent synchronization of user data. If the collection of users in your Jira instance is updated on a regular basis, we strongly suggest that you leave this setting switched off and import changes manually. To learn more, see User Data Synchronization.
Click the Start import button.
YouTrack creates new projects and imports data to the existing ones according to the configured project mapping.
YouTrack imports issues, comments, users, groups, and related data from the selected Jira projects to the target YouTrack projects.
If the Continuous import option is enabled, YouTrack will periodically check target Jira projects for updated and new issues.
When you have set up an import, it appears in the imports list. To view the configuration and import details, select the import configuration from the list.
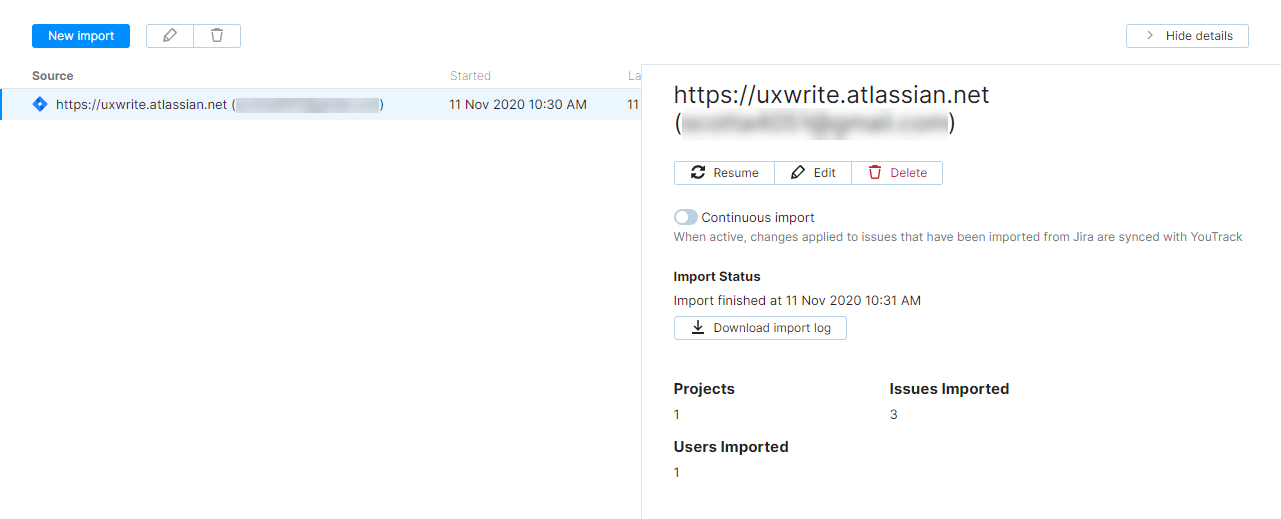
In the details sidebar, YouTrack shows import status, the date and time of the last import, and details on the data that was imported. If there are any problems encountered during import, the error messages are displayed here.
Click the Resume button in the toolbar to explicitly start polling for changes and importing updates from the source Jira project.
You can also download the import log file to study and investigate when needed.
Project Mapping
On the final step of the import setup, you have an option to select those Jira projects that you want to import to YouTrack. You can also choose whether to create a new project for the import or import data into an existing project in YouTrack.

To configure project mapping:
Locate those Jira projects that you want to import.
Use the filter bar on the right to filter projects by name.
Select the projects that you want to import. Check the box on the top of the list to import all available Jira projects.
Select a target YouTrack project for each Jira project.
When loading the list of Jira projects for mapping, YouTrack checks for existing YouTrack projects with corresponding names. If it finds a YouTrack project with the same name as the Jira one, YouTrack suggests it as the target project.
If there is no existing YouTrack project with the corresponding name, YouTrack suggests creating a new one.
If you want to change a target project, select another option from the corresponding dropdown on the list.
Click Start import to finalize import setup and start the import.
Import Options
After the initial import, the following controls are available in the sidebar:
Control | Description |
|---|---|
Resume | Immediately imports any changes that were made in the selected Jira projects after the previous import. |
Edit | Opens the integration settings page in edit mode. Use this option to connect to a different Jira instance, update the login credentials, update project mapping, or upload a fresh copy of the CSV file that contains user data from your Jira instance. |
Delete | Deletes the current import settings. Jira entity IDs that are attached to imported issues are also removed. Projects, issues, users, and groups that were imported from the connected Jira instance are not affected. If you delete the import settings and connect to the same Jira instance, the issues are re-imported into existing projects with new issue IDs. |
Download import log | Downloads the import log. Use this option to view and investigate errors that occurred during import. |