Tag Issues
Tags allow you to group issues the way you like, irrelevant of their attributes. For example, you can create a tag fix it today and add the tag to issues in multiple projects.
You can associate any issue with an unlimited number of tags.
Tags give you an alternative method to search for issues. Instead of searching by assignee, state, or project, you can tag any number of issues and search for issues by tag. Use tags to add arbitrary and descriptive attributes to any issue without having to worry about adding new custom fields.
The tags you use to categorize issues are also available for use with articles in the knowledge base. This means you can use a single scheme to group and search for content across the application.
Create a Tag
Before you can start working with tags, you need to create them. You can create and use personal tags to categorize issues according to your own tastes or create shared tags to support internal workflows.
By default, tags are visible to you only. Other users cannot see your personal tags.
When you create or edit a tag, use the settings to share the tag with a group. You can share a tag with a group in the following ways:
Make a tag visible to specific users and members of selected groups and project teams. These users can see the tag and use it as a filter to search for issues.
Designate which users can use the tag. Specified users and members of selected groups and teams are able to add the tag to and remove the tag from issues that they also have permission to view and update.
This setting does not affect the visibility of the tag itself. If you want users or group members to be able to use the tag, be sure that they are also allowed to view it.
Let users edit the tag settings. Selected users and members of selected groups and project teams are allowed to update the name, color scheme, and the Remove tag when issue is resolved setting.
The settings that allow other users to view, use, and edit the tag are only available to the tag owner and users who have the Override Visibility Restrictions permission.
This setting does not affect the visibility of the tag itself. If you want users or group members to be able to edit the tag settings, be sure that they are also members of the group that is allowed to view it.
To create a tag:
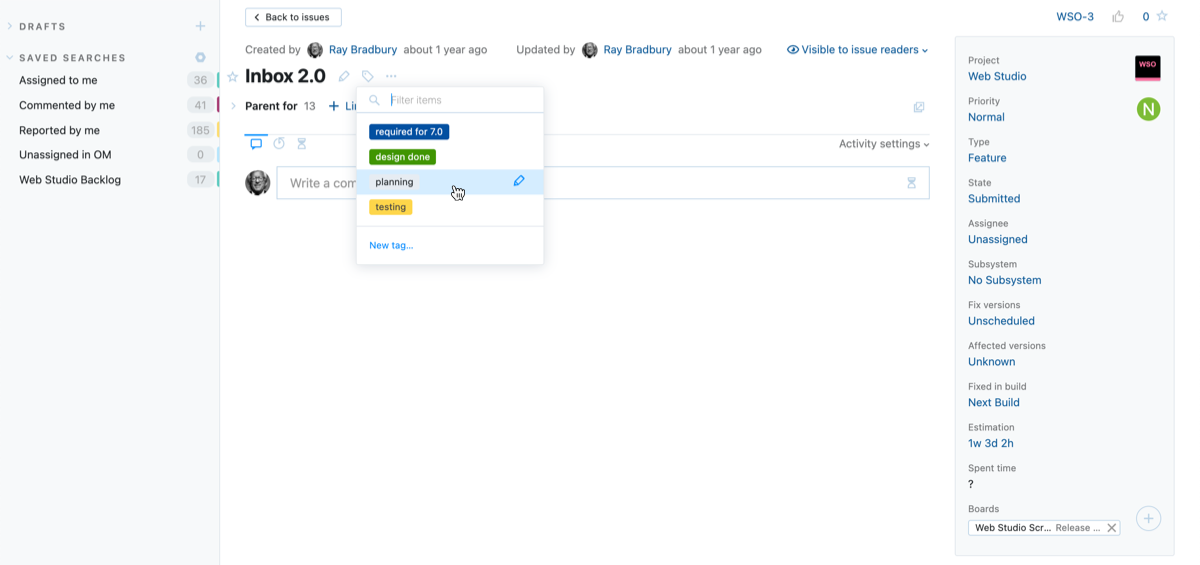
Open an issue in quick view or single issue view.
Click the Add tag icon in the toolbar.

Click the New tag link at the bottom of the list.

The New Tag dialog opens.
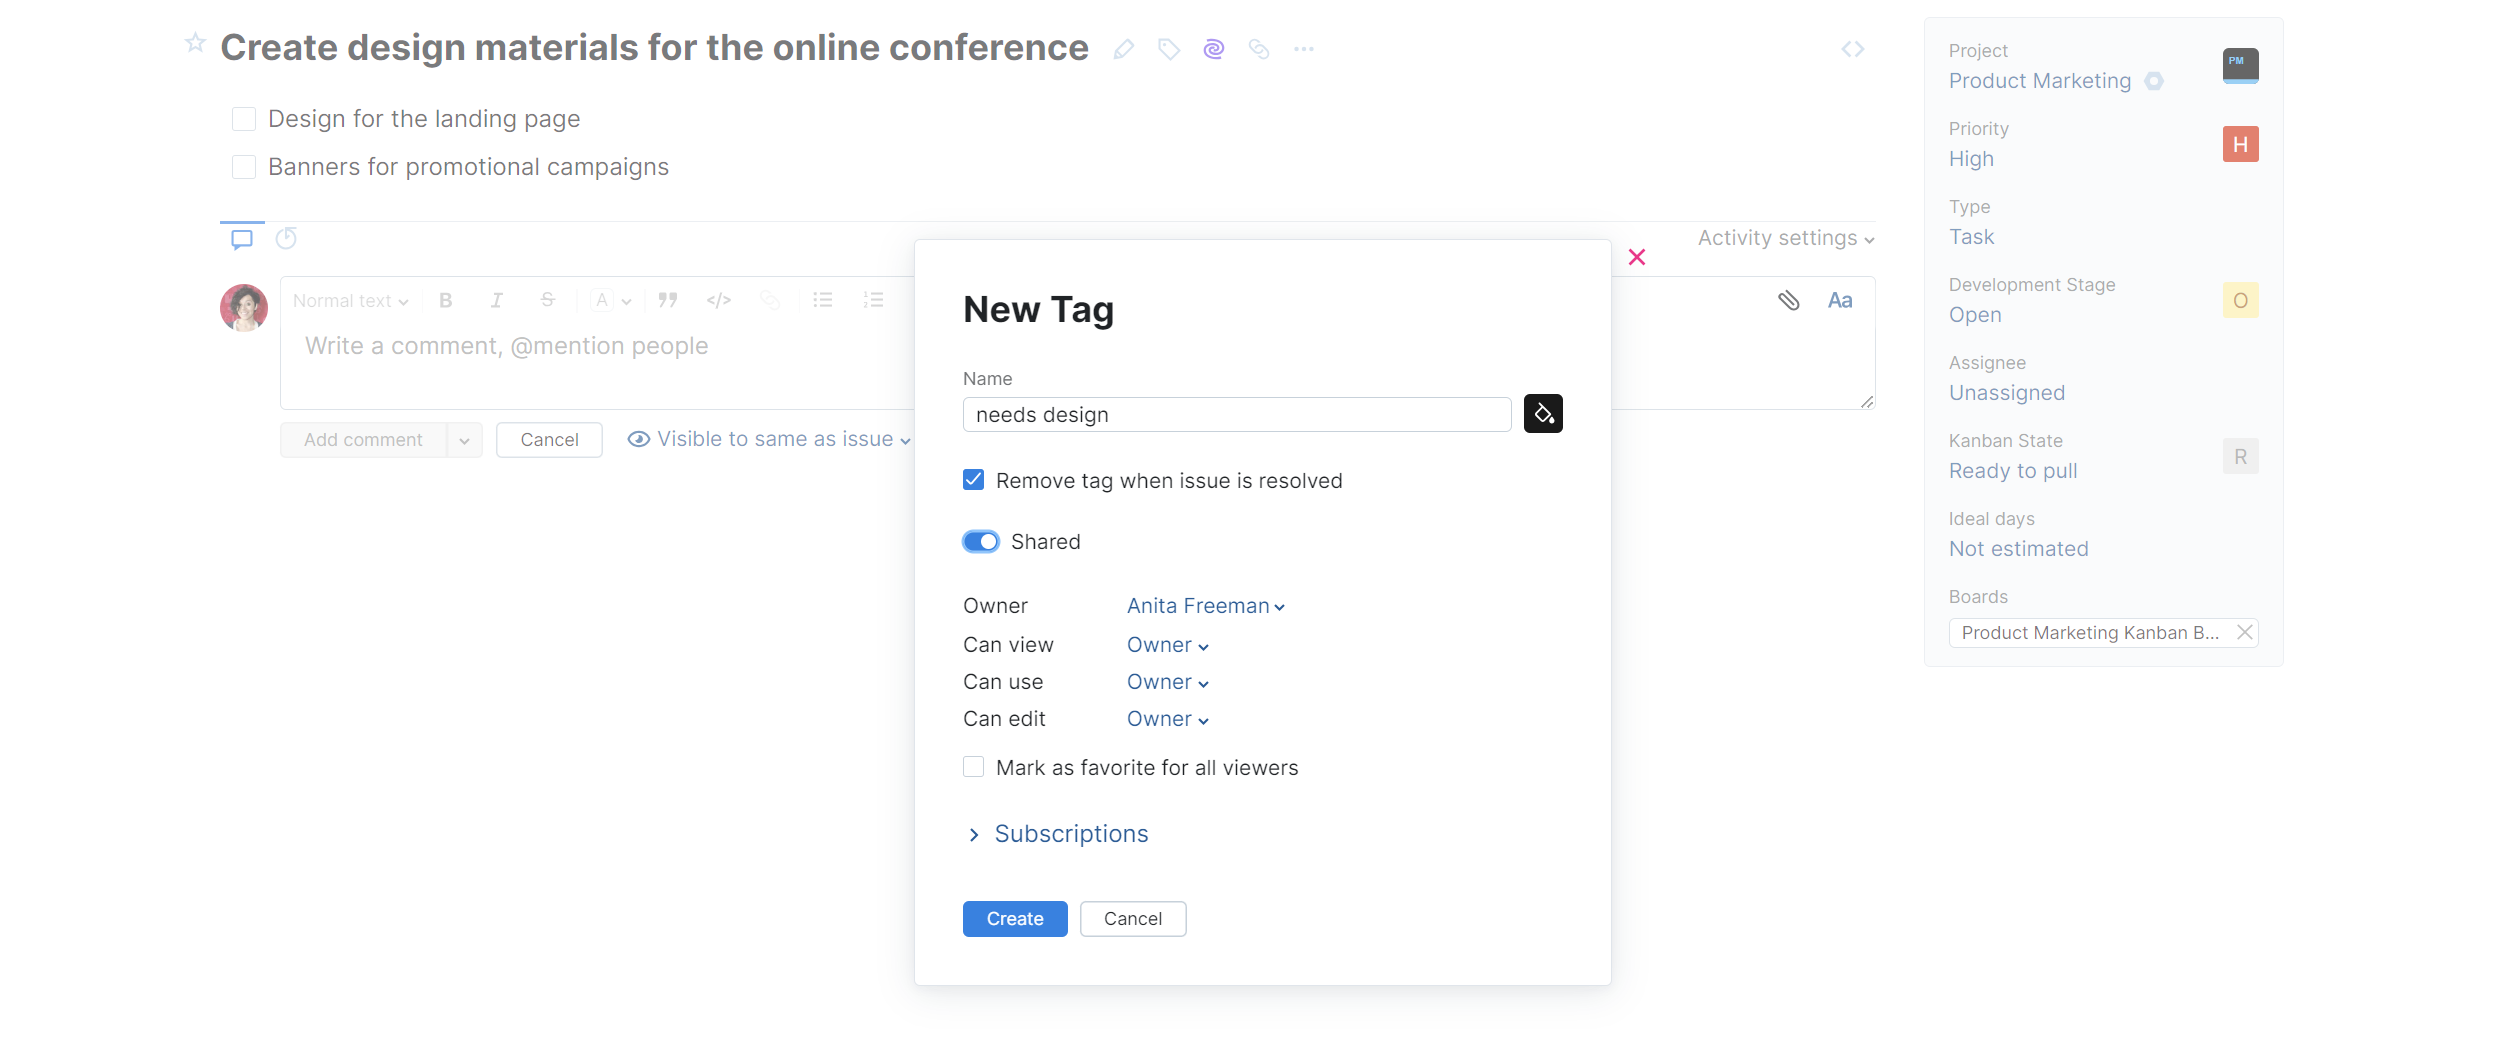
Enter values for the following settings:
Setting
Description
Name
Assign the tag a name.
Tag color
Apply an optional color scheme to the tag. Use this setting to make tagged issues stand out in the Issues list.
Remove tag when issue is resolved
Select to automatically remove the tag from an issue when its state is set to a state that is considered to be resolved.
Shared
Enable this toggle to access advanced sharing settings for the tag.
Owner
Stores the name of the user who is assumed to be responsible for managing the tag and its permissions. This can be set to any user in the system.
Can view
Select which users can see the tag and use it as a filter to search for issues. You can select multiple users, groups, and project teams.
Can use
Select which users are allowed to add the tag to and remove the tag from the issues that they also have permission to view and update. You can select multiple users, groups, and project teams.
This setting does not affect the visibility of the tag itself. If you want users or group members to be able to use the tag, be sure that they are also allowed to view it.
Can edit
Select which users can update the settings for this tag. You can select multiple users, groups, and project teams.
This setting does not affect the visibility of the tag itself. If you want users or group members to be able to edit the tag settings, be sure that they are also allowed to view it.
Mark as favorite for all viewers
Enable to mark this tag as favorite for all users who can view the tag.
Subscriptions
Displays settings that let you subscribe to specific update events for issues, tickets, and articles that are marked using this tag. These settings are only relevant to your YouTrack account and are not transferred to other user who can view or use the tag.
For more information about available subscription options, see Subscriptions.
Click the Create button.
To create a tag:
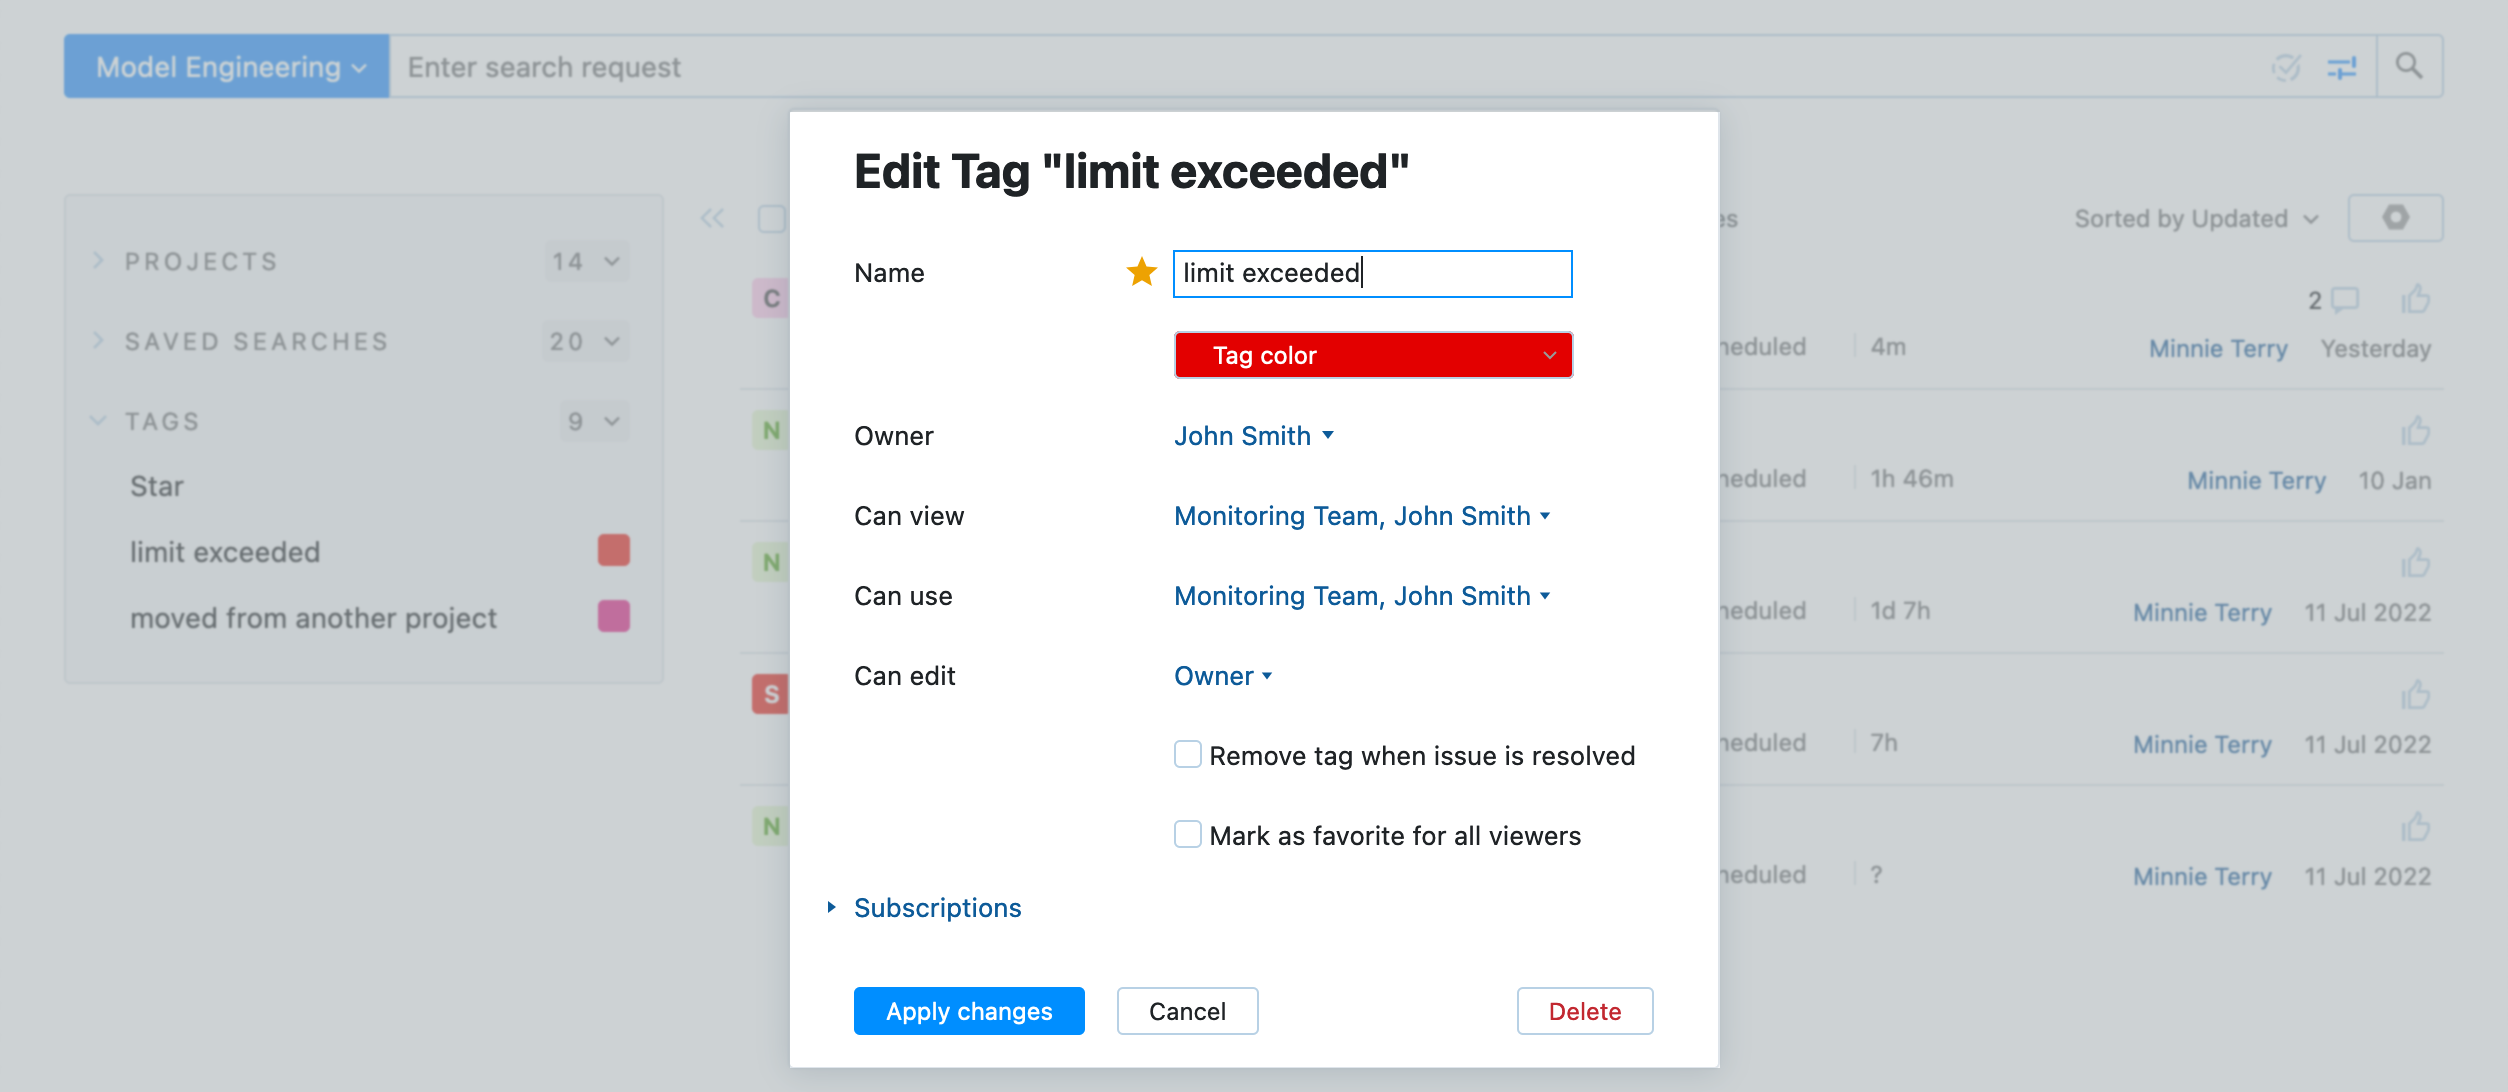
Navigate to the Issues list and expand the sidebar.
Expand the menu to show the list of available tags in the Tags section of the sidebar.
Click the New tag link at the bottom of the list.
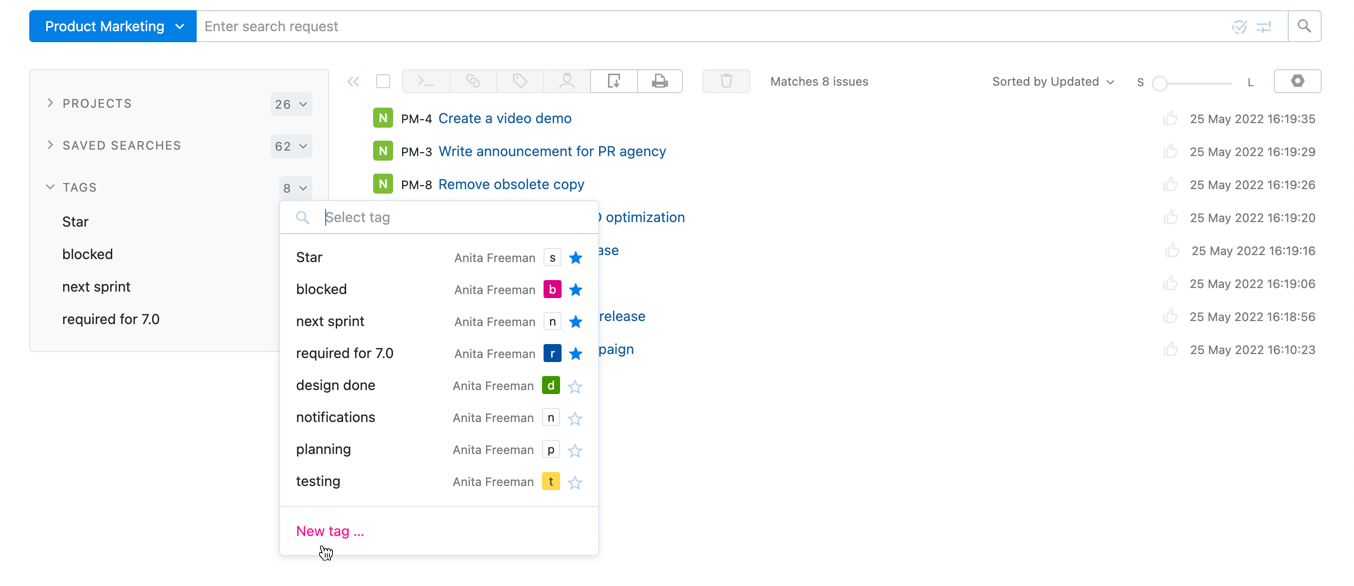
The New Tag dialog opens.
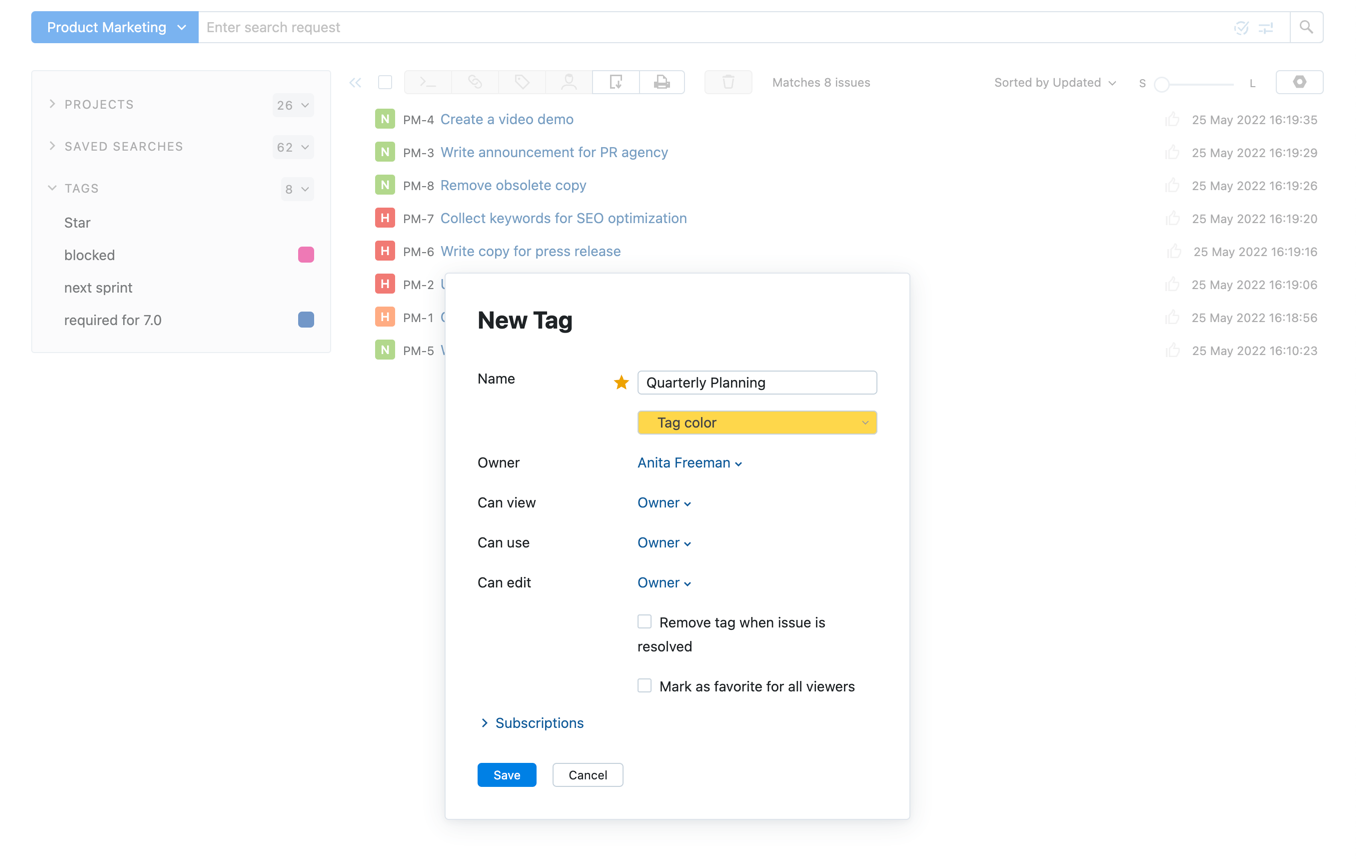
Enter values for the following settings:
Setting
Description
Name
Assign the tag a name.
Click the star icon next to the name field to mark this tag as a favorite.
Tag color
Apply an optional color scheme to the tag. Use this setting to make tagged issues stand out in the Issues list.
Owner
Stores the name of the user who is assumed to be responsible for managing the tag and its permissions. This can be set to any user in the system.
Can view
Select which users can see the tag and use it as a filter to search for issues. You can select multiple users, groups, and project teams.
Can use
Select which users are allowed to add the tag to and remove the tag from the issues that they also have permission to view and update. You can select multiple users, groups, and project teams.
This setting does not affect the visibility of the tag itself. If you want users or group members to be able to use the tag, be sure that they are also allowed to view it.
Can edit
Select which users can update the settings for this tag. You can select multiple users, groups, and project teams.
This setting does not affect the visibility of the tag itself. If you want users or group members to be able to edit the tag settings, be sure that they are also allowed to view it.
Remove tag when issue is resolved
Enable to automatically remove the tag when the issue is set to a resolved state.
Mark as favorite for all viewers
Enable to mark this tag as favorite for all users who can view the tag.
Optionally, expand the Subscriptions section. If you want to receive notifications for specific events, you can enable them here before the tag is created.
Click the Save button.
Add Tags to Issues
You can add tags to issues one at a time, or search for issues that match specific criteria and tag them all at once. These actions are available to:
The user who created the tag (its owner).
Users and members of groups or teams who are allowed to use the tag.
To add a tag to an issue:
To add a tag to one or more issues:
Select one or more issues in the Issues list.
Click the Add tag button in the toolbar.
Select the tag that you want to add to the selected issues. To help find the tag you want, filter the list by name. YouTrack filters the list of tags as you type.
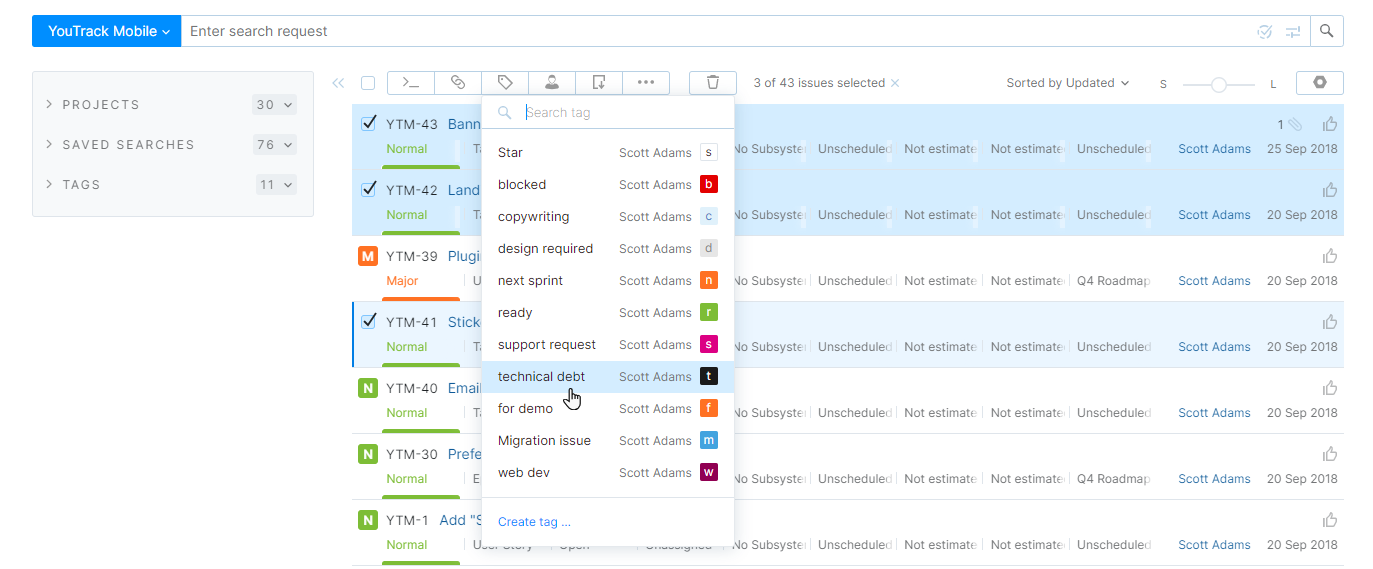
Select the tag from the list.
The tag is added to all the selected issues.
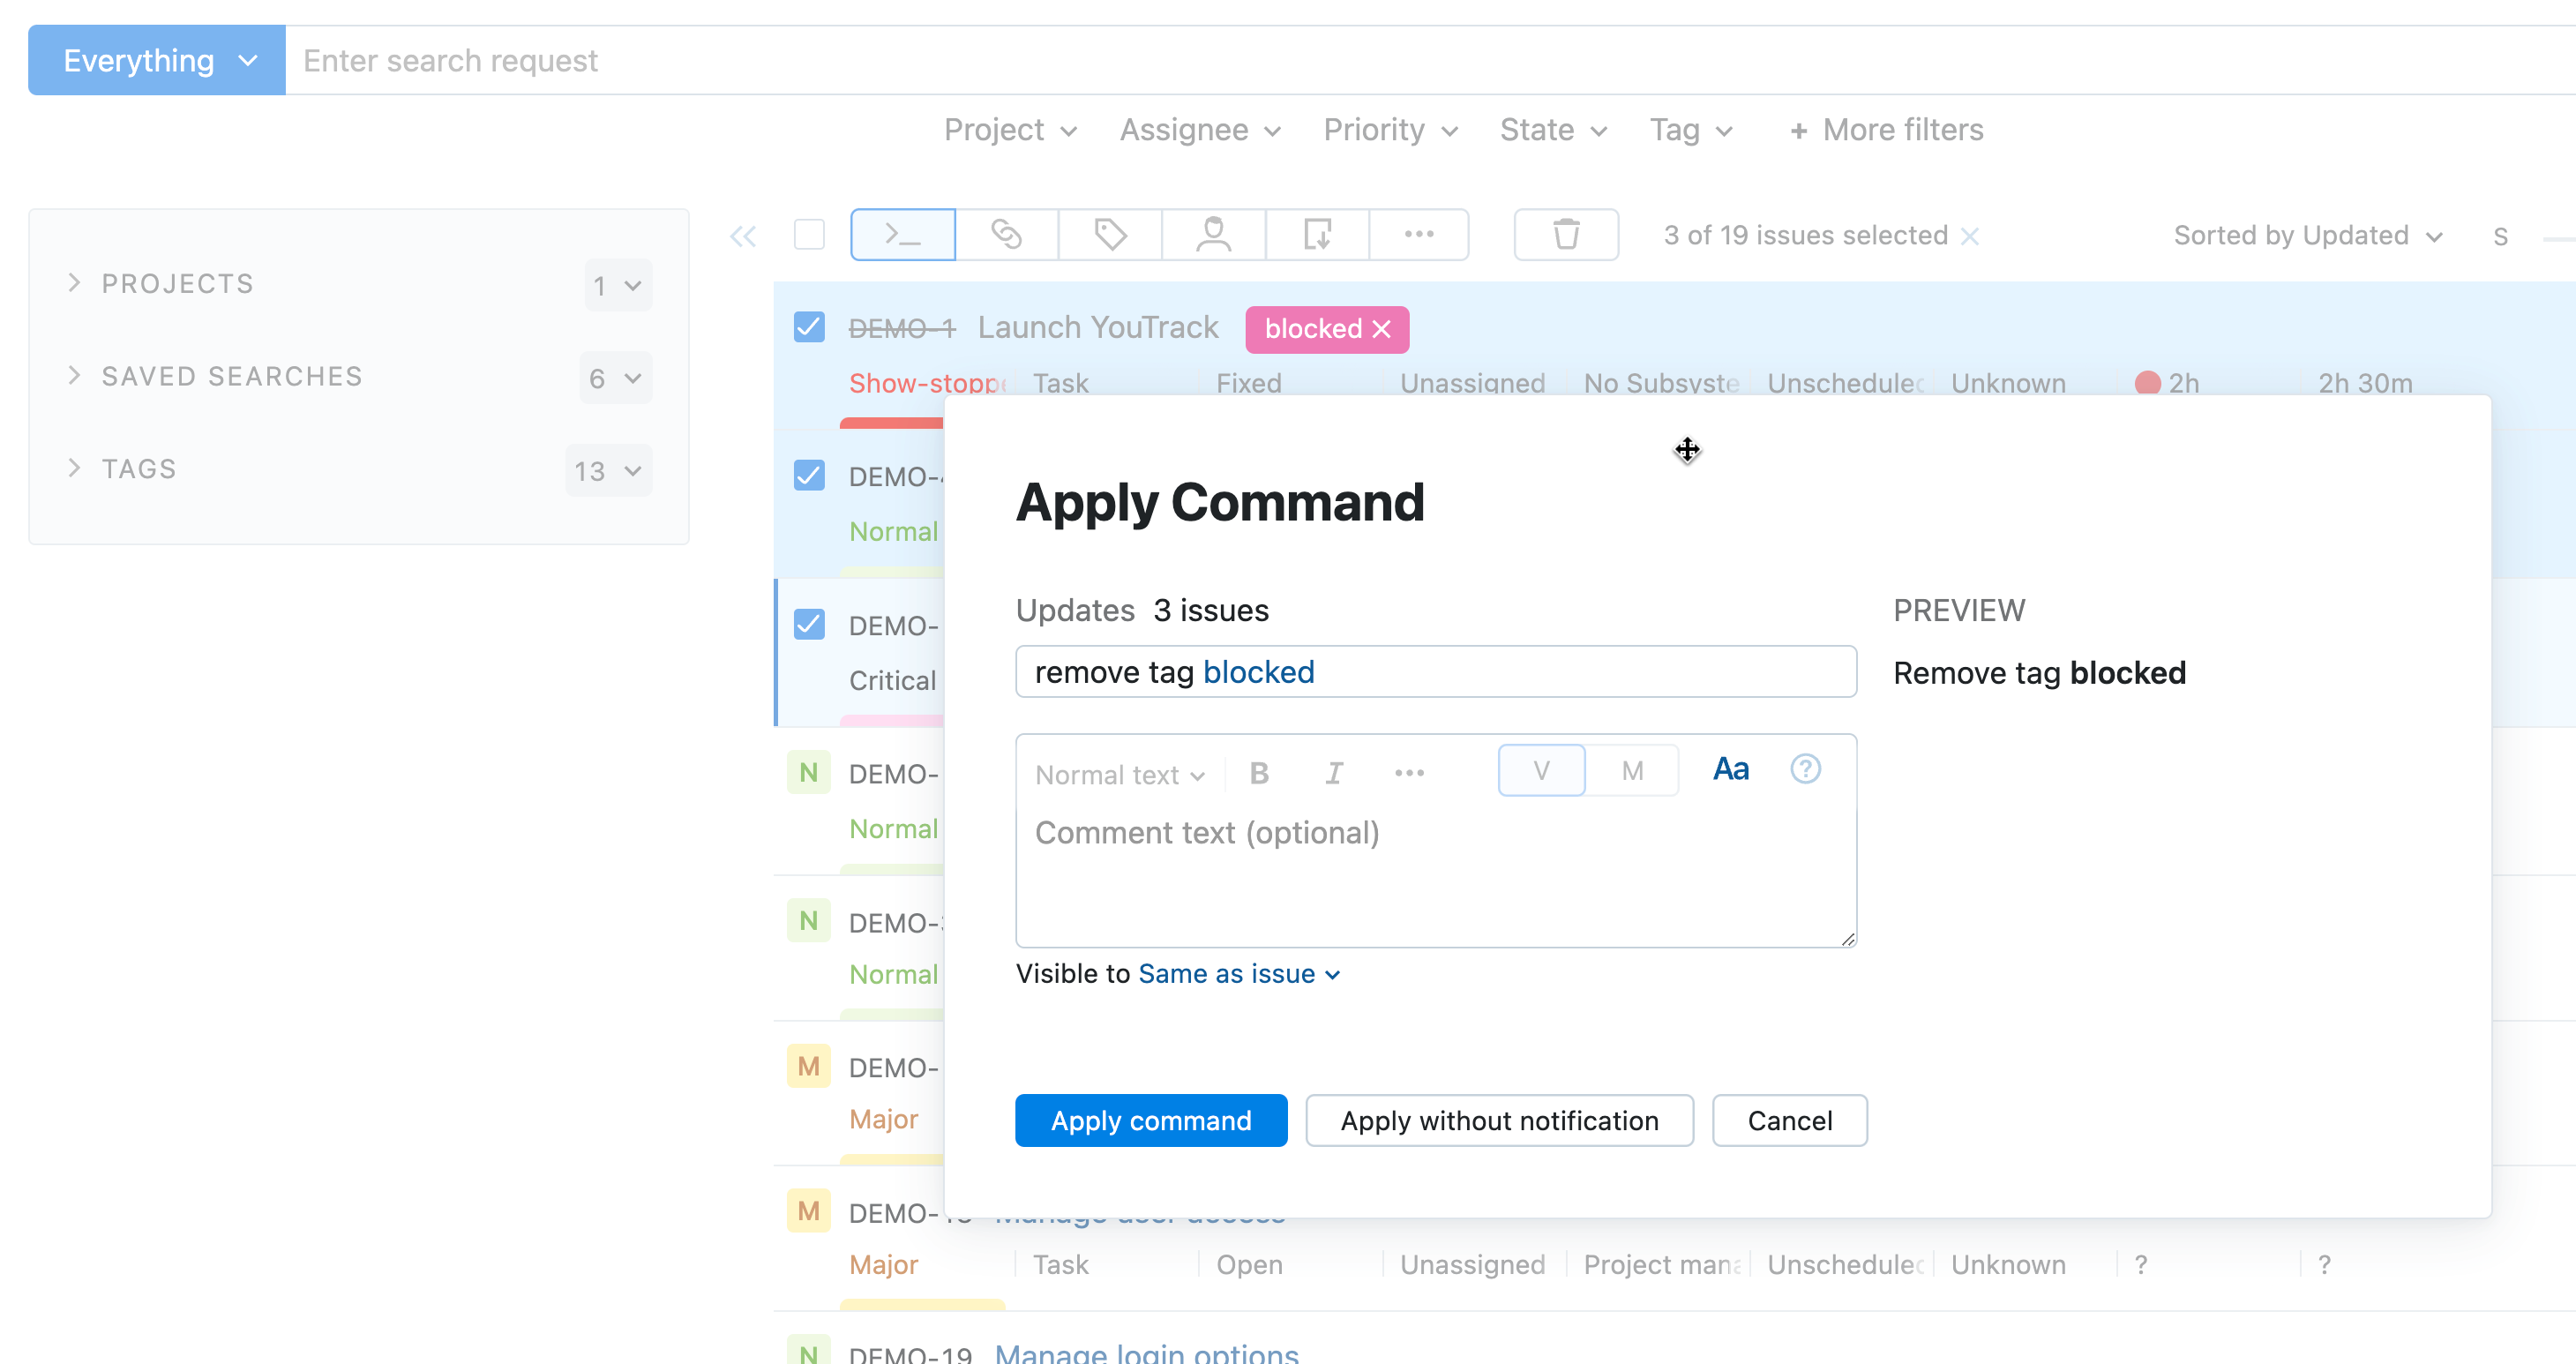
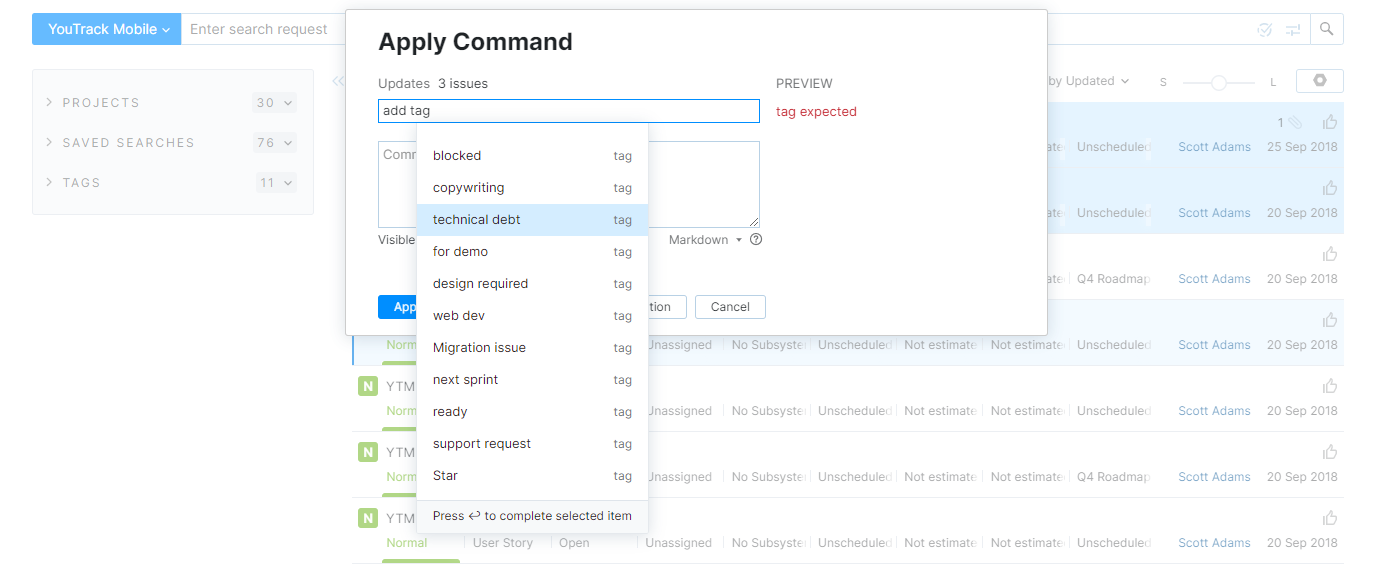
You can also add tags to issues in the Apply Command dialog. This command uses the syntax add tag <tag name>
Remove Tags from Issues
Tags are like temporary tattoos. You can apply them to look cool at the nightclub and wash them off in the morning.
We use tags like design, wording, and documentation to indicate that an issue requires input from a specific department without assigning the issue explicitly to a member of the team. When the team has provided the required input or feedback, they remove the tag.
This action is available to:
The user who created the tag (its owner).
Users and members of groups or teams who are allowed to use the tag.
The Edit Tag or Saved Search permission is not required. This permission only determines whether users who are members of the group that is allowed to edit a tag can update its properties.
To remove a tag from an issue:
Open an issue in quick view or single issue view.
Click the Remove icon for the tag that you want to remove from the issue.
Add and Remove Tags Automatically
Adding and removing tags manually requires minimal effort, but if you want to incorporate tags into your business processes, you might want to automate these actions.
YouTrack workflows let you add and remove tags automatically whenever a specific set of conditions is met. This means you can use tags to initiate a set of actions or filter for issues that have been processed by the workflow.
To learn how to work with tags using the no-code workflow constructor, see Add a Tag and Remove a Tag.
To see a sample workflow that removes a tag automatically based on a change in the issue state, see Untag on Reopen.
View a List of Tagged Issues
The easiest way to list the issues that are associated with a tag is to click the corresponding tag in any issue. This automatically switches to the list view and filters the list to show issues with this tag.
Additional options are available based on the interface that you're currently working with.
In the Lite UI, clicking a tag automatically updates the current query. If you want to add this tag to the list in the sidebar, you can save it as a new search.
This action is available to:
The user who created the tag (its owner).
Users and members of groups or teams who are allowed to view the tag.
To search for issues by tag:
Click the Issues link in the application header.
If you're currently working with the filters, switch to query mode.
Enter
tag:in the search box.Select a tag from the completion list.
Enter additional search criteria to refine your search. For example, to display unresolved critical issues that are tagged with fix by end of month, enter:
tag: {fix by end of month} state: unresolved priority: criticalor
#{fix by end of month} #unresolved #criticalClick the Search button or press Enter.
In the Classic UI, you can filter the Issues list by selecting a tag in the Tags section of the sidebar.
If you set a preliminary filter as a search context, the list displays issues that match the selected context and are associated with the selected tag.
You can also use a tag as the search context.
This action is available to:
The user who created the tag (its owner).
Users and members of groups or teams who are allowed to view the tag.
To search for issues by tag:
Click the Issues link in the application header.
Enter
tag:in the search box.Select a tag from the completion list.
Enter additional search criteria to refine your search. For example, to display unresolved critical issues that are tagged with fix by end of month, enter:
tag: {fix by end of month} state: unresolved priority: criticalor
#{fix by end of month} #unresolved #criticalClick the Search button or press Enter.
Edit Tag Settings
Your ability to edit tag settings varies based on the type of tag.
For tags that you created yourself, you can update any of the tag settings at any time.
For tags that are shared with you, you can only change the name, color scheme, and the Remove tag when issue is resolved setting.
These actions are available to:
The user who created the tag (its owner).
Users and members of groups or teams who are allowed to edit the tag.
The following settings are available:
Setting | Description |
|---|---|
Name | Stores the name of the tag. |
Owner | Stores the name of the user who is assumed to be responsible for managing the tag and its permissions. This can be set to any user in the system. For new tags, the owner default to the current user. When a new tag is added to the system by a workflow, its owner is set to the YouTrack Workflow user account. |
Can view | Determines which users and groups can see the tag when it has been applied to the issue. This also gives users the ability to use the tag to filter for issues in various contexts. |
Can use | Determines which users and groups can apply and remove the tag in the issues that they have permission to update. |
Can edit | Determines which users and groups can edit the settings for the tag. |
Remove tag when issue is resolved | Determines whether the tag is automatically removed from issues when they transition to a state that is considered to be resolved. Moving the issue back to an unresolved state doesn't restore the tag. |
Mark as favorite for all viewers | Determines whether the tag is automatically marked as favorite for all users who can view the tag. |
To edit tag settings:
Delete a Tag
The user who created a tag is able to delete the tag from YouTrack. Users with the Override Visibility Restrictions permission are able to view and manage tags that were created by other users. Other users only have the option to hide the tag by unpinning it from the sidebar.
If you have a personal tag that you no longer want to use or have shared a tag that is obsolete, you can delete it from the system.
To delete a tag:
Open an issue in quick view or single issue view.
Click the Add tag icon in the toolbar.
Click the Edit icon next to the tag.
The Edit Tag dialog opens.
Click the Delete button.
Click OK to confirm the action.
The tag is deleted. The tag is removed from all issues.
To delete a tag:
Click the Edit icon next to the tag in the sidebar.
In the Edit Tag dialog, click Delete tag button.
Click OK to confirm the action.
The tag is deleted. The tag is removed from all issues.
