Resource bundles
Required plugins: Resource Bundle Editor
A resource bundle is a set of properties files with the same base name and a language-specific suffix. For example, if you create file_en.properties and file_de.properties, IntelliJ IDEA will recognize and combine them into a resource bundle.
IntelliJ IDEA marks resource bundles with the following icon: .
In the Project tool window, select the directory where the new resource bundle should be created.
In the main menu, go to File | New | Resource Bundle, or press AltInsert and click Resource Bundle.
In the Create Resource Bundle dialog, specify the base name of the resource bundle.
If necessary, select the Use XML-based properties files.
In the dialog, you may also define the additional locales you want to include.
By default, the list of locales includes the Default locale which is defined by a properties file without a language-specific suffix.
To add locales, click
and type the comma-separated suffixes of the required locales.
If you already have properties files created in your project, those locales will appear as suggestions.
Click OK when ready.

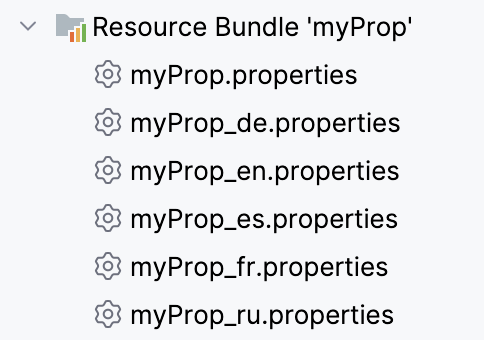
A new node Resource Bundle '<base_name>' appears in the Project tool window:

By default, the bundle contains properties files for all specified locales. You can dissociate it to show only the properties files without the bundle.
Right-click the resource bundle you want to dissociate.
From the context menu, click Dissociate Resource Bundle.
Select the properties files to be combined.
Right-click the selection.
From the context menu, click Combine to Resource Bundle.
Specify the base name of the resource bundle.
Once you create several properties files with the same name and different locale suffixes, IntelliJ IDEA automatically recognizes them and groups them in the Project view into a resource bundle.

The Resource Bundle Editor plugin provides an editor for convenient editing of localizable strings in properties files.
Do one of the following:
Select a resource bundle in the Project tool window, and press F4.
Open a properties file that is a part of a bundle and click the Resource Bundle tab at the bottom of the editor:

Open a properties file.
Add, change, or delete keys as required. IntelliJ IDEA reflects the changes in the Resource Bundle editor.
Use the Resource Bundle editor to change property values, which will ensure that you edit the entire set of property files simultaneously. IntelliJ IDEA creates respective records in each file of the bundle.
Select the property key in the left pane of the resource bundle editor.
In the target locale frame, edit the value as required. IntelliJ IDEA updates the respective properties file accordingly.

Here, you can also add new properties (use the button), sort, and group properties.
When editing a resource bundle, keep the following in mind:
IntelliJ IDEA highlights properties with no values or those omitted in one of the properties files.
To convert between escape sequences (for example,
\u00df) and unicode literals (corresponding national characters, such asß) in properties files and in the Resource Bundle editor, select the Transparent native-to-ascii conversion checkbox on the File Encoding page of the IDE settings.For more information, refer to Encoding.
It is possible to encode non-ASCII symbols using both uppercase and lowercase hex sequences (for example,
\u00E3and\u00e3). By default, IntelliJ IDEA supports only uppercase sequences. To use lowercase hex sequences, set theidea.native2ascii.lowercaseproperty in the idea.properties file totrue.For more information, refer to Platform properties.
When editing properties files, you can press AltEnter to use the context actions for copying the key or value of the property at the caret to the clipboard.

Thanks for your feedback!