Navigate file by its structure
ReSharper | Windows | File Structure
(ReSharper_ShowCodeStructure)
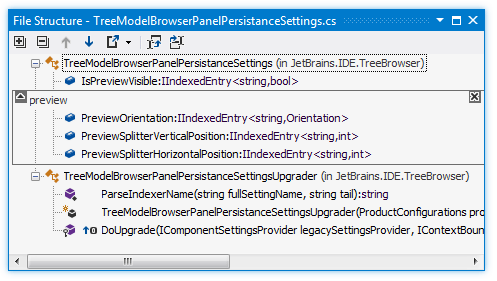
With ReSharper, you can navigate the structure of the current document using the File Structure window, which greatly simplifies navigation in large files. The window is synchronized with the editor: as you switch to another editor tab, the window displays the structure of the corresponding file.
tip
To list file members using a popup instead of a tool window, press
Press or choose ReSharper | Windows | File Structure from the main menu. Alternatively, you can press , start typing the command name in the popup, and then choose it there.
The contents of the current document appear in a tree structure, that you can explore and navigate through the document. You can double-click any symbol to make the caret in the editor switch to the corresponding position.
If some parts of the code are surrounded by
#regionblocks, the regions appear in the file structure too.You can wrap symbols into a region right from the file structure. To do so, select the members you want to wrap (Ctrl-click items for multiple selection), and then click Surround with Region
.png) on the toolbar.
on the toolbar.You can remove any region by clicking the cross icon
.png) in the upper right corner of the region frame.
in the upper right corner of the region frame.To rename a region, double-click its name or press F2 over it, and then type the new name.
tip
ReSharper provides more features for managing regions. For more information, refer to Add and remove #region blocks.
To synchronize the way you change caret position in the editor with the symbol highlighted in the File Structure window, click Track Caret in Editor
.png) on the toolbar.
on the toolbar. To synchronize symbols that you select in the File Structure window with the caret position in the editor, click Automatically Scroll to Source
.png) on the toolbar.
on the toolbar.

tip
File members are marked with symbol icons that you can configure on the Environment | General page of ReSharper options.
Right from the File Structure window, you can access even more actions. To check available commands, you can right-click any symbol.
To open a specific type or member in the editor, double-click it or press Enter or Ctrl+Enter. There is a difference between these two shortcuts: Enter opens the corresponding line in the editor but keeps the focus in the Find Results window so that you can press Up and Down to study other results; Ctrl+Enter also moves the focus to the editor.
Drag-n-drop types and type members to rearrange their order. Your changes are immediately reflected in the file.
If the opened file contains unit tests, these are marked with corresponding icons displaying the status of their last execution. You can also run and debug unit tests right from inside the File Structure window.
tip
To search items in the File Structure window, just start typing a name or a CamelHumps abbreviation.
Control | Name | Description |
|---|---|---|
| Expand All/Collapse All | Expands/collapses all nodes in the current tab. |
| Previous/Next | Navigate to the previous/next item and scrolls through the source code accordingly. |
| Export | Click this button to export the data currently displayed in the window in text format , or use the drop-down selector to export the data in an XML or HTML format. The Export Data dialog that appears will help you save the data to a file or copy it to the clipboard . |
| Track Caret in Editor | When this button is pressed, items in the window are highlighted according to the position of the caret in the editor. |
| Automatically Scroll to Source | When this button is pressed, the editor opens the file and scrolls it according to the items selected in the window. |
| Surround with Region | In C# and VB.NET files, surrounds the selected symbols with Select one or several adjacent nodes in the window and click Surround with Region You can remove the region from the source code by clicking the X mark in the upper-right corner of the region frame. You can also collapse/expand the region frame using the arrow in the upper-left corner. |
| Show Preprocessor Directives | In C++, shows all preprocessor directives in the current file. |
This feature is supported in the following languages and technologies:
The instructions and examples given here address the use of the feature in C#. For more information about other languages, refer to corresponding topics in the Languages and frameworks section.