Recover Data
Recover volume data
If a dev environment fails to start and you cannnot connect to it via SSH or the IDE client, you can try to recover user data (e.g., uncommitted changes) from the dev environment volume. To help you with this, CodeCanvas provides a recovery workflow.
In this workflow, CodeCanvas crates a temporary recovery dev environment. The volume of the failed dev environment is mounted to /mnt/jetbrains/additional-volume, so you can access and save your data.
In CodeCanvas, click the CodeCanvas logo in the upper-left corner. This page shows all dev environments that you have access to.
Find the failed dev environment and in the dev environment menu, select Recover volume data.
In the dialog, select a template. For example, if you want to save your unpushed changes, it makes sense to select the same template as in the failed dev environment.
Specify other settings if needed and click Create. CodeCanvas will start creating a recovery dev environment.
Once the recovery dev environment is created, connect to it via SSH or the IDE client and save your data from the
/mnt/jetbrains/additional-volumedirectory. For example, if you want to save your unpushed changes, you can copy them to the project directory (by default, it is/home/codecanvas/<project_name>), commit them, and push the commit to the remote repository.Stop and delete the recovery dev environment when you finish.
Recover volume data (advanced)
If creating a recovery dev environment fails, system administrators can manually access the failed volume in the cloud infrastructure. The workflow consists of the following steps:
Get the volume name in the CodeCanvas UI.
In the cloud object storage, find the volume by its name.
In the same cloud, create a virtual machine with the same OS as the dev environment.
Attach the volume to the virtual machine.
Get user data from the volume.
This guide describes the first two steps.
Step 1. Get a volume name
In the header navigation, select Administration, then in the sidebar menu, select Dev environments.
Find the failed dev environment and in the dev environment menu and click its name.
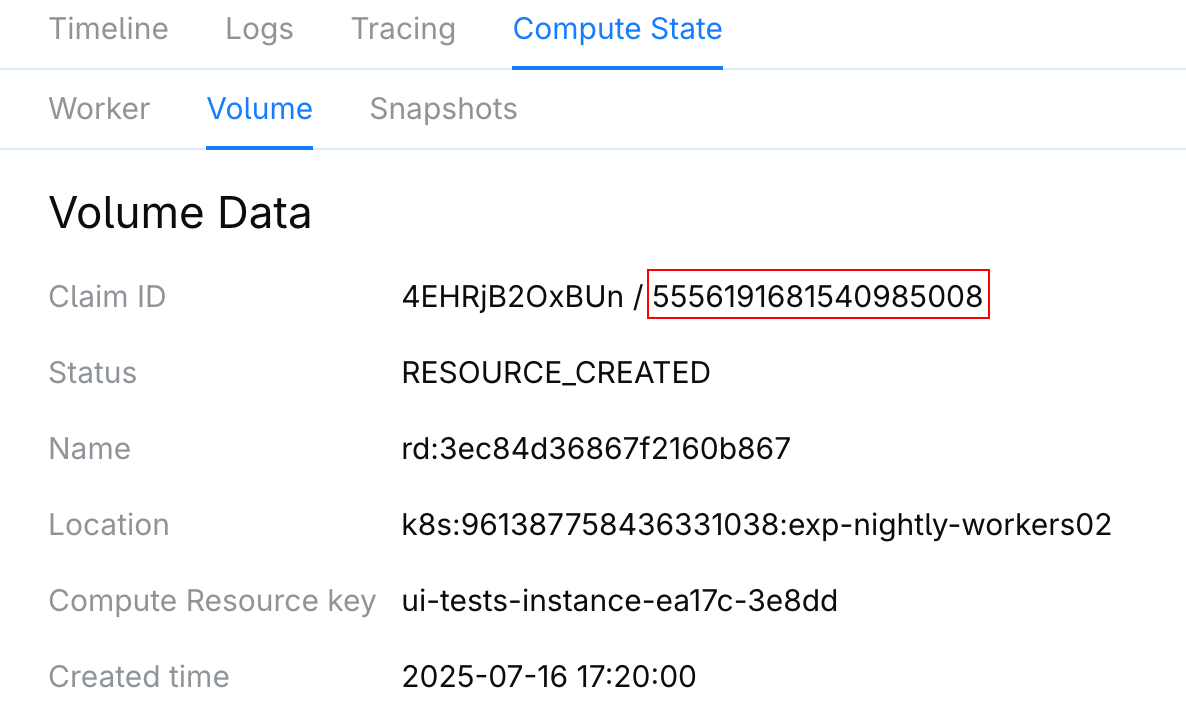
Open the tab and copy the volume name in Claim ID.

Step 2. Find the volume
You can get the required volume either in the AWS Management Console or in the Kubernetes cluster using the kubectl command.
Open AWS Management Console.
Open the EC2 service.
Under Elastic Block Store, click Volumes.
In the Volumes list, start searching by the following tag:
kubernetes.io/created-for/pvc/nameIn Operators, select Equals and paste the volume name you got from CodeCanvas.

As a result, you will see the required volume which you can attach to a virtual machine.

Get information about the related persistent volume claim (PVC) in the Kubernetes cluster:
kubectl describe pvc -n NAMESPACE_NAME VOLUME_NAME_FROM_CODECANVASFor example:
kubectl describe pvc -n my-codecanvas 5556191681540985008In the output, find the
Volumefield:Name: 5556191681540985008 Namespace: my-codecanvas StorageClass: ebs-sc Status: Bound Volume: pvc-d20a1bf8-36c3-4d18-ae42-79432526f65b Labels: ... ...Use the
Volumevalue to get the related persistent volume (PV):kubectl describe pv -n NAMESPACE_NAME VOLUME_VALUE_FROM_PVCFor example:
kubectl describe pv -n my-codecanvas pvc-d20a1bf8-36c3-4d18-ae42-79432526f65bIn the output, find the
Source.VolumeHandlefield:Name: pvc-d20a1bf8-36c3-4d18-ae42-79432526f65b Labels: <none> Annotations: ... Finalizers: [kubernetes.io/pv-protection external-attacher/ebs-csi-aws-com] StorageClass: ebs-sc Status: Bound Claim: my-codecanvas/5556191681540985008 Reclaim Policy: Delete Access Modes: RWO VolumeMode: Filesystem Capacity: 101Gi Node Affinity: Required Terms: Term 0: topology.ebs.csi.aws.com/zone in [eu-west-1a] Message: Source: Type: CSI (a Container Storage Interface (CSI) volume source) Driver: ebs.csi.aws.com FSType: ext4 VolumeHandle: vol-0b56ca4e68437875a ReadOnly: false VolumeAttributes: ... Events: <none>The
VolumeHandlevalue is the AWS volume ID. In our example, it isvol-0b56ca4e68437875a.
You can get the required volume either in the Google Cloud Console or in the Kubernetes cluster using the kubectl command.
In Google Cloud Console, open the Kubernetes Engine service.
Under Resource Management, click Storage.
In Cluster, select the cluster with the dev environment.
Use a filter by Name and paste the volume name you got from CodeCanvas.

Copy the value from the Volume column. It must start with
pvc-prefix. E.g.,pvc-12345678-1234-1234.Open the Compute Engine service.
Under Storage, click Disks.
Use a filter by Name and paste the value you got from the previous step (e.g.,
pvc-12345678-1234-1234).As a result, you will see the required volume which you can attach to a virtual machine.

Get information about the related persistent volume claim (PVC) in the Kubernetes cluster:
kubectl describe pvc -n NAMESPACE_NAME VOLUME_NAME_FROM_CODECANVASFor example:
kubectl describe pvc -n my-codecanvas 5556191681540985008In the output, find the
Volumefield:Name: 8309948235062827357 Namespace: my-codecanvas StorageClass: workers-storageclass Status: Bound Volume: pvc-7a4647e9-5e22-473a-b7bc-e8c4cfcf7c05 Labels: ... ...Use the
Volumevalue to get the related persistent volume (PV):kubectl describe pv -n NAMESPACE_NAME VOLUME_VALUE_FROM_PVCFor example:
kubectl describe pv -n my-codecanvas pvc-7a4647e9-5e22-473a-b7bc-e8c4cfcf7c05In the output, find the
Source.VolumeHandlefield:Name: pvc-7a4647e9-5e22-473a-b7bc-e8c4cfcf7c05 Labels: <none> Annotations: ... Finalizers: [kubernetes.io/pv-protection external-attacher/pd-csi-storage-gke-io] StorageClass: workers-storageclass Status: Bound Claim: my-codecanvas/8309948235062827357 Reclaim Policy: Delete Access Modes: RWO VolumeMode: Filesystem Capacity: 101Gi Node Affinity: Required Terms: Term 0: topology.kubernetes.io/zone in [europe-west1-b] Message: Source: Type: CSI (a Container Storage Interface (CSI) volume source) Driver: pd.csi.storage.gke.io FSType: ext4 VolumeHandle: projects/dev-workers/zones/europe-west1-b/disks/pvc-7a4647e9-5e22-473a-b7bc-e8c4cfcf7c05 ReadOnly: false VolumeAttributes: ...In the
VolumeHandlefield, you're interested only in the last part of the value after the last slash. In our example, it ispvc-7a4647e9-5e22-473a-b7bc-e8c4cfcf7c05. This is the GCP persistent disk ID.
You can get the required volume either in the Azure Portal or in the Kubernetes cluster using the kubectl command.
Open Azure Portal.
Open Disks.
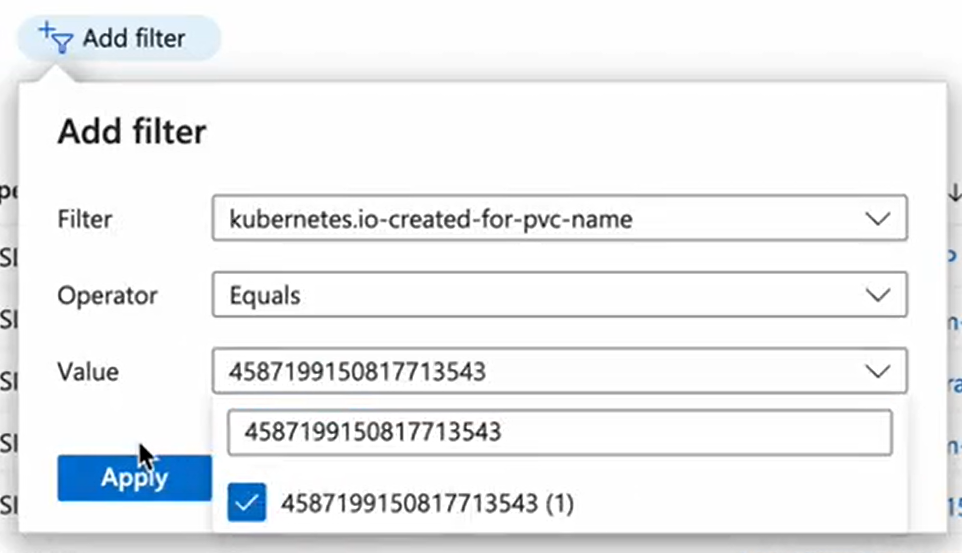
Click Add filter and in Filters, select the
kubernetes.io-created-for-pvc-nametag.In Operator, select Equals and paste the volume name you got from CodeCanvas to the Value field.

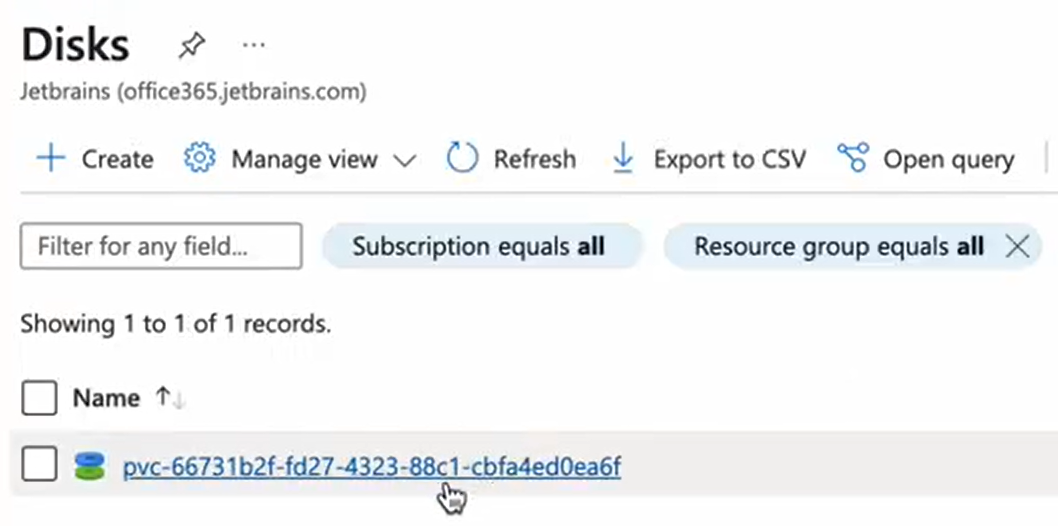
Click Apply. As a result, you will see the required volume.

Get information about the related persistent volume claim (PVC) in the Kubernetes cluster:
kubectl describe pvc -n NAMESPACE_NAME VOLUME_NAME_FROM_CODECANVASFor example:
kubectl describe pvc -n my-codecanvas 4587199150817713543In the output, find the
Volumefield:Name: 4587199150817713543 Namespace: my-codecanvas StorageClass: managed-csi Status: Bound Volume: pvc-66731b2f-fd27-4323-88c1-cbfa4ed0ea6f Labels: ... ...Use the
Volumevalue to get the related persistent volume (PV):kubectl describe pv -n NAMESPACE_NAME VOLUME_VALUE_FROM_PVCFor example:
kubectl describe pv -n my-codecanvas pvc-66731b2f-fd27-4323-88c1-cbfa4ed0ea6fIn the output, find the
Source.VolumeHandlefield:Name: pvc-66731b2f-fd27-4323-88c1-cbfa4ed0ea6f Labels: <none> Annotations: ... Finalizers: [external-provisioner.volume.kubernetes.io/finalizer kubernetes.io/pv-protection external-attacher/disk-csi-azure-com] StorageClass: managed-csi Status: Bound Claim: my-codecanvas/4587199150817713543 Reclaim Policy: Delete Access Modes: RWO VolumeMode: Filesystem Capacity: 101Gi Node Affinity: Required Terms: Term 0: topology.disk.csi.azure.com/zone in [] Message: Source: Type: CSI (a Container Storage Interface (CSI) volume source) Driver: disk.csi.azure.com FSType: VolumeHandle: /subscriptions/8fd64-98c4f3a20/resourceGroups/mc_azure-doc-helm-v3_azure-doc-helm-v3_northeurope/providers/Microsoft.Compute/disks/pvc-66731b2f-fd27-4323-88c1-cbfa4ed0ea6f ReadOnly: false VolumeAttributes: ...In the
VolumeHandlefield, you're interested only in the last part of the value after the last slash. In our example, it ispvc-66731b2f-fd27-4323-88c1-cbfa4ed0ea6f. This is the Azure disk ID.