Database Versioning
To ensure the data model in the source code matches the relational databases, it's crucial to keep them synchronized. There are two commonly used methods to tackle this challenge.
Database first
In this approach, the database takes precedence over data model classes (POJOs or JPA entities), which are generated from the database schema through code generation, also known as "Database reverse engineering." It's essential to avoid altering the generated classes since they can be regenerated at any time, and any changes made in the source code will be lost. However, this approach does not eliminate the need for migration script generation, as they are necessary for upgrading existing installations to the latest version.
Source code first
This is the opposite approach, here the data model classes serve as the single source of truth. Hence, the database gets modified by changes made in the data model. To update the database, migration scripts must represent the changes between the outdated database state and the current state of the data model classes in any format, such as Flyway SQL migrations or Liquibase changelogs.
IntelliJ IDEA provides convenient tools to help developers proceed with each of these two scenarios. This guide shows how IntelliJ IDEA can save a lot of time for differential update scripts generation.
Library Support
IntelliJ IDEA supports two popular solutions that are often used in Java applications along with JPA:
General Differential Scripts Generation Flow
This section basic principles of migration script generation. For specific details on how to generate migration scripts in Liquibase and Flyway, refer to Liquibase and Flyway.
To generate a differential migration script, right-click a database connection in the Database and select Create Liquibase Changelog or Create Flyway Versioned Migration. The actions are available if JPA and Liquibase or Flyway dependencies are added in your build files.
In the opened dialog, select a source (the desired state of the data model) and target (the old state of the data model).
Resulting migration script(s) = Current State (Source) – Previous State (Target).
IntelliJ IDEA will generate the resulting migration script for upgrading the target database to the source's state.
You can choose between the following source options:
DB — should be used in case you have an up-to-date database and would like to generate migration scripts for updating another DB to the same state.
Model — use it to generate migration scripts representing the difference between the current state of the entity relationship model (JPA entities) and the old (target) state.
The target can be set to:
DB — target DB with an older version of the schema.
Snapshot — use this option in case you have the desired state stored in a data model snapshot. It can be generated by JPA Buddy as well.
Click OK to proceed further. JPA Buddy will analyze the difference between Source and Target and show the Preview dialog to enable fine-tuning for the resulting migration script. Click Save to add the new script to the project or to append an existing one.
Differential Migration Scripts Generation Options
Using a Database
It makes sense to compare a database with another database/snapshot if you have a source database already synchronized with your data model. There are two popular approaches for keeping a database in accordance with JPA entities:
Using schema auto-generators (Hibernate and EclipseLink provide their own implementations). Note that even Hibernate documentation warns against using this way beyond prototyping or testing reasons.
Applying changes in JPA entities over the database schema manually. This approach may appear to be too laborious, especially for early development stages when the data model is being changed frequently.
Using a Data Model
An application uses JPA entities to represent the data model, including entities, associations, indexes, and other related elements, in accordance with JPA principles. In other words, it already contains sufficient information about the database schema. So, your source code is the only point of truth, which represents the up-to-date (source) schema. This is why it's preferable to compare your data model with a database/snapshot for generating differential changelogs.
IntelliJ IDEA scans all JPA objects, compares them with a target database or a snapshot and generates a differential migration script.
When a data model serves as the source for the current schema state, it causes the selection of a persistence unit.
Following the documentation: A persistence unit defines a set of all entity classes that are managed by EntityManager instances in an application. This set of entity classes represents the data contained within a single data store.
Effectively, this means that if your application uses multiple data stores, you will need to generate migration scripts separately for each of them, specifying corresponding persistence units.
Using a Data Model Snapshot
IntelliJ IDEA allows using a data model snapshot as the target of the comparison. Sometimes, it is impossible or difficult to obtain a database for a certain state of the model, for example, when merging changes into some earlier application version. It may be unfeasible to keep a database dump for each release. IntelliJ IDEA lets you check out the required version of the application and generate a JSON snapshot based on the JPA entities, eliminating the need for a database when producing differential migration scripts.
Generate Data Model Snapshot
Open the Persistence tool window.
Right-click an element and select .
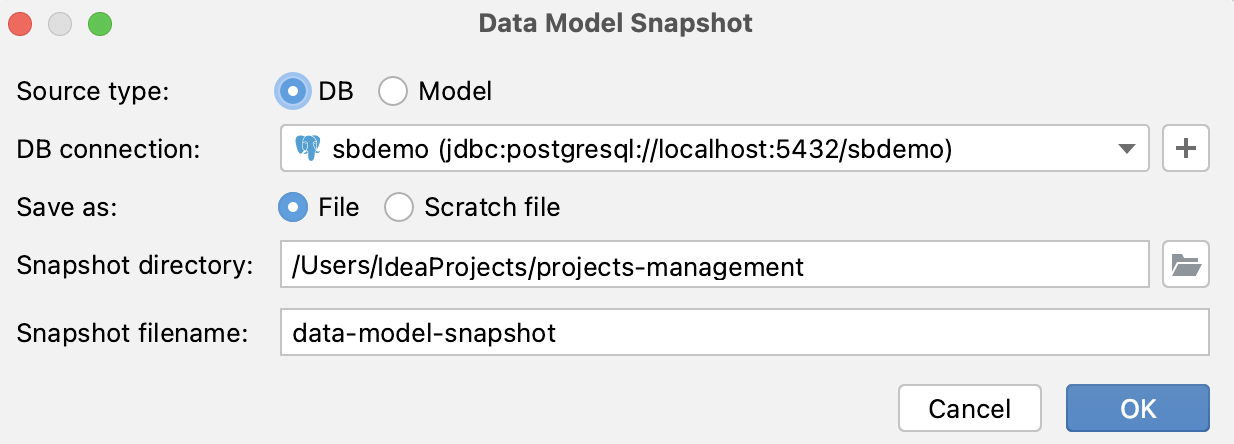
This allows you to capture the state of the data model at some older point, so that you can create a diff migration script describing all the modifications that happened from that point until now.
For example, you have been working in a feature branch and modified the model. Before merging, it is necessary to create a diff changelog describing the changes in this branch only.
Depending on the setup, there might be no DB that is always in sync with the main branch. Things get even more complicated when you need to merge changes into a state of the application other than the main branch, such as a release branch. Maintaining a database dump for each release may not be practical. IntelliJ IDEA offers a simpler alternative:
Checkout the target branch (for example, main or release)
Create a snapshot of the model in that branch
Checkout the feature branch
Generate a diff migration script by comparing the model and the snapshot you created in step 2.
In four simple steps you get a migration script that describes the changes between the current branch and the target branch.
Preview Window
The preview window for Liquibase looks like this (The Flyway preview window is slightly different):
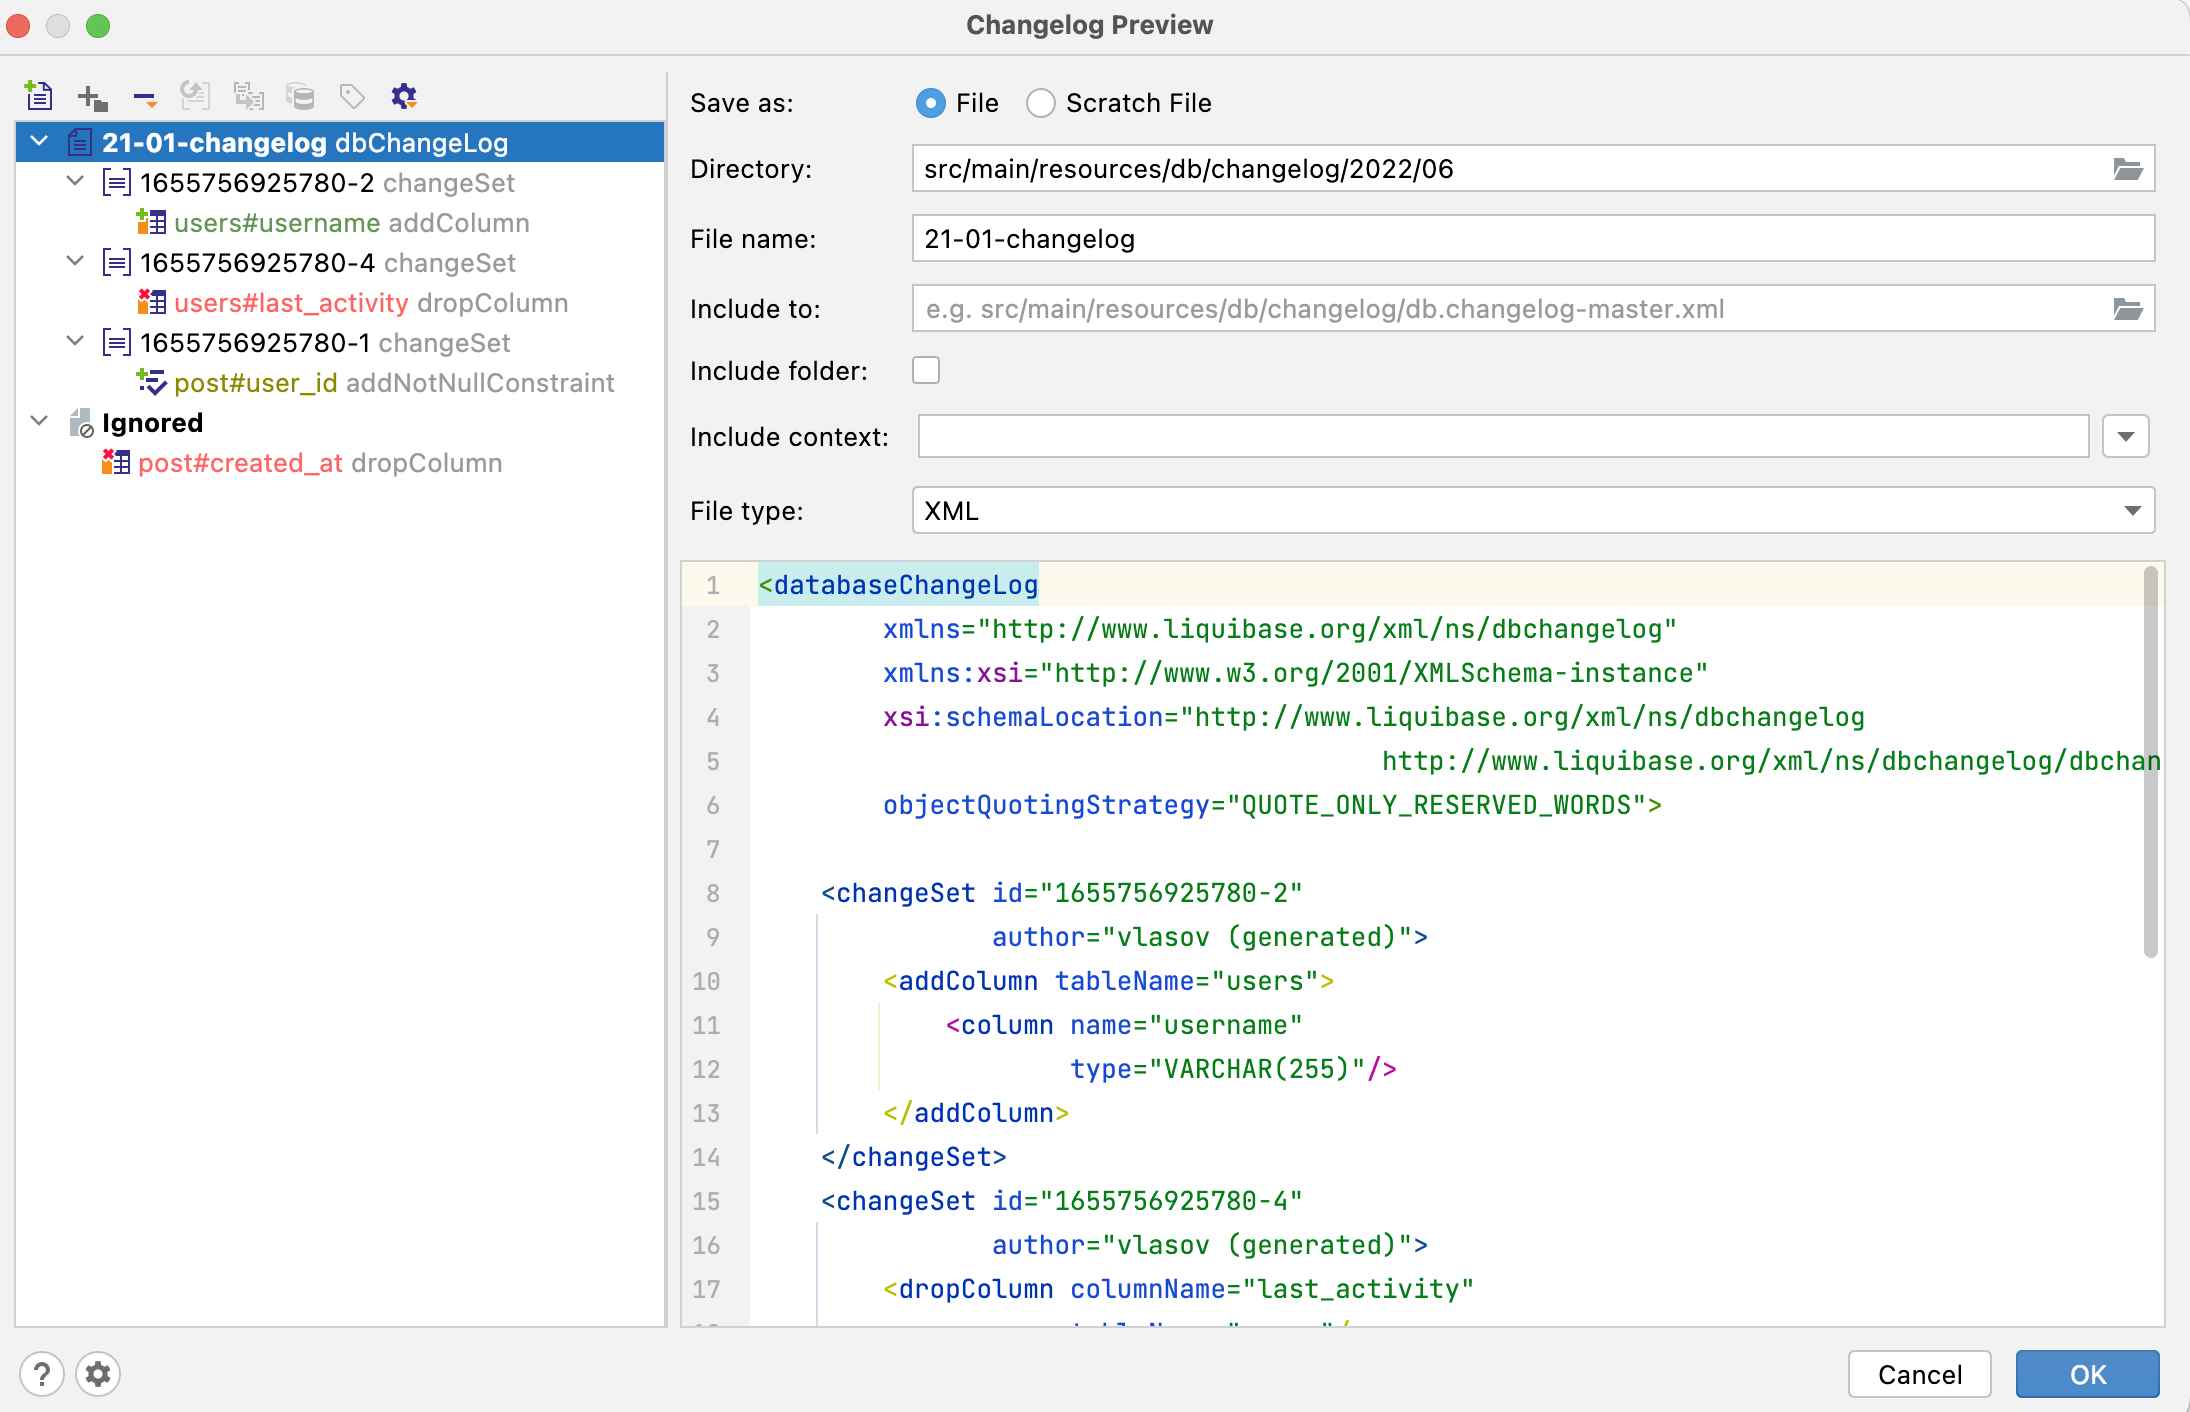
Some types of changes have custom fields in the preview window. For example, add not null constraint change allows you to replace all existing NULL values in the DB with a specified value:

Each change type is color-coded according to its danger level: green for SAFE, yellow for CAUTION and red for DANGER. SAFE operations are the ones that cannot cause loss of data in any way, for example, adding a column does not affect the existing data. Operations marked with CAUTION are generally safe but require your attention: for instance, adding a NOT NULL constraint can fail if there are null values in the column. DANGER operations can cause loss of data, for example, dropping a column or modifying a data type.
The danger levels can be customized in the IDE settings under :
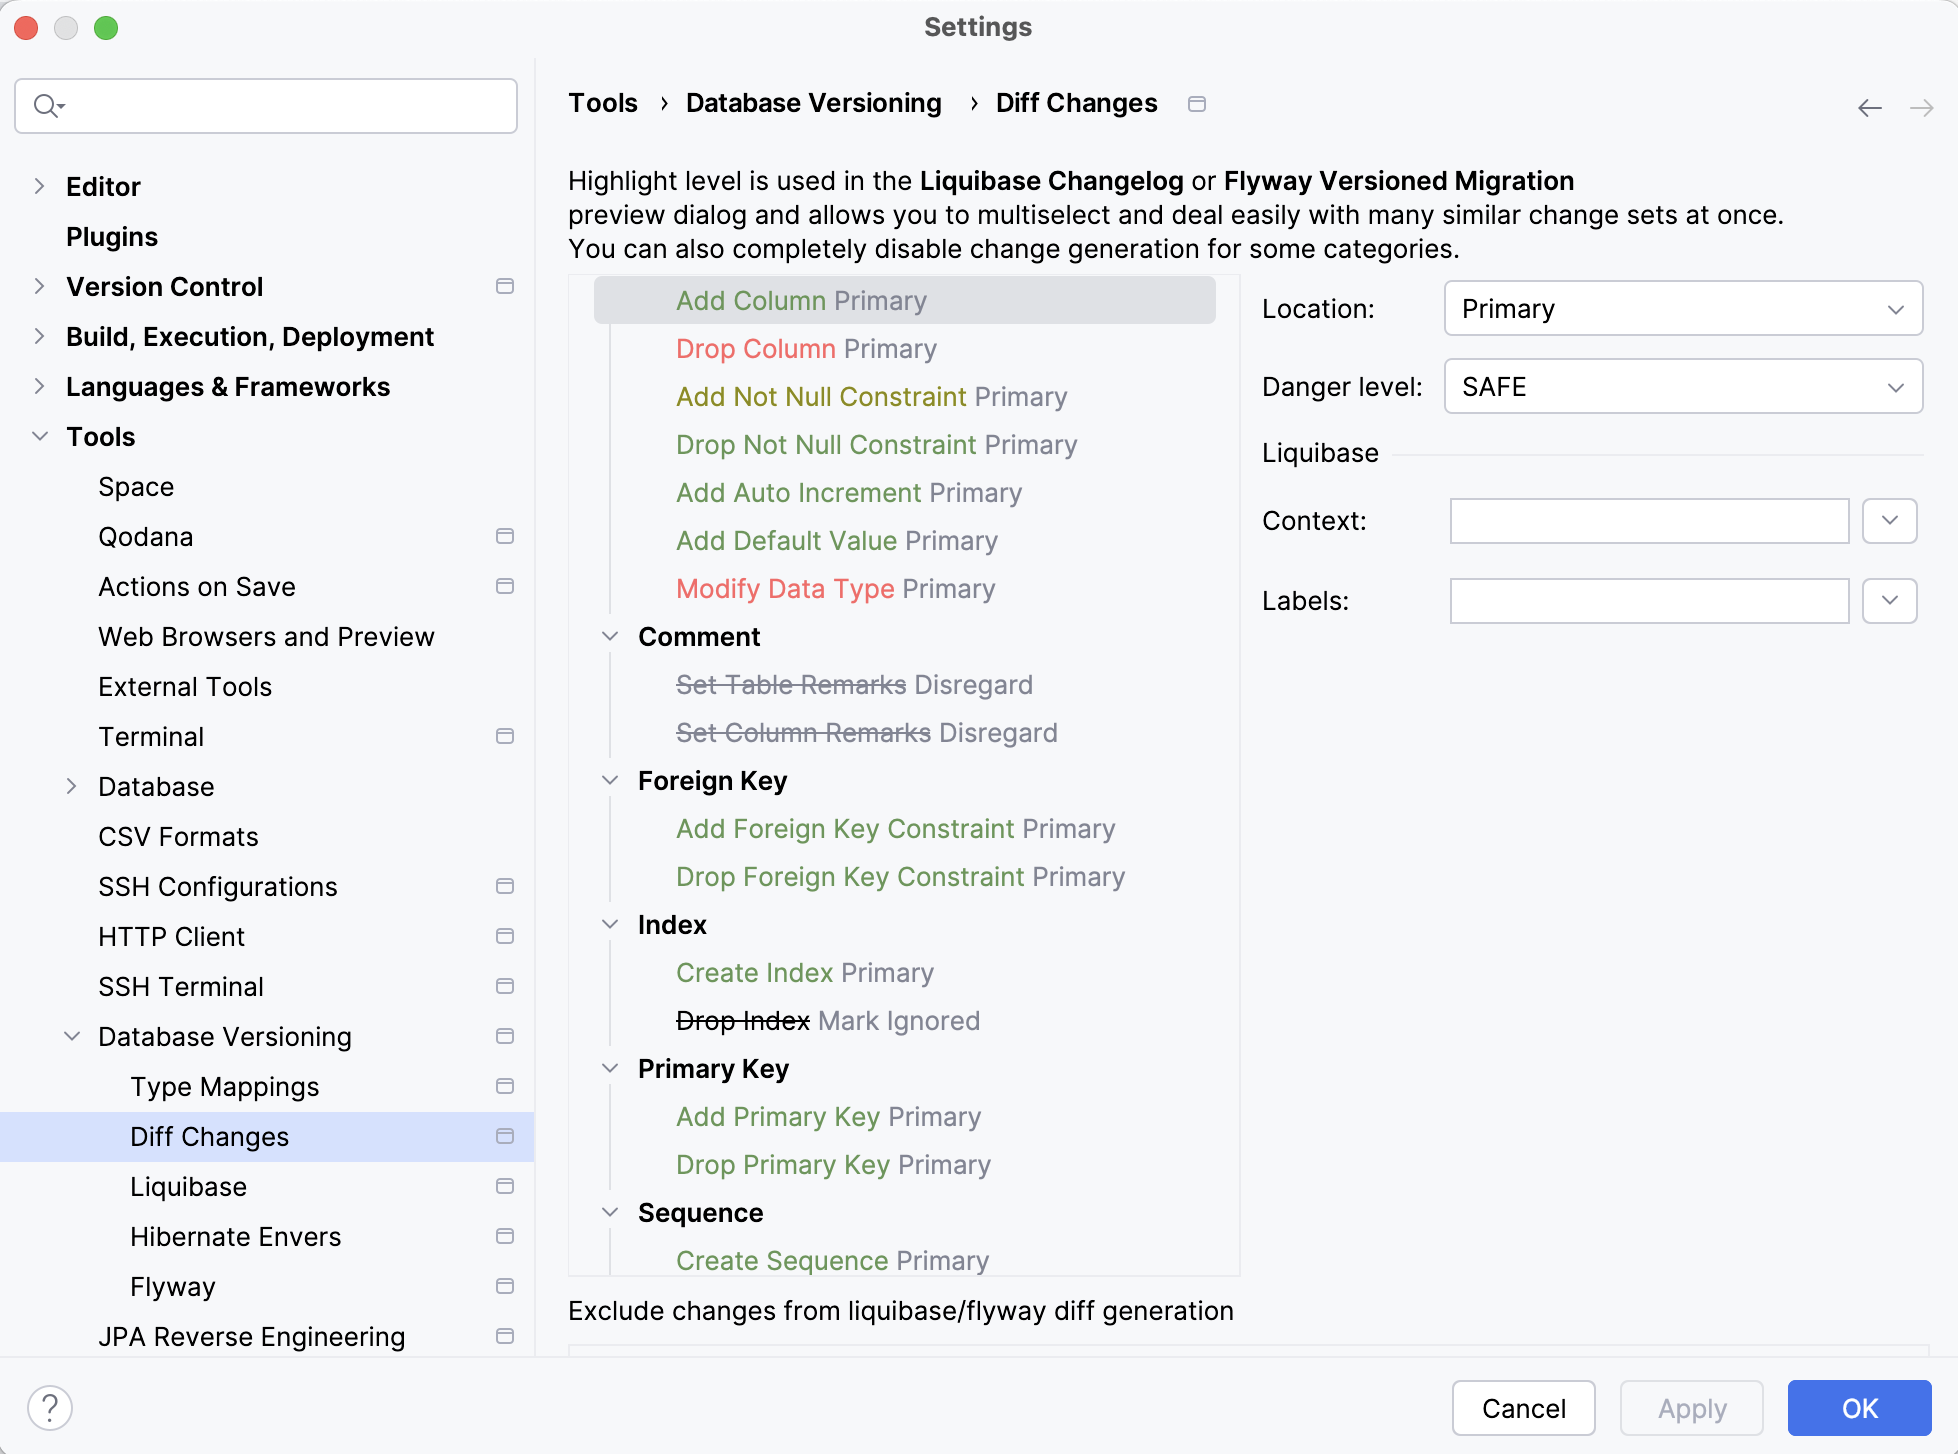
You can configure the location of each change type, either in the primary or secondary location, or ignore it altogether. By default, newly generated migration scripts will exclude ignored changes but display them in the Ignored section during preview so that they can be added back manually. For Liquibase, you can also set the context and labels to use for each change type.
Merging statements
Basically, renaming schema elements, such as table name, column name, etc., leads to two statements:
Drop an existing value
Add a new one
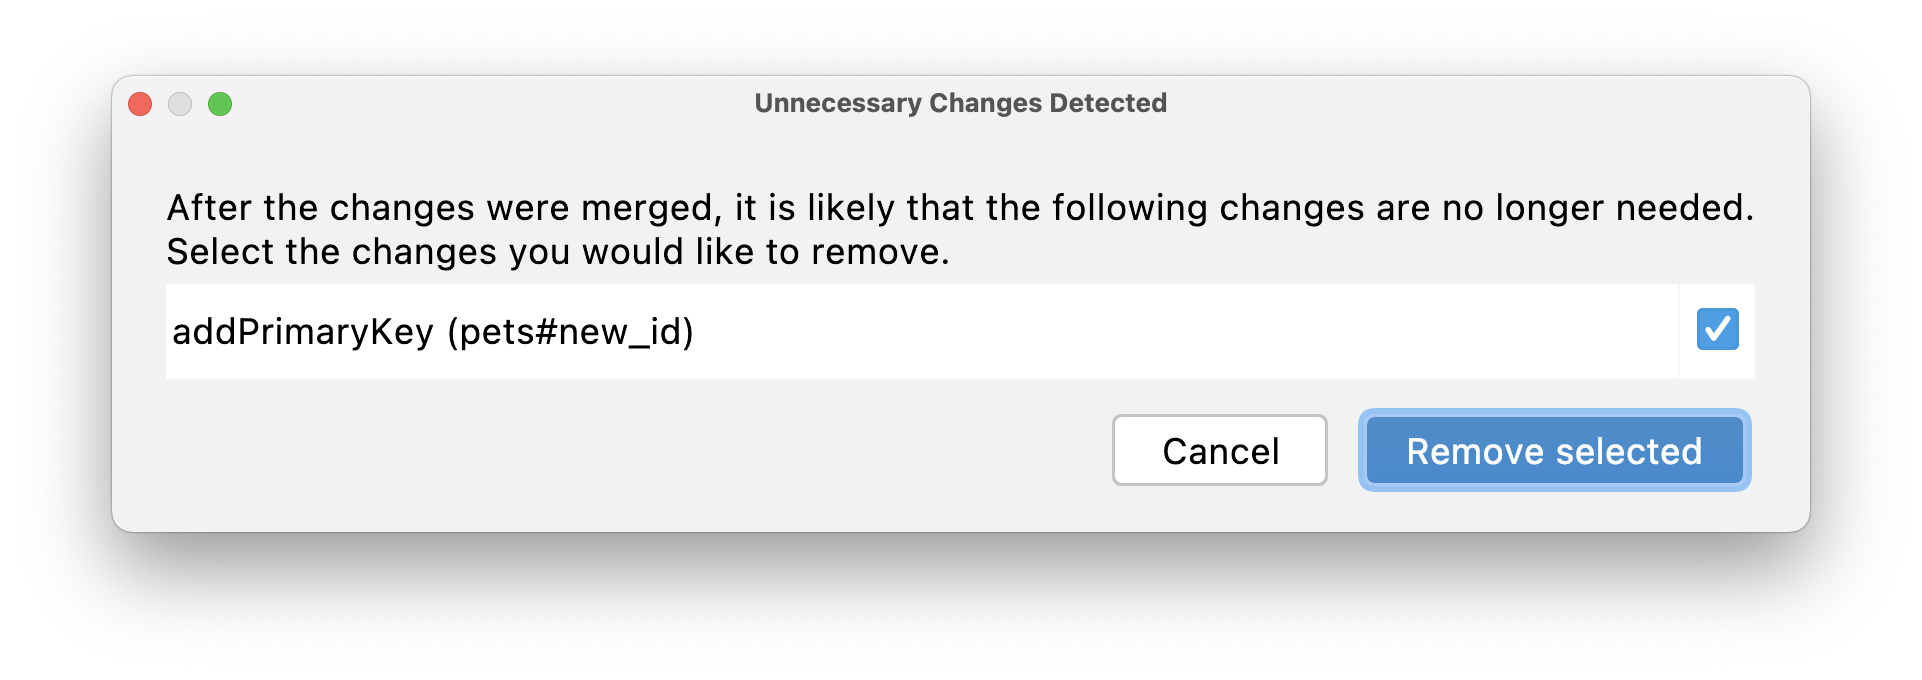
But JPA Buddy can replace such statements with a single rename or modify statement. For example, you will see two statements in the preview window after renaming a column/table/sequence or changing a column type. But by choosing any of the related statements, you can merge them:
After the merge, drop statements may be irrelevant. You can choose the changes that you want to remove from the migration scripts. For example, after renaming an id column (rather than dropping an old value and adding a new one), there is no need to add a new primary key for it.
DDL by Entity
IntelliJ IDEA allows you to convert entities into DDL statements. You can generate:
An initialization script for a single entity right from the editor.
Initialization scripts for multiple entities: create a database schema based on the entire model or selected entities.
Differential DDL: update an already existing database to the valid state in accordance with JPA entities.
This feature is useful if you want to avoid using the automatic scripts generation enabled by hbm2ddl or ddl-auto properties. By using this feature, you can fully control DDL before execution, set up proper Java -> DB types mapping, map fields with attribute converters and Hibernate types, generate drop statements, and many more.
Generate DDL for single entity
IntelliJ IDEA provides an action to generate DDL statements for a specific entity.
With your entity source code opened in the editor, click
(Show Entity actions) in the gutter and select Generate DDL. Or place the caret at the class name, press Alt+Enter to invoke context actions, and select Generate DDL.
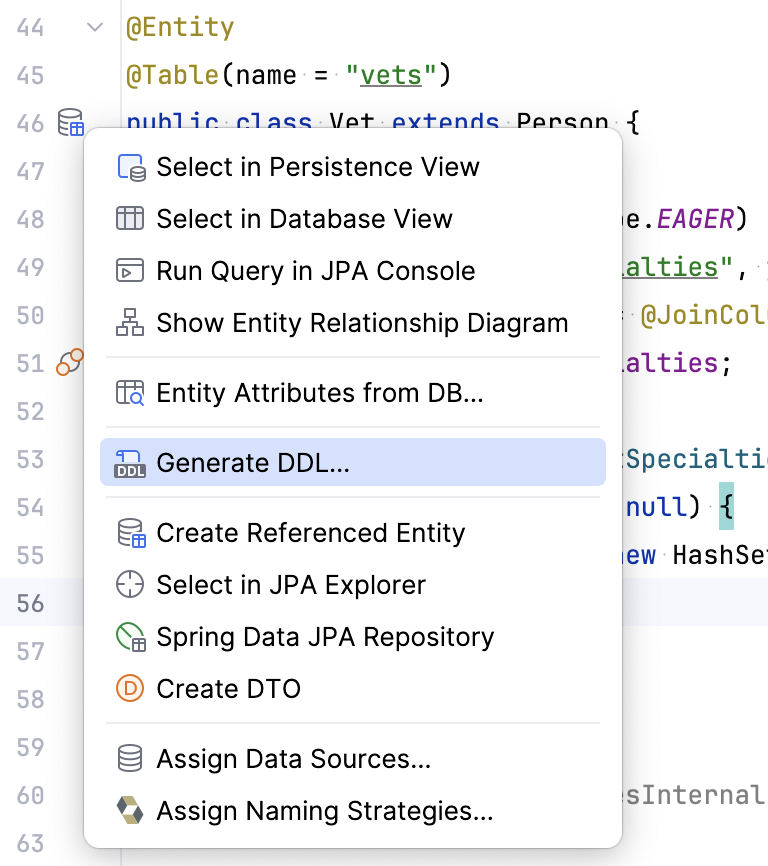
Alternatively, in the Project tool window, right-click your entity class file and select .
In the Generate DDL by <Entity name> window that opens, configure the options to save the DDL statement:
DB type: select a database management system for which you want to generate the DDL statement.
Save as: select how to save the DDL statement: File, Scratch File, Clipboard, or Database Console,
Directory: if the DDL statement is saved as a file, select the file location.
File name: if the DDL statement is saved as a file, select the file name.
DB connection: if the DDL statement is saved as a console command, select the database connection where you want to run this statement.
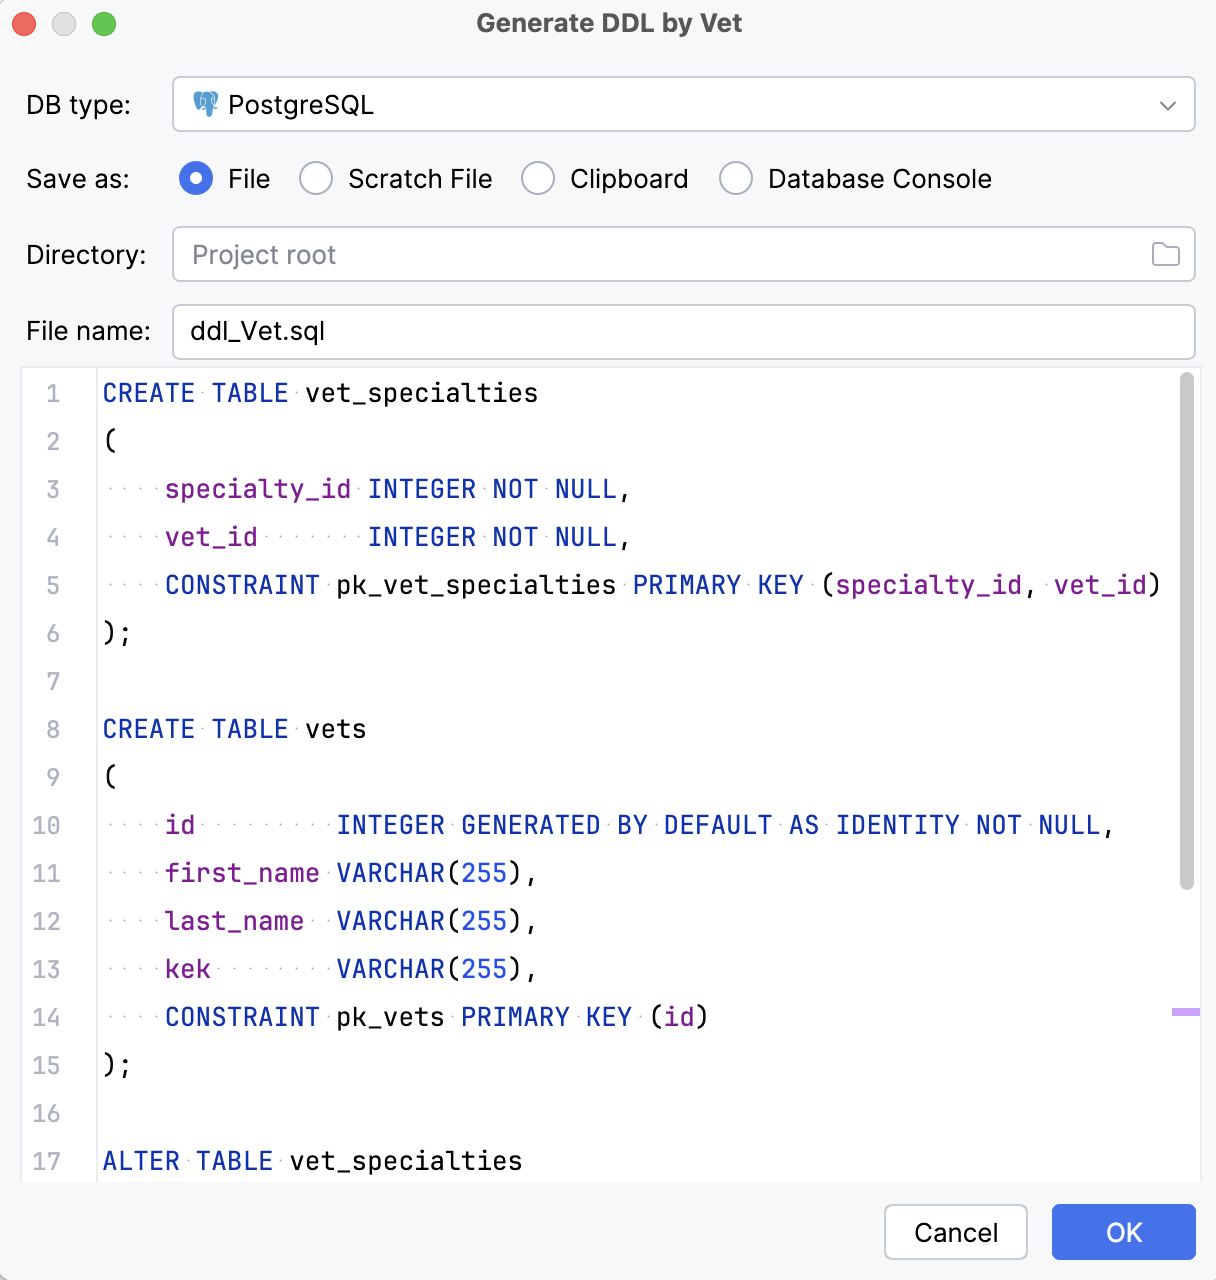
Preview the statement and click OK to save it.
Generate database initialization script
Open an SQL file or a query console. In the toolbar, click
.
In the Init DDL dialog that opens, click Model and select a persistence unit.
To generate a DDL script for particular entities, under Scope, select Selected Entities.

Click OK. IntelliJ IDEA will analyze the difference between Source and Target and show the DDL Preview dialog.
Preview the DDL statement and click Save to insert the resulting DDL script into your query console or SQL file.
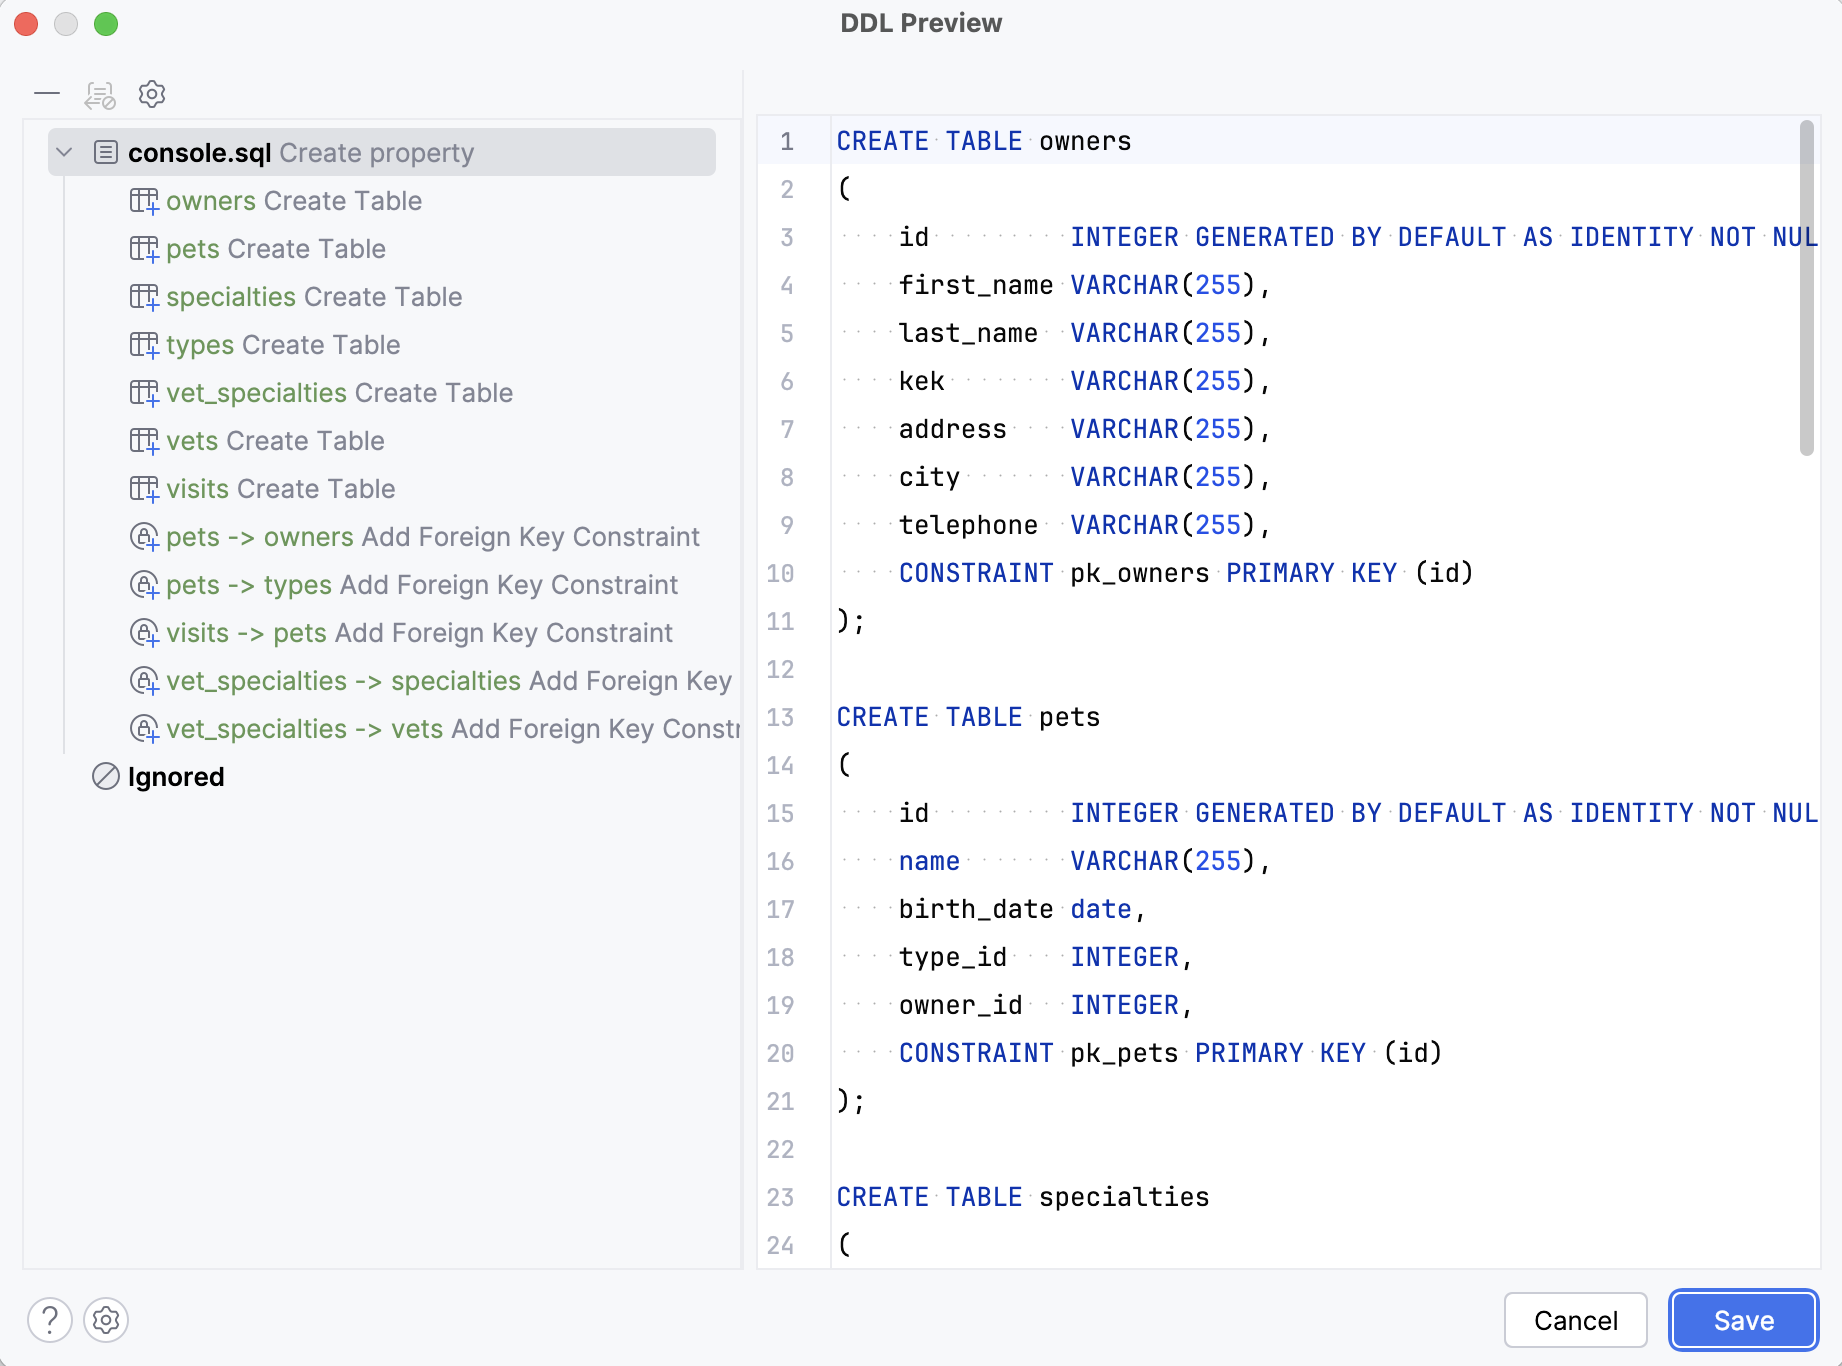
Generate Differential DDL
A differential DDL is a set of SQL commands to update an existing database based on the JPA entities: create, alter, drop tables, columns, constrains, and so on.
Open an SQL file or a query console. In the toolbar, click
.
In the Diff DDL dialog that opens, select a source (the desired state of the data model) and target (the old state of the data model).
You can choose between the following source options:
DB: should be used in case you have an up-to-date database and would like to generate migration scripts for updating another DB to the same state.
Model: use it to generate migration scripts representing the difference between the current state of the entity relationship model (JPA entities) and the old (target) state.
The target can be set to:
DB — target DB with an older version of the schema.
Snapshot — use this option in case you have the desired state stored in a data model snapshot. It can be generated by IntelliJ IDEA as well.
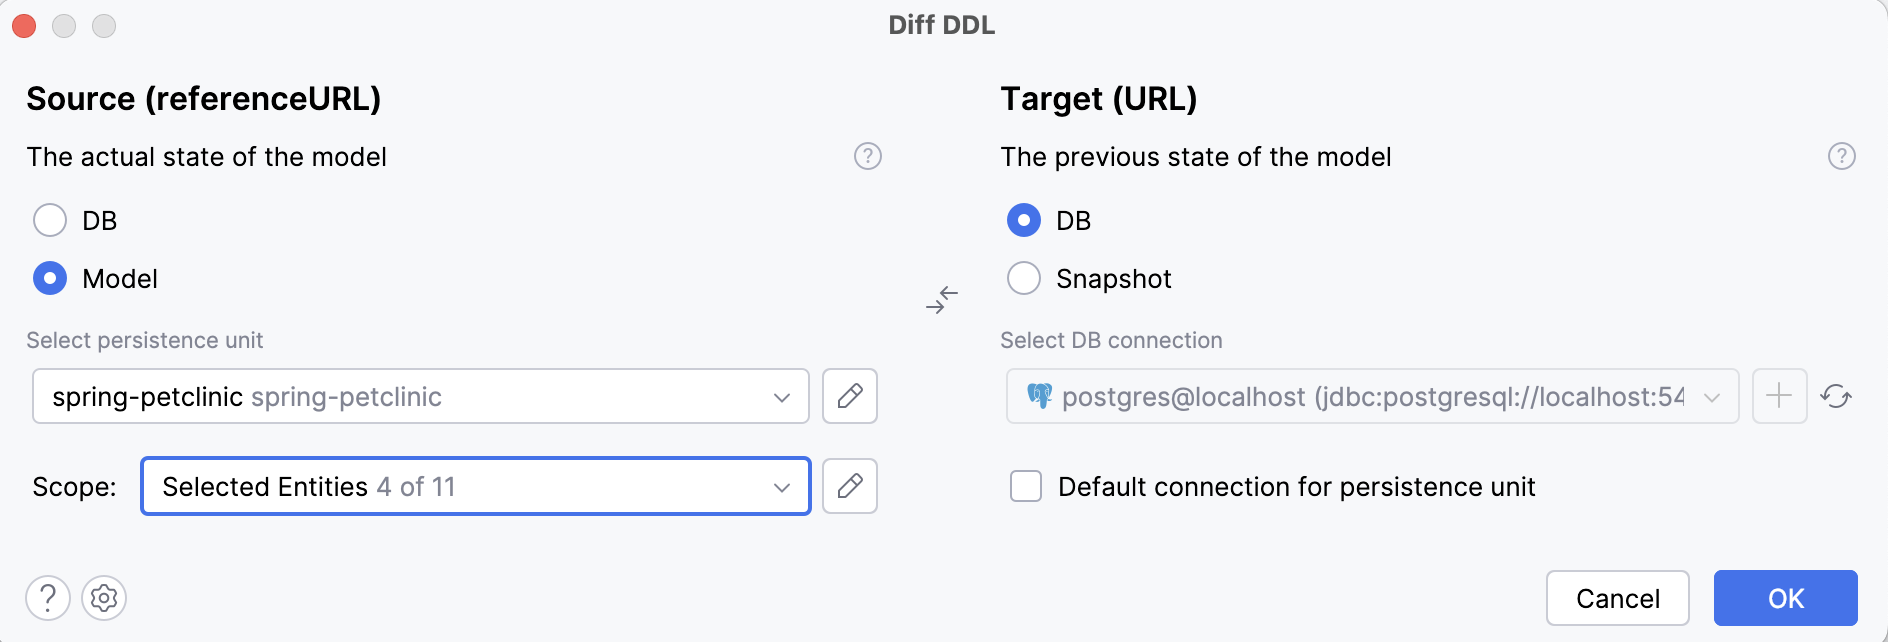
Click OK. IntelliJ IDEA will analyze the difference between Source and Target and show the DDL Preview dialog.
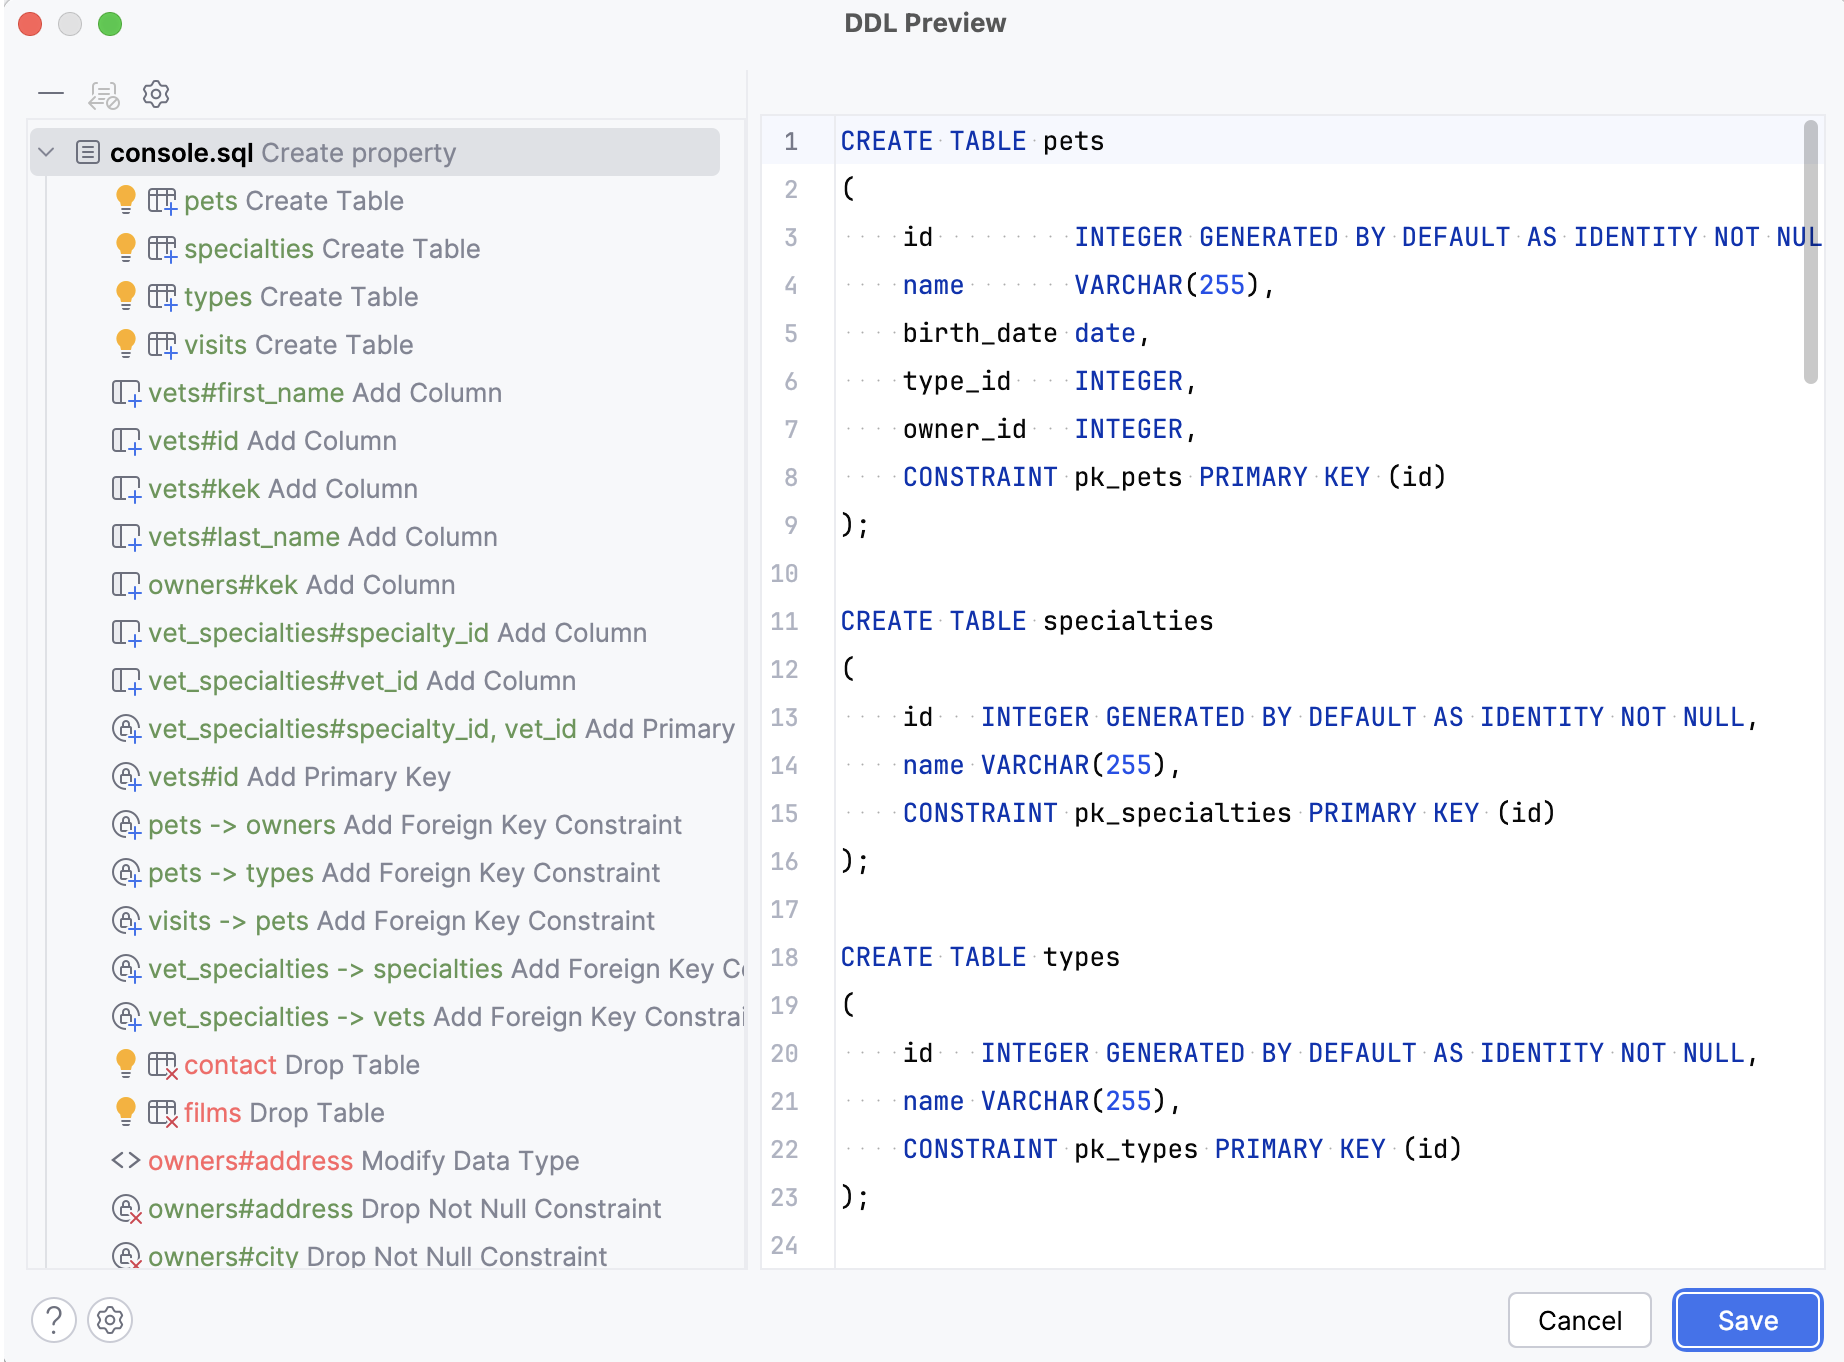
Preview the DDL statement and click Save to insert the resulting DDL script into your query console or SQL file.
Resolve SchemaManagementException Automatically
If you stumble upon SchemaManagementException on the application startup, it means you have the ddl-auto property set to validate and Hibernate couldn't properly map JPA entities to your database tables. IntelliJ IDEA allows you to generate DDL to fill up the difference between JPA entities and the database right from the stack trace!
SQL Visual Designer
In some cases, it's useful to have SQL scripts for the JPA data model, especially when you need to quickly set up a fresh database. JPA Buddy can generate a wide range of SQL statements via JPA Palette or Editor Toolbar. For each statement, there is a corresponding window that allows you to configure the statement:
Hibernate 6 Support
Before Hibernate 6, the Hibernate Types library or @Type/@Converter annotations were commonly used to map non-standard SQL types to Java types. With Hibernate 6, new annotations for mapping are available, allowing for the elimination of numerous Hibernate types and JPA converters. Currently, IntelliJ IDEA supports these new mapping annotations:
@JdbcType,@JdbcTypeCode&@JdbcTypeRegistration
@Type,@JavaType&@JavaTypeRegistration
@TimeZoneStorage&@TimeZoneColumn
Hibernate Envers Support
Hibernate Envers is a module that facilitates entity auditing in a database. IntelliJ IDEA can generate all the required tables for Hibernate Envers to function correctly. This includes audit tables for entities marked with the @Audited annotation and a revision table for the entity annotated with the @RevisionEntity annotation.
With the JPA Buddy plugin installed and enabled, you can also generate a revision entity. Check out how it works in action:
It is possible to configure various aspects of Hibernate Envers behavior, such as suffixes and prefixes for audited entities. While generating Liquibase changelogs or Flyway migration scripts, you can either use these settings from your properties file or configure them in the dedicated settings page in IntelliJ IDEA.
Settings
Custom Type Mappings
There is no generic way to automatically map custom Java types to the SQL/Liquibase types. That's why you will need to define the target type manually for those attributes. If such attributes exist in your project, after Liquibase or Flyway script generation actions call, JPA Buddy will show you the following window:
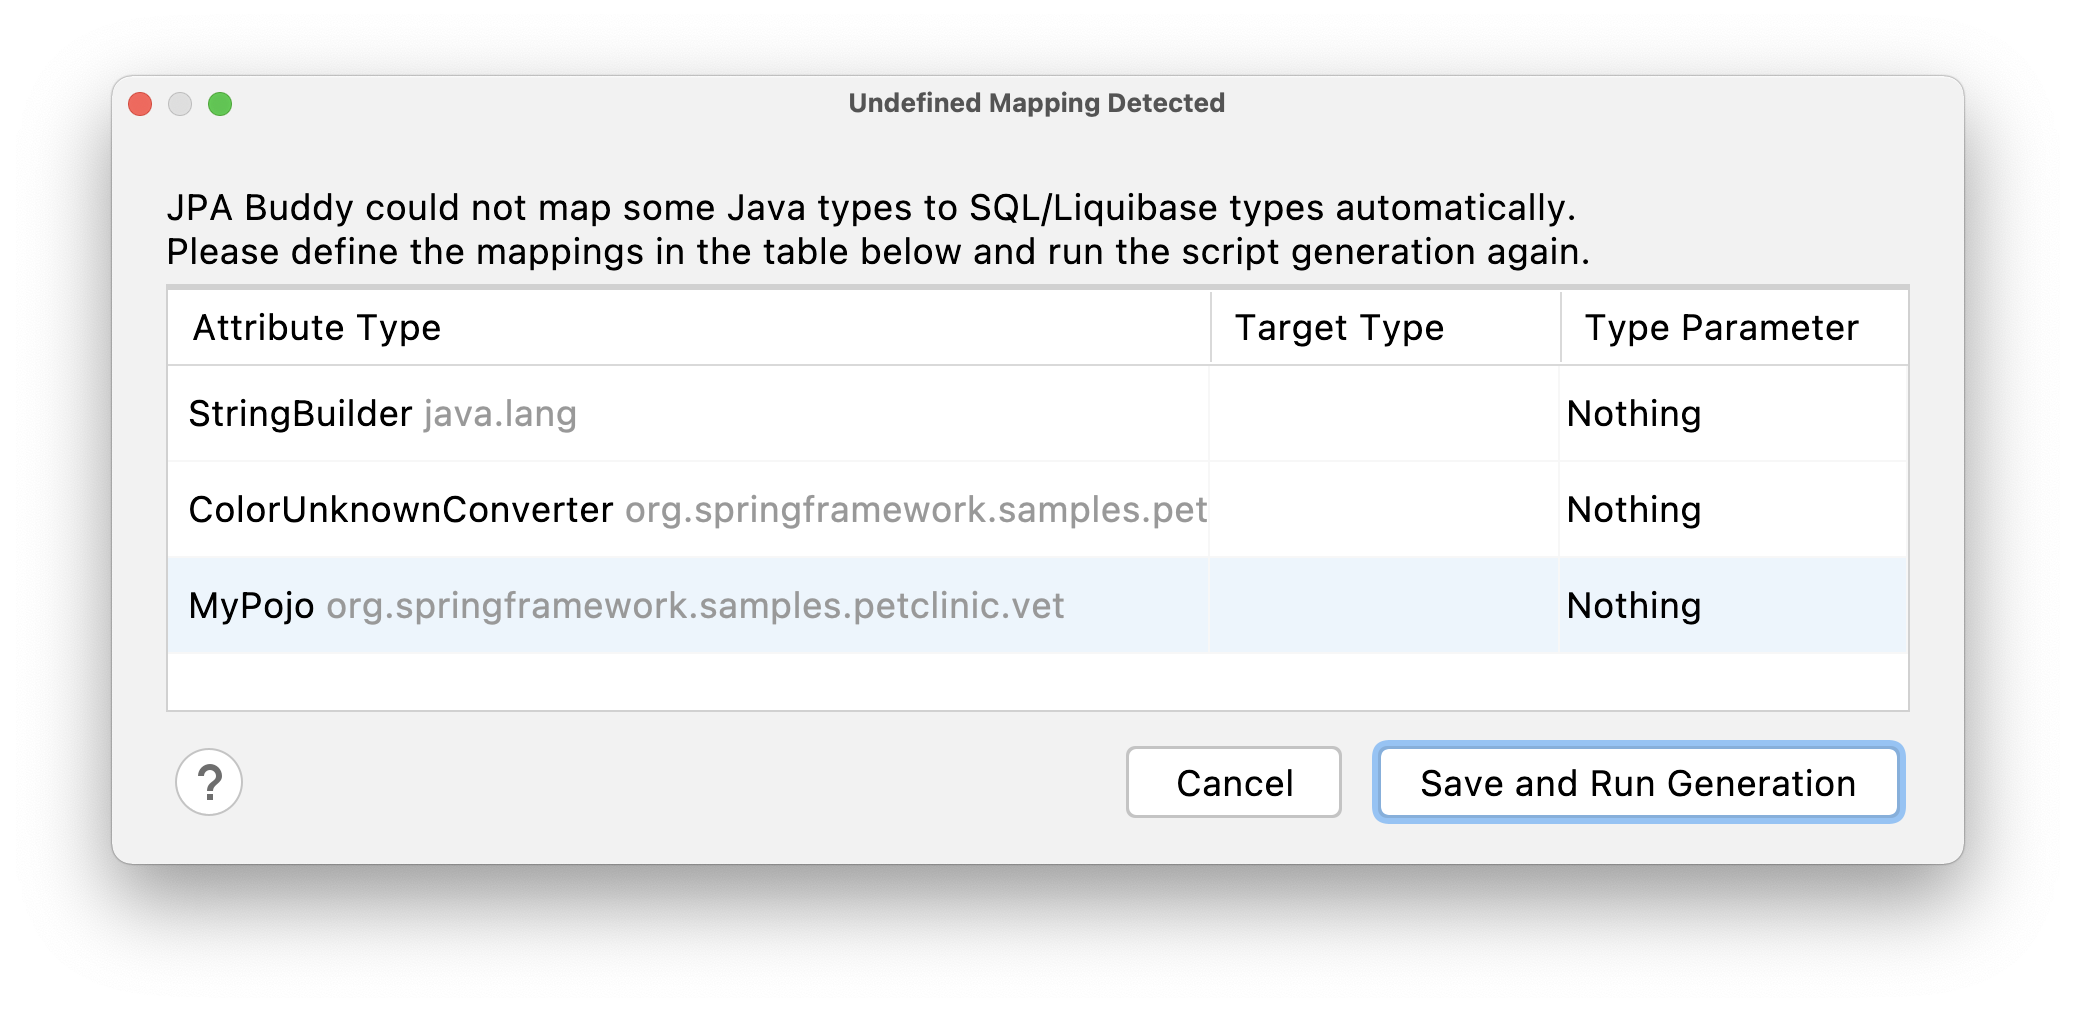
You can change the saved mapping configuration at any time from .
Also, it may be helpful when the application works with databases from different vendors. In this case, your schema might have slightly different data types for each of them.
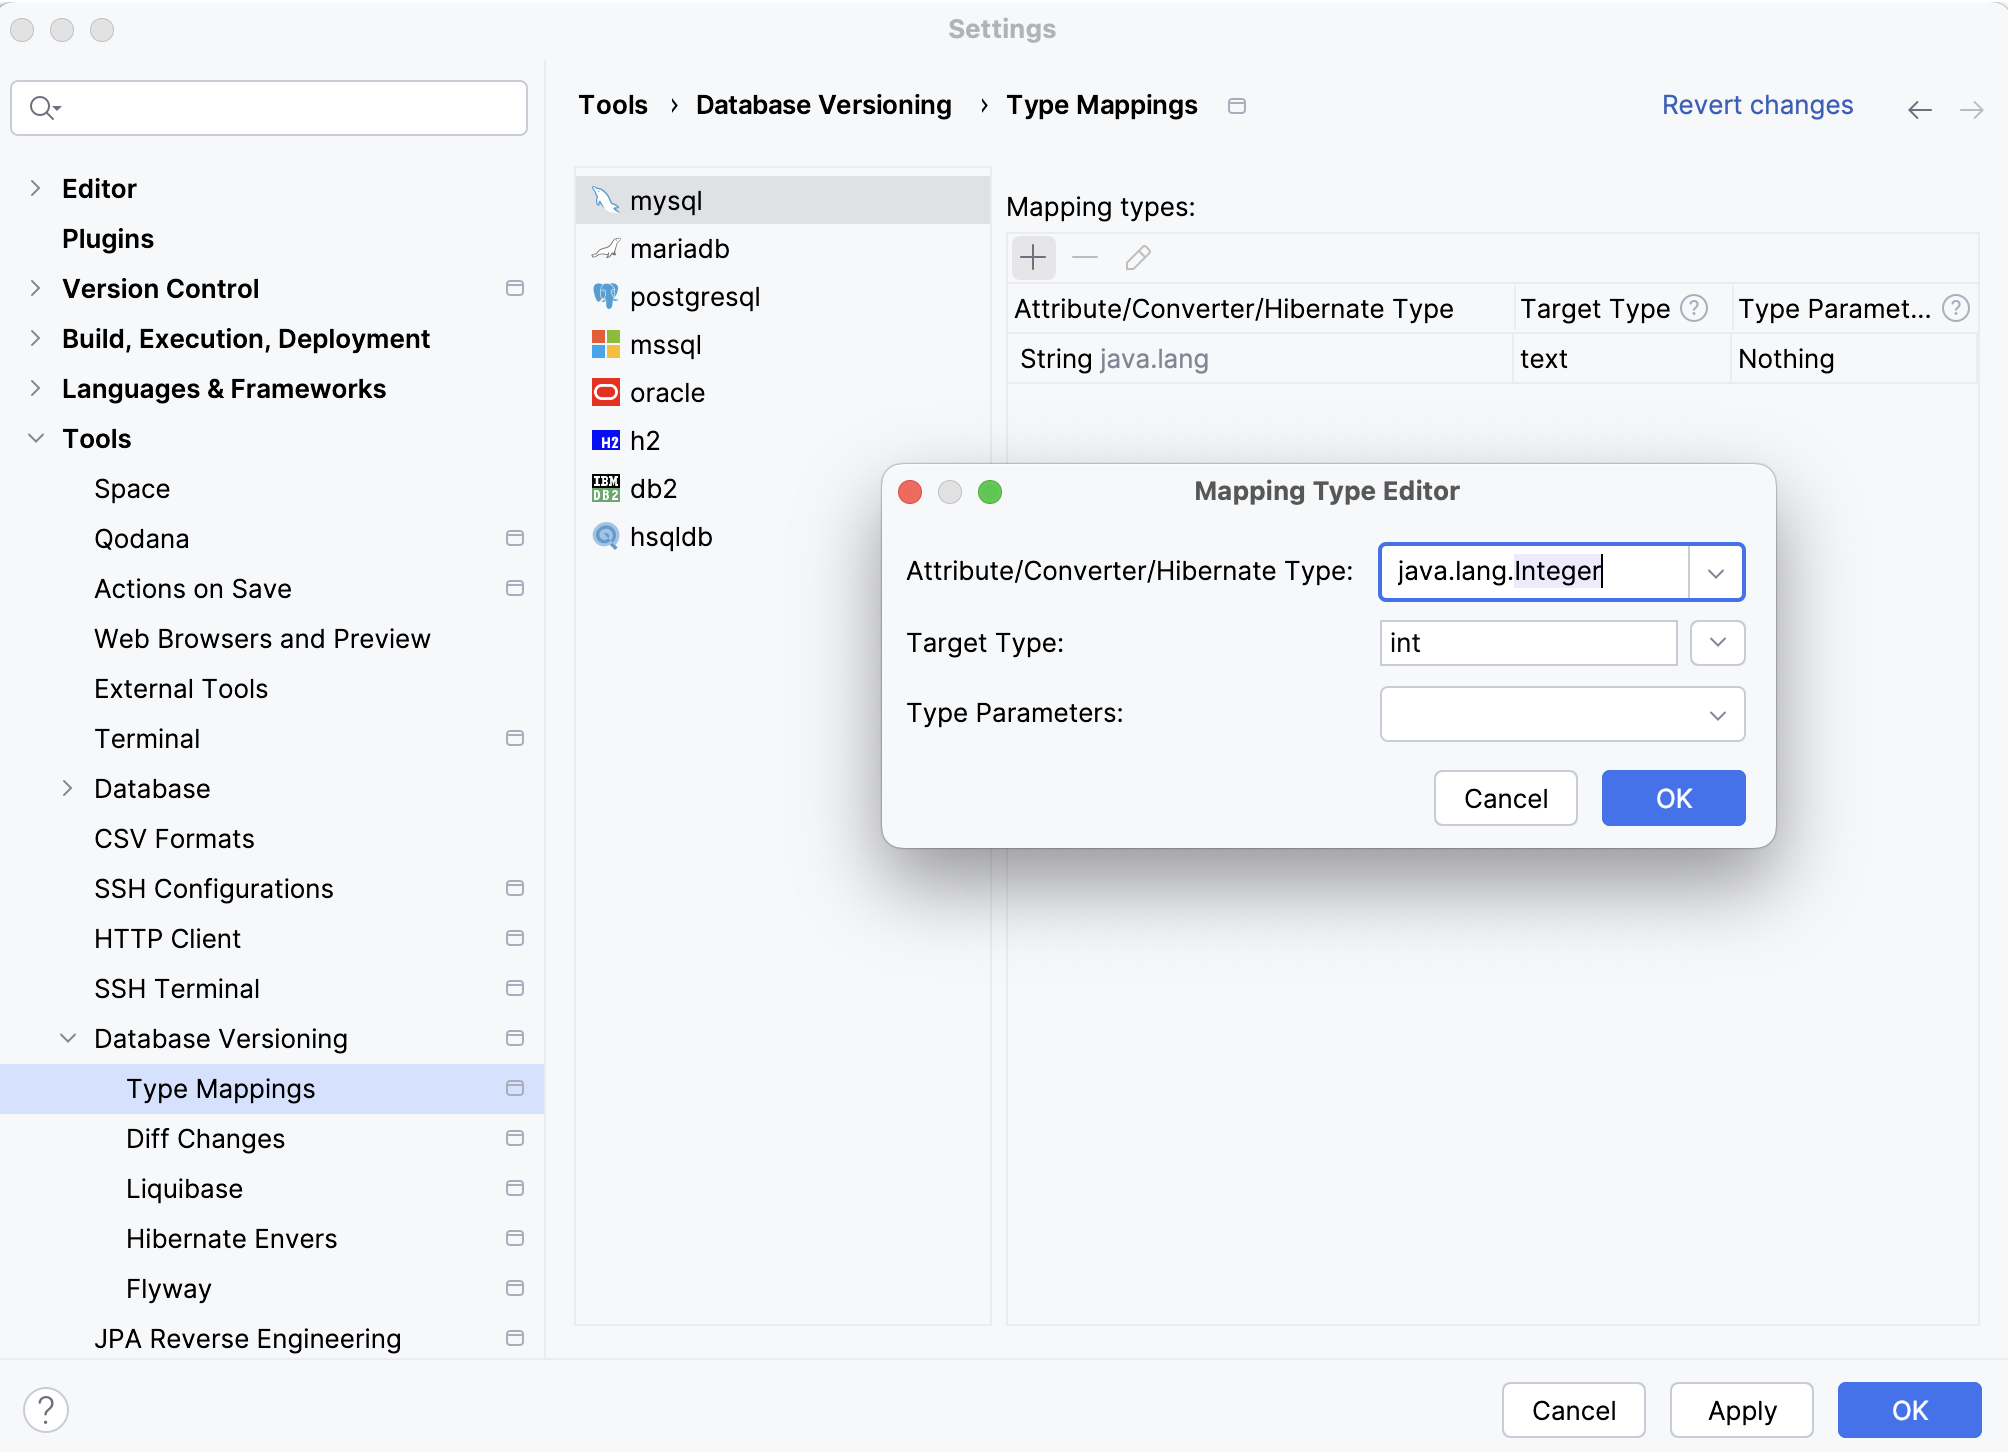
Let's say the application needs to support both PostgreSQL and MS SQL. And you want to store Unicode characters in your strings. PostgreSQL supports Unicode chars in VARCHAR, but MS SQL has a separate NVARCHAR data type for it.
You can specify type mappings for each DBMS. It is also possible to set mappings for JPA Converters and Hibernate Types:
Converters
In order to simplify type mapping, IntelliJ IDEA introduces DB-agnostic SQL types, that are transformed into the DB-specific type. For example, "varchar" is transformed into "varchar2" for Oracle DB and left as "varchar" for PostgreSQL.
Each DB-agnostic type has a set of aliases (for example, "java.sql.Types.VARCHAR" or "character varying"), which in most cases are interchangeable. Unknown types are used as is without any transformations. Check out the full list of aliases in the table:
Name | Aliases | Liquibase class |
|---|---|---|
|
|
|
|
|
|
|
|
|
|
|
|
|
|
|
|
|
|
|
|
|
|
|
|
|
|
|
|
|
|
|
|
|
|
|
|
|
|
|
|
| |
|
|
|
|
|
|
|
|
|
|
|
|
|
|
|
|
|
|
|
|
|
|
|
|
|
|
|
|
|
|
Hibernate Envers
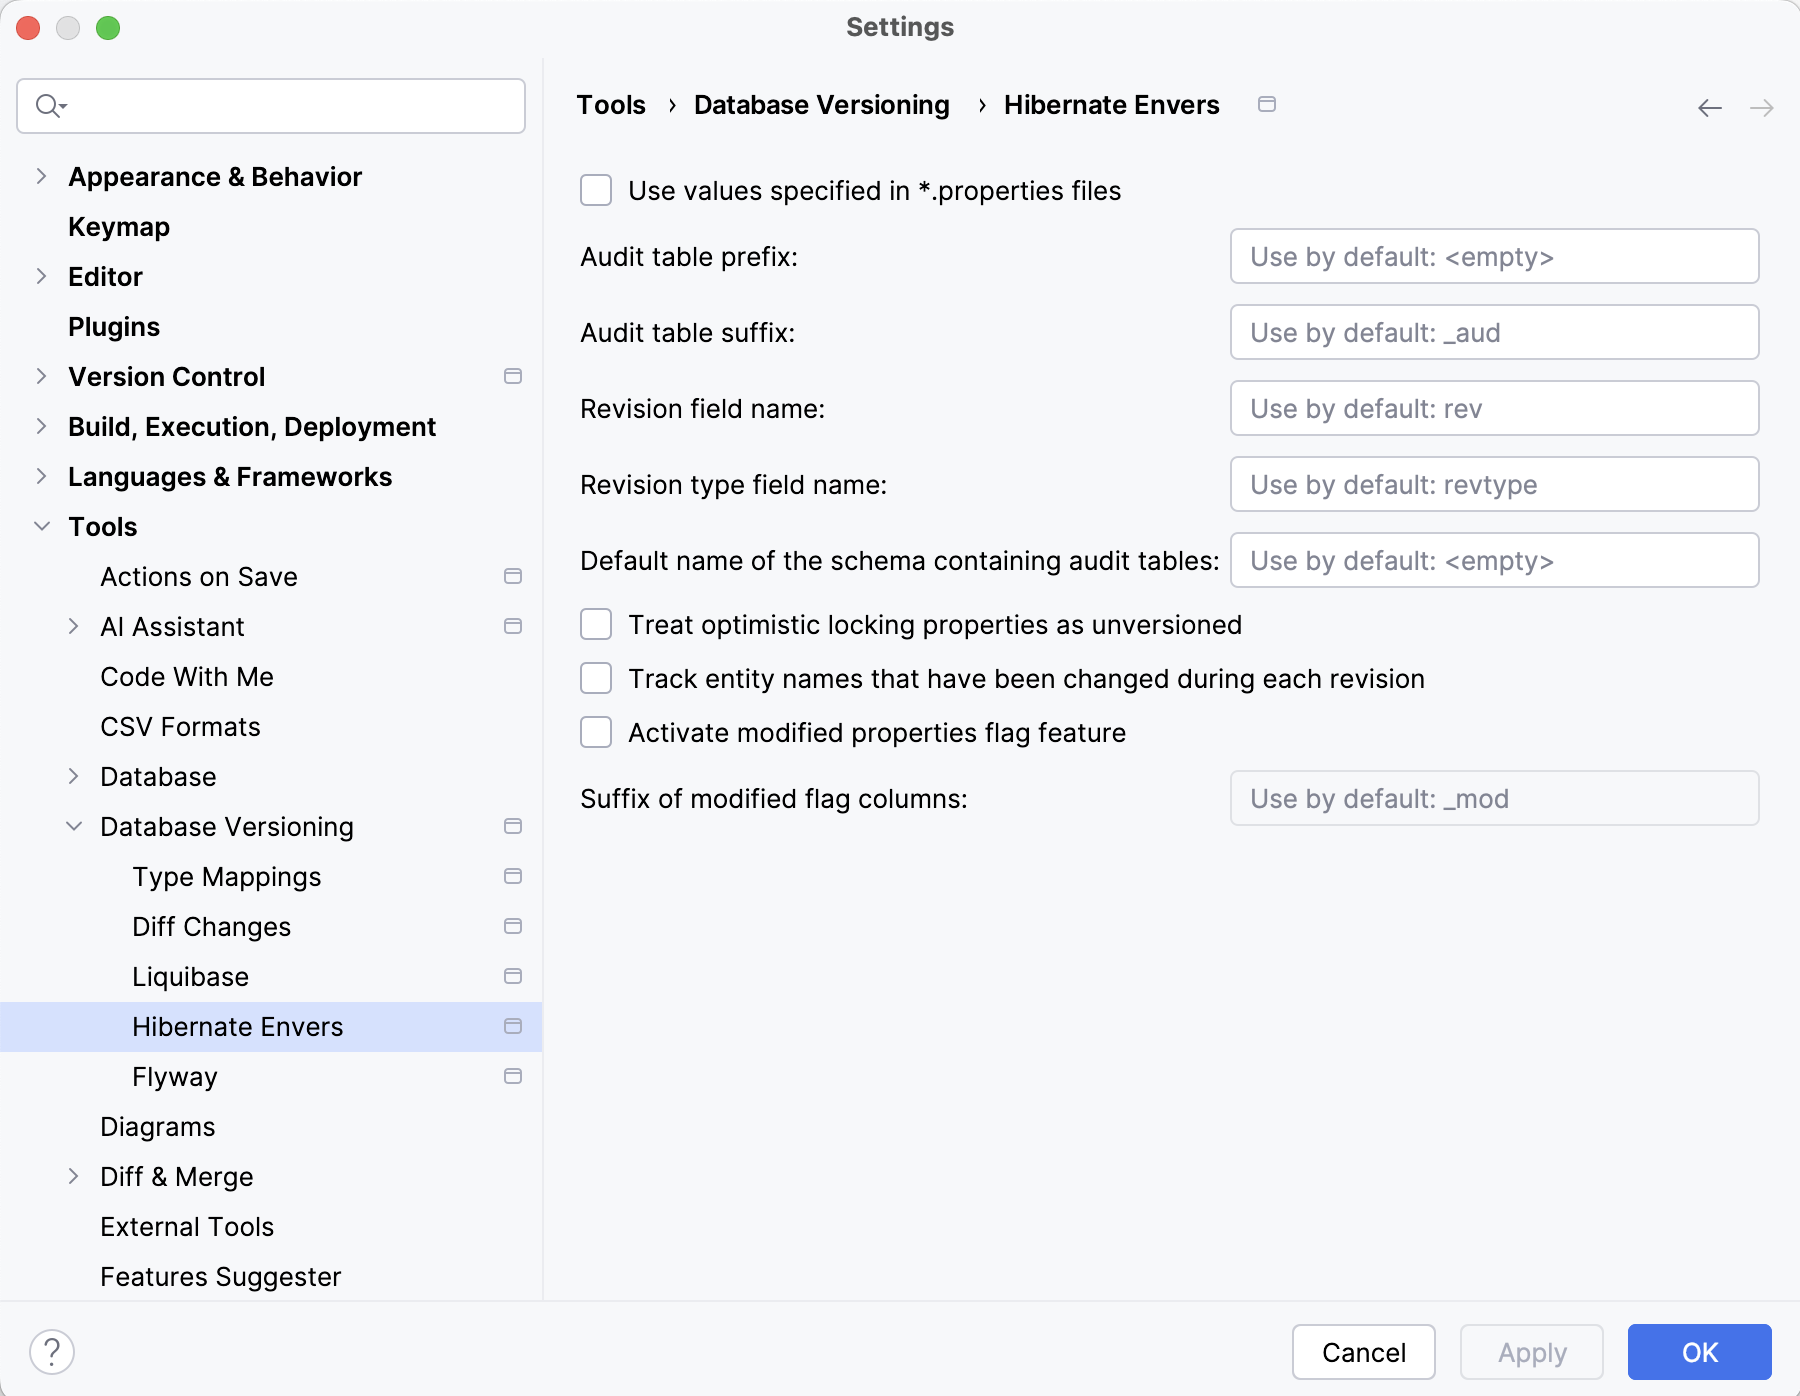
Hibernate Envers offers various customization options. You can specify the configuration in the IDE settings or let IntelliJ IDEA read the existing settings from .properties files automatically.
Naming Strategy
By default, Spring Boot configures the physical naming strategy with SpringPhysicalNamingStrategy. This implementation generates all table names in lower case separated by underscores. For example, a TelephoneNumber entity is mapped to the telephone_number table. Even if you annotate the entity with @Table(name = "TelephoneNumber"). The same names must be used in the migration scripts, so JPA Buddy also applies a physical naming strategy to all names during script generation.
The following strategies are supported:
SpringPhysicalNamingStrategy– the default optionPhysicalNamingStrategyStandardlmplCamelCaseToUnderscoresNamingStrategy(only for projects with Hibernate 6 and later versions)
To learn more about naming strategies, you can check out our article.
Custom Naming Strategy
Sometimes, the default behavior for naming strategy in a project changes. JPA Buddy can help you with that too! Once it detects a class in the project that implements org.hibernate.boot.model.naming.PhysicalNamingStrategy (or one of its successors), an additional "custom" section with the corresponding class will appear in the naming strategy dropdown menu.
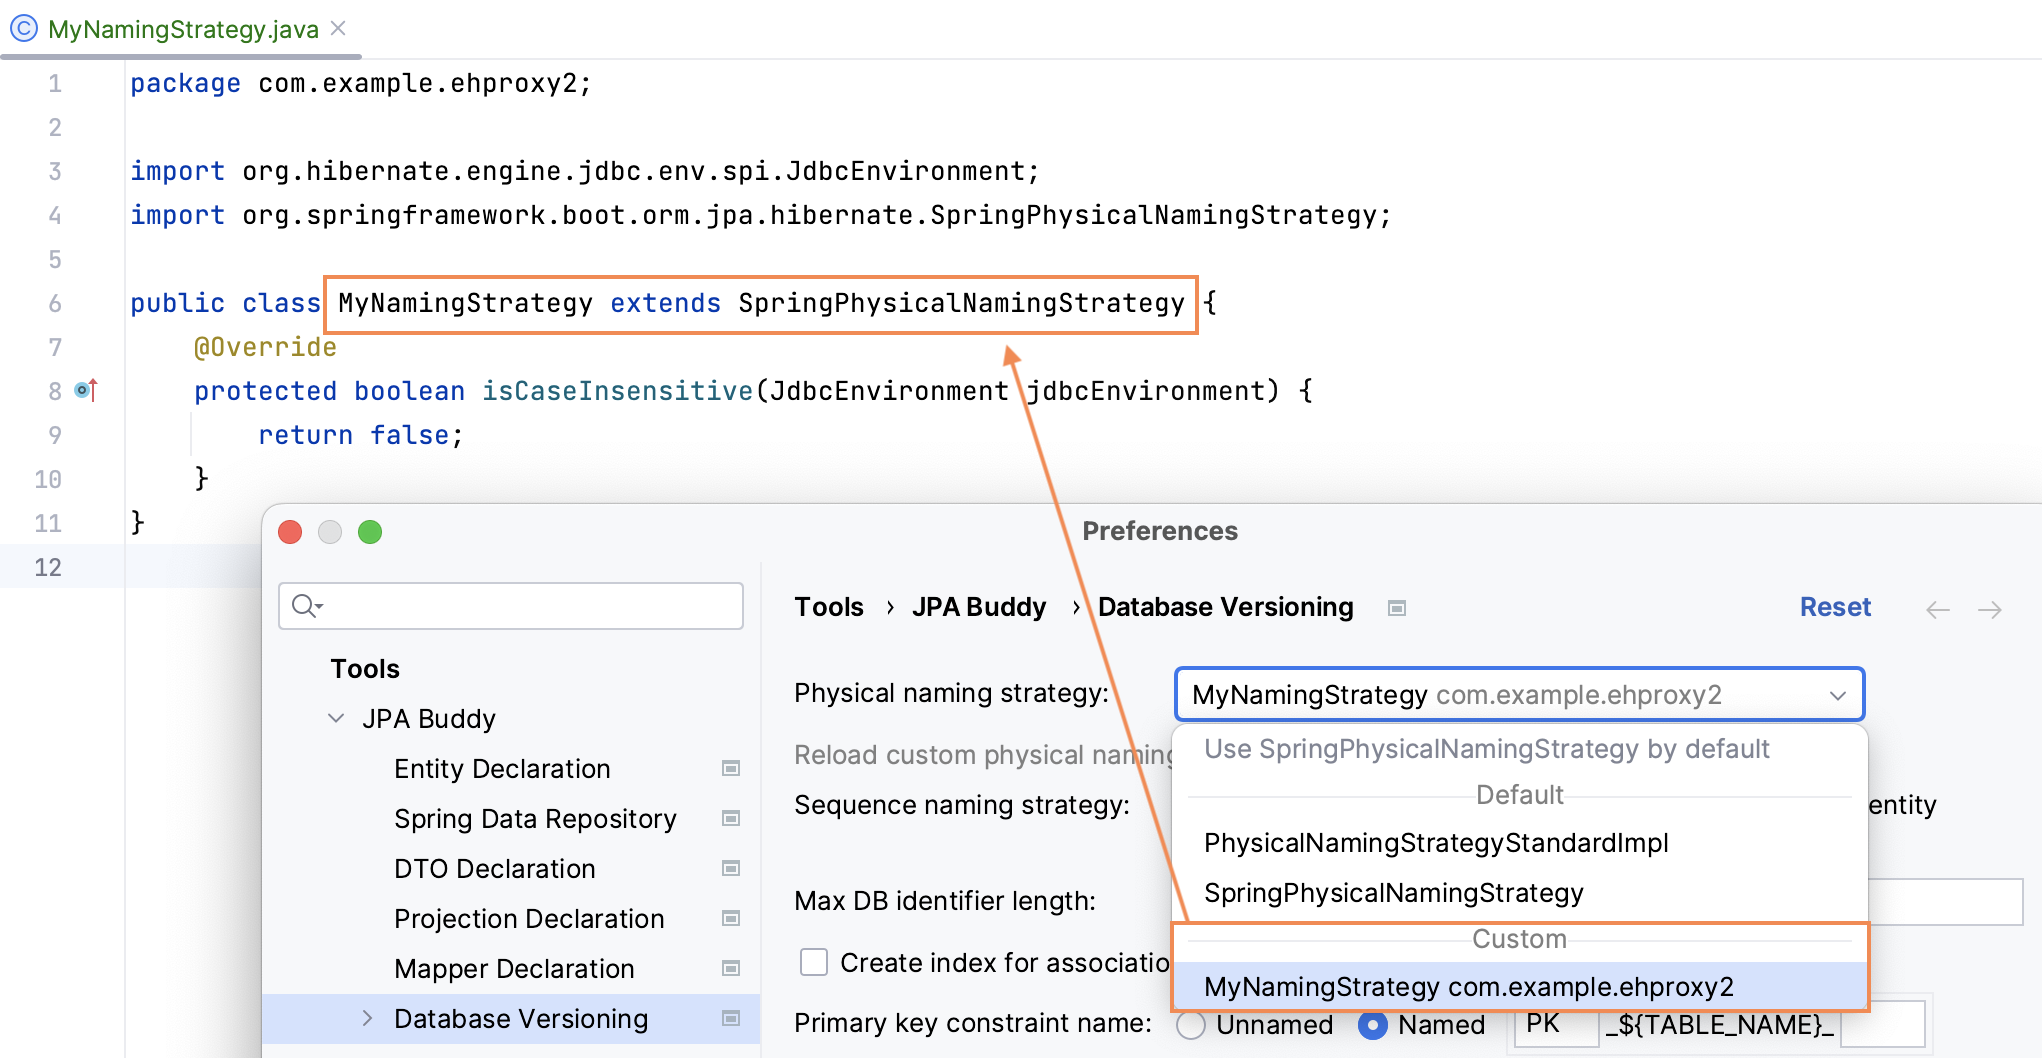
Once you select this class from the dropdown menu, IntelliJ IDEA will use this strategy when generating migration scripts. Note that IntelliJ IDEA doesn't update the class changes automatically, so if you modify your strategy code, you need to either click Reload custom physical naming strategy class or restart IntelliJ IDEA.

Max Identifier
RDBMSs have their own limitations. For example, table names for OracleDatabase earlier than 12.1 version are limited to 30 bytes. To avoid problems with versioning scripts, you can limit table names:
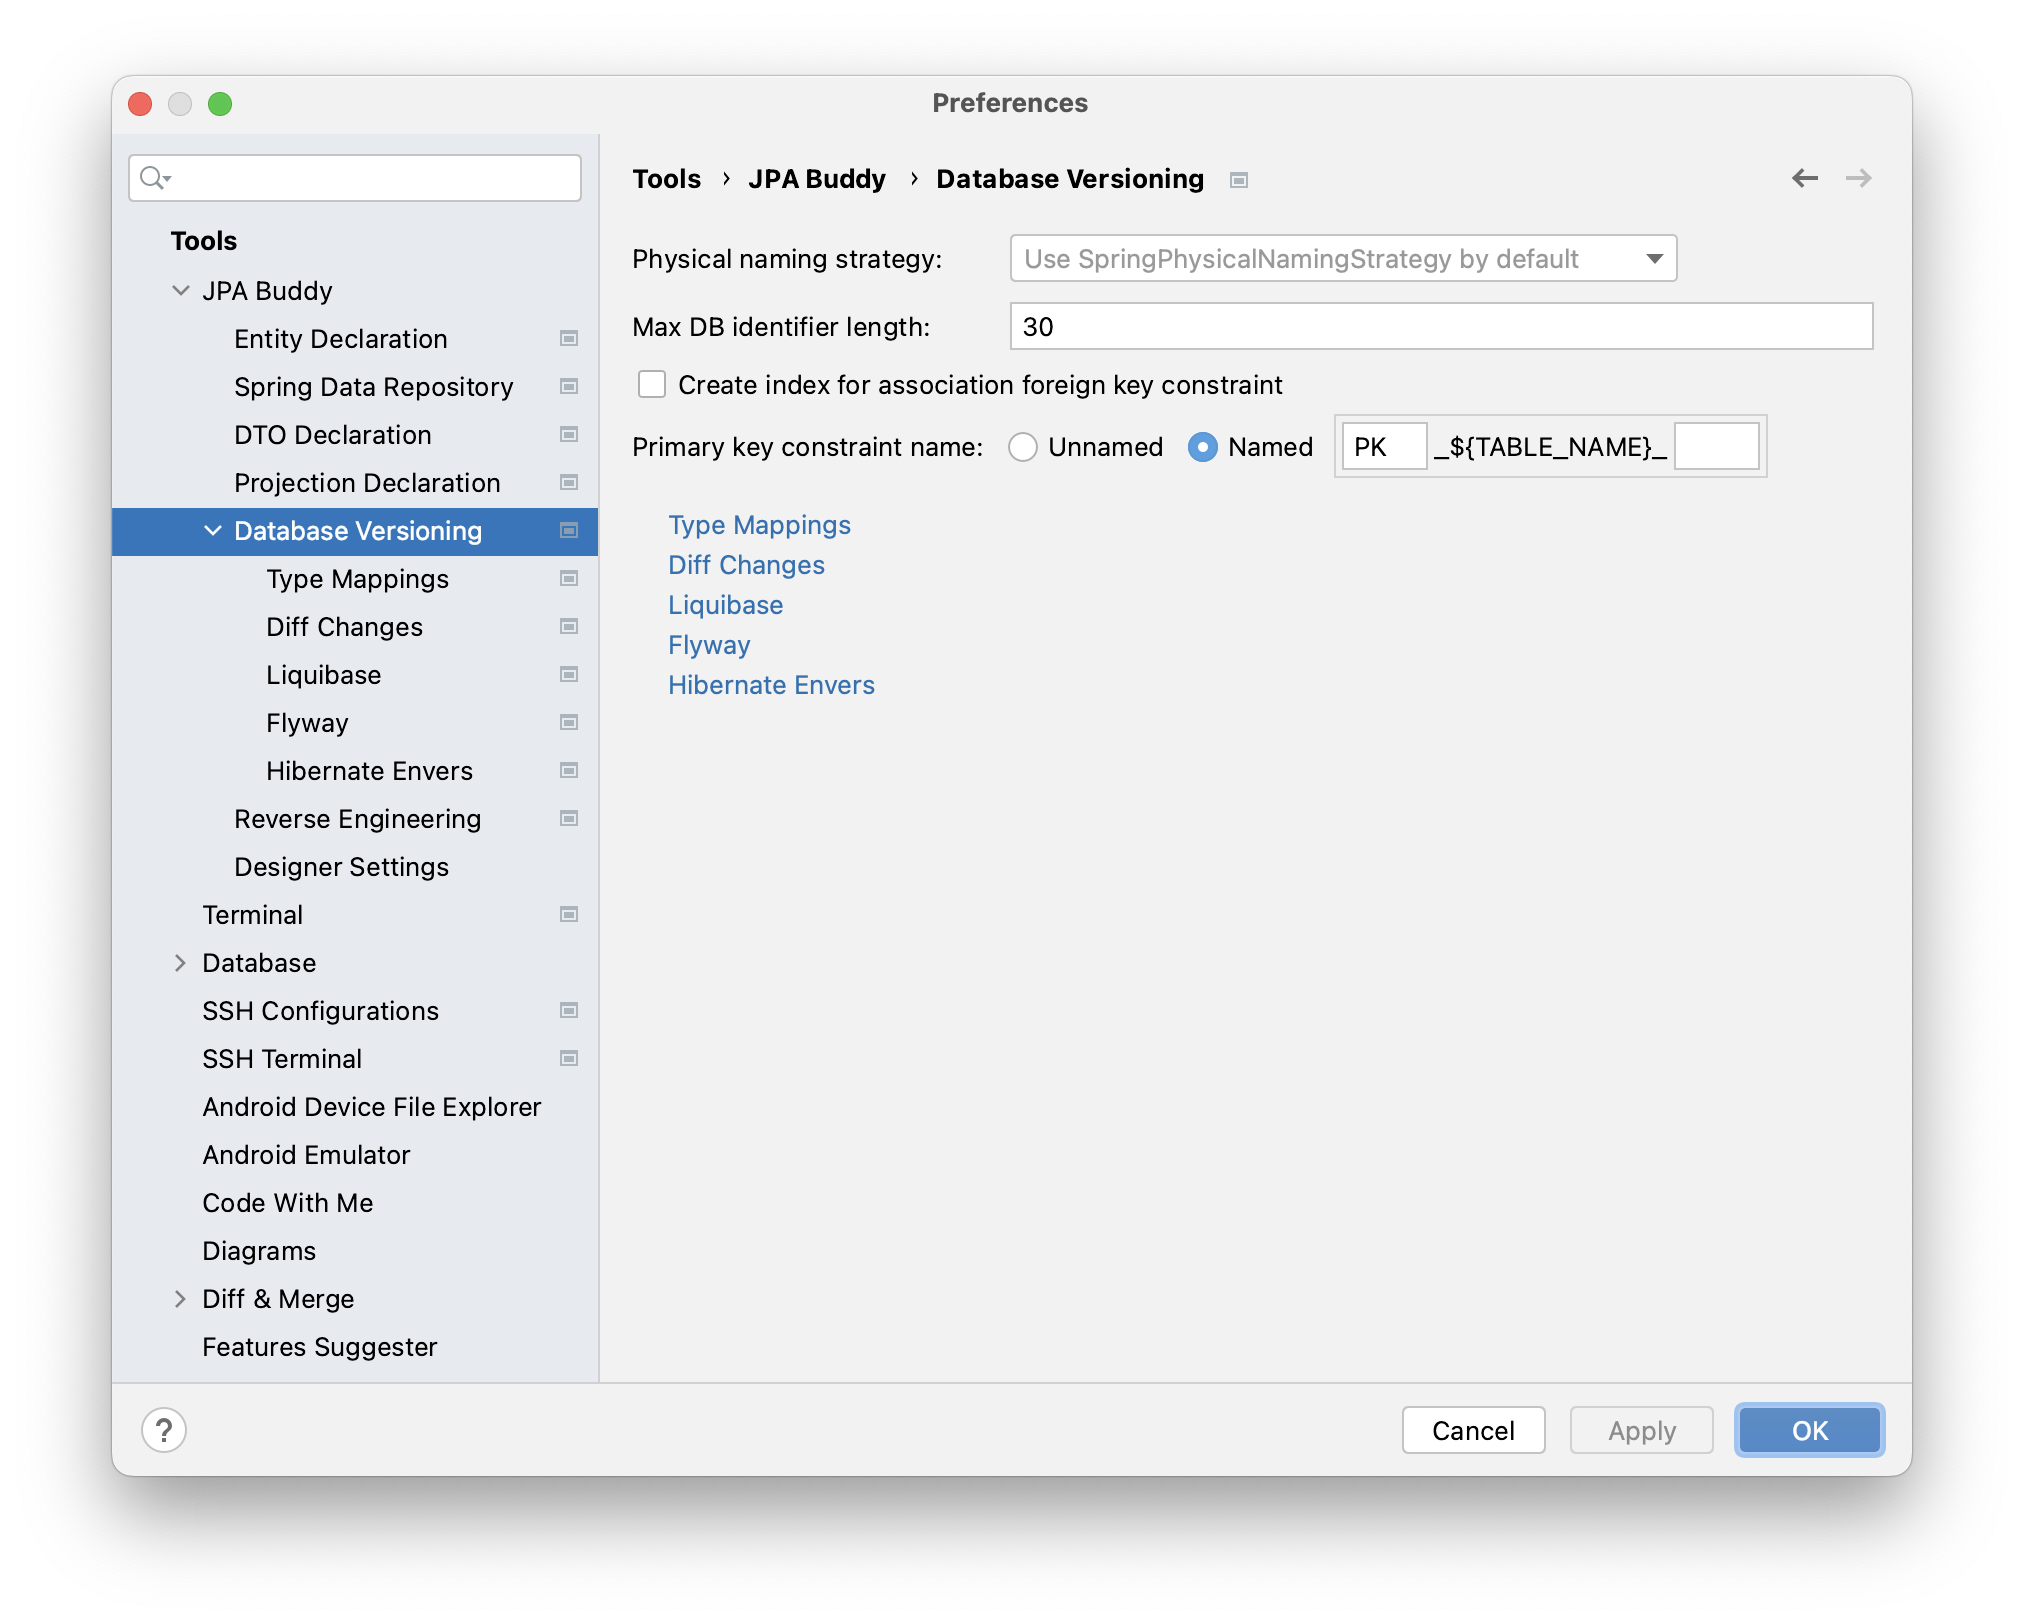
Also, you can define:
whether to create an index for the association foreign key constraint or not;
primary key constraint name.