Make your Android application work on iOS – tutorial
Edit pageLast modified: 18 March 2025Learn how to make your existing Android application cross-platform so that it works both on Android and iOS. You'll be able to write code and test it for both Android and iOS only once, in one place.
This tutorial uses a sample Android application with a single screen for entering a username and password. The credentials are validated and saved to an in-memory database.
To make your application work on both iOS and Android, you'll first make your code cross-platform by moving some of it to a shared module. After that you'll use your cross-platform code in the Android application, and then you'll use the same code in a new iOS application.
tip
If you aren't familiar with Kotlin Multiplatform, learn how to create a cross-platform application from scratch first.
Prepare an environment for development
Install all the necessary tools and update them to the latest versions.
note
You will need a Mac with macOS to complete certain steps in this tutorial, which include writing iOS-specific code and running an iOS application. These steps can't be performed on other operating systems, such as Microsoft Windows. This is due to an Apple requirement.
In Android Studio, create a new project from version control:
https://github.com/Kotlin/kmp-integration-sampletip
The
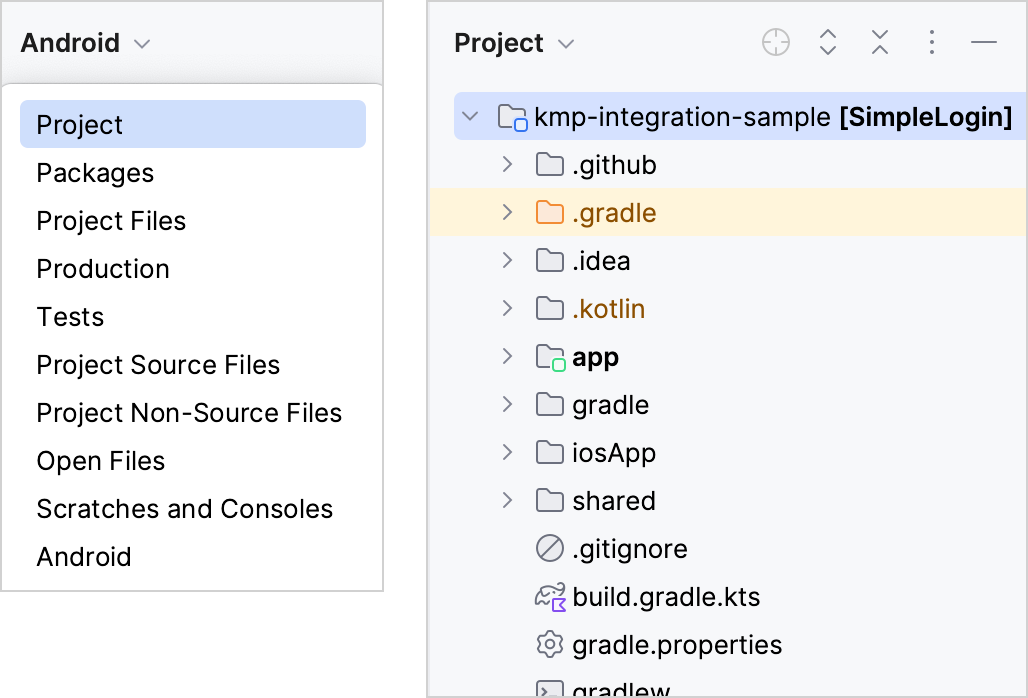
masterbranch contains the project's initial state — a simple Android application. To see the final state with the iOS application and the shared module, switch to thefinalbranch.Switch from the Android view to the Project view:

Make your code cross-platform
To make your code cross-platform, you'll follow these steps:
Decide what code to make cross-platform
Decide which code of your Android application is better to share for iOS and which to keep native. A simple rule is: share what you want to reuse as much as possible. The business logic is often the same for both Android and iOS, so it's a great candidate for reuse.
In your sample Android application, the business logic is stored in the package com.jetbrains.simplelogin.androidapp.data. Your future iOS application will use the same logic, so you should make it cross-platform, as well.

Create a shared module for cross-platform code
The cross-platform code used for both iOS and Android will be stored in a shared module. Starting with the Meerkat version, Android Studio provides a wizard for creating such shared modules.
Create a shared module and connect it to both the existing Android application and your future iOS application:
In Android Studio, select File | New | New Module from the main menu.
In the list of templates, select Kotlin Multiplatform Shared Module. Leave the library name
sharedand enter the package namecom.jetbrains.simplelogin.shared.Click Finish. The wizard creates a shared module, changes the build script accordingly, and starts a Gradle sync.
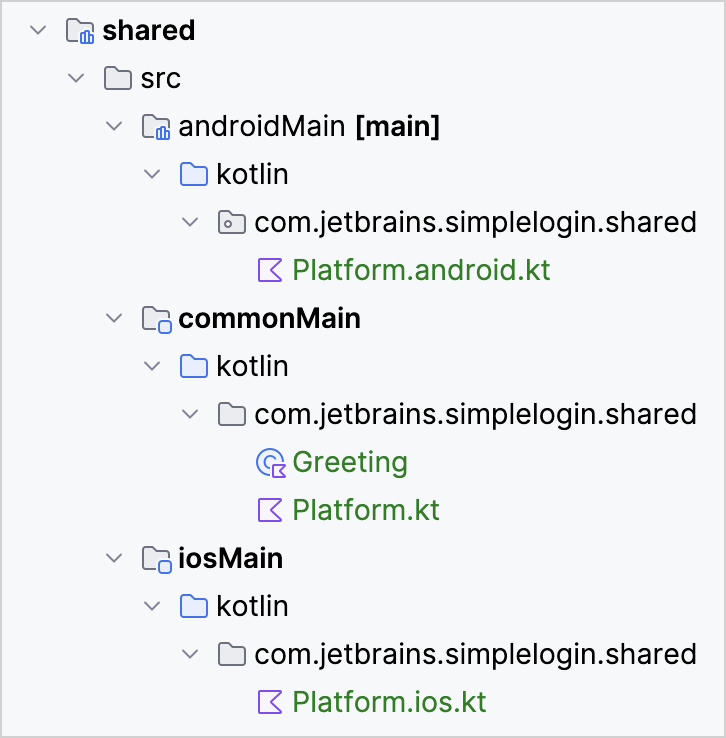
When the setup is complete, you will see the following file structure in the
shareddirectory:
Make sure that the
kotlin.androidLibrary.minSdkproperty in theshared/build.gradle.ktsfile matches the value of the same property in theapp/build.gradle.ktsfile.
Add code to the shared module
Now that you have a shared module, add some common code to be shared in the commonMain/kotlin/com.jetbrains.simplelogin.shared directory:
Create a new
Greetingclass with the following code:package com.jetbrains.simplelogin.shared class Greeting { private val platform = getPlatform() fun greet(): String { return "Hello, ${platform.name}!" } }Replace the code in created files with the following:
In
commonMain/Platform.kt:package com.jetbrains.simplelogin.shared interface Platform { val name: String } expect fun getPlatform(): PlatformIn
androidMain/Platform.android.kt:package com.jetbrains.simplelogin.shared import android.os.Build class AndroidPlatform : Platform { override val name: String = "Android ${Build.VERSION.SDK_INT}" } actual fun getPlatform(): Platform = AndroidPlatform()In
iosMain/Platform.ios.kt:package com.jetbrains.simplelogin.shared import platform.UIKit.UIDevice class IOSPlatform: Platform { override val name: String = UIDevice.currentDevice.systemName() + " " + UIDevice.currentDevice.systemVersion } actual fun getPlatform(): Platform = IOSPlatform()
If you want to better understand the layout of the resulting project, see the basics of Kotlin Multiplatform project structure.
Add a dependency on the shared module to your Android application
To use cross-platform code in your Android application, connect the shared module to it, move the business logic code there, and make this code cross-platform.
Add a dependency on the shared module to the
app/build.gradle.ktsfile:dependencies { // ... implementation(project(":shared")) }Sync the Gradle files as suggested by the IDE or using the File | Sync Project with Gradle Files menu item.

In the
app/src/main/java/directory, open theLoginActivity.ktfile in thecom.jetbrains.simplelogin.androidapp.ui.loginpackage.To make sure that the shared module is successfully connected to your application, dump the
greet()function result to the log by adding aLog.i()call to theonCreate()method:override fun onCreate(savedInstanceState: Bundle?) { super.onCreate(savedInstanceState) Log.i("Login Activity", "Hello from shared module: " + (Greeting().greet())) // ... }Follow Android Studio's suggestions to import missing classes.
In the toolbar, click the
appdropdown, then click the debug icon:
In the Logcat tool window, search for "Hello" in the log, and you'll find the greeting from the shared module:

Make the business logic cross-platform
You can now extract the business logic code to the Kotlin Multiplatform shared module and make it platform-independent. This is necessary for reusing the code for both Android and iOS.
Move the business logic code
com.jetbrains.simplelogin.androidapp.datafrom theappdirectory to thecom.jetbrains.simplelogin.sharedpackage in theshared/src/commonMaindirectory.
When Android Studio asks what you'd like to do, select to move the package and then approve the refactoring.

Ignore all warnings about platform-dependent code and click Continue.

Remove Android-specific code by replacing it with cross-platform Kotlin code or connecting to Android-specific APIs using expected and actual declarations. See the following sections for details:
To make your code work well on both Android and iOS, replace all JVM dependencies with Kotlin dependencies in the moved
datadirectory wherever possible.In the
LoginDataSourceclass, replaceIOExceptionin thelogin()function withRuntimeException.IOExceptionis not available in Kotlin/JVM.// Before return Result.Error(IOException("Error logging in", e))// After return Result.Error(RuntimeException("Error logging in", e))Remove the import directive for
IOExceptionas well:import java.io.IOExceptionIn the
LoginDataValidatorclass, replace thePatternsclass from theandroid.utilspackage with a Kotlin regular expression matching the pattern for email validation:// Before private fun isEmailValid(email: String) = Patterns.EMAIL_ADDRESS.matcher(email).matches()// After private fun isEmailValid(email: String) = emailRegex.matches(email) companion object { private val emailRegex = ("[a-zA-Z0-9\\+\\.\\_\\%\\-\\+]{1,256}" + "\\@" + "[a-zA-Z0-9][a-zA-Z0-9\\-]{0,64}" + "(" + "\\." + "[a-zA-Z0-9][a-zA-Z0-9\\-]{0,25}" + ")+").toRegex() }Remove the import directive for the
Patternsclass:import android.util.Patterns
In the
LoginDataSourceclass, a universally unique identifier (UUID) forfakeUseris generated using thejava.util.UUIDclass, which is not available for iOS.val fakeUser = LoggedInUser(java.util.UUID.randomUUID().toString(), "Jane Doe")Even though the Kotlin standard library provides an experimental class for UUID generation, let's use platform-specific functionality for this case to practice doing that.
Provide the
expectdeclaration for therandomUUID()function in the shared code and itsactualimplementations for each platform – Android and iOS – in the corresponding source sets. You can learn more about connecting to platform-specific APIs.Change the
java.util.UUID.randomUUID()call in thelogin()function to arandomUUID()call, which you will implement for each platform:val fakeUser = LoggedInUser(randomUUID(), "Jane Doe")Create the
Utils.ktfile in thecom.jetbrains.simplelogin.sharedpackage of theshared/src/commonMaindirectory and provide theexpectdeclaration:package com.jetbrains.simplelogin.shared expect fun randomUUID(): StringCreate the
Utils.android.ktfile in thecom.jetbrains.simplelogin.sharedpackage of theshared/src/androidMaindirectory and provide theactualimplementation forrandomUUID()in Android:package com.jetbrains.simplelogin.shared import java.util.* actual fun randomUUID() = UUID.randomUUID().toString()Create the
Utils.ios.ktfile in thecom.jetbrains.simplelogin.sharedof theshared/src/iosMaindirectory and provide theactualimplementation forrandomUUID()in iOS:package com.jetbrains.simplelogin.shared import platform.Foundation.NSUUID actual fun randomUUID(): String = NSUUID().UUIDString()Import the
randomUUIDfunction in theLoginDataSource.ktfile of theshared/src/commonMaindirectory:import com.jetbrains.simplelogin.shared.randomUUID
Now, Kotlin will use platform-specific implementations of UUID for Android and iOS.
Run your cross-platform application on Android
Run your cross-platform application for Android to make sure it works.

Make your cross-platform application work on iOS
Once you've made your Android application cross-platform, you can create an iOS application and reuse the shared business logic in it.
Create an iOS project in Xcode
In Xcode, click File | New | Project.
Select a template for an iOS app and click Next.

As the product name, specify "simpleLoginIOS" and click Next.

As the location for your project, select the directory that stores your cross-platform application, for example,
kmp-integration-sample.
In Android Studio, you'll get the following structure:

You can rename the simpleLoginIOS directory to iosApp for consistency with other top-level directories of your cross-platform project. To do that, close Xcode and then rename the simpleLoginIOS directory to iosApp. If you rename the folder with Xcode open, you'll get a warning and may corrupt your project.

Configure the iOS project to use a KMP framework
You can set up integration between the iOS app and the framework built by Kotlin Multiplatform directly. Alternatives to this method are covered in the iOS integration methods overview, but they are beyond the scope of this tutorial.
In Xcode, open the iOS project settings by double-clicking the project name in the Project navigator.
In the Targets section on the left, select simpleLoginIOS, then click the Build Phases tab.
Click the + icon and select New Run Script Phase.

The new phase is created at the bottom of the list.
Click the > icon to expand the created Run Script item, then paste the following script in the text field:
cd "$SRCROOT/.."
./gradlew :shared:embedAndSignAppleFrameworkForXcode
Move the Run Script phase higher in the order, placing it before the Compile Sources phase:

Click the Build Settings tab, then find and disable the User Script Sandboxing option under Build Options:

note
If you have a custom build configuration different from the default
DebugorRelease, on the Build Settings tab, add theKOTLIN_FRAMEWORK_BUILD_TYPEsetting under User-Defined and set it toDebugorRelease.Build the project in Xcode (Product | Build in the main menu). If everything is configured correctly, the project should build successfully (you can safely ignore the "build phase will be run during every build" warning)
tip
Build may fail if you built the project before disabling the User Script Sandboxing option: the Gradle daemon process may be sandboxed and needs to be restarted. Stop it before building the project again by running this command in the project directory (
kmp-integration-samplein our example):./gradlew --stop
Set up an iOS run configuration in Android Studio
When you made sure that Xcode is set up correctly, you can set up a run configuration for the iOS app in Android Studio:
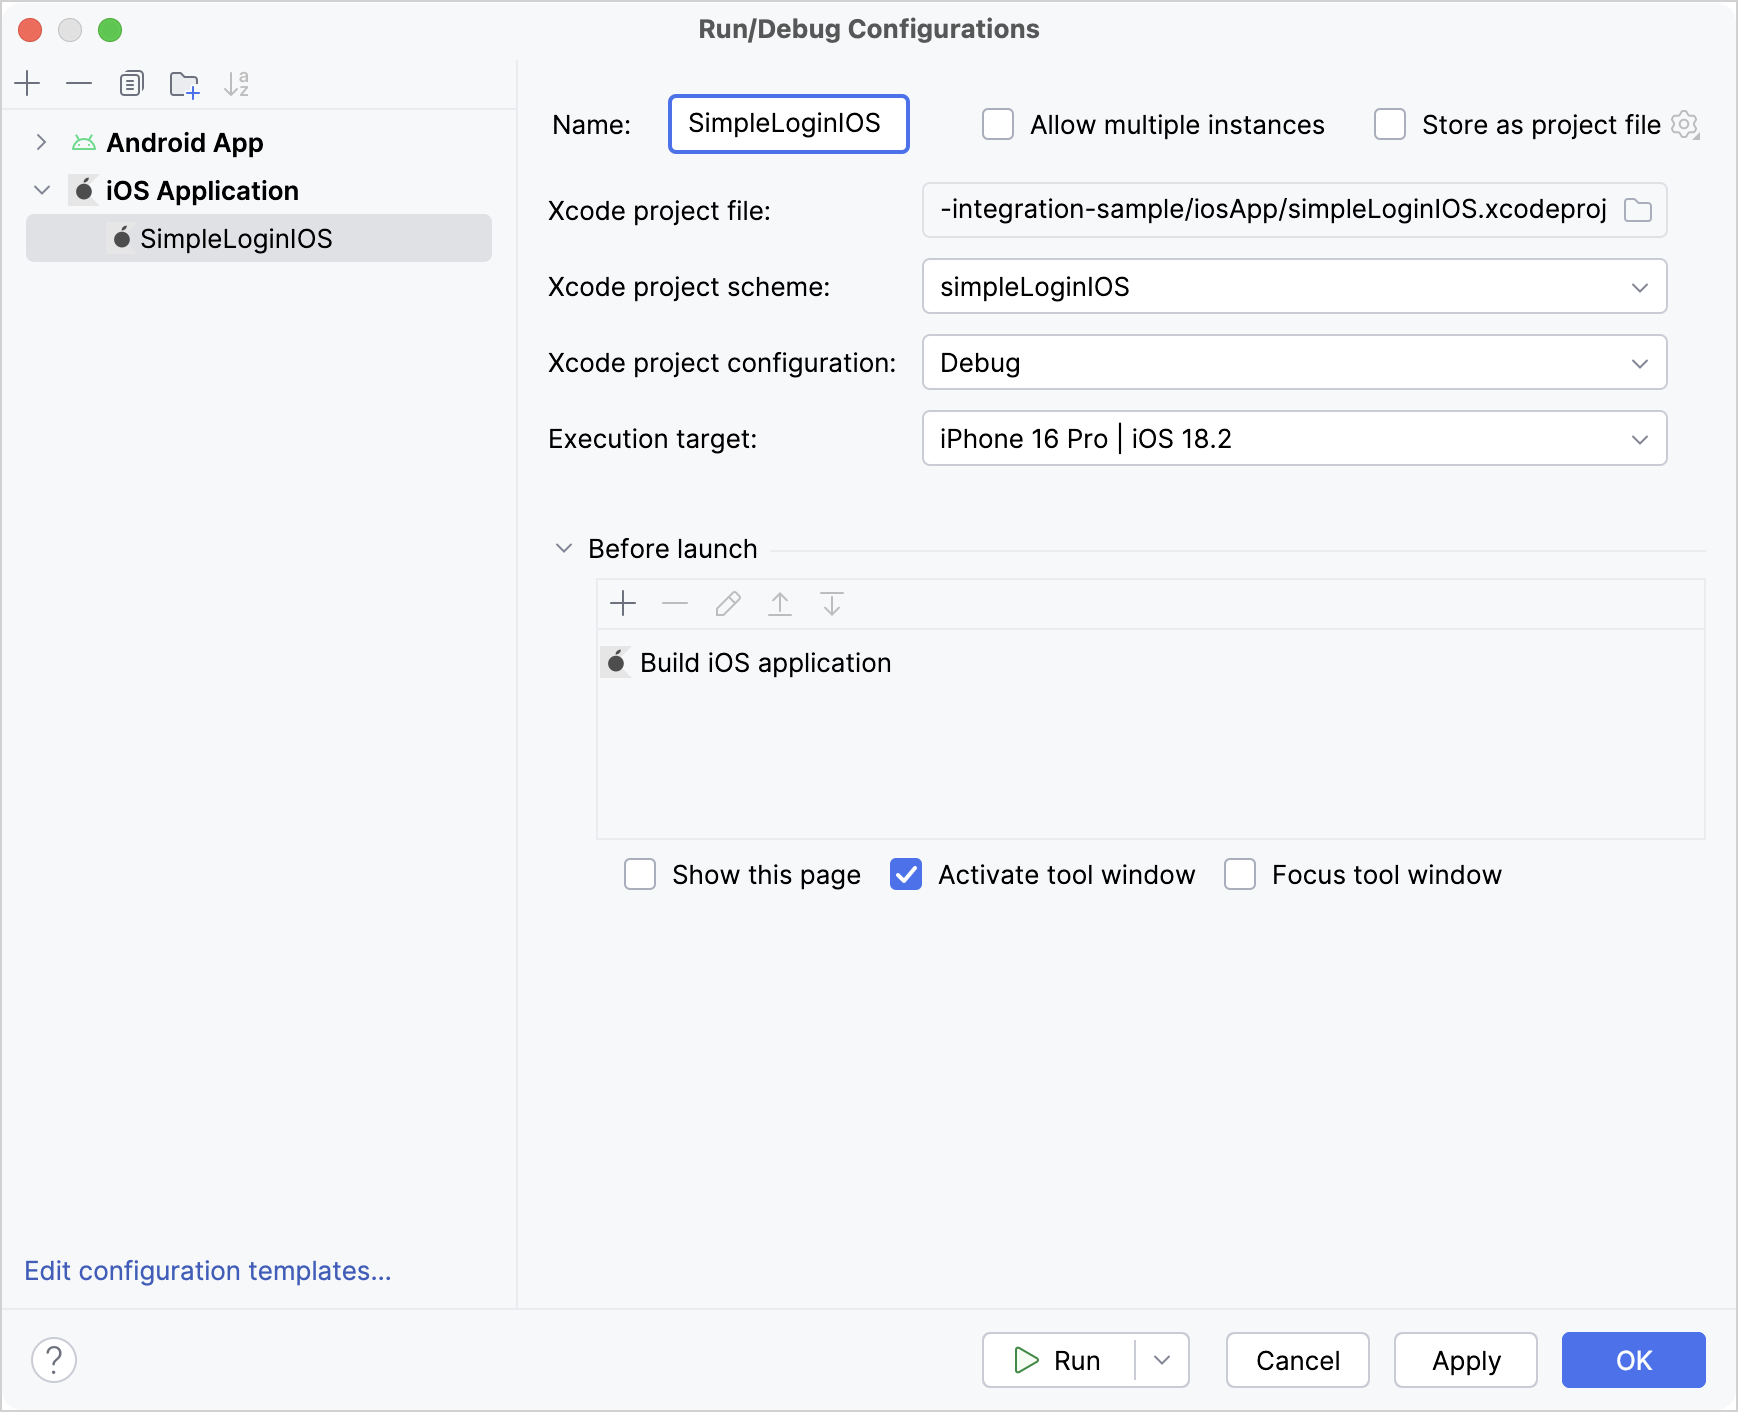
Select Run | Edit configurations in the main menu.
To add a new configuration, click the plus sign and choose iOS Application.
Name the configuration "SimpleLoginIOS".
In the Xcode project file field, select the location of the
simpleLoginIOS.xcodeprojfile.Choose a simulation environment from the Execution target list and click OK:

Check the newly created configuration by pressing the run button to build and launch the iOS app:

Use the shared module in the iOS project
The build.gradle.kts file of the shared module defines the binaries.framework.baseName property for each iOS target as sharedKit. This is the name of the framework that Kotlin Multiplatform builds for the iOS app to consume.
To test the integration, add a call to common code in Swift code:
In Android Studio, open the
iosApp/simpleloginIOS/ContentView.swiftfile and import the framework:import sharedKitTo check that it is properly connected, change the
ContentViewstructure to use thegreet()function from the shared module of your cross-platform app:struct ContentView: View { var body: some View { Text(Greeting().greet()) .padding() } }Run the app using the Android Studio iOS run configuration to see the result:

Update code in the
ContentView.swiftfile again to use the business logic from the shared module to render the application UI:import SwiftUI{...}In the
simpleLoginIOSApp.swiftfile, import thesharedKitmodule and specify the arguments for theContentView()function:import SwiftUI import sharedKit @main struct SimpleLoginIOSApp: App { var body: some Scene { WindowGroup { ContentView(viewModel: .init(loginRepository: LoginRepository(dataSource: LoginDataSource()), loginValidator: LoginDataValidator())) } } }Run the iOS run configuration again to see that the iOS app shows the login form.
Enter "Jane" as the username and "password" as the password.
As you have set up the integration earlier, the iOS app validates input using common code:

Enjoy the results – update the logic only once
Now your application is cross-platform. You can update the business logic in the shared module and see results on both Android and iOS.
Change the validation logic for a user's password: "password" shouldn't be a valid option. To do that, update the
checkPassword()function of theLoginDataValidatorclass (to find it quickly, press Shift twice, paste the name of the class, and switch to the Classes tab):package com.jetbrains.simplelogin.shared.data class LoginDataValidator { //... fun checkPassword(password: String): Result { return when { password.length < 5 -> Result.Error("Password must be >5 characters") password.lowercase() == "password" -> Result.Error("Password shouldn't be \"password\"") else -> Result.Success } } //... }Run both the iOS and Android applications from Android Studio to see the changes:


You can review the final code for this tutorial.
What else to share?
You've shared the business logic of your application, but you can also decide to share other layers of your application. For example, the ViewModel class code is almost the same for Android and iOS applications, and you can share it if your mobile applications should have the same presentation layer.
What's next?
Once you've made your Android application cross-platform, you can move on and:
You can also check out community resources: