Building standalone IDEs for your languages
Introduction
The term standalone IDE refers to a stripped down version of the IDE that only contains those artifacts that are necessary for a given business purpose. Standalone IDEs provide a convenient way to distribute DSLs to the end users, who will be able to use the languages including all the IDE support, refactorings and code analysis prepared by language designers in the comfort of a dedicated IDE. All the distracting language-design-related functionality and unnecessary languages will have been removed.
Once you have designed your languages, MPS can help you build a stripped down version of MPS that only contains those artifacts that are necessary to use these domain-specific languages. Various aspects of MPS can be removed or customized to deliver a custom user experience for a given group of users. This article describes how.
In particular, the following aspects of MPS can be customized:
various icons, slogans, splash screens and images
the help URL
the set of languages available to the users
the set of plugins available in MPS
Process Overview
To build a custom RCP version of MPS, you have to create a solution that contains a so-called build script. A build script is written in MPS' build language, which is optimized for building RCP applications (as well as IntelliJ and MPS plugins). When running the generator for this build script, MPS generates an ant file that creates the actual RCP distribution.
Building an example RCP build
In this document we describe the development of an RCP build scripts for the robot Kaja sample that is bundled with MPS distributions. You can open the project in MPS and follow the instructions described here.
tip
If you want to see an example of a non-trivial project with an advanced build script that handles a complex project with several languages and runtime libraries, creates a standalone IDE and bundles the capabilities to run generated Java code, check out the Voice Menu project.
Creating the Solution and the Build Script
The wizard way
The preferred way to create the necessary build scripts is to run the Build Solution Wizard on your current project. You start it from the Project View tool window:
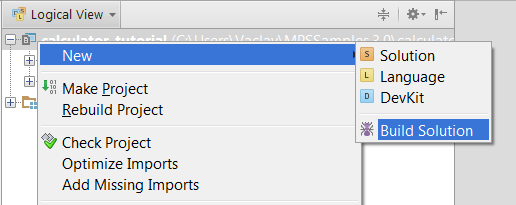
The wizard will create a new solution and a model to hold the scripts and set the necessary imports as well as used languages. You can instruct the wizard to reuse an existing solution or a model, instead of creating new ones.
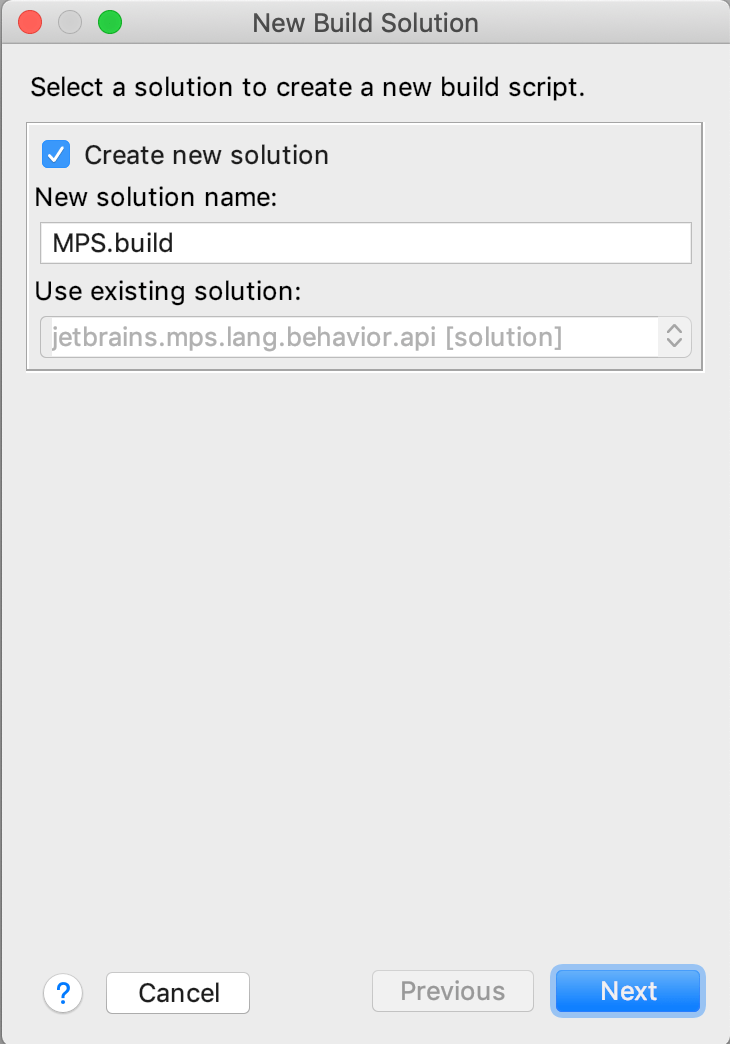
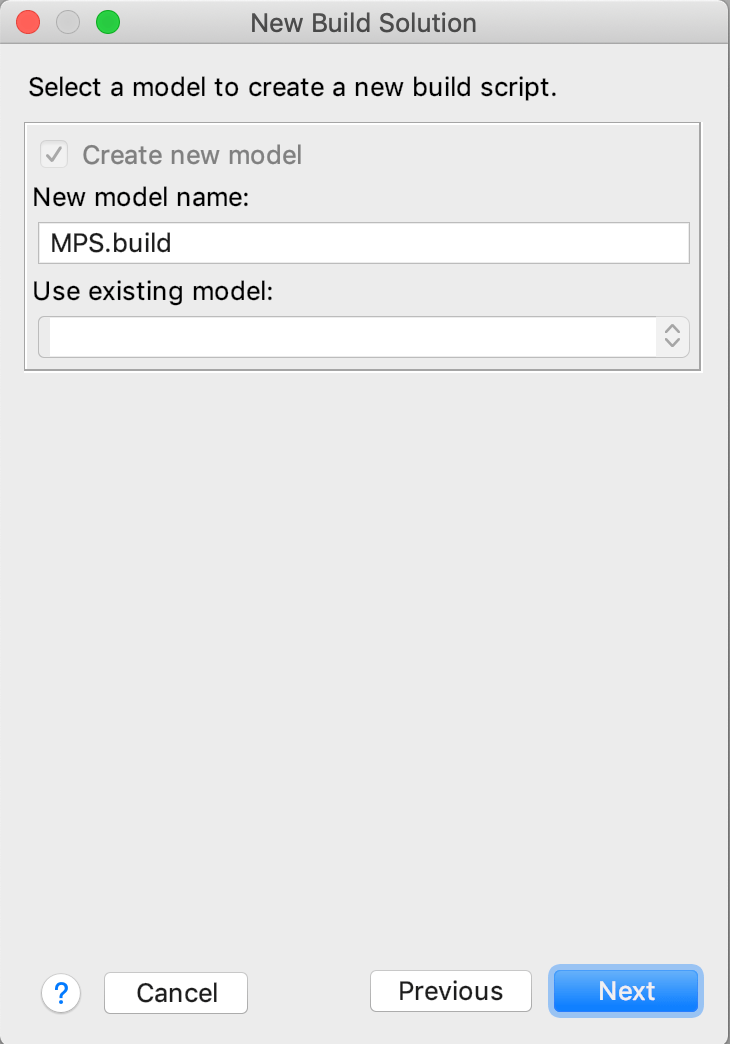
You'll then need to select the Standalone IDE option from the three available options:
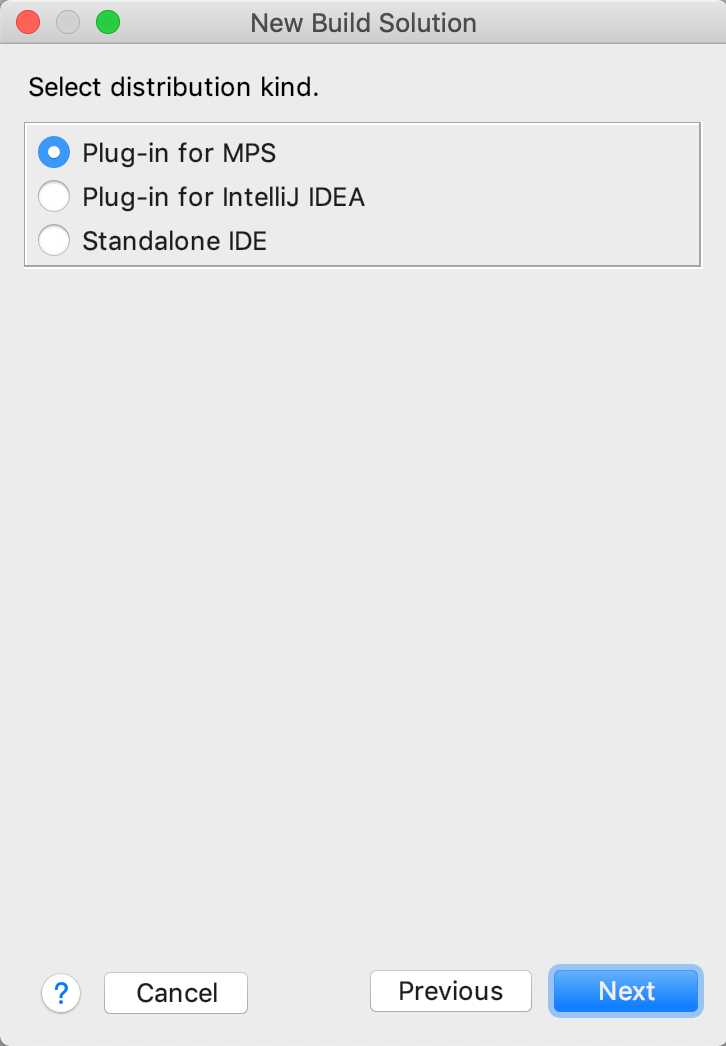
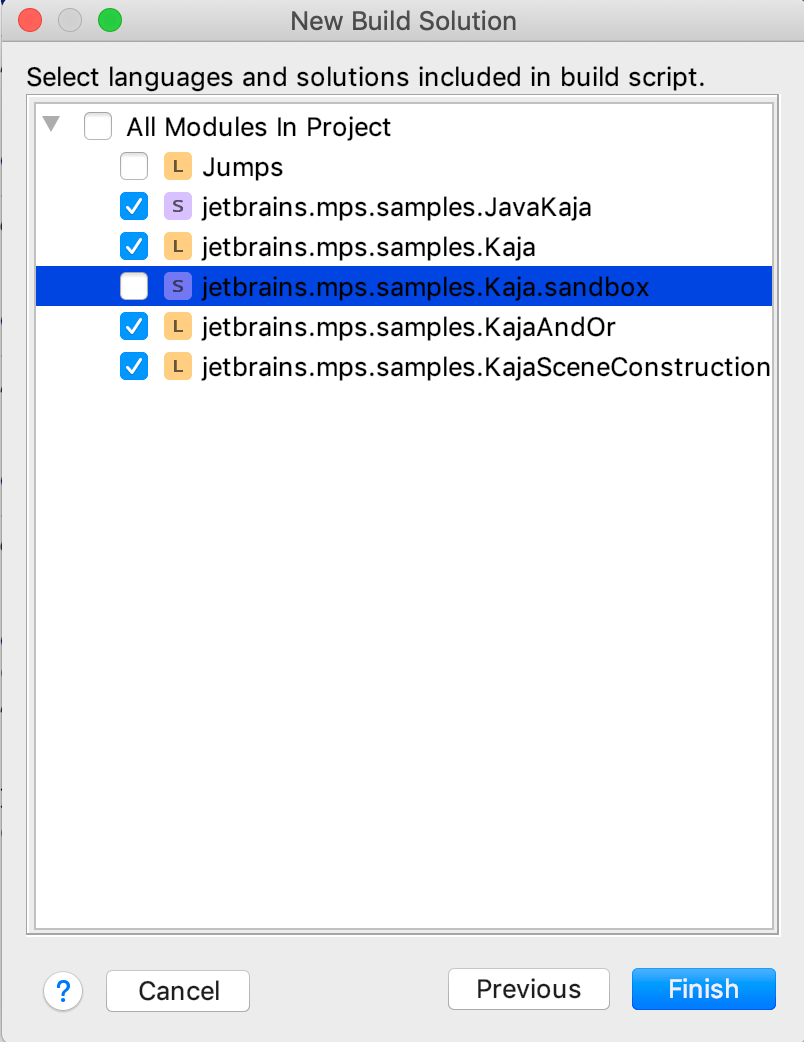
On the last page of the wizard, you de-select the modules that should not be made part of the IDE. Typically you skip the sandbox modules and keep the languages as well as plugin and runtime solutions.
The new solution should now be listed in the Project View and should hold two new build scripts:
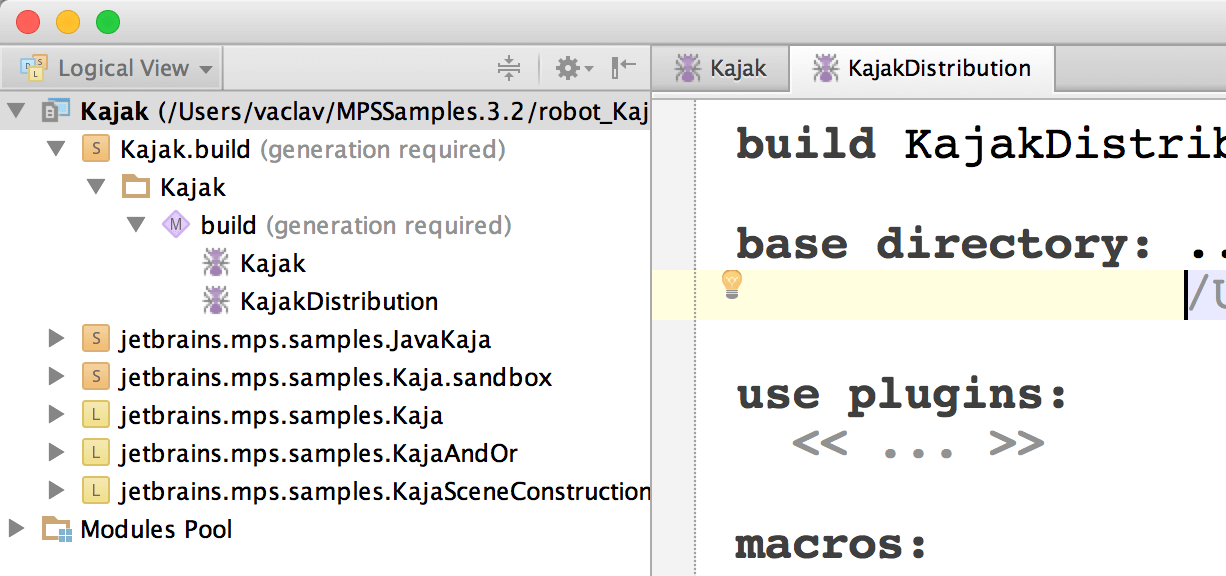
The dependencies have been also set properly:


The manual way
Alternatively you could create the scripts manually. You'd have to create a new solution with a new model inside. In the model, configure the used languages
jetbrains.mps.build
jetbrains.mps.build.mps
Also import the jetbrains.mps.ide.build model. You can now create a new build project in the model (the name is confusing: it is not actually a new build project, just a build script).
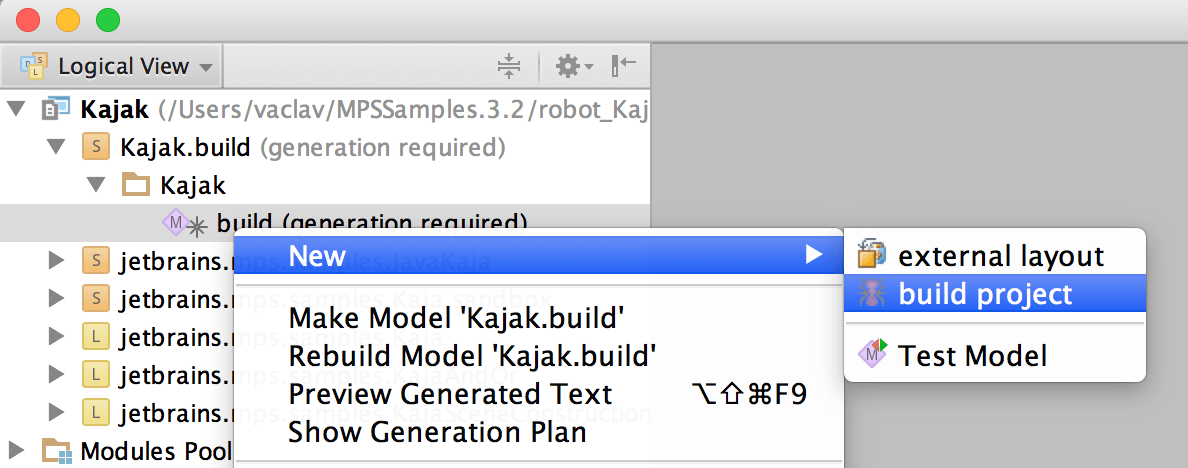
Investigating the build scripts
A build scripts contains several sections, which we can observe on an empty build script:
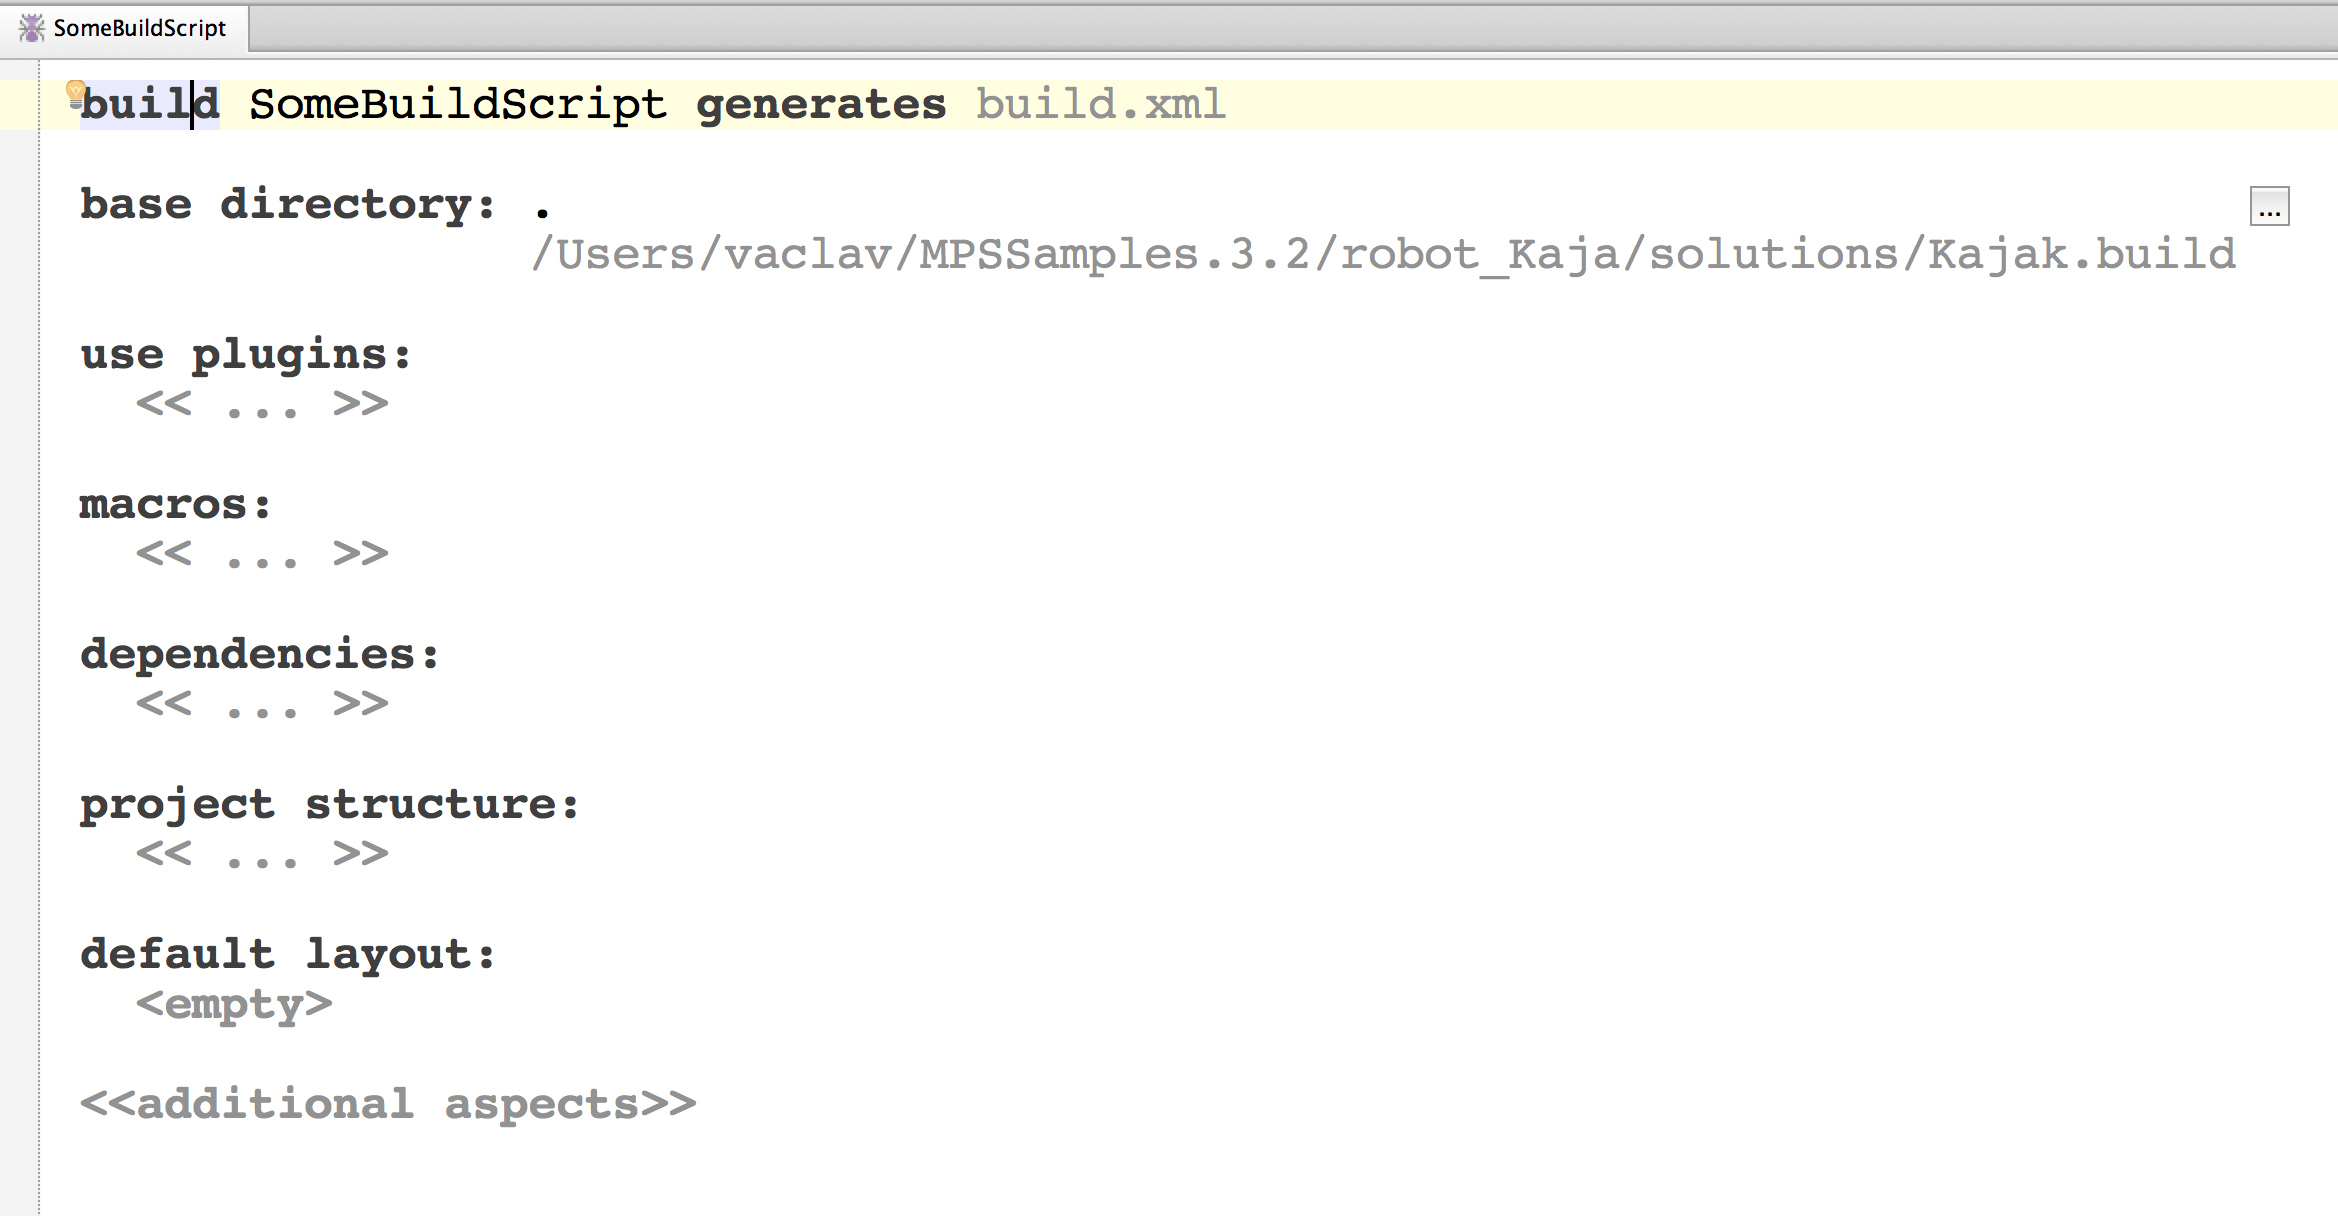
Let us look at the various sections of a build script:
base directory The base directory defines an absolute path relative to which all other paths are specified. By default, this is the directory in which the resulting ant file will be generated, and in which it will be executed.
use plugins The build language itself can be extended via plugins (Note that these are not the plugins that make up MPS itself; those will be configured later). These plugins contribute additional build language syntax. Typically, the java and mps plugins are required. We will use syntax contributed by these plugins below.
macros Macros are essentially name-value pairs. In the Macros section, these names are defined and values are assigned. In the remainder of the build script these macro variables will be used. MPS supports two kinds of Macros: var macros are strings and can be assigned any value. folder represents paths, relative to the base directory defined above and/or based on other Macros. Note that MPS provides code completion for the path components in folder macros.
dependencies This section defines dependencies to other build scripts. MPS bundles a set of build scripts (e.g. buildStandalone, buildWorkbench or buildMPS ). By establishing a dependency to any one of them, the structures defined in that references build script can be used in the referencing build script. For example, the macros defined in the referenced build scripts can be used.
project structure This section defines the actual contents of the to-be-built RCP application. Such contents may be MPS modules (languages, solutions, devkits), Java libraries, IDEA branding and plugins.
default layout This section defines the files that are output, it creates the directory, file and JAR structure of the new RCP distribution. It references and includes the artifacts defined in the project structure section and in other build scripts this one depends on.
The wizard created two builds scripts, each of which serves a separate purpose:
Kajak- generates the modules, compiles the generated sources and packages them into an IDEA plugin (a plugin for the IntelliJ IDEA platform)
KajakDistribution- creates platform-specific distributions out of the artefacts created by Kajak
Editing the build scripts
Lets focus on the Kajak build script first.
Name of the generated build script
The default name of the ant xml file to generate from each MPS build script is build.xml. It is advisable to change the name so that you avoid clashes between multiple build scripts:


Base directory
Specifies the directory, into which the build script will be generated.
Use plugins
The build language has packaged its capabilities into plugins. The plugins used in the build script are listed in its use plugins section.
java- contains the capability to compile Java sources
mps- contains the capability to generate MPS models
module-tests- adds capability to run tests in the build script (you need to import the jetbrains.mps.build.mps.tests language)
The wizard has already pre-set java and mps for us.
Macros
We should define a couple of macros to reuse across the script. The first two represent string variables that we will use in the build, the set of folders represents the directory for MPS itself as well as the two root directories where the MPS-bundled languages are stored. These languages will become part of the RCP distribution. Note how all of these folders are relative to the base directory.
macros:
  var date = date 20150422
  var build.number = Kajak-139.SNAPSHOT
  var version.major = 2020
  var version.minor = 2
  var version.bugfixNr = <empty>
  var version.eap =  EAP
  folder mps_home = ./../../../../Applications/MPS 3.2.app/Contents
Note that you can leave a macro undefined (i.e. just specify the name) and then define it either in the MPS Path Variables section of the Project Settings dialog, or when you call ant by using a property definition:
ant -Dsome.variable=a.valueDependencies
Next, we define the dependencies. Dependencies indicate, on which other build scripts and platforms this script depends.
We need dependencies to mpsStandalone (it represents the minimal set of a standalone MPS installation) and optionally also mpsMakePlugin that enables creating build scripts in the standalone IDE, mpsDebuggerPlugin (because the robot Kaja sample requires debugger and Java execution integration) and mps ExecutionPlugin (because one the robot Kaja sample languages uses the execution framework to run an external executable). Most RCPs will likely just use mps Standalone.
dependencies:
  mpsStandalone (artifacts location $mps_home)
  mpsMakePlugin (artifacts location $mps_home/plugins)
  mpsDebuggerPlugin (artifacts location $mps_home/plugins)
  mpsExecutionPlugin (artifacts location $mps_home/plugins)
The artifacts location specifies from where the artifacts will be copied. The build scripts work by copying code from an existing MPS installation, so you don't have to check out the MPS sources. The artifacts location should hence be pointing to the MPS home directory.
Project Structure
The plugins specified in the use plugins section influence the options available here. With java , mps and module-tests plugins enabled we get the following ones:
generator options- configure the generator
idea branding - configure the visual aspect of standalone IDEs, such as icons, splash-screens, urls, images and other
idea plugin - details the information to hook the generated artefacts into the underlying IntelliJ IDEA platform
Java library - groups jars and classes so they could be referred to as a unit
Java module - groups Java sources so they could be referred to as a unit
Java options - configures the java compiler process
mps group - groups MPS modules (solutions, languages, devkits) so that they could be referred to as a unit
solution - represents a solution
language - represents a language
devkit - represents a devkit
In the project structure we start with the branding. The idea branding section supports the definition of all kinds of icons, splash screens and the like. It is a good idea to take those from the MPS distribution and modify the pictures to suit your needs, while retaining the sizes and transparency values. Notice that the Version property holds a structured value. You can also specify a help file and an update website.
idea branding Kajak
  codename Kajak
  company <no company>
  Version
    ${version.major}.${version.minor} ${version.bugfixNr} ${version.eap}
    codename (optional) <empty>
  full name Kajak
  build number ${build.number}, date ${date}
  icons
    16x16 ./icons/MPS16.png
    32x32 ./icons/MPS32.png
    32x32 opaque ./icons/MPS32.png
    128x128 <no icon128>
  splash screen ./icons/splash.png textcolor 002387
  about screen ./icons/about.png
  dialog image ./icons/dialogImage.png
  welcome screen
    caption ./icons/caption.png
    slogan ./icons/slogan.png
    logo ./icons/logo.png
  <no updateWebsite>
  plugins <no plugins>
  whats new <no whatsnew>
  <no stats>
  <no help>
  feedback url <no feedbackUrl>
In the sample we have copied the MPS icons into the ./icons folder and changed them accordingly without changing the names — this is why most of them start with mps.
Next we define an idea plugin that contains the languages and solutions to bundle. An idea plugin is a plugin to the IDEA platform on which MPS is built.
idea plugin Kajak
  name Kajak
  short (folder) name Kajak
  description <no description>
  version 1.0
  << no vendor >>
  content:
    Kajak
  dependencies:
    jetbrains.mps.core
  << ... >>
You can define a name and a version, dependencies to other plugins as well as the actual contents. Whenever your RCP contains languages, you will need jetbrains.mps.core because it provides things like BaseConcept or the INamedConcept interface. The Kajak entry in the contents is a reference to an mps group defined below. An mps group is a group of MPS artifacts. Since we have included the mps plugin (at the very top of the build script) we can use MPS-specific language constructs. mps groups are an example.
Let us look at the Kajak group. It references a set of languages and solutions. A language reference points to a language defined in an MPS project. A language reference in a group consists of the name (which must be the same as the name of the actual language) and a pointer to the respective mpl file. The simplest way to enter it is to start with the path to the mpl file and then use the load required information from file intention (Alt+Enter) to adjust the name of the reference.
mps group Kajak
  solution jetbrains.mps.samples.JavaKaja
    load from ./solutions/JavaKajak/JavaKajak.msd

  language jetbrains.mps.samples.KajaAndOr
    load from ./languages/KajaAndOr/KajaAndOr.mpl

  language jetbrains.mps.samples.Kaja
    load from ./languages/Kajak/Kajak.mpl

  language jetbrains.mps.samples.KajaSceneConstruction
    load from ./languages/KajaSceneConstruction/KajaSceneConstruction.mpl
Note that a group has to contain the transitive closure of all languages. For example, if you have references a language A which references another language B, then B must also be included in the group. This makes sense, because otherwise the resulting RCP application would not run because dependencies could not be resolved. If a language is missing, then an error will be reported in the build script (red squiggly line). After adding the required languages you may have to rerun the load required information from file intention (Alt+Enter) on the language with the error to make it "notice" that something has changed.
In addition to languages, you can also reference solutions with the solution construct and devkits with the devkit construct.
tip
The Inspector tool window contains further details on the dependencies of the selected language, solution or devkit.
Default Layout
The layout constructs the directory and file structure of the RCP distribution. It copies in files from various sources, and in particular from the project structure discussed in the previous section. It also compiles, builds and packages these files if necessary. It can also refer to artifacts defined in other build scripts, on which this script depends. We start out with the following code:
default layout:
  import mpsStandalone::languages
  import mpsStandalone::license
Those two imported are folder elements in the referenced mpsStandalone build script. By importing them, the contents of these folders are imported (i.e. copied into) our RCP distribution.
The wizard has added code to create a bin folder and copy common configuration and properties files into it. You may further customise it or leave it untouched.
folder bin
  import files from mpsStandalone::bin
    include log.xml
    include log4j.dtd
  file $mps_home/bin/idea.properties
    replace regex "\.MPS(\w+)" /g -> \.${build.number}
Next up, we create a new folder lib into which we import all the stuff from from mpsStandalone::lib except the MPS sources and the existing branding.jar (which contains the default MPS splash screen etc.). We then create a new jar file branding.jar (it has to have this name to work; the IDEA platform expects it this way) into which we put all the files defined in the branding section of the project structure defined above.
folder lib
  import files from buildStandalone::lib
    exclude MPS-src.zip
    exclude branding.jar
  jar branding.jar
    files of idea branding Kajak
We then create a folder plugins. The mps-core plugin is required in any RCP app, so it needs to be imported in any case. We then import various version control plugins (CVS, SVN anf git) defined in the mpsStandalone build script. For obvious reasons, a standalone Kaja IDE needs version control support, so it makes sense to import those plugins. Finally, we include the debugger plugin, since Kaja also integrates with the MPS debugger.
folder plugins
  import mpsStandalone::plugins/svn4idea
  import mpsStandalone::plugins/cvsIntegration
  import mpsStandalone::plugins/git4idea
  import mpsStandalone::plugins/mps-core
  import mpsDebuggerPlugin::plugins/mps-debugger-api
We then integrate the Kajak plugin defined in the project structure earlier. Using the plugin construct we can import the complete definition of the plugin defined earlier.
plugin Kajak
  <empty>
Inside the plugin we define further subdirectories that contain various library jars. These jar files are automatically made visible to the plugin classpath. Using the file construct we copy various files into the plugin directory, using the macros defined earlier.
plugin Kajak
  folder libs
    file ./solutions/JavaKajak/images/kaja_images.jar
...
Note how this plugin does not just contain the jars we copied in, but also all the language artifacts necessary. That has been accomplished by defining these mps groups and referencing them from the plugin. The fact that we can use these mps groups is thanks to the mps build language plugin. It provides direct support for MPS artifacts, and all the necessary files and metadata are handled automatically.
We may also import mps-make:
# optional plugins
import mpsMakePlugin::mps-make
Property Files
Finally we create a property file called build.number that contains a bunch of meta data used in the running RCP application. It is required by the underlying IntelliJ platform.
properties file build.number
  build.number = ${build.number}
  date = ${date}
  version = 1.0
Creating the Platform-Specific Distributions
At this point, the generated directory structure consitutes the platform indepenent core of a stripped down MPS distribution that contains all the artifacts you've configured into it, including your custom branding. However, you cannot run it, since the platform specific aspects are still missing.
It is the time to look at the second generated build script - KajakDistribution.
build KajakDistribution generates buildDistribution.xml

base directory: ../../

use plugins:
  << ... >>

macros:
  folder mps_home = ./../../work/MPS 3.2
  var version = 1.0

dependencies:
  Kajak

project structure:
  << ... >>

default layout:
  tar ${build.number}-linux.tar.gz (compression gzip)
    folder Kajak ${version}
      import files from Kajak::/
        <any>
      folder bin
        file $mps_home/bin/linux/fsnotifier (755)
        file $mps_home/bin/linux/fsnotifier64 (755)
        file $mps_home/bin/mps.vmoptions (644)
          fix eol: convert to a single LF, remove eof (Ctrl-Z): true
        file $mps_home/bin/mps64.vmoptions (644)
          fix eol: convert to a single LF, remove eof (Ctrl-Z): true
        files from $mps_home/bin/linux
          exclude **/fsnotifier
          exclude **/fsnotifier64

      file $mps_home/mps.sh (755)
        fix eol: convert to a single LF, remove eof (Ctrl-Z): true

  zip ${build.number}.zip
...
The build script depends on Kajak so that it could properly package the platform-neutral artefacts into platform-specific distributions. The mps_home macro points to a generic MPS installation, since the distributions targeting a single platform (MacOS, Linux or Windows) would miss artefacts needed by the other platforms. The generic distribution is also available for download from the MPS website.
Creating a Windows distribution
There is no windows-specific distribution generated by the builds scripts. To run the generated standalone IDE on windows, you need to use the generated generic zip file, copy the contents of the win directory into the bin directory and use the mps.bat file to start the IDE.

Tips & Tricks
All standalone IDEs built on top of MPS can offer their users a Tips & Tricks dialog with useful hints that help the users familiarize with the tool.
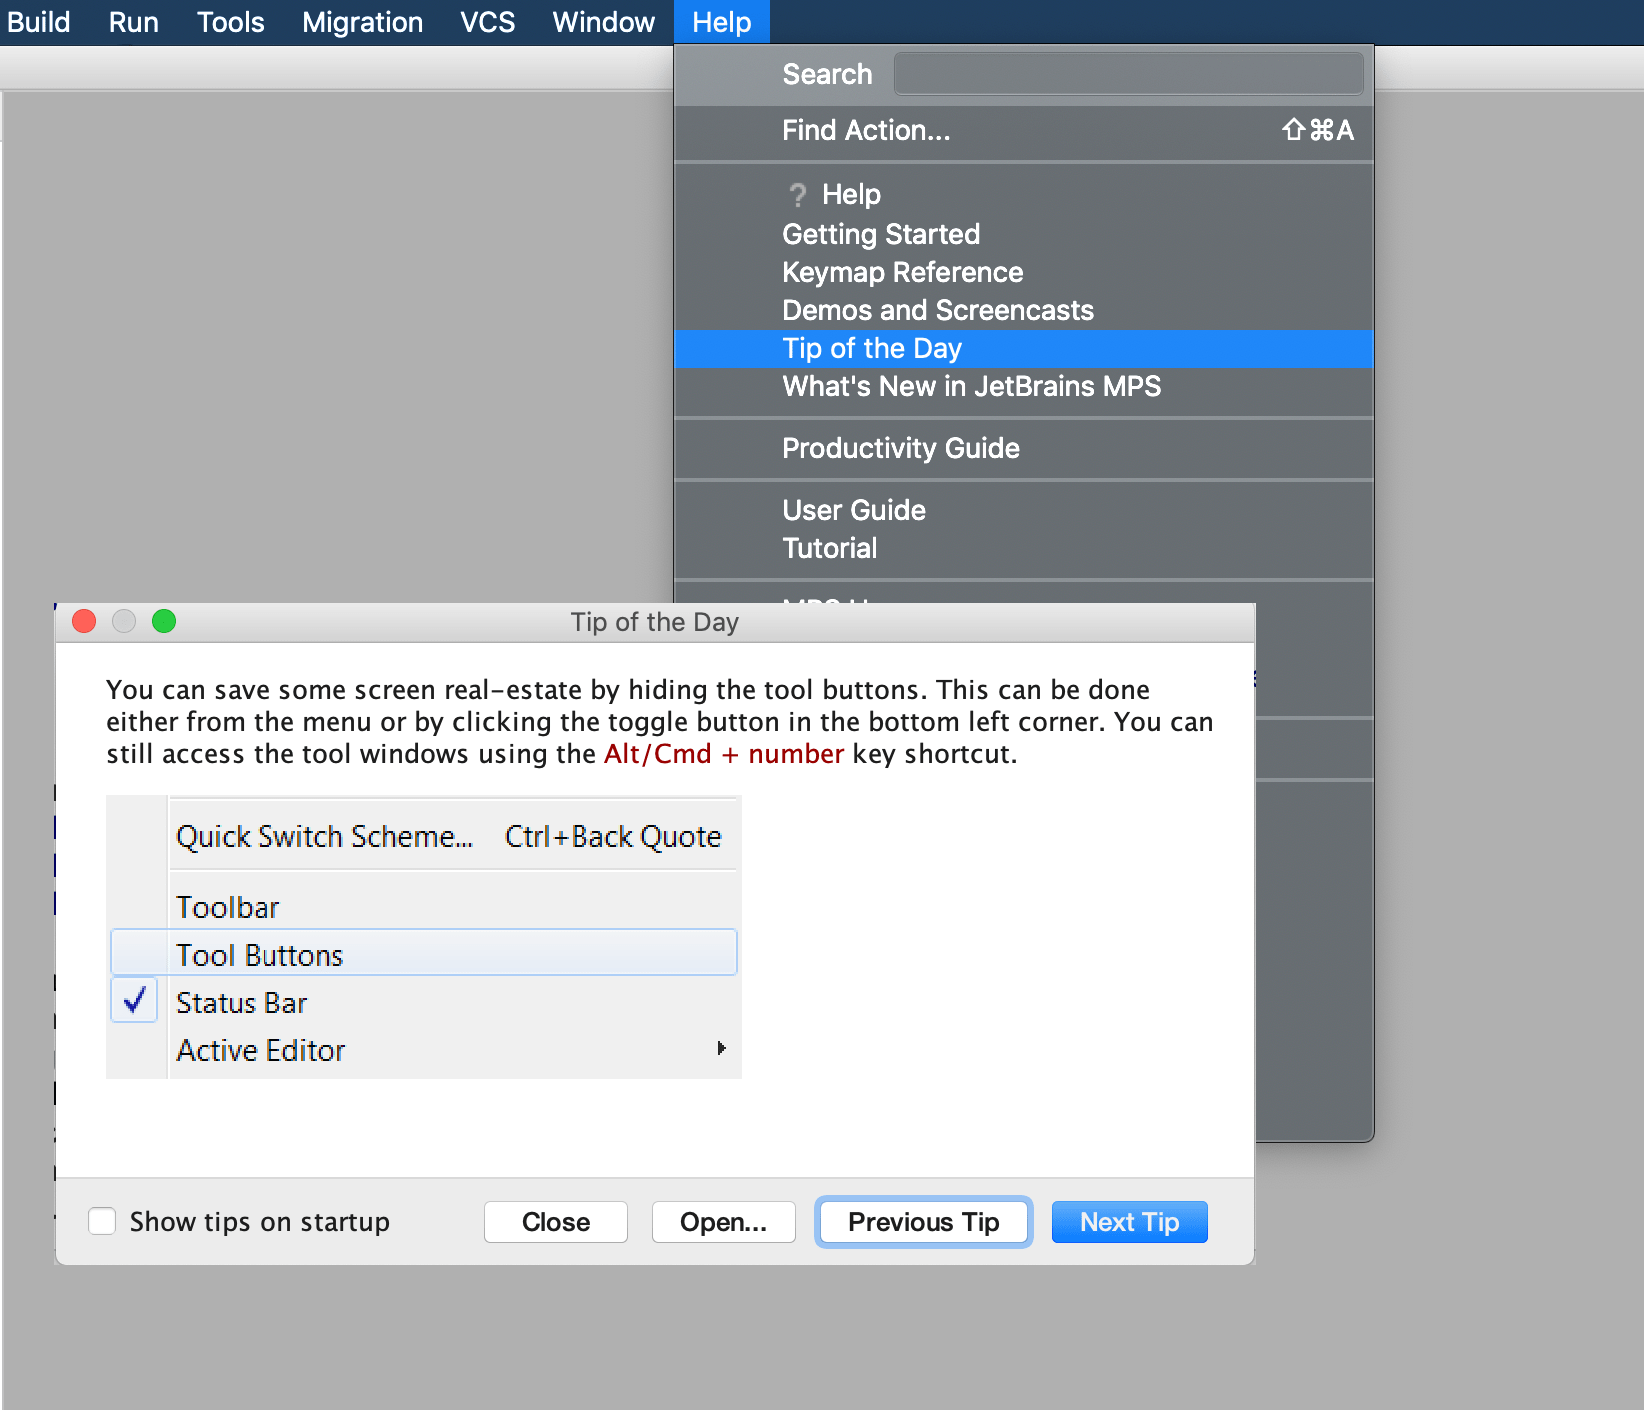
The content of the Tips & Tricks for MPS can be customized. This can be done with the new build script tips & tricks concept:

Tips can be either reused from the MPS general distribution, imported from a directory or from a solution:

The first option just adds all the MPS tips to the distribution. This is the default option for build scripts generated with the build script wizard.
The second one requires a manually created folder with the correct structure of tips. The desired structure can be obtained from the mps-tips.jar file itself. You need a folder that contains all the html files plus the css and image folders.
The last option allows tips to be defined using the jetbrains.mps.build.tips and jetbrains.mps.core.xml languages in MPS itself.
Finally, the tips must be packaged into the build script layout to the lib folder. In the build script generated with the wizard MPS tips & tricks are packaged to lib folder by default:

The Tips & Tricks language
To import tips & tricks from a solution, create a solution with a model and add languages jetbrains.mps.build.tips and jetbrains.mps.core.xml to the model used languages. Then you can create an instance of the MPSTipsAndTricks concept, where multiple tips can be created. Each tip is an HTML formatted text. One image can be added to each tip:
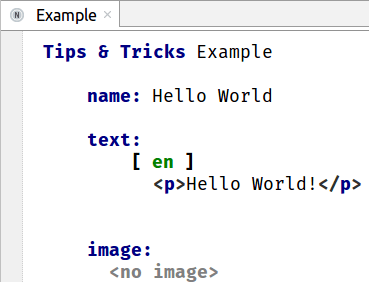
Importing from a solution to a build script tips & tricks is done by pointing to the solution and the generated xml from the MPSTipsAndTricks concept:

The final Robot Kaja IDE build scripts
Kajak
build Kajak generates myBuild.xml

base directory: ../../

use plugins:
  java
  mps

macros:
  var date = date 20150422
  var build.number = Kajak-139.SNAPSHOT
  folder mps_home = ./../../../../Applications/MPS 3.2.app/Contents

dependencies:
  mpsStandalone (artifacts location $mps_home)
  mpsMakePlugin (artifacts location $mps_home/plugins)

project structure:
  idea branding Kajak
    codename Kajak
    company <no company>
    version 1.0, eap false
    full name Kajak
    build number ${build.number}, date ${date}
    icons
      16x16 ./icons/MPS16.png
      32x32 ./icons/MPS32.png
      32x32 opaque ./icons/MPS32.png
      128x128 <no icon128>
    splash screen ./icons/splash.png textcolor 002387
    about screen ./icons/about.png
    dialog image ./icons/dialogImage.png
    welcome screen
      caption ./icons/caption.png
      slogan ./icons/slogan.png
      logo ./icons/logo.png
    <no updateWebsite>
    plugins <no plugins>
    whats new <no whatsnew>
    <no stats>
    <no help>
    feedback url <no feedbackUrl>

  idea plugin Kajak
    name Kajak
    short (folder) name Kajak
    description <no description>
    version 1.0
    << no vendor >>
    content:
      Kajak
    dependencies:
      jetbrains.mps.core
    << ... >>

  mps group Kajak
    solution jetbrains.mps.samples.JavaKaja
      load from ./solutions/JavaKajak/JavaKajak.msd

    language jetbrains.mps.samples.KajaAndOr
      load from ./languages/KajaAndOr/KajaAndOr.mpl

    language jetbrains.mps.samples.Kaja
      load from ./languages/Kajak/Kajak.mpl

    language jetbrains.mps.samples.KajaSceneConstruction
      load from ./languages/KajaSceneConstruction/KajaSceneConstruction.mpl


default layout:
  import mpsStandalone::languages
  import mpsStandalone::license
  folder bin
    import files from mpsStandalone::bin
      include log.xml
      include log4j.dtd
    file $mps_home/bin/idea.properties
      replace regex "\.MPS(\w+)" /g -> \.${build.number}

  folder lib
    import files from mpsStandalone::lib
      exclude MPS-src.zip
      exclude branding.jar
    jar branding.jar
      files of idea branding Kajak

  folder plugins
    import mpsStandalone::plugins/svn4idea
    import mpsStandalone::plugins/cvsIntegration
    import mpsStandalone::plugins/git4idea
    import mpsStandalone::plugins/mps-core
    plugin Kajak
      folder libs
        file ./solutions/JavaKajak/images/kaja_images.jar

    # optional plugins
    import mpsMakePlugin::mps-make

  properties file build.number
    build.number = ${build.number}
    date = ${date}
    version = 1.0


<<additional aspects>>
KajakDistribution
build KajakDistribution generates buildDistribution.xml

base directory: ../../

use plugins:
  << ... >>

macros:
  folder mps_home = ./../../work/MPS 3.2
  var version = 1.0

dependencies:
  Kajak

project structure:
  << ... >>

default layout:
  tar ${build.number}-linux.tar.gz (compression gzip)
    folder Kajak ${version}
      import files from Kajak::/
        <any>
      folder bin
        file $mps_home/bin/linux/fsnotifier (755)
        file $mps_home/bin/linux/fsnotifier64 (755)
        file $mps_home/bin/mps.vmoptions (644)
          fix eol: convert to a single LF, remove eof (Ctrl-Z): true
        file $mps_home/bin/mps64.vmoptions (644)
          fix eol: convert to a single LF, remove eof (Ctrl-Z): true
        files from $mps_home/bin/linux
          exclude **/fsnotifier
          exclude **/fsnotifier64

      file $mps_home/mps.sh (755)
        fix eol: convert to a single LF, remove eof (Ctrl-Z): true

  zip ${build.number}.zip
    folder Kajak ${version}
      import files from Kajak::/
        <any>
      folder bin
        file $mps_home/bin/mps.vmoptions (644)
        file $mps_home/bin/mps64.vmoptions (644)
        file $mps_home/bin/mps.exe.vmoptions (644)
        file $mps_home/bin/mps64.exe.vmoptions (644)
        folder win
          files from $mps_home/bin/win
            exclude **/*.exe
          filemode folders: <default (755)>, files: 755
            files from $mps_home/bin/win
              include **/*.exe

        folder linux
          files from $mps_home/bin/linux
            exclude **/fsnotifier
            exclude **/fsnotifier64
          file $mps_home/bin/linux/fsnotifier (755)
          file $mps_home/bin/linux/fsnotifier64 (755)

        folder nix
          filemode folders: <default (755)>, files: 755
            files from $mps_home/bin/nix

        folder mac
          file $mps_home/bin/mac/libbreakgen.jnilib (644)
          file $mps_home/bin/mac/libbreakgen64.jnilib (644)
          file $mps_home/bin/mac/restarter (755)
          file $mps_home/bin/mac/fsnotifier (755)
          folder Contents
            folder Resources
              file $mps_home/bin/mac/Contents/Resources/mps.icns (644)

            folder MacOS
              file $mps_home/bin/mac/Contents/MacOS/mps (755)

            file $mps_home/bin/mac/Contents/Info.plist (644)

      file $mps_home/mps.sh (755)
      file $mps_home/mps.bat (755)

  zip ${build.number}-macos.zip
    folder Kajak ${version}.app
      folder Contents
        import files from Kajak::/
          <any>
        folder Resources
          file $mps_home/bin/mac/Contents/Resources/mps.icns (644)

        folder MacOS
          file $mps_home/bin/mac/Contents/MacOS/mps (755)

        file $mps_home/bin/mac/Contents/Info.plist (644)
        folder bin
          file $mps_home/bin/mac/libbreakgen.jnilib (644)
          file $mps_home/bin/mac/libbreakgen64.jnilib (644)
          file $mps_home/bin/mac/restarter (755)
          file $mps_home/bin/mac/fsnotifier (755)
          file $mps_home/bin/mps.vmoptions (644)
            fix eol: convert to a single LF, remove eof (Ctrl-Z): true
          file $mps_home/bin/mps64.vmoptions (644)
            fix eol: convert to a single LF, remove eof (Ctrl-Z): true

        file $mps_home/mps.sh (755)
          fix eol: convert to a single LF, remove eof (Ctrl-Z): true

<<additional aspects>>
Generating and running the Build Scripts
Assuming your build scripts are free of errors, you can generate them (Rebuild Model or Ctrl-F9 ). This creates two ant files that have the names set as defined at the top of each of the build scripts:
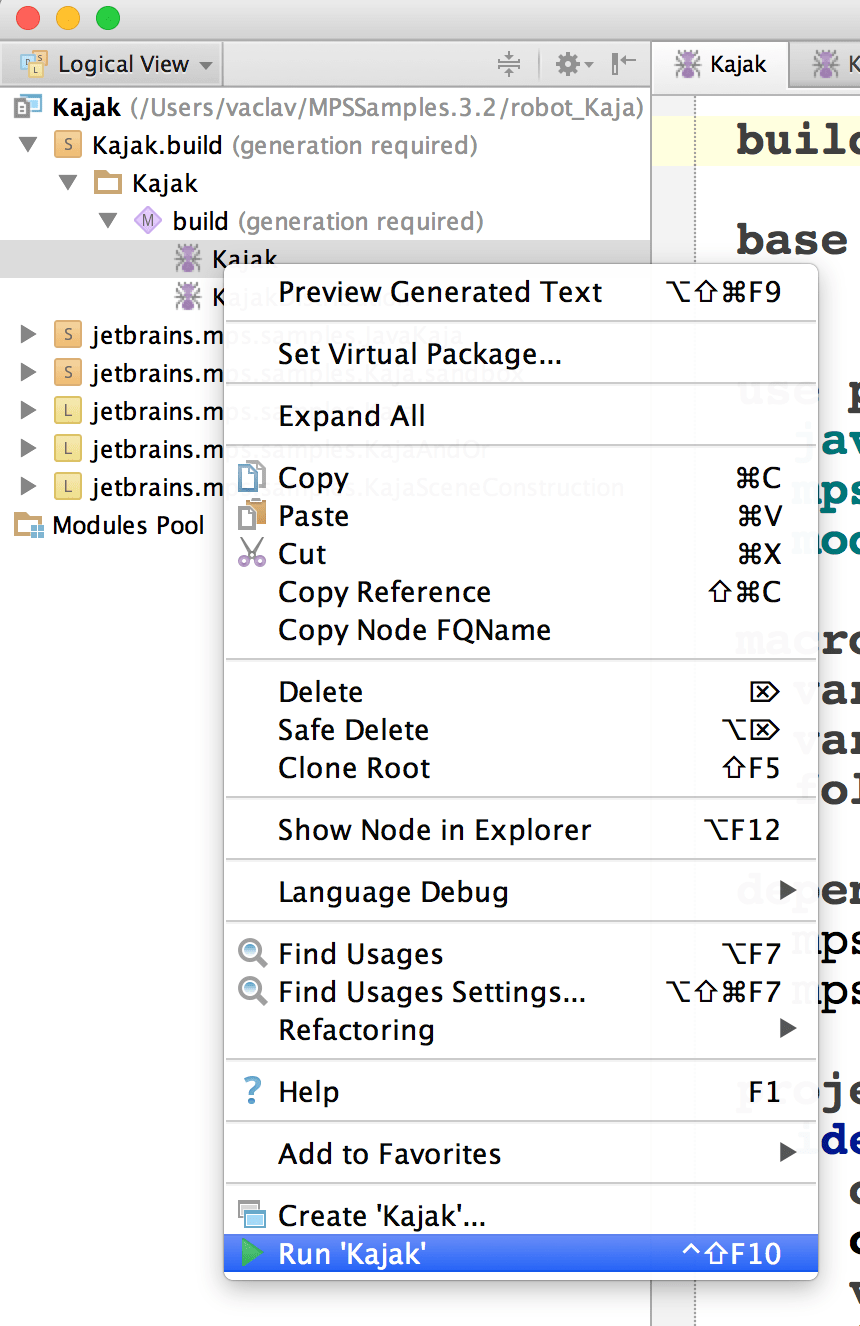
build Kajak generates myBuild.xmlThis myBuild.xml (in this case) resides directly in your project directory. You can either run the file from the command line (using ant -buildfile myBuild.xml) or directly from within MPS (via the context menu on the build script in the project explorer).
tip
Note that the build script compiles and packages all your languages, but it does not regenerate them! So you have to make sure by other means that your language definitions are fully generated and up to date.
Inspecting the Generated Directory Structure
Run both build scripts. The figure below shows the project structure after running the build scripts. In particular, inside the build/artifacts directory, the structure defined in the default layout section of the build script has been created.


We suggest that you browse through the directory and file structure to connect what you see to the definitions in the build script.