Rearrange members with file and type layout patterns
ReSharper can reorder types and type members in C# files according to different patterns. Patterns can describe a lot of conditions and constraints that are evaluated when reordering items in a file and/or wrapping them with specified regions.
Introduction to layout patterns
You can configure multiple layout patterns to be applied in different contexts (for example, you can have different patterns for classes and interfaces). There are two types of patterns:
File pattern. Applies to all C# files. Can arrange namespaces, types, and delegates; wrap them in regions or organize into groups, remove regions. The contents of the types can be further arranged with type patterns. Note that only one file pattern can be applied at a time.
Type pattern. Only applies to types that match pattern's constraints, if any. Can arrange file members, wrap them into regions or organize in groups, remove regions, sort, and so on.
Within the patterns, you can specify matcher entries and snippets in the desired order, as well as regions/groups into which the matching items are wrapped/grouped.
The algorithm of applying the current pattern set works as follows:
If a file pattern exists, ReSharper checks whether regions in the file should be removed, then it checks whether each of the matcher entries or snippets in the pattern matches any code item in the file.
If there are matching entries, their position in the file is changed according to the position of the corresponding matcher item in the file pattern.
If the same code item matches several matcher entries, then the matcher with higher priority or stronger constraints is applied. That is, if there is pattern A that matches public types and pattern B that matches public static types, then all public static types will be matched by the pattern B. To change this, you can raise the priority of the pattern A.
If there are matcher entries with the same set of constraints, the matching items are moved according to the position of the first of such matcher entries.
If regions or groups are specified, the matched items are grouped or wrapped with the regions accordingly.
A group or a region allows you to specify priority for it. For example, if a group/region has higher priority than other matchers outside it, then ReSharper first processes matchers inside the group/region, and then the rest of the matchers. The only difference between group an region is that the region wraps matched items into
#region/#endregion.Everything that is not matched is moved after the matched items. If you need to put the unmatched items elsewhere, you can create a matcher without constraints and set the desired position for it in the pattern.
After that, type patterns are applied, if any. ReSharper checks whether each of the type patterns matches any type in the file. If there are several matching patterns for a type, the conflicts are resolved similarly to steps 3 and 4.
When the type match is established, ReSharper checks whether regions in the type should be removed; then it checks whether each of the matcher entries in the pattern matches any member in the file.
If there are matching members, their position in the type is changed according to the position of the corresponding matcher item in the type pattern.
Regions, groups and unmatched members are dealt with similarly to steps 5 and 6.
File and type layout preferences
Out of the box, ReSharper provides several targeted type patterns (for example, for NUnit test fixtures), and the default pattern for the rest of C# types.
The default member layout rules are based on the numerous best practices and can be recommended in most cases. However, if your personal preferences or company standards differ from ReSharper defaults, you can configure code reordering patterns based on the default ones as well as create new patterns for specific cases.
All modifications to the layout patterns are done in the page of ReSharper options (Alt+R, O). After the editing is done, click Save in the Options dialog to apply the modifications and let ReSharper choose where to save them, or save the modifications to a specific settings layer using the Save To list. For more information, see manage and share resharper settings.
Configure file and type layout rules visually
ReSharper allows you to configure all parameters of layout rules using a dedicated visual editor. Items in the editor page can be displayed in one of the following views:
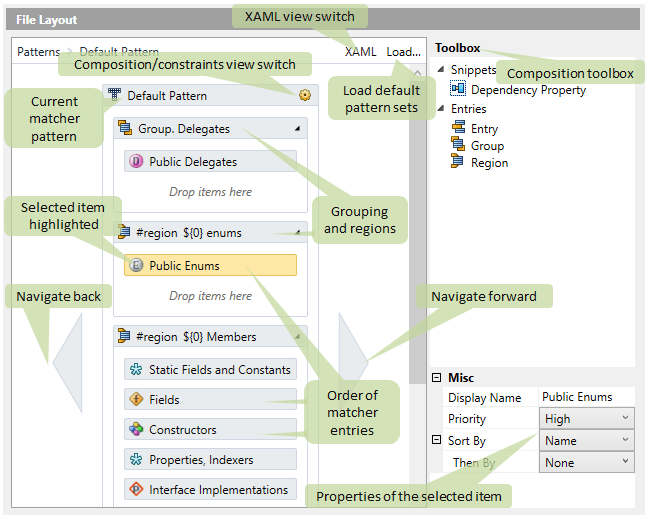
Patterns. This is a root view that displays all available patterns in the current patterns set. You can open this view by clicking Patterns in the top left corner of the page. From this view, you can navigate to any pattern by double-clicking it. To add a new pattern to the set, drag-n-drop a file or type pattern item from the toolbox on the right. You can also use drag-n-drop to reorder patterns. The order of type patterns defines which pattern is applied if several patterns match the same type with equal priority and constraints.
Composition. This view visualizes the order and grouping of the matcher entries, regions, and groups inside a pattern, a region or a group. In the illustration below, you can see a composition view of a type pattern:
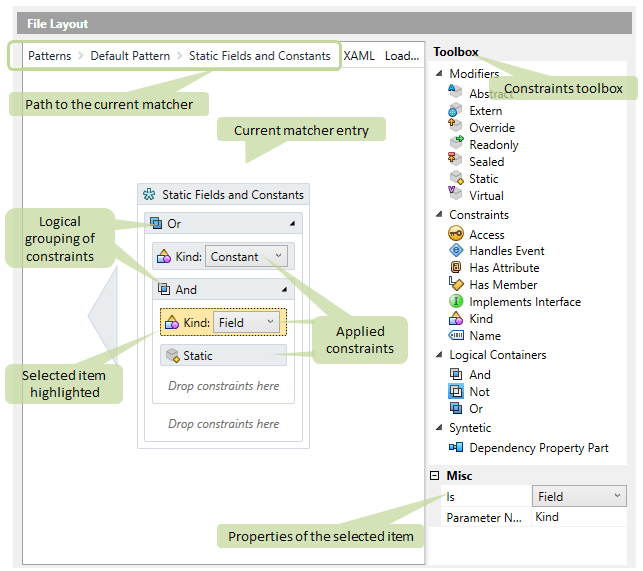
Constraints. This view visualises constraints of a pattern or a matcher entry, for example what kind of code items with which modifiers or attributes should or should not be matched by it, and so on. Patterns and matchers will only apply to items matching all their constraints. All constraints are grouped by logical containers that identify relations between these constraints. In the illustration below, you can see a constraints view of a matcher entry:
Edit an existing layout pattern
Select from the main menu or press Alt+R O, then choose on the left.
Click Patterns on the upper left corner of the page to see all patterns in the current set. In the properties of this element, you can use the Static Field Reordering Policy selector to define whether and how to reorder static fields with initializers. The options are:
Strict — static fields are not reordered if there is a chance it might affect program behavior. For example, if there is a static field with initializer that has a reference to a static member of the same class, all static fields of the class are not reordered.
Relaxed — reordering of static fields that have explicit usage of other static fields in their initializers as well as the static fields they are referencing is prohibited.
Unrestricted — reordering is always allowed (not recommended).
The selected behavior will be applied to all patterns.
For non-reordered static fields with initializers, ReSharper preserves their relative order while still reordering them together with other declarations.
Optionally, to load one of the default pattern sets, click Load in the upper right corner of the page, and then choose the pattern set.
Double-click the desired pattern, and switch it to the composition view if it is in the constraints view (click the icon to the right of the pattern header to switch views). Note that file patterns are always displayed in the composition view, that is, you cannot specify any constraints for them.
In the composition view, you can modify the pattern in the following ways:
To change the order of the items, drag them inside the pattern.
To remove a specific item, select it, and press Delete. Note that if you are deleting a region or group, all items inside it will also be deleted. Therefore, you may want to drag the items from the region/group before deleting it.
To add a new item, drag it into the desired place in the pattern from the Toolbox area. Drag a Region or Group to use it as a grouping item, or drag an Entry to match something in the target code.
You can also use the Dependency property matcher to match and arrange all parts of WPF dependency properties, and the Property with Backing Field matcher to arrange the backing fields of properties directly before or after declarations of the corresponding properties.
To configure the properties of the pattern or an item inside it, select it and modify its properties in the right bottom part:
- Display Name
This property, available for a pattern and for a matcher entry is only used for your convenience and should describe what is matched by it.
- Name
This property of a region specifies how to name the region when it is created.
You can use the
${0}parameter in the name to insert the sequence number of the region if the region is spawned according to the Group By option.You can also use named parameters to insert the grouping option in the region name. For example, you can use the
${Access}parameter, which will be replaced withprivate,publicand so on in the names of the corresponding regions. Obviously, this parameter makes sense if you use the same value for the Group By property of the region. Valid values for this parameter are the same as the values of the Group By property without spaces. That is, to insert the name of the implementing interface in the region name, use the${ImplementsInterface}parameter.You can also generate region names by a partial match in item names.
- Remove Regions
This property of file and type patterns specifies what to do with existing regions in the matched code. The Except generated value can be used to only remove regions created previously by applying this feature with default patterns.
- Priority
This property sets the relative priority of the matcher entry. That is, if some piece of code is matched by several matcher entries, it is moved according to the position of the entry with the highest priority.
- Sort By
This property of an entry specifies sorting preferences in case of multiple matching code items. As soon as you select a sorting preference other than None, a Then By clause appears that allows further refinement of the sort order.
- Group By
This property of a region or a group specifies whether to spawn regions/groups according to the specified grouping. For example, if Kind is selected as a value, several regions/groups would be created for fields, properties, and other kind of members, if any. As soon as you select a grouping preference other than None, a Then By clause appears that allows further separation of matched code items.
To configure constraints that define how a specific type pattern or a matcher entry matches code items, we switch to the constraints view. To open this view for a type pattern, click the corresponding icon on its header; to open this view for a matcher entry, double-click it.
In the constraints view, the selected item is represented as a container of conditions. To configure these conditions, drag items from the Toolbox area into the edited pattern or entry:
The items in the Logical Containers should be added first as they define how to apply multiple conditions. Names of these containers explain rather clearly how the conditions are related inside these containers. If you add constraints without logical containers, they will be grouped by the And container.
The items in the Constraints group allow you to define what the matching item should or should not be (if wrapped in the Not container).
Note that you can use regexp expressions in the value of the Name constraint, for example,
MyTest.*will match items with namesMyTest_One,MyTest_Two,MyTest_Three, and so on.Drag items from this group into logical containers and configure their properties in the bottom right part.
Drag the items from the Modifiers group to specify which modifiers the target item should or should not have.
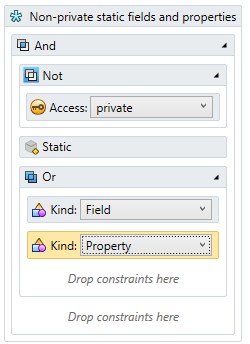
For example, an entry that matches non-private static fields and properties would look like this:
Configure file and type layout by editing the source XAML
If necessary, you can edit the source XAML that describes the set of file and type patterns. To do so, click XAML at the top of the File Layout page. This view can also be helpful if you want to copy and paste the pattern set.
We recommend that you load one of the default patterns and check the tags used in this format. They are rather self-explanatory, for example, the Entry tag defines a matcher entry and the Entry.Match specifies what code items should be matched. the Entry.SortBy tag specifies how the matched items should be sorted, and so on. Consider the example below:
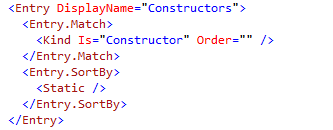
This XAML code matches constructors and sorts them in such way that first go static constructors.
Scenario: group items in regions by partial name match
Consider a class where all methods start with test, and then some of them have one common substring, others — another one, and so on:
You can use type layout to wrap each set of methods in a region and use the common substrings as region names.
To do so, specify ${Name} in the region name field and add the Name constraint to the entry with the following RegEx value: test\w+?_.*.
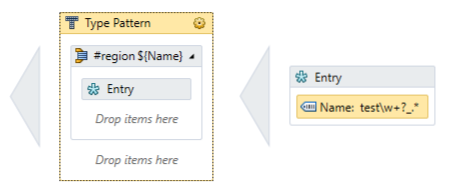
Or alternatively, add the following pattern in the XAML view:
After applying the layout to the class, the methods will be sorted and wrapped in the corresponding regions:
Reorder file and type members
To apply your file and type layout settings in the desired scope, use either run code cleanup with the Built-in: Full Cleanup profile or create and run a custom profile solely targeted at your specific task as described below.
Apply file and type layout with custom Code Cleanup profile
Select from the main menu or press Alt+R O.
Go to the cleanup profiles settings page: .
Create a new profile as described in the Create a new custom cleanup profile section. In the Selected profile settings section for the new profile, tick the Apply file layout checkbox. Optionally, you can enable other code cleanup tasks in this profile.
Click Save in the Options dialog to apply the modifications and let ReSharper choose where to save them, or save the modifications to a specific settings layer using the Save To list. For more information, see manage and share resharper settings.
Select the scope where you want to apply file layout:
Set the caret anywhere in the file to apply file layout to the file.
Select one or more items in the Solution Explorer to apply file layout in the files under these nodes and their child items.
Do one of the following:
Press Control+Alt+F or choose from the main menu .
Right-click anywhere in the text editor or right-click the selection and choose Cleanup Code in the context menu.
In the Code Cleanup dialog that opens, select the newly created profile .
Click Run. ReSharper will apply file layout in the selected scope.
If you want to apply file layout without opening the Code Cleanup dialog to choose a profile, you can bind the created profile to the silent cleanup and run it by pressing Control+Shift+Alt+F. You can also create a custom cleanup profile that would combine applying file layout with other code style tasks.
This feature is supported in the following languages and technologies: