Navigate current context
Last modified: 26 October 2022JetBrains Rider provides a number of features that help you navigate your code based on the current context, that is according to the opened document and your caret position inside it.
Move caret in the current document
Command | How to invoke | Use it to |
|---|---|---|
Move Caret to Previous Word Move Caret to Next Word | Ctrl+Left Ctrl+Right | Move the caret to the beginning/end of the current word, and then further word by word in the same direction. If Use CamelHumps is selected on the Editor | General | Typing Assistance page of the IDE settings Ctrl+Alt+S, the caret will move to the next/previous capitalized word inside identifiers with CamelCase names. Note that by default, on Ctrl+Right the caret jumps to the end of the current word. This behavior is configurable in the Caret Movement section on the Editor | General settings page. |
Move Caret to Line Start Move Caret to Line End | Home End | Move the caret to the first/last character on the current line. |
Go to Containing Declaration | Alt+Shift+[ | Move the caret to the declaration of a type or a function from any position within its body. |
Move Caret to Matching Brace | Ctrl+Shift+M | When the caret is right before or after a brace, a bracket, or HTML/XML tag, jump to the item that matches it. |
Move Caret to Code Block Start Move Caret to Code Block End | Ctrl+[ Ctrl+] | Move the caret to the opening/closing brace of the enclosing code block. |
Next Method Previous Method | Alt+Down Alt+Up | Move the caret to the declaration of the next/previous member in the current type. |
Move Caret to Page Top Move Caret to Page Bottom | Ctrl+Page Up Ctrl+Page Down | Move the caret to the top/bottom line of the currently visible editor area, without scrolling. |
Page Up Page Down | Page Up Page Down | Move the caret up/down to the current height of the editor area and scroll the document accordingly, and then further with the same step in the same direction. |
Move Caret to Text Start Move Caret to Text End | Ctrl+Home Ctrl+End | Move the caret to first/last character in the current document. |
Navigate file by its structure
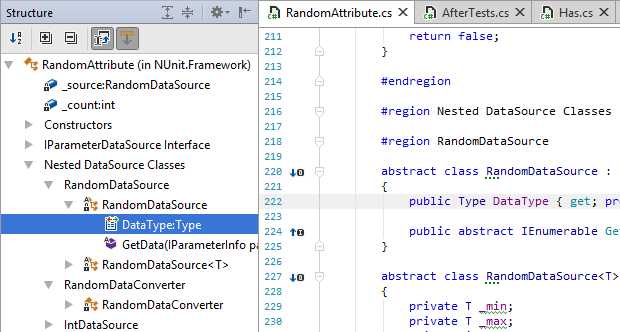
With JetBrains Rider, you can navigate the structure of the current document using the Structure window, which greatly simplifies navigation in large files. The window is synchronized with the editor: as you switch to another editor tab, the window displays the structure of the corresponding file. To navigate through the file easily, preprocessor directives are hidden by default.
Press Alt+7 or choose View | Tools Windows | Structure.
Contents of the current document appear in a tree structure, that you can explore and navigate through the document. You can double-click any symbol to make the caret in the editor switch to the corresponding position.
If some parts of the code are surrounded by
#regionblocks, the regions appear in the file structure too.To synchronize the way you change caret position in the editor with the symbol highlighted in the File Structure window, click Always Select Opened Element
 on the toolbar.
To synchronize symbols that you select in the File Structure window with the caret position in the editor, click Navigate with Single Click
 on the toolbar.
Right from the Structure window, you can access even more actions. To check available commands, you can right-click any symbol.
To open a specific type or member in the editor, double-click it or press Enter or F4.
Find usages of symbols Alt+F7
Generate type members Alt+Insert
Perform refactorings ( Ctrl+Alt+Shift+T)
If the opened file contains unit tests, these are marked with corresponding icons displaying the status of their last execution. You can also run and debug unit tests right from inside the Structure window.
tip
To search items in the Structure window, just start typing a name or a CamelHumps abbreviation.

tip
To list file members using a popup instead of a tool window, press Ctrl+F12
Use editor breadcrumbs
Editor breadcrumbs help you quickly understand where your caret is with regard to the structure of the current document as well as navigate that structure. With editor breadcrumbs enabled, you will always see the path from the root code element to the current caret position right in the editor.

The first element in a C#/VB.NET file includes the project name where the file is included and the framework that is used for the design time inspection in the project. If the project targets multiple frameworks, you can click the first element and change the framework; if the file is included in several projects, you can click and change the project in whose context the file is analyzed.
To jump to a parent element in the source code, click the breadcrumb with its name. If you click the namespace element in a C#/VB.NET file, you will be able to navigate to all the files where this namespace is used.
By default breadcrumbs are shown at the bottom of the editor. To display them at the top or hide them altogether, right-click the breadcrumb bar and choose Breadcrumbs | Top or Breadcrumbs | Don't show.
You can also do that as well as configure in which languages and with which colors editor breadcrumbs should be displayed on the Editor | General | Breadcrumbs page of the IDE settings Ctrl+Alt+S.
View code outside of the editor frame
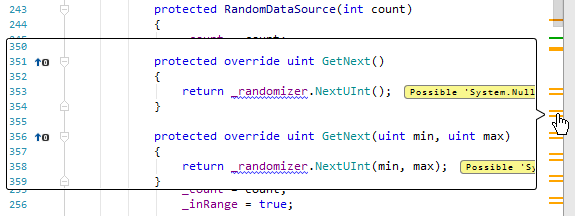
You can hover the mouse over the scrollbar to view source code above or below the currently visible area:

You can disable this behavior by clearing the Show code lens on scrollbar hover checkbox on the Editor | General | Appearance page of JetBrains Rider settings Ctrl+Alt+S.
note
The term code lens used for this feature in the settings is not related to Visual Studio's CodeLens functionality, which is called Code Vision in JetBrains Rider.
Navigate to containing declaration
With a single shortcut, you can jump in the editor to the declaration of a type or a function from any position within its body.
tip
JetBrains Rider provides a related feature — Select Containing Declaration ( Ctrl+Alt+Shift+[) , and you can also use Ctrl+[/Ctrl+] to jump to the opening/closing brace of the enclosing code block .
Set the caret into any position within the body of a type or a function.
Press Alt+Shift+[.
JetBrains Rider will set the caret to the declaration of the type or function.
If the type or function is declared within another type, you can repeat step two to navigate to the declaration of the containing type.
Navigate between members and tags
With the Next/Previous Member commands, you can quickly navigate between members and nested types in code files or between tags in markup files.
When your focus is in the editor, press Alt+Down/Alt+Up or choose Navigate | Next/Previous Member in the main menu.
The caret will move to the declaration of the next/previous member/tag. If there are inner types, the caret will also stop at each inner type's member.
Navigate editor tabs and tool windows
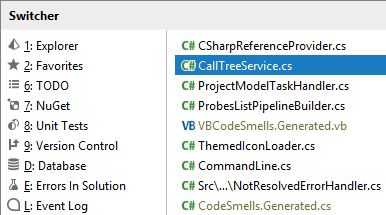
You can switch between files opened in the editor, split editor tabs, and tool windows (docked or floating) similarly to your OS application switcher. The switcher brings up a popup consisting of two columns: the left one displays tool windows, the right one shows editor tabs. If no files are currently opened, or there is just one tab, the switcher shows recently opened files:

Press Ctrl+Tab and then keeping the first key pressed (Ctrl on Windows/Linux or ⌃ on macOS), use the following keys:
Left and Right to switch between the lists of tool windows and files.
Up and Down arrow keys, Tab or Shift+Tab to go up and down the list in both panes.
Delete or Backspace to close the editor tab where the selected file is opened and remove the selected file from the list.
Release the Ctrl/⌃ key. The corresponding file or tool window gets the focus, and the switcher popup disappears.
Locate current item in other views
When you select a file, type, member, or other code item in the editor or one of the tool windows, you can quickly locate it in another IDE component.
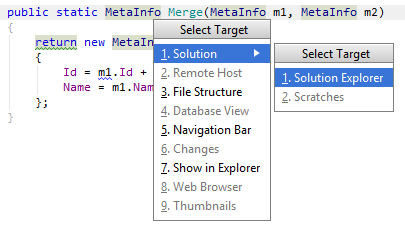
Press Alt+F1 or select Navigate | Select In from the main menu. The Select Target popup shows up.
Use the arrow keys or the mouse pointer to select the desired component. If your target is the Solution window, you can select the desired view:

tip
You can also double-click selected file or member in one of the tool windows or press Enter to open it in the editor.
Locate current document in Solution/Assembly Explorer
This handy navigation feature lets you expand the tree in the Solution Explorer, auto-scroll and highlight the item corresponding to the current document. It is especially useful when you have a massive solution, or a limited screen area that forces you to shrink the Solution Explorer window to the limit.
note
Note that this command will not work if the file that is opened in the editor is not included in the current solution.
tip
You can also locate a library symbol in the Assembly Explorer right from the source code where this symbol is used: While your caret is on the symbol, press Ctrl+Shift+G or choose Navigate | Navigate To… from the main menu , and then select Locate in Assembly explorer.
Press Alt+Shift+L.
JetBrains Rider will bring up the Solution Explorer window to focus and show you the item there.
Navigate code by line numbers
The Go to Line command lets you quickly jump to any line of code in the current document.
To go to a specific line in any other file, use the Go To File command (Ctrl+Shift+N), type : (colon) after the target file name, and specify the line number after that.
tip
To display line numbers in the editor, select Show line numbers on the Editor | General | Appearance page of JetBrains Rider settings Ctrl+Alt+S.
Press Ctrl+G or choose Navigate | Line/Column from the menu.
Type the target line number and optionally, a column number after a colon
:, and then click OK.