Rider settings
Do one of the following:
Press .
Go to File | Settings (for Windows and Linux) or JetBrains Rider | Preferences (for macOS).
Rider uses two mechanisms to store its settings:
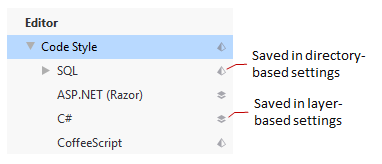
One part of the settings, which is for the front-end IntelliJ Platform features, is saved in the directory-based format.
The other part of the settings, which is for the back-end ReSharper features, is saved in the layer-based format.
Layer-based settings are compatible with ReSharper, so if you have been working with ReSharper or any of your team members use it, Rider will be able to read and apply settings that you have configured in ReSharper.
Solution-wide settings in the 'Solution personal' and 'Solution team-shared' layers, which are saved in the solution directory, are used automatically.
However, ReSharper and Rider save machine-wide settings in 'This computer' layer in different files so that your new Rider installation is not affected by existing ReSharper installation.
If you want Rider to use the same 'This computer' settings file as ReSharper, select Synchronize machine-wide Rider and ReSharper settings on the Tools | ReSharper page of JetBrains Rider settings .
In the Rider settings dialog , you can look at page icons to see, which setting-management mechanism is used for specific pages:

Pages that are not marked with any icon host IDE settings which are saved in your user profile.
Another thing to note is there are cases where both setting mechanisms are used for different settings on a single settings page. For such pages, a layer-based icon is shown but preferences that are saved using the directory-based mechanism are marked with the warning icon ![]() .
.
If you are working in a team, both mechanisms offer you a possibility to share Rider preferences. In short, it is recommended to add Rider solution-specific settings (the [Solution_Name].sln.DotSettings file in the solution folder and all files in the .idea subfolder except workspace.xml) to your version control system.