What's New in TeamCity 2021.12
Running builds in your own Cloud infrastructure
TeamCity Cloud can run builds in a customer's local environment or in a JetBrains-managed cloud. Usually, the first approach works best for companies who want to have full control over their build processes, while the second one suits teams whose processes rely on IaaS. Since this update, we want to introduce the third approach that stays somewhere in between: running builds in a customer's cloud.
If you have a cloud infrastructure in Amazon EC2, Kubernetes, or VMware vSphere/vCenter, you can now integrate your TeamCity Cloud instance with it. This opens all the capabilities of cloud solutions (like custom launch policies and spot fleets) and gives you more control over the build environment than using JetBrains-hosted agents. In terms of subscription, such agents are considered self-hosted, which means you purchase monthly slots for concurrent builds — there is no limit to their duration.
All three approaches can be combined for higher flexibility and fault-tolerance of your pipelines.
Users familiar with TeamCity On-Premises might already know that TeamCity integrates with Cloud providers with the help of cloud profiles. And now, their functionality becomes available in TeamCity Cloud.
To integrate your TeamCity Cloud project with your cloud infrastructure:
On the cloud side, configure a virtual machine image with an installed TeamCity agent.
In the TeamCity project's settings, create a cloud profile. If you want it to be available around the whole server, create it in the Root project's settings.
Configure the profile's common settings as described here and then follow the guidelines specific to your provider:
After the cloud profile is configured, TeamCity will be able to launch agents in your cloud and assign builds to them. If given a variety of agent environments (local and cloud), it will always try to choose the least expensive option for each build.
Prepaid JetBrains-hosted build agents
Another improvement related to build agents is an alternative pricing model: now, JetBrains-hosted agents can be prepaid on a monthly basis. This option is the most convenient if you run a lot of builds on agents of certain types (6 or more hours a workday). As JetBrains-hosted agents are charged per build time, some customers could greatly benefit from paying a fixed amount of credits monthly, without caring about the builds' duration.
Note that while the builds' duration is not limited, their concurrent number is. For example, if you prepay for 2 Linux Small cloud agents, only a maximum of 2 of those types of agents can be running concurrently with the prepaid rate. Any further concurrent builds on the same type will revert to the per-minute pricing.
To prepay JetBrains-hosted agents, go to Administration | Subscription & Resources, click Buy agents under the Per-Month Agents section, and choose an instance type you want to acquire. You can also define how many instances of this type can be run in parallel.
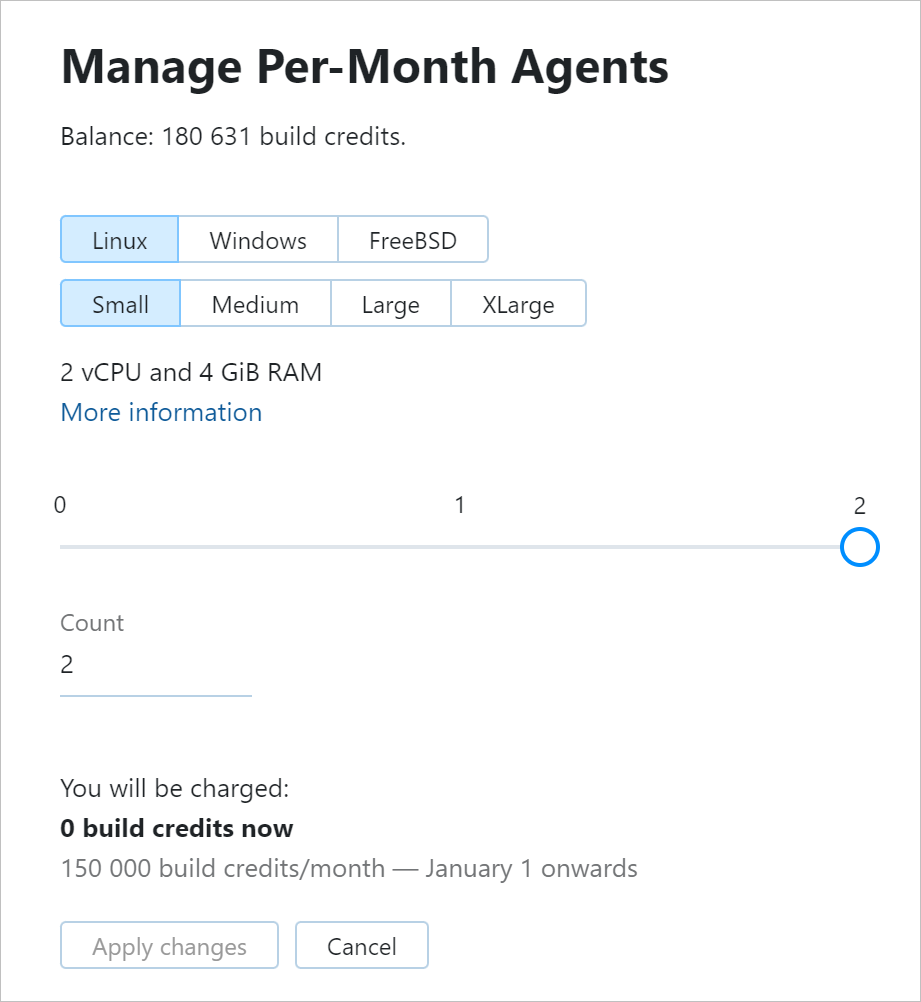
There is no need to wait until the end of the next month: whenever you prepay agents, the amount of charged build credits will depend on the number of days left till the end of the current month.
If you plan to reduce the number of prepaid agents in the next month, you can adjust this number straight away. The setting will only be applied since the next month, and you won't have to worry about forgetting to change it at the end of the current one.
Single sign-on authentication via SAML 2.0
TeamCity Cloud now supports a new authentication method: Single Sign-On (SSO) via SAML 2.0. Enabling it in your instance will allow users to authenticate in TeamCity with their account stored in one of the major identity providers: Okta, OneLogin, AWS SSO, AD FS, and so on.
With a multitude of services an average software developer uses in their daily work, having one account for authentication in all of them can significantly offload the clutter. More importantly, using SSO identity managers is a good security practice, and TeamCity wants to encourage it by providing easy integration.
You can enable SSO in TeamCity as any other authentication module: in Administration | Authentication.

After that, the new SAML Settings page will appear in the Administration section. Use it to customize the module's behavior and to establish the integration on the TeamCity side. On the provider's side, you will need to create a dedicated app for a service connection to TeamCity. Its settings may vary depending on the provider, but the key steps are the same:
Enter the TeamCity single sign-on URL, copied from the SAML Settings page, in the app's settings.
Copy the values of the app's SSO URL, issuer URL, and certificate.
Enter them in the SAML Settings in TeamCity.
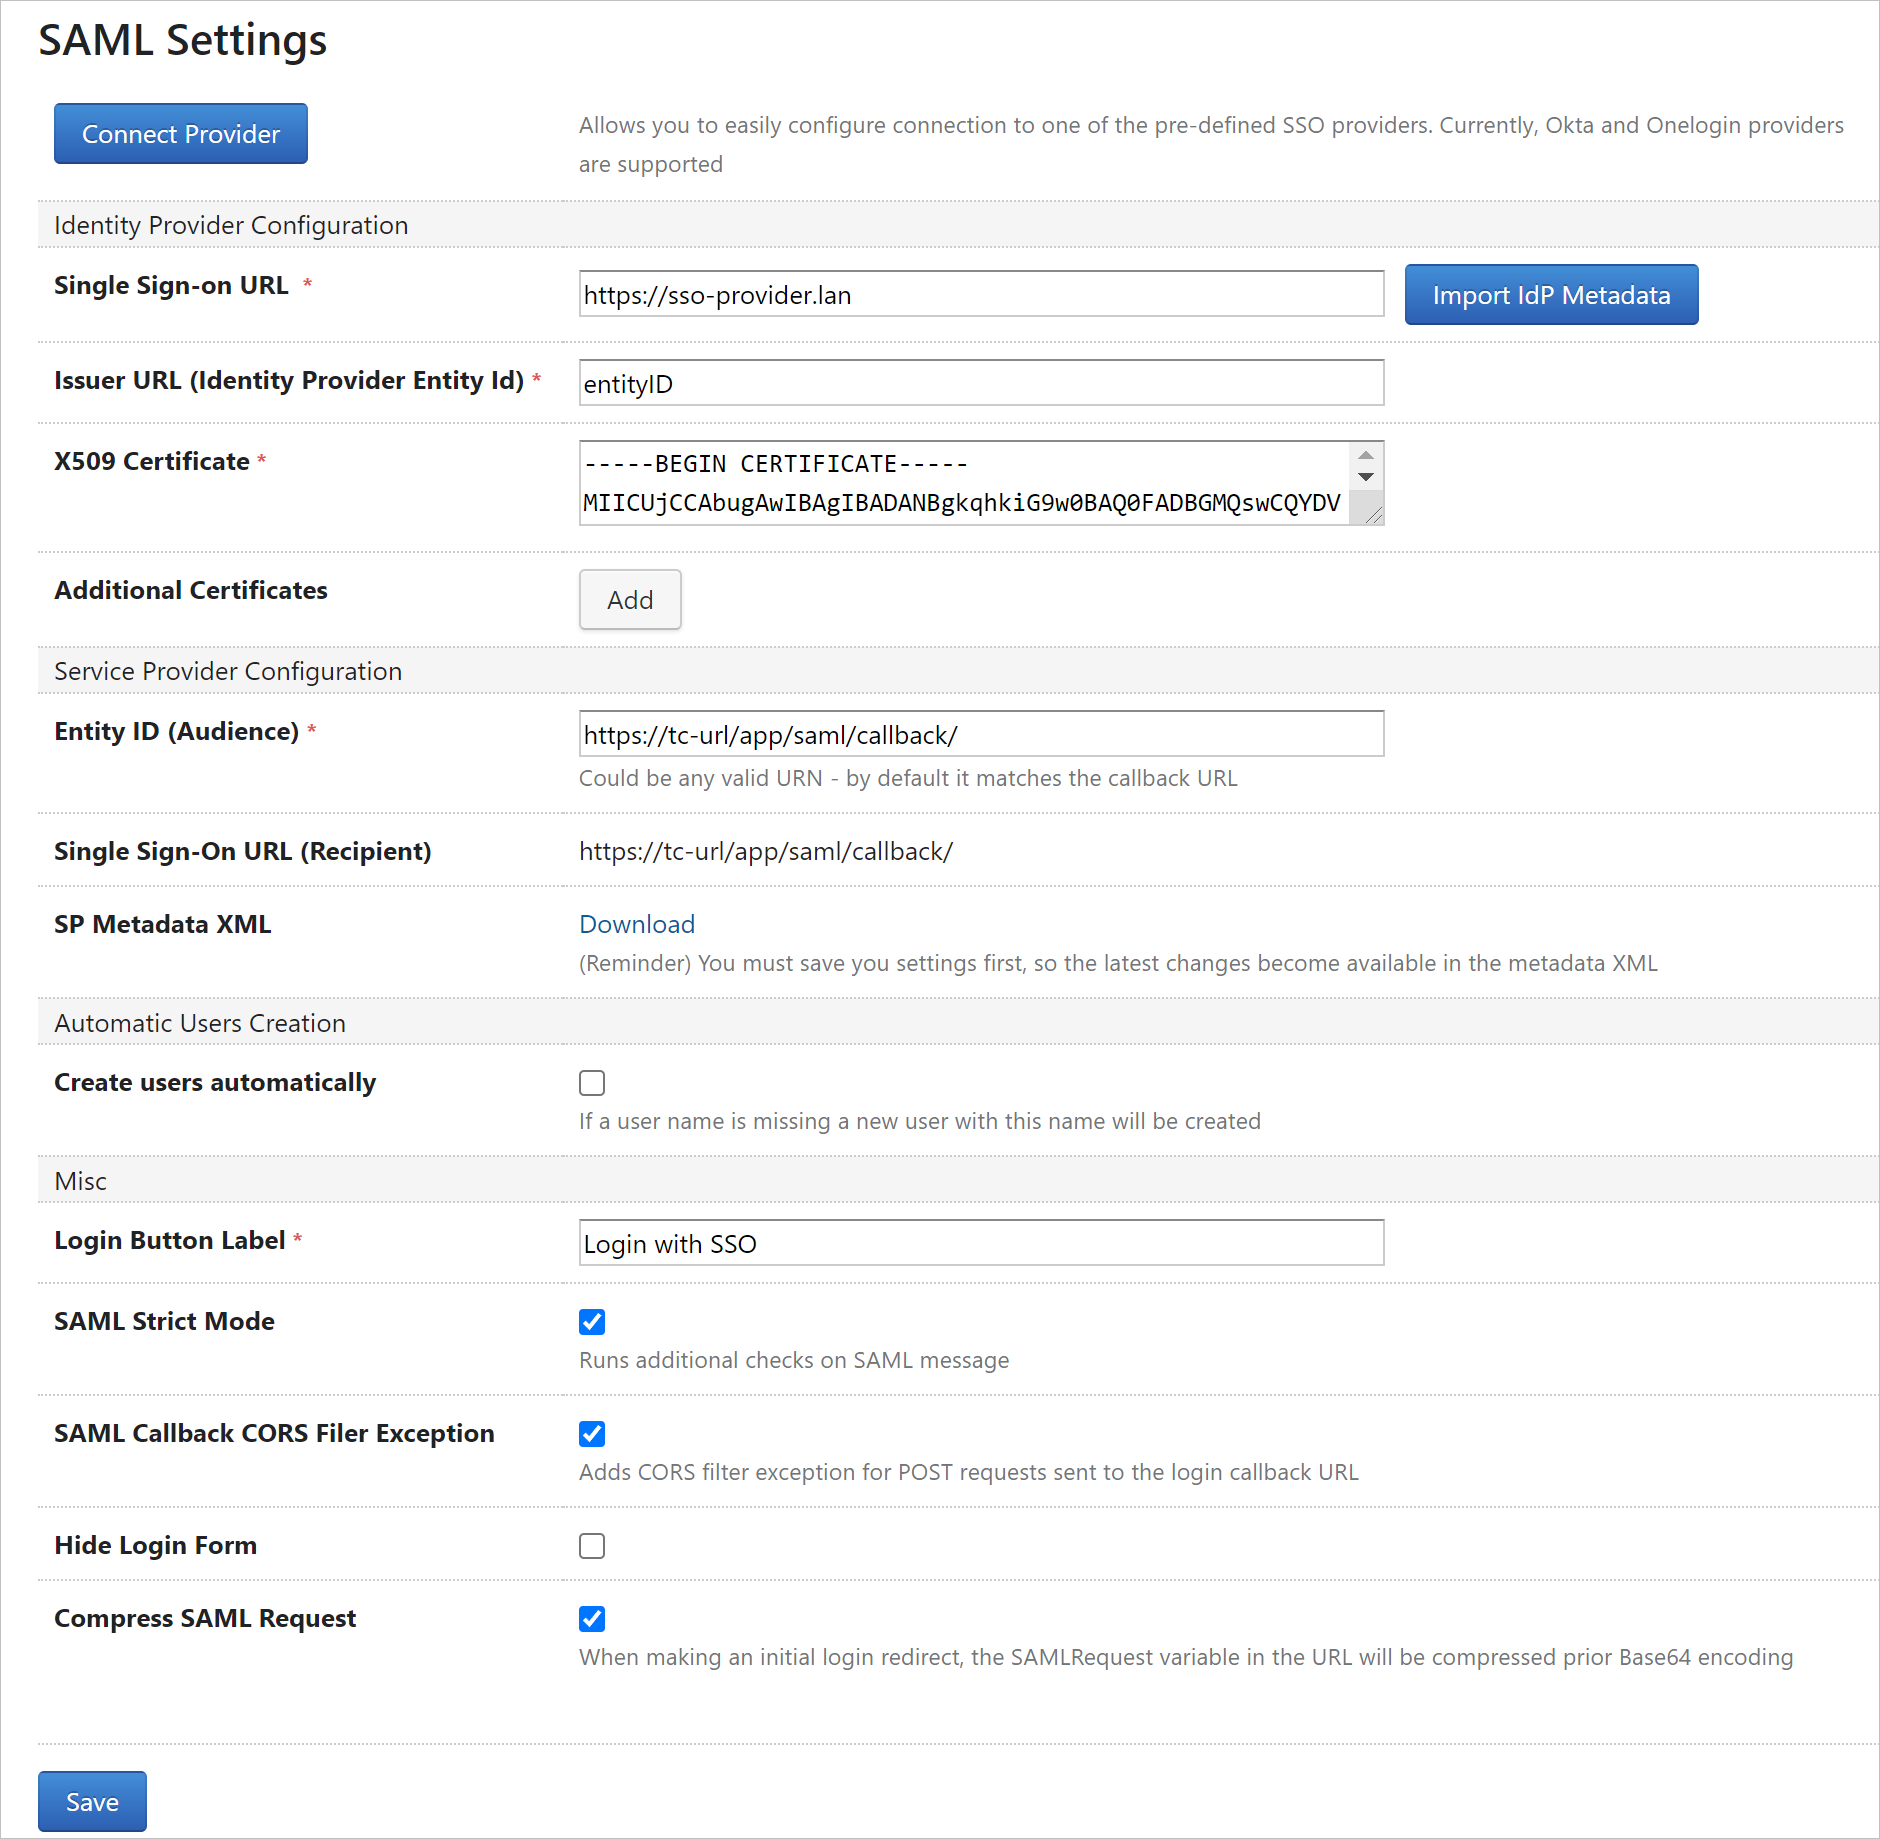
See more details about this authentication module in this article.
As soon as the connection between TeamCity Cloud and your SSO provider is established, users will see a new authentication button on the TeamCity login form. To sign in, they will need to click it and confirm the authentication on the provider's side.
Depending on the module settings, TeamCity can prohibit authentication to accounts whose emails don't match emails of existing TeamCity users, or it can create a new user profile for such an account.
Running builds on JetBrains Space merge requests
TeamCity integration with JetBrains Space now includes the Pull Requests build feature. If you enable this feature in a build configuration, TeamCity will automatically detect changes in merge requests submitted to your Space repository. For a build run on these changes, it will display the merge request details in the build's overview and send the build statuses back to JetBrains Space.
To enable this functionality in TeamCity:
In the project settings, configure a connection to JetBrains Space and create a Git VCS root with your Space repository URL and an empty branch specification.
In the build configuration settings, add the Pull Requests build feature with the JetBrains Space VCS hosting type:
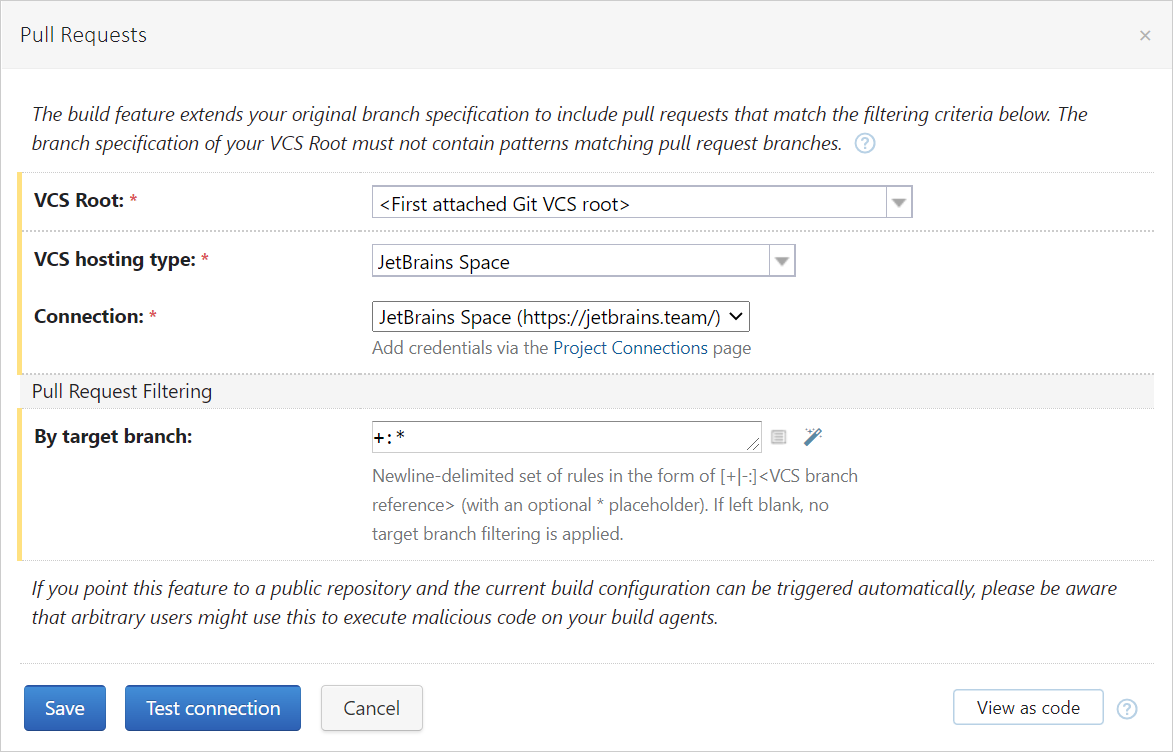
You can specify the branch filter to monitor merge requests only on target branches that match the specified criteria. For example, if you set the+:refs/heads/feature-*filter, TeamCity will monitor merge requests sent only to branches whose names start withfeature-.To allow publishing build statuses in JetBrains Space, you also need to add the Commit Status Publisher feature to this build configuration.
After the integration is configured, TeamCity will detect merge requests submitted to the JetBrains Space target branches. For builds run on the requested changes, it will display the merge request details in the Overview tab:
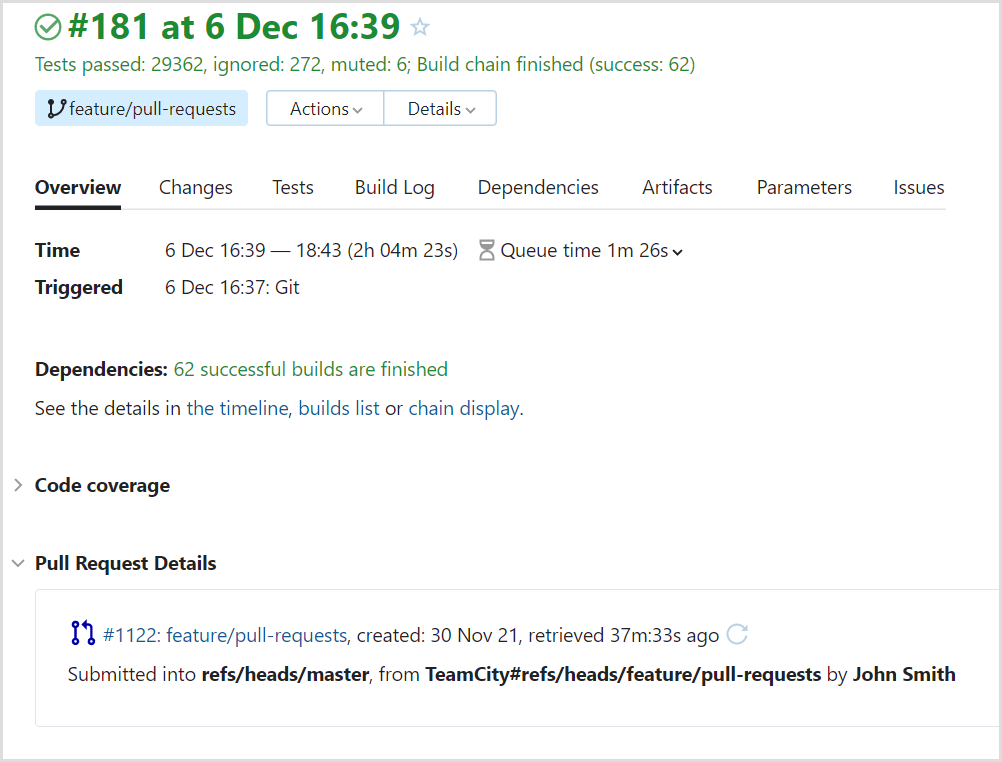
If the Commit Status Publisher feature is enabled in the build configuration, TeamCity will also send statuses per build change to timelines of merge requests in JetBrains Space:
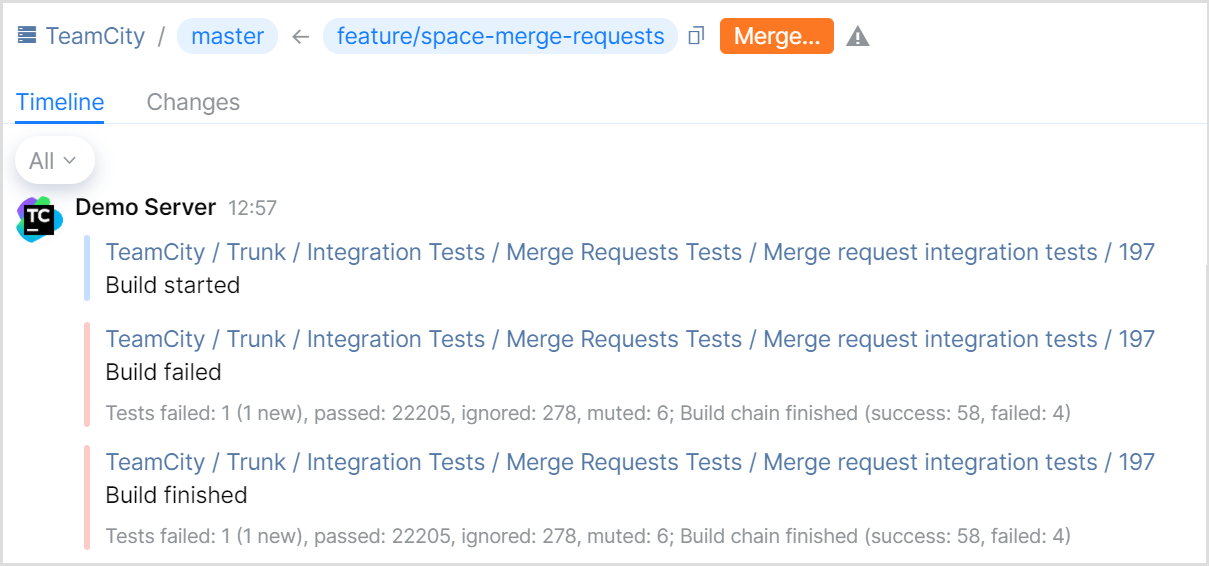
To protect a target branch and ensure that only verified requests are merged into it, you can set up Quality Gates for your Space repository and use a TeamCity build as an external check. If a build on a merge request fails, Space will notify you that the changes have not passed the required quality check.

New UI: Editing scope of agent pools
It is now possible to edit the scope of agent pools and quickly assign agents and projects to them right in the new Sakura UI — without switching to the classic UI mode.
To edit an agent pool, click Assign agents in its settings. In this dialog, you can choose what agents you want to assign to the pool:
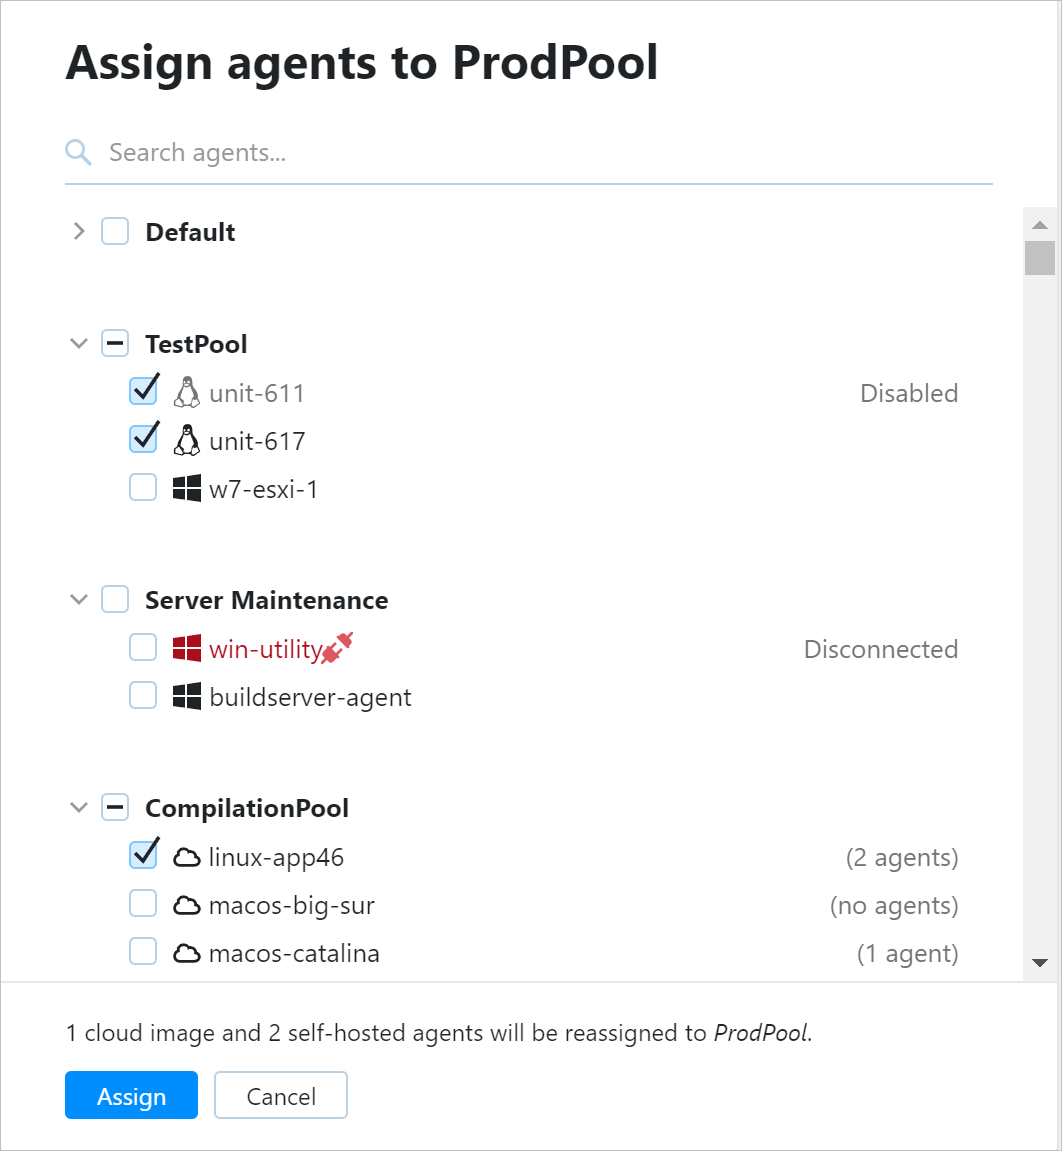
Note that whenever you select a cloud image, you actually assign all its instances to the pool. If this pool has a limit of agent slots, each cloud instance will take a single slot, just like any regular agent.
Similarly, you can also associate projects with this pool: open the Projects tab of the pool's settings and click Assign projects. This way, agents assigned to this pool will be allowed to run builds only in the selected projects.
Other updates
Change the project scope of an investigation or mute
If a build problem occurs in multiple subprojects of the same project, it is convenient to assign its investigation (or mute it) within the whole parent project. However, users often forget to change the project scope in the Investigation/Mute dialog, and TeamCity applies the action only within the current subproject. Now, project administrators can set a parent project as a preferred scope for all its subprojects. Read how.
Build failure conditions: Create a build problem per each matching error
When configuring a Fail build on specific text in build log failure condition, you can now specify whether to create a build problem only for the first text occurrence found in a build log (default) or for each error that matches the specified pattern.
Fixed issues
Upgrade notes
To comply with the common identifier format of .NET tests, TeamCity now uses a different format of names for .NET assemblies (omitting a file extension). After updating to 2021.12, this format will be applied within all the tests launched via the
testorvstestcommand of the .NET runner, but the investigations and history of these tests might be reset.TeamCity stops supporting the Microsoft Edge Legacy web browsers.
It is now impossible to automatically trigger builds via REST API when the queue limit is reached on the server.
Bundled IntelliJ IDEA has been updated to version 2021.2.3. Note that this version requires Java 11.
The SBT launcher, used in the Simple Build Tool (Scala) plugin, has been updated to version 1.5.5.
The Octopus Deploy integration plugin bundled with TeamCity Cloud has been updated to version 6.1.8.
The Unity Support plugin bundled with TeamCity Cloud has been updated to version SNAPSHOT-20211116104228.
Roadmap
See the TeamCity roadmap to learn about future updates.