Kotlin DSL
Besides storing settings in version control in XML format, TeamCity allows storing the settings in the DSL (based on the Kotlin language).
Using the version control-stored DSL enables you to define settings programmatically. Since Kotlin is statically typed, you automatically receive the auto-completion feature in an IDE which makes the discovery of available API options much simpler.
Check out the blog post series on using Kotlin DSL in TeamCity, and the Recommended Refactorings article.
See more TeamCity Kotlin DSL video tutorials:
When versioned settings in Kotlin format are enabled, TeamCity commits the current settings to the specified settings' repository.
When a new commit is detected in a settings' repository, TeamCity runs the DSL scripts found in this commit and applies the result to the settings on the TeamCity server or reports errors on the project's Versioned Settings tab.
Note: DSL scripts is essentially another way of writing TeamCity configuration files. DSL scripts do not have direct control on how builds are executed. For instance, it is impossible to have a condition and change something depending on the current state of a build. The result of scripts execution is configuration files, which are loaded by TeamCity server and then behavior of the newly triggered builds changes.
Since DSL is a code in Kotlin programming language, all paradigms supported by this language are available. For instance, instead of using TeamCity templates, one can create a function or class which will encapsulate project common settings. For those who have programming skills it allows for more natural reuse of build configuration settings.
DSL is also good in case when you need to have a big amount of similar build configurations. In this case they can be generated by some pretty simple code, while without DSL one would need to spend significant time in user interface creating all these configurations.
This Kotlin tutorial helps quickly learn most Kotlin features. The Kotlin DSL API documentation for your server is available at <teamcityserver:port>/app/dsl-documentation/index.html. You can also refer to the Kotlin DSL API documentation for latest TeamCity version.
To start working with Kotlin DSL in TeamCity, create an empty sandbox project on your server and follow these steps:
Enable versioned settings for your project.
Select a required VCS root. Make sure it specifies correct credentials; TeamCity won't be able to commit changes if anonymous authentication is used.
Select Kotlin as the format.
Click Apply, and TeamCity will commit the generated Kotlin files to your repository.
note
Note: right after the Kotlin DSL settings are enabled in your project, the web UI for this project will become read-only until the TeamCity server detects its own commit and applies it back to the project.
Usually it takes a minute or two, depending on the Changes Checking Interval defined for the VCS root where the DSL is located.
After the commit to the repository, you will get the .teamcity settings directory with the following files:
settings.kts— The main file containing all the project configuration.pom.xml— Allows TeamCity and external IDEs (that you use to open Kotlin projects) to resolve dependencies required to compile and run DSL code.
You can create, edit, and debug TeamCity Kotlin DSL projects in IntelliJ IDEA (both Ultimate and Community versions are supported).
To add the .teamcity settings directory as a new module to an existing project in IntelliJ IDEA, follow the step below:
Go to File | Project Structure, or press Ctrl+Shift+Alt+S.
Select Modules under the Project Settings section.
Click the plus sign, select Import module and choose the directory containing your project settings. Click OK and follow the wizard.
Click Apply. The new module is added to your project structure.
To open the Kotlin DSL project in IntelliJ IDEA, open the .teamcity/pom.xml file as a project. All necessary dependencies will be resolved automatically right away.
note
If you use macOS, note that the
.teamcitydirectory will be hidden, and IntelliJ IDEA will not show it in the file chooser by default. To display the hidden files and directories, pressCommand+Shift+.inside the file chooser.
If all dependencies have been resolved, no errors in red will be visible in settings.kts. If you already have an IntelliJ IDEA project and want to add a Kotlin DSL module to it, follow instructions in the Create New Project section.
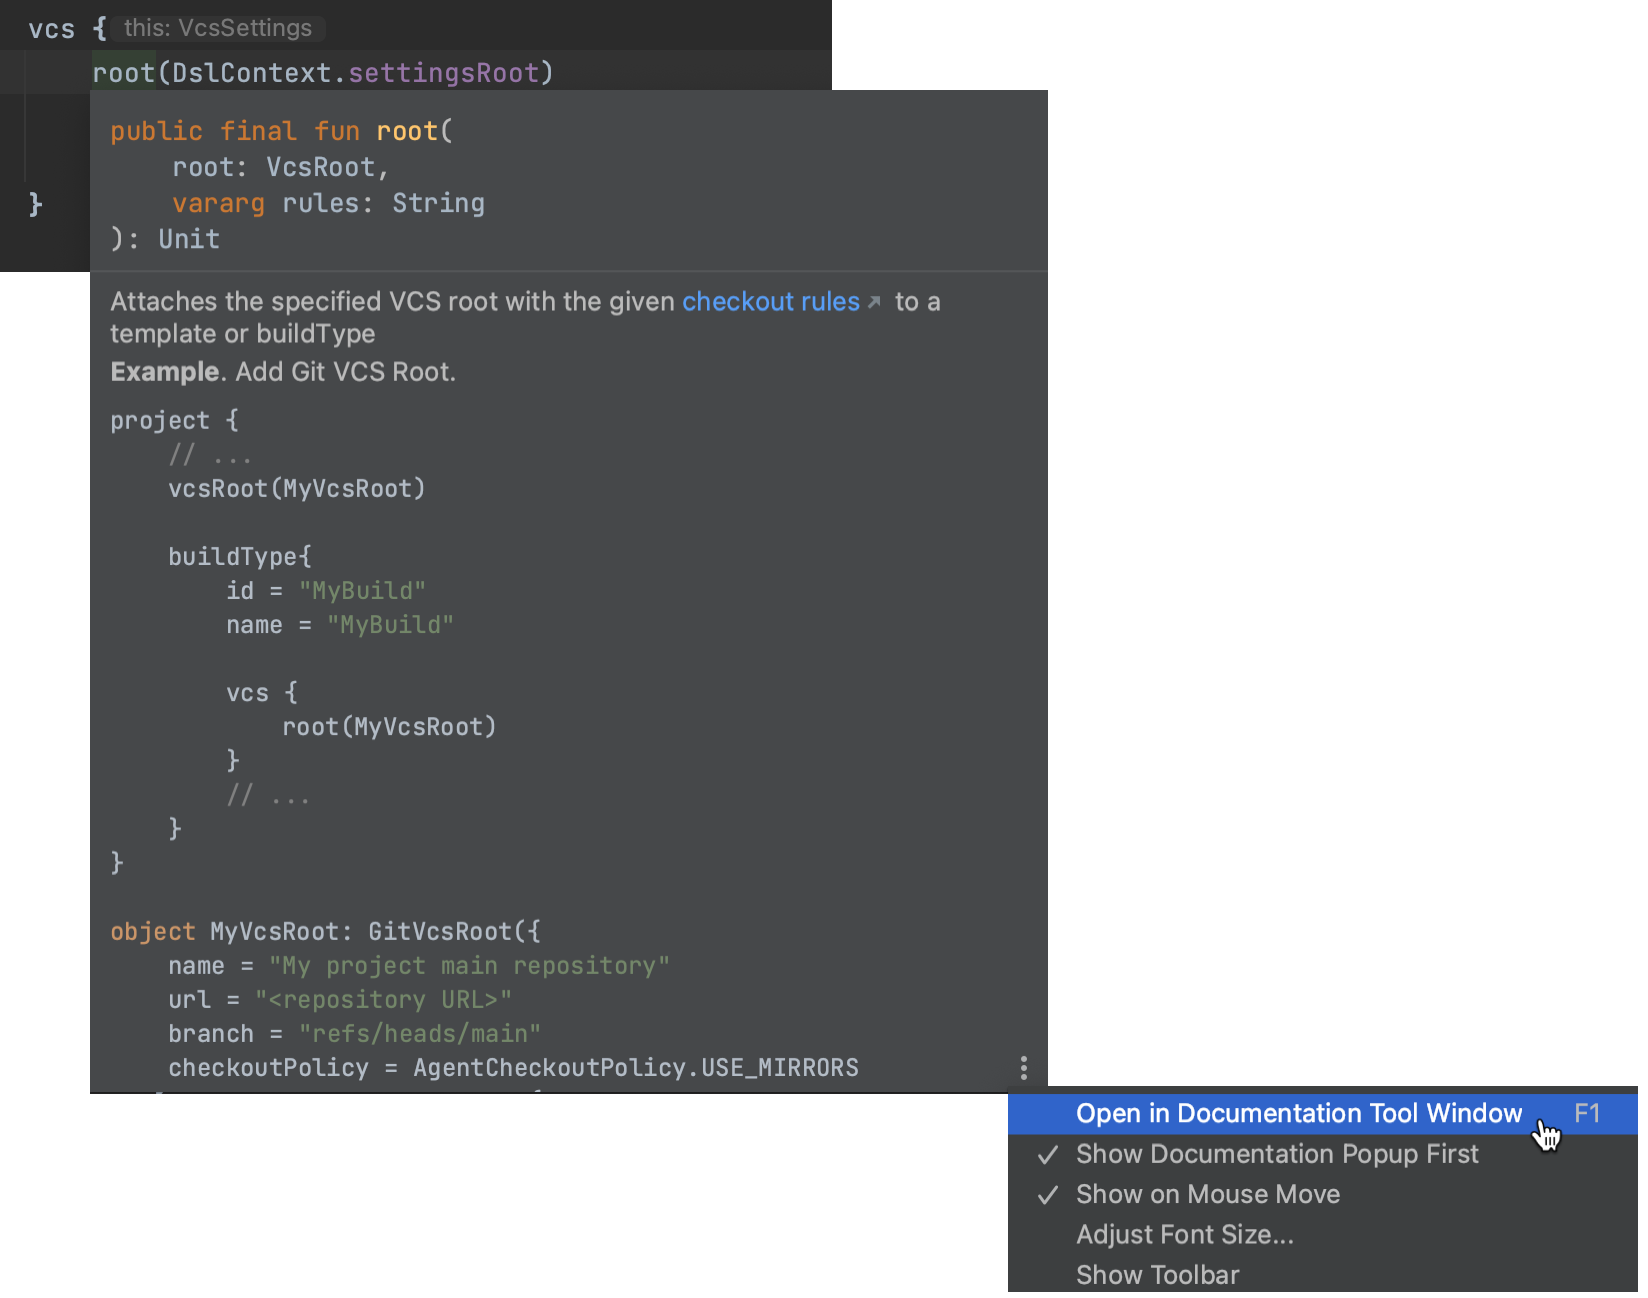
DSL documentation for your local TeamCity server is always available at <TeamCity_server_URL/app/dsl-documentation/index.html. You can also import this documentation to IDE. This way you will be able to view object descriptions and examples as you edit your .kts files.
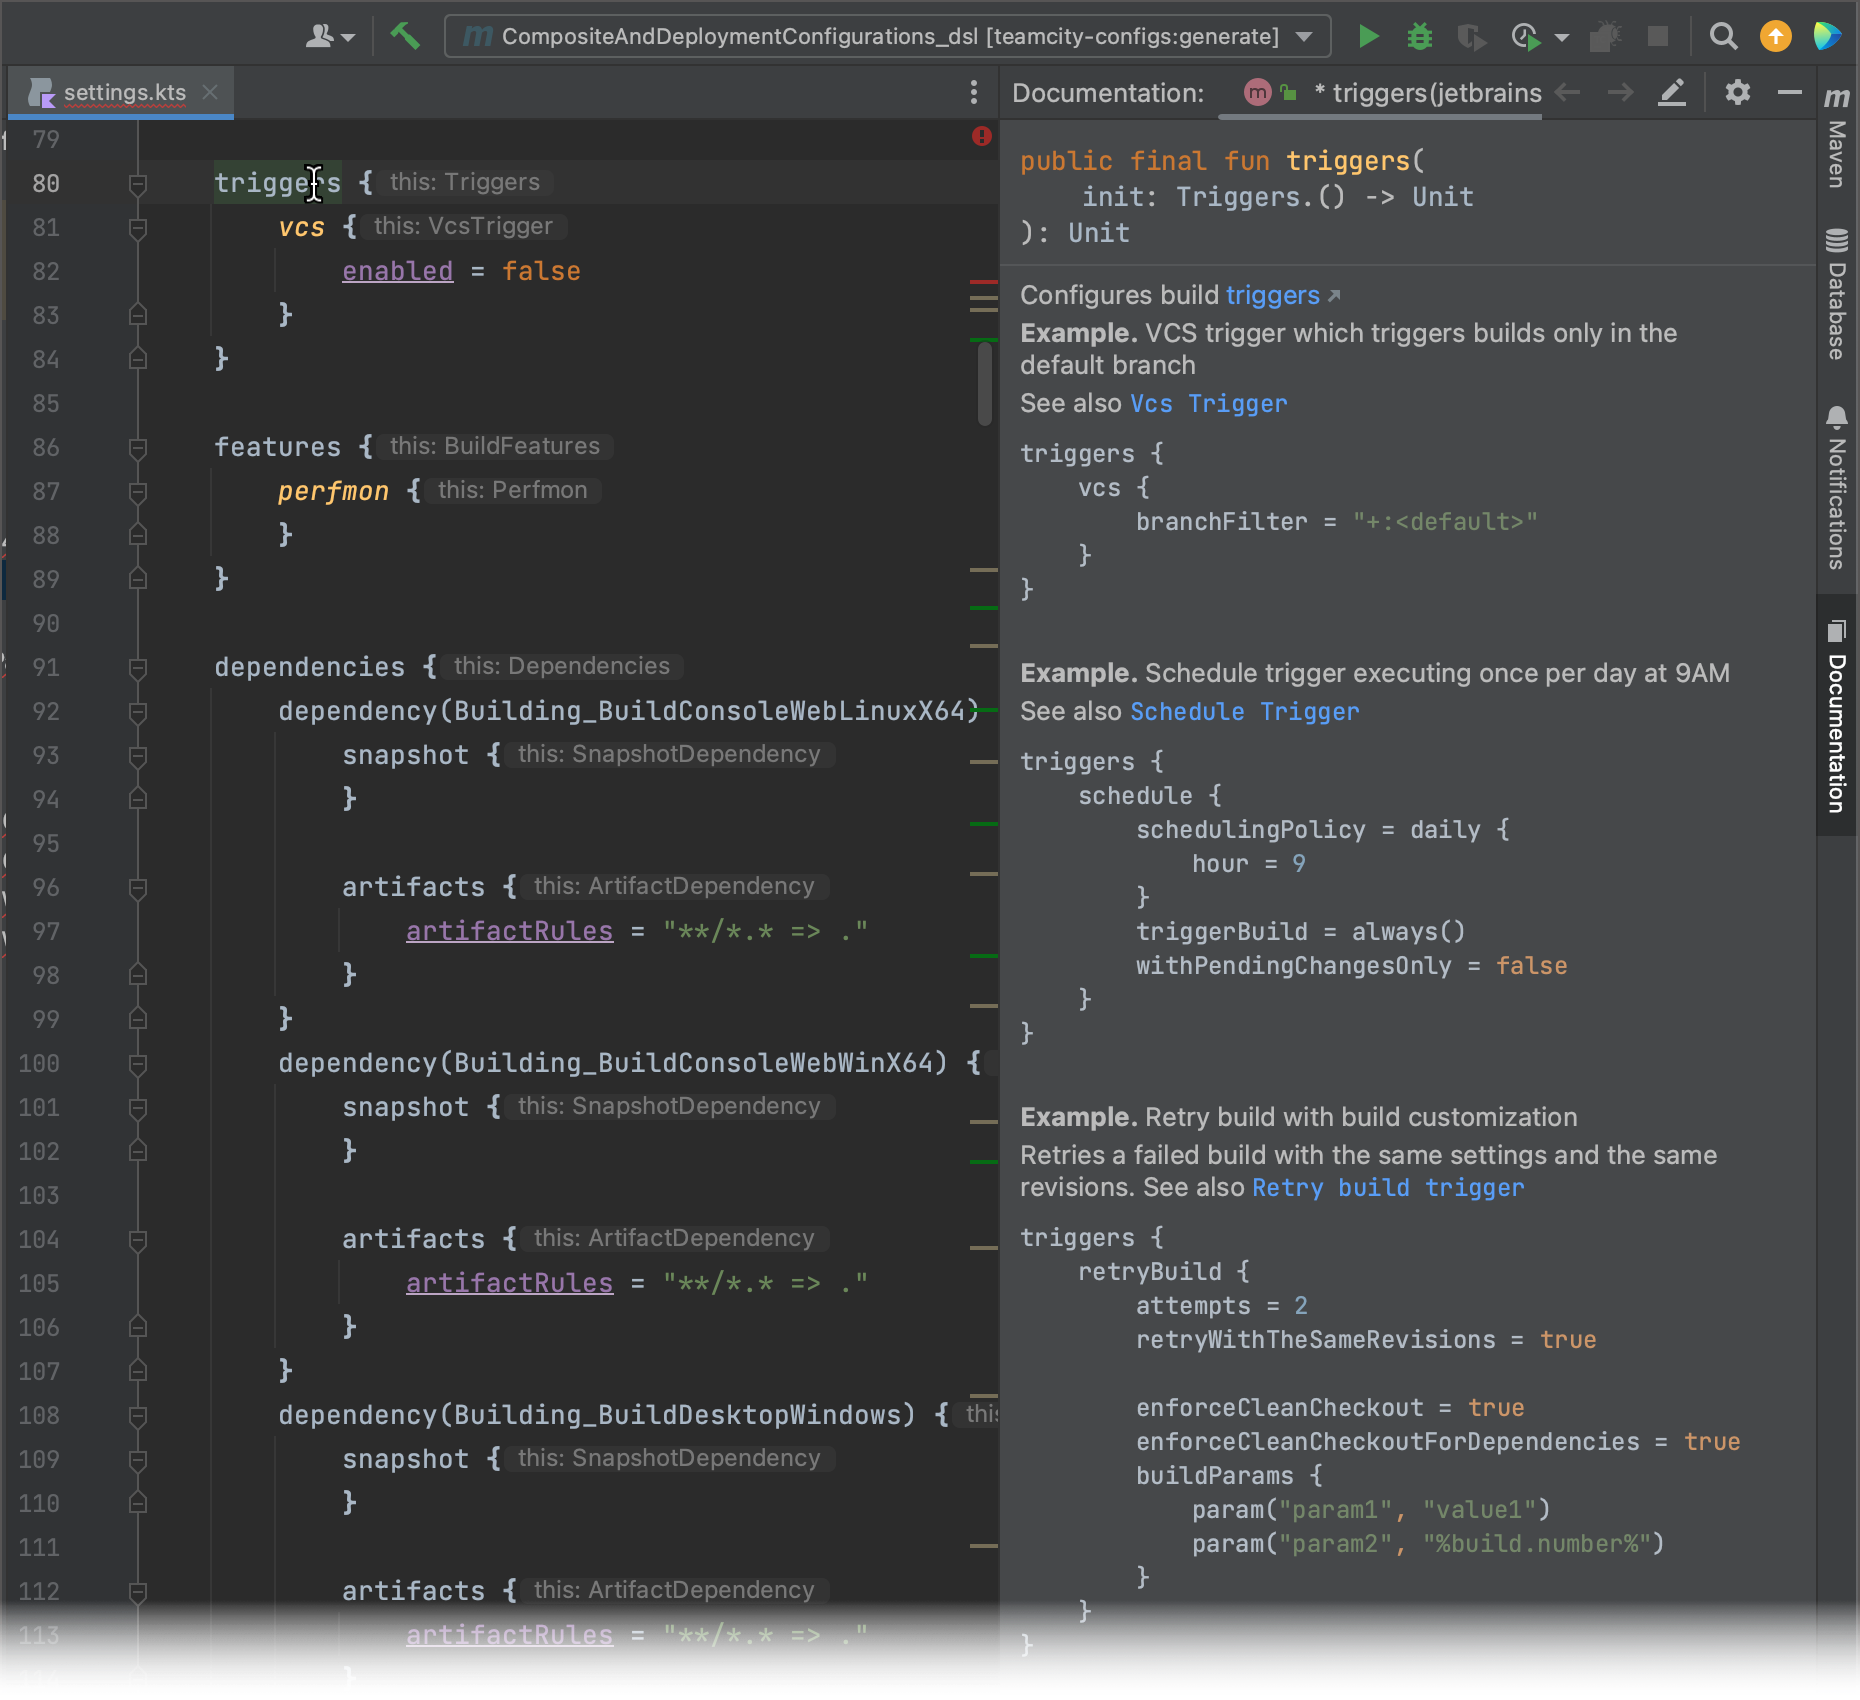
To download these sources, click a corresponding option in the Maven panel...
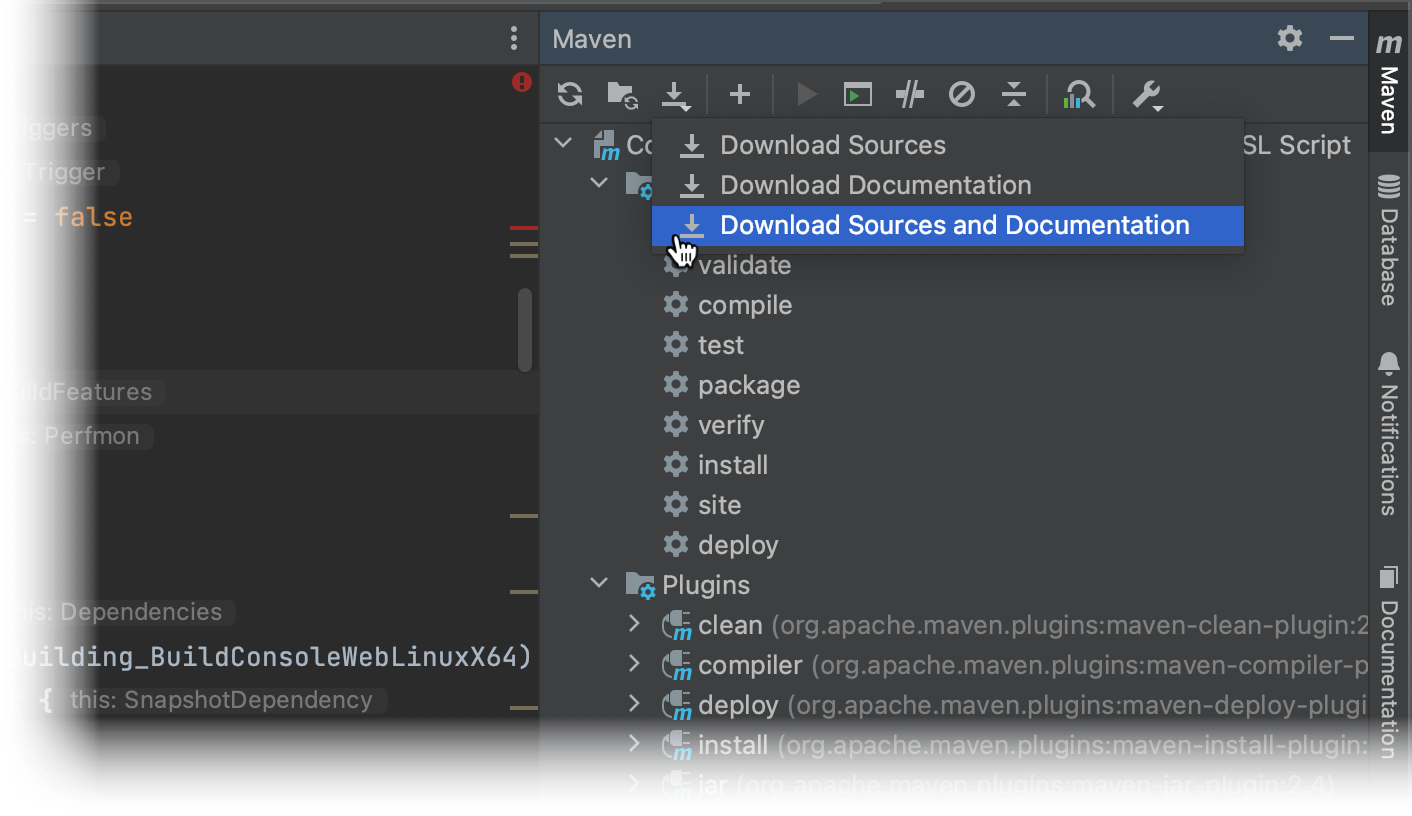
...or run the mvn -U dependency:sources command.
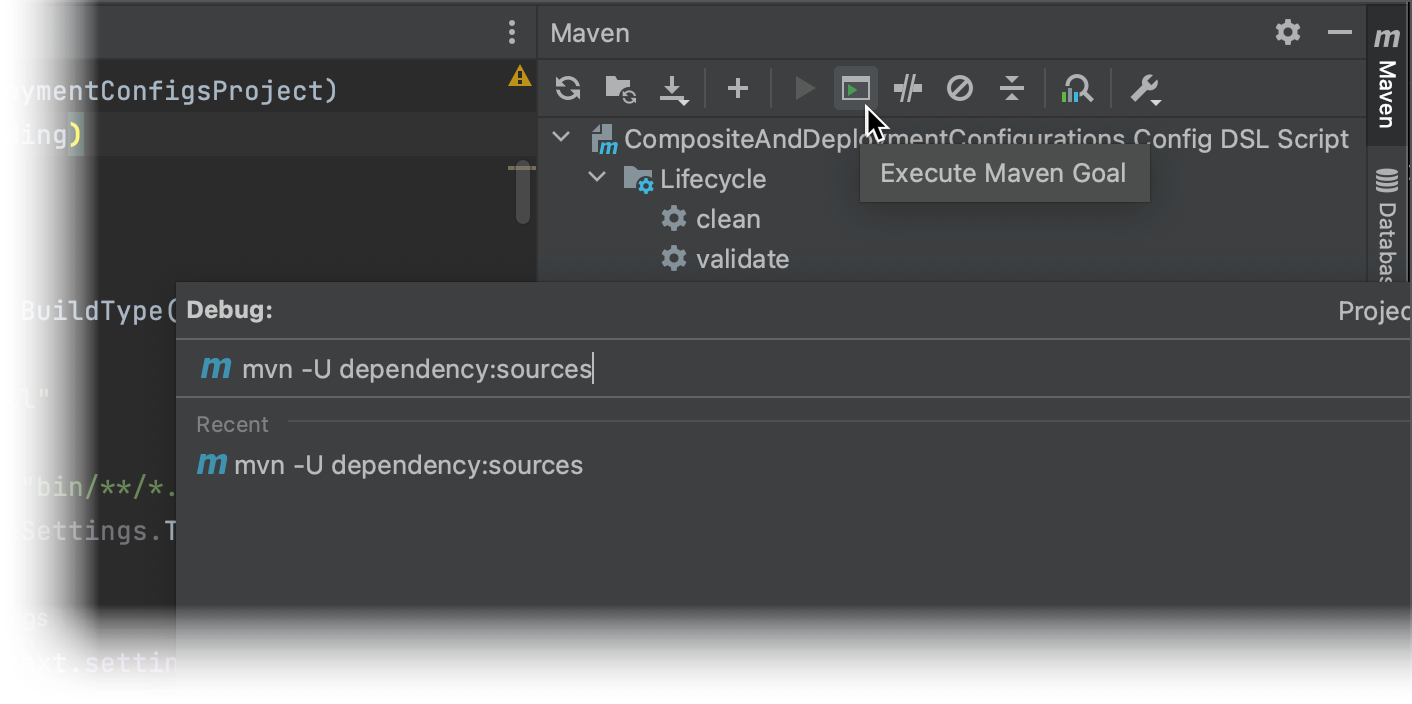
Imported documentation is shown as hints that appear when a pointer hovers over a keyword. To open it in a standalone window, press the documentation hotkey (F1 by default), click View | Tool Windows | Documentation, or use the ellipsis button in a hint panel.
When creating an empty project, that's what you see in settings.kts in your IDE:
import jetbrains.buildServer.configs.kotlin.*
/* some comment text */
version = "2023.09"

project {
}
Here, project {} represents the current project whose settings you'll define in the DSL (in DSL code it is sometimes referenced as _Self). This is the same project where you enabled versioned settings on the previous step. This project ID and name can be accessed via a special DslContext object but cannot be changed via the DSL code.
The following example shows how to add a build configuration with a command line script:
import jetbrains.buildServer.configs.kotlin.*
import jetbrains.buildServer.configs.kotlin.buildSteps.script

version = "2023.09"

project {
  buildType {
    id("HelloWorld")
    name = "Hello world"
    steps {
        script {
            scriptContent = "echo 'Hello world!'"
        }
    }
  }
}
Here, id will be used as the value of the Build configuration ID field in TeamCity. In the example above the id must be specified. If you omit it, there will be a validation error on an attempt to generate settings from this script.
There is also another way to define the same build configuration:
import jetbrains.buildServer.configs.kotlin.*
import jetbrains.buildServer.configs.kotlin.buildSteps.script

version = "2023.09"

project {
  buildType(HelloWorld)
}

object HelloWorld: BuildType({
    name = "Hello world"
    steps {
        script {
            scriptContent = "echo 'Hello world!'"
        }
    }
})
In this case the usage of the id() function call is optional because TeamCity will generate the id based on the class name (HelloWorld in our case).
After making the necessary changes in settings.kts file, you can submit them to the repository — TeamCity will detect and apply them. If there are no errors during the script execution, you should see a build configuration named "Hello world" in your project.
The pom.xml file provided for a Kotlin project has the generate task which can be used to generate TeamCity XML configuration files locally from the DSL scripts. This task can be started from IDE (see Plugins | teamcity-configs | teamcity-configs:generate node in the Maven tool window), or from the command line:
mvn teamcity-configs:generateThe result of the task execution will be placed under the .teamcity/target/generated-configs directory.
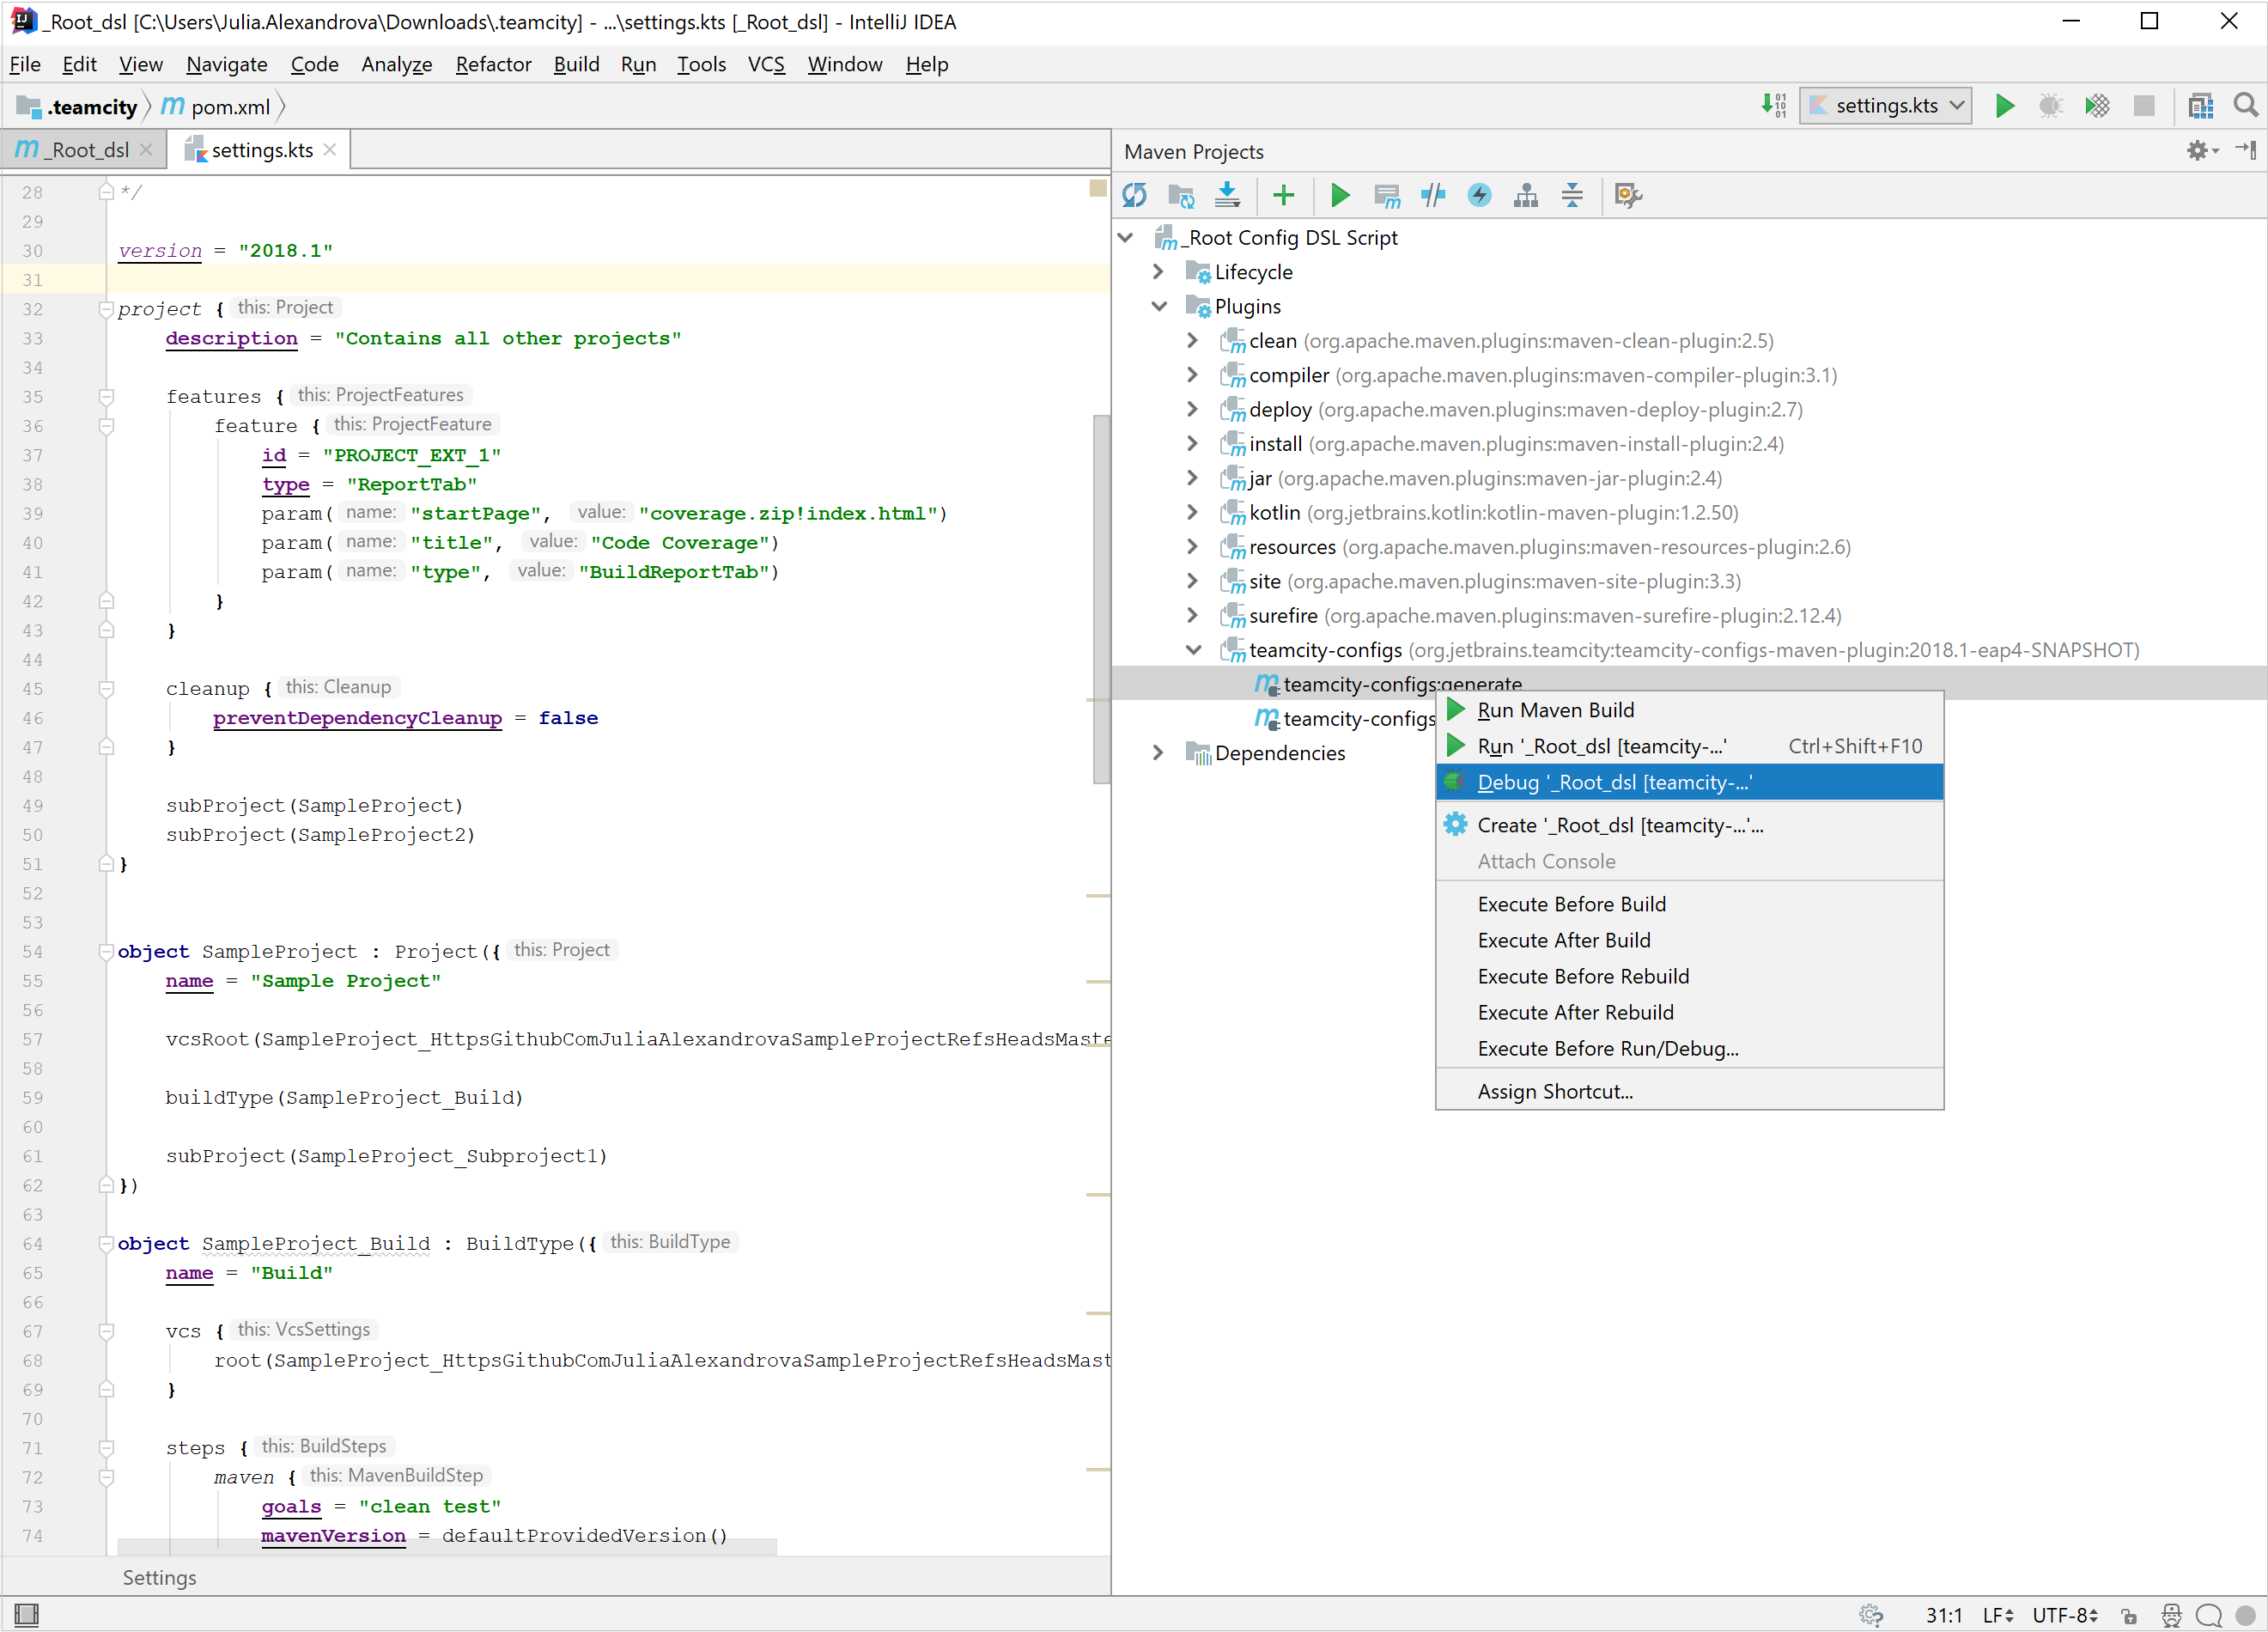
If you are using IntelliJ IDEA, you can easily start debugging of any Maven task:
Navigate to View | Tool Windows | Maven Projects. The Maven Projects tool window is displayed.
Locate the task node: Plugins | teamcity-configs | teamcity-configs:generate, the Debug option is available in the context menu for the task:
TeamCity allows editing a project settings via the web interface, even though the project settings are stored in Kotlin DSL. If DSL scripts were not changed manually, that is if they were generated by TeamCity and stay the same way in the repository, then changes via the web UI will be applied directly to these generated files.
But if generated files were changed, then TeamCity will have to produce a patch, since it no longer knows what part of .kt or .kts file should be changed.
In case of portable DSL the patches are placed under the .teamcity/patches directory, for example:
patches/projects/<relative project id>.kts
patches/buildTypes/<relative build configuration id>.kts
patches/templates/<relative vcs root id>.kts
patches/vcsRoots/<relative build configuration id>.ktsThe following patch adds the Build files cleaner (Swabra) build feature to the build configuration with the ID SampleProject_Build:
changeBuildType(RelativeId("SampleProject_Build")) { // this part finds the build configuration where the change has to be done
    features {
        add {
            // this is the part which should be copied to a file which generates settings for SampleProject_Build build configuration
            swabra {
                filesCleanup = Swabra.FilesCleanup.DISABLED
            }
        }
    }
}
It is implied that you move the changes from the patch file to the corresponding .kt or .kts file and delete the patch file. Patches generation allows you to continue using the user interface for editing of the project settings and at the same time use the benefits of Kotlin DSL scripts.
To identify a build configuration in a project based on the portable DSL, TeamCity uses the ID assigned to this build configuration in the DSL. We recommend keeping this ID constant, so the changes made in the DSL code are consistently applied to the respective build configuration in TeamCity.
However, if you modify the build configuration ID in the DSL, note that for TeamCity this modification will look as if the configuration with the previous ID was deleted and a new configuration with the new ID was created with a single commit. In this case, TeamCity will automatically attach the builds' history to the build configuration with the new ID. This also applies to the case when IDs of several build configurations are changed within one commit: TeamCity uses the logic that assigns build histories to the configurations most similar to the deleted ones.
If you use two commits to modify the build configuration ID — one to delete the configuration with the previous ID and another to add the build configuration with the new ID — the new build configuration will not contain the builds' history anymore. TeamCity will keep the history of builds for 5 days until cleaning it up, and the history can still be restored manually during this period.
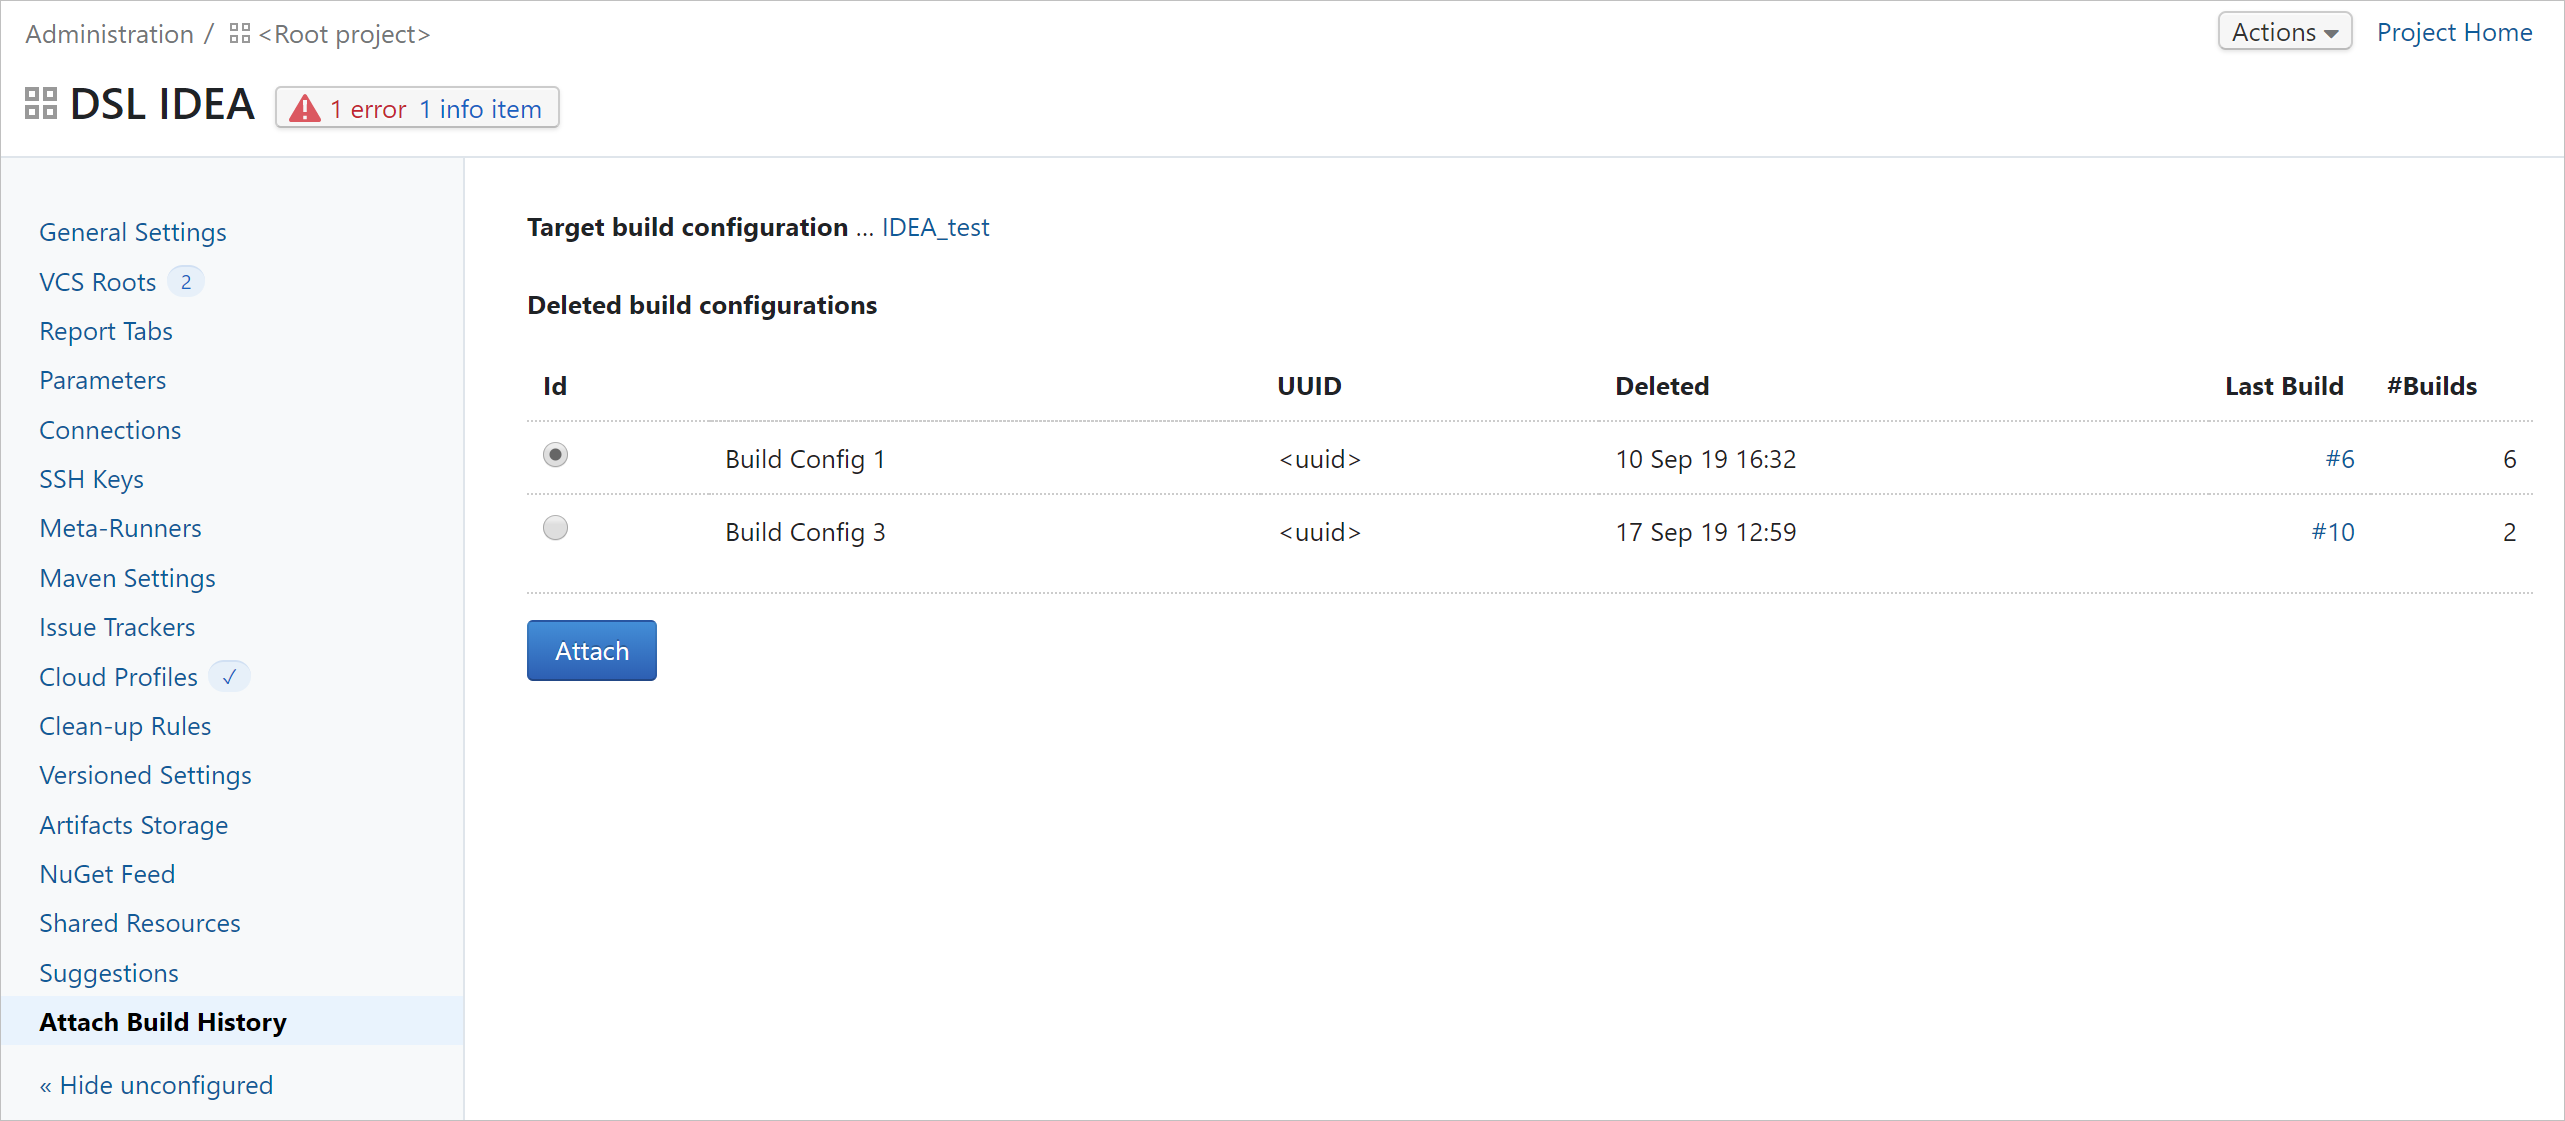
To manually restore the builds' history after changing the build configuration ID, go to the Build Configuration Settings of the build configuration whose ID was changed, open the Actions menu, and click Attach build history. You will be redirected to the Attach Build History tab. Select the detached build history and click Attach.
tip
If you are not sure which build history to select, you can look at the Build Results page of the last build in this history.
When viewing your build configuration settings in the UI, you can click View as code in the sidebar: the DSL representation of the current configuration will be displayed and the setting being viewed (for example, a build step, a trigger, dependencies) will be highlighted. To go back, click Edit in UI.
This is especially useful if you need to add some build feature or trigger to your DSL scripts and you're not sure how DSL code should look like.
One of the advantages of the portable DSL script is that the script can be used by more than one project on the same server or more than one server (hence the name: portable).
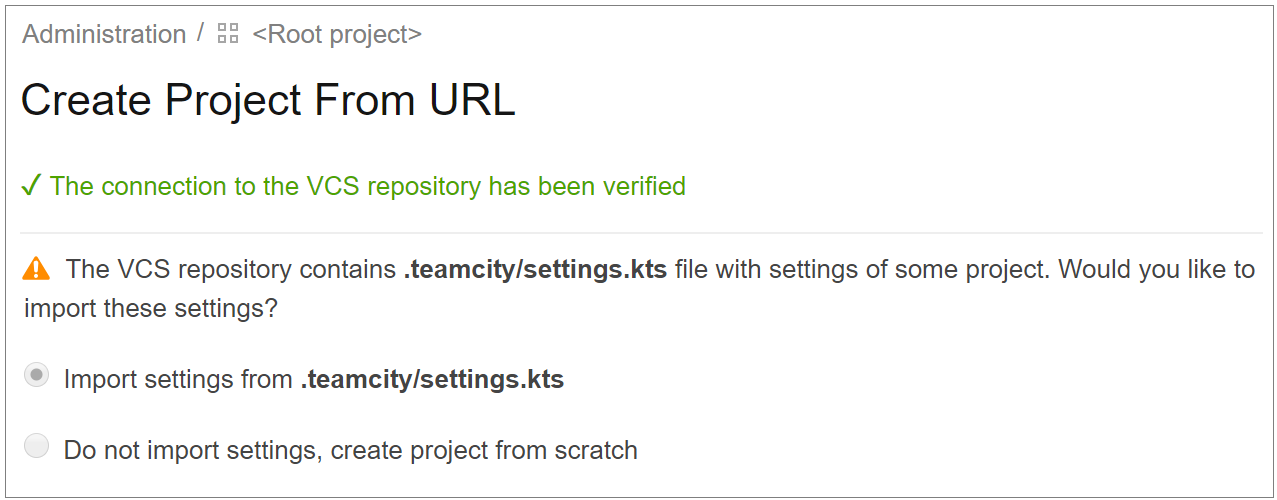
If you have a repository with .teamcity containing settings in portable format, you can easily create another project based on these settings. The Create Project From URL feature can be used for this.
Point TeamCity to your repository, and it will detect the .teamcity directory and offer to import settings from there:
note
It seems pointless to keep two projects using the same DSL scripts on one server, as such projects will be identical. All changes to the one project will be replicated to another. However, since TeamCity 2019.2, it is possible to customize generation of project settings with help of DSL context parameters.
You can customize the DSL generation behavior using context parameters configured in the TeamCity UI. Context parameters are specified as a part of the project versioned settings in the UI.
With context parameters, it is possible to maintain a single Kotlin DSL code and use it in different projects on the same TeamCity server. Each of these projects can have own values of context parameters, and the same DSL code can produce different settings based on values of these parameters.
Visit our blog to watch a tutorial and learn how to use context parameters in your projects.
note
Currently, if Kotlin DSL uses context parameters, then the settings of such projects cannot be edited via the TeamCity UI (see TW-63565 for details).
To use a context parameter in a TeamCity project, you need to (1) define it in the project versioned settings in the UI and (2) reference it in the project DSL.
Managing context parameters in UI
You can manage project context parameters on the Versioned Settings | Context Parameters tab.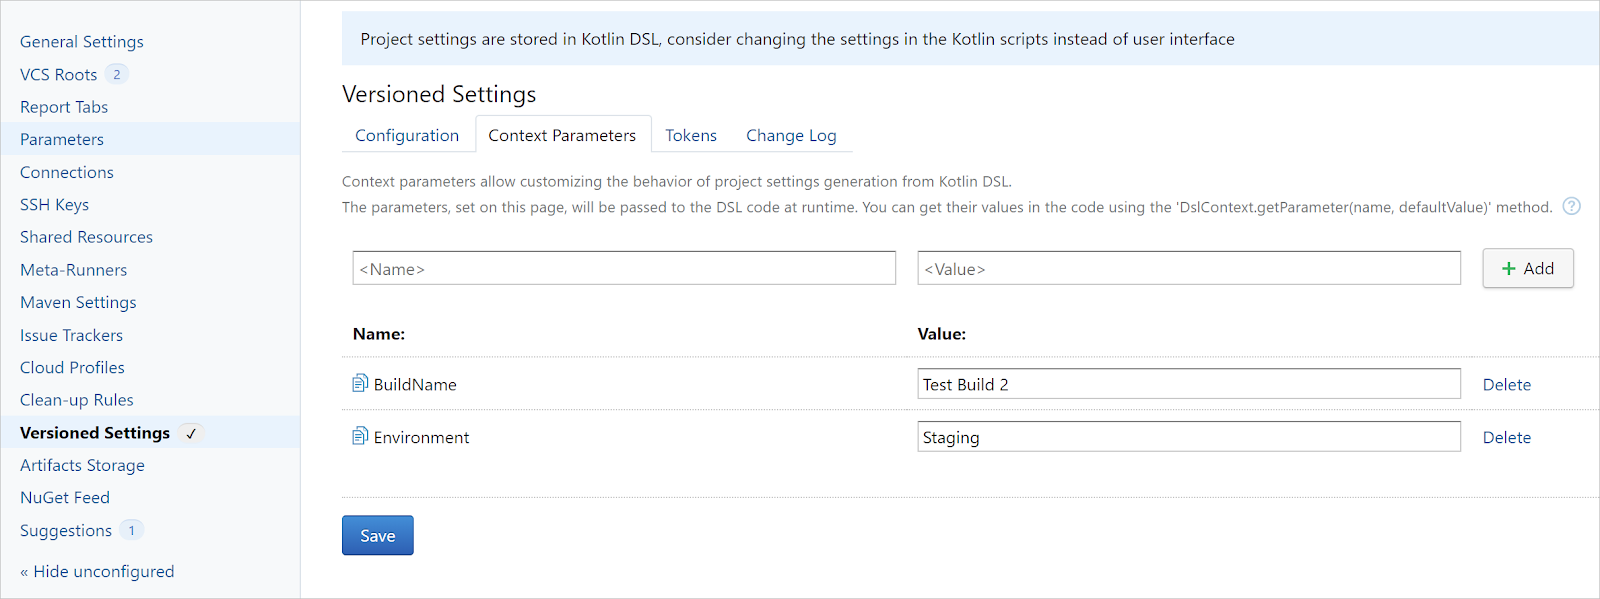
After you add, edit, or delete the parameters and click Save, TeamCity will reload the DSL configuration and apply the changed values to the project settings.Referencing context parameters in DSL
To reference a context parameter in the DSL code, use thegetParameter()method of theDslContextobject. You can specify a default value of this parameter as an optional second argument:getParameter("<parameter-name>", "<default-value>").
The following example shows how to use context parameters in DSL:object Build : BuildType({ /* a context parameter that defines a build configuration name; its default value is `Test Build` */ name = "${DslContext.getParameter("BuildName", "Test Build")}" script { scriptContent = "echo Build Successful" } /* disable the last build step depending on the value of the `environment` parameter */ script { scriptContent = "echo Deploy" enabled = DslContext.getParameter(name = "Environment") != "Staging" } })
Each context parameter is expected to have a value, either the default one, set in the DSL, or a project-specific one, set in the UI. When you create a project from DSL or update the project versioned settings, TeamCity detects all context parameters with missing values and prompts you to set them.
To define specific values for context parameters, add the <contextParameters> block to your pom.xml file.
Example of a Maven plugin with context parameters:
<plugin>
    <groupId>org.jetbrains.teamcity</groupId>
    <artifactId>teamcity-configs-maven-plugin</artifactId>
    <version>${teamcity.dsl.version}</version>
    <configuration>
        <format>kotlin</format>
        <dstDir>target/generated-configs</dstDir>

        <contextParameters>
            <BuildName>Test</BuildName>
            <Message>Test</Message>
        </contextParameters>

    </configuration>
</plugin>
This is useful if you want to verify locally that your DSL scripts produce settings correctly for different values of DSL context parameters.
note
The TeamCity server does not use Maven for generating settings from your DSL scripts, so the generation of settings on the server will not be affected if you commit
pom.xmlcontaining context parameters back to the repository.
TeamCity Kotlin DSL provides an alternative way to configure a build chain in a pipeline style.
In the DSL code, a build chain is declared inside a project by the sequential method that lists chained builds one by one. To group builds that will run in parallel to each other inside a chain, use the parallel method: the first subsequent build after the parallel block will depend on all the preceding parallel builds.
The following example illustrates a typical pipeline for compiling and deploying an application:
project {
  buildType(Compile)
  buildType(Test1)
  buildType(Test2)
  buildType(Package)
  buildType(Deploy)
  buildType(Extra)
  ...

    sequential  {
      buildType(Compile)
      parallel (options = { onDependencyFailure = FailureAction.CANCEL }) { // non-default snapshot dependency options
        dependsOn(Extra) // extra dependency to be defined in all builds in the parallel block
        buildType(Test1)
        buildType(Test2)
      }
      buildType(Package)
      buildType(Deploy)
    }
}
If you define a build chain in a pipeline style, ensure there are no explicit snapshot dependencies defined within the referenced build configurations themselves.
In the example above, a build chain references already declared builds. Alternatively, you can register all listed builds after the chain declaration with a simplified syntax:
project {

 // build chain definition:
  val buildChain = sequential {
   ...
  }

  // register all build configurations, referenced in the chain, in the current project:
  buildChain.buildTypes().forEach { buildType(it) }
}
Explicit snapshot dependencies can be defined via a dependsOn() statement within both parallel and sequential blocks, with an optional lambda argument that allows setting dependency options. Non-default values of options for implicit snapshot dependencies can be set via the options lambda argument of any block.
The settings using the DSL API version v2017_2+ are validated during DSL execution on the TeamCity server. You can also perform validation locally by generating XML configuration files with help of generate task.
Validation checks that the mandatory properties are specified, for example a build step like this:
buildType {
    ...
    steps {
        exec {
        }
    }
    ...
}
will produce a validation error saying that the mandatory path property is not specified. This is similar to the checks performed by TeamCity when you create a new build step in the UI.
You can also extend the validation in a way relevant for your setup. To do that, you need to override the validate() method. For example, the following class adds a custom validation to Git VCS roots:
open class MyGit() : GitVcsRoot() {
    constructor(init: MyGit.() -> Unit): this() {
        init()
    }

    override fun validate(consumer: ErrorConsumer) {
        super.validate(consumer) //perform basic validation

        url?.let {
            if (it.startsWith("git://") || it.startsWith("http://")) {
                consumer.consumePropertyError("url", "Insecure protocol, please use https or ssh instead")
            }
        }

        authMethod?.let {
            if (it is AuthMethod.CustomPrivateKey || it is AuthMethod.DefaultPrivateKey) {
                consumer.consumePropertyError("authMethod", "Prohibited authentication method, please use 'uploadedKey' instead")
            }
        }
    }
}You can use external libraries in your Kotlin DSL code, which allows sharing code between different Kotlin DSL-based projects.
To use an external library in your Kotlin DSL code, add a dependency on this library to the .teamcity/pom.xml file in the settings repository and commit this change so that TeamCity detects it. Then, before starting the generation process, the TeamCity server will fetch the necessary dependencies from the Maven repository, compile code with them, and then start the settings' generator.
You can establish access to external libraries in private repositories. For this, specify all the required credentials in the Maven settings file (mavenSettingsDsl.xml) and upload it on the Maven Settings page of the Root project.
TeamCity versions before 2018.1 used a different format for Kotlin DSL settings. If you import a project in this obsolete non-portable format, TeamCity will allow working with it. In this case, the Generate portable DSL scripts option will become available.
When TeamCity generates a non-portable DSL, the project structure in the .teamcity directory looks as follows:
pom.xml<project id>/settings.kts<project id>/Project.kt<project id>/buildTypes/<build conf id>.kt<project id>/vcsRoots/<vcs root id>.kt
where <project id> is the ID of the project where versioned settings are enabled. The Kotlin DSL files producing build configurations and VCS roots are placed under the corresponding subdirectories.
In the non-portable format each project has the following settings.kts file:
package MyProject
import jetbrains.buildServer.configs.kotlin.*
/* ... */
version = "2023.09"

project(MyProjectId.Project)
This is the entry point for project settings generation. Basically, it represents a Project instance which generates project settings.
The Project.kt file looks as follows:
package MyPackage
import jetbrains.buildServer.configs.kotlin.*
import jetbrains.buildServer.configs.kotlin.Project

object Project : Project({
   uuid = "05acd964-b90f-4493-aa09-c2229f8c76c0"
   id("MyProjectId")
   parentId("MyParent")
   name = "My project"
   ...
})
where:
idis the absolute ID of the project, the same ID you'll see in browser address bar if you navigate to this projectparentIdis the absolute ID of a parent project where this project is attacheduuidis some unique sequence of characters.
Theuuidis a unique identifier which associates a project, build configuration or VCS root with its data. If theuuidis changed, then the data is lost. The only way to restore the data is to revert theuuidto the original value. On the other hand, theidof an entity can be changed freely, if theuuidremains the same. This is the main difference of the non-portable DSL format from portable. The portable format does not require specifying theuuid, but if it happened so that a build configuration lost its history (for example, on changing build configuration external id) you can reattach the history to the build configuration using the Attach build history option from the Actions menu. See details.
note
If the build history is important, it should be restored as soon as possible: after the deletion, there is a configurable timeout (5 days by default) before the builds of the deleted configuration are removed during the build history clean-up.
In case of a non-portable DSL, patches are stored under the project patches directory of .teamcity:
<project id>/patches/projects/<uuid>.kts
<project id>/patches/buildTypes/<uuid>.kts
<project id>/patches/templates/<uuid>.kts
<project id>/patches/vcsRoots/<uuid>.kts
Working with patches is the same as in portable DSL: you need to move the actual settings from the patch to your script and remove the patch.
In general, TeamCity processes a DSL parameter as a string. To mark a DSL value as secure, you can assign it to a parameter of the password type:
params {
    password("<parameter_name>", "credentialsJSON:<token>")
}
where <parameter_name> is a unique name which can be used as a key for accessing the secure value via DSL (for example, in the File Content Replacer build feature); <token> is the token corresponding to the target secure value.
Example:
params {
    password("pass-to-bucket", "credentialsJSON:12a3b456-c7de-890f-123g-4hi567890123")
}
tip
To generate a token for a secure value, follow this instruction.
Templates, build configurations, and VCS roots have unique IDs throughout all the TeamCity projects on the server. These IDs usually look like: <parent project id>_<entity id>.
Since these IDs must be unique, there cannot be two different entities in the system with the same ID.
However, one of the reasons why portable DSL is called portable is because the same settings.kts script can be used to generate settings for two different projects even on the same server.
To achieve this while overcoming IDs uniqueness, TeamCity operates with relative IDs in portable DSL scripts. These relative IDs do not have parent project ID prefix in them. So when TeamCity generates portable Kotlin DSL scripts, it has to remove the parent project ID prefix from the IDs of all the generated entities.
But this will not work if not all the project entities have this prefix in their IDs. In this case the following error can be shown:
Build configuration id '<some id>' should have a prefix corresponding to its parent project id: '<parent project id>'
To fix this problem, change the ID of the affected entity. If there are many such IDs, use the Bulk edit IDs project action to change all of them at once.
To keep your settings files neat, it is convenient to store lengthy code instructions in separate files. Such auxiliary scripts can be put in the .teamcity directory alongside the settings files. You can refer to them by their relative paths.
For example, this part of settings.kts creates an object with a function readScript which reads the contents of the file it receives on input:
object Util {
    fun readScript(path: String): String {
        val bufferedReader: BufferedReader = File(path).bufferedReader()
        return bufferedReader.use{ it.readText() }.trimIndent()
    }
}
In the build step, we call this function, so it reads the scripts\test.sh file located under the .teamcity directory:
object CommandLineRunnerTest : BuildType({
    name = "Command Line Runner Test"
    steps {
        script {
            name = "Imported from a file"
            scriptContent = Util.readScript("scripts\\test.sh")
        }
    }
})
As a result, your Command Line build step will run a custom script with the body specified in scripts\test.sh.
Problem: I changed the URL of the VCS root where settings are stored in Kotlin, and now TeamCity cannot find any settings in the repository at the new location.
Solution:
Fix the URL in the Kotlin DSL in the version control and push the fix.
Disable versioned settings to enable the UI.
Fix the URL in the VCS root in the UI.
Enable versioned settings with the same VCS root and the Kotlin format again. TeamCity will detect that the repository contains the
.teamcitydirectory and ask you if you want to import settings.Choose to import settings.
Problem: I want to generate a TeamCity build configuration based on the data in some file residing in the VCS inside the .teamcity directory.
Solution:
You can access the location of the .teamcity directory from DSL scripts with help of the DslContext.baseDir property, for example:
val dataFile = File(DslContext.baseDir, "data/setup.xml")Since 2019.2, this is the preferable approach as TeamCity no longer guarantee that the current working directory for DSL scripts is the same as the .teamcity directory.
Before 2019.2, the following code could be used:
val dataFile = File("data/setup.xml")To reorder subprojects or build configurations inside a project via DSL, similarly to the respective UI option, pass their lists to subProjectsOrder or buildTypesOrder respectively. For example,
project {
    buildType(BuildA)
    buildType(BuildB)
    buildType(BuildC)
    buildTypesOrder = arrayListOf(BuildC, BuildA, BuildB)
}

object BuildA: buildType ({
...
})

object BuildB: buildType ({
...
})

object BuildC: buildType ({
...
})
With these settings, the build configurations will be displayed in the UI in the following order: C, A, B.
Thanks for your feedback!