Creating and Editing Build Configurations
Build configurations and pipelines represent actual CI/CD routines. A build configuration stores a sequence of build steps (basic operations to be performed during a build run), and settings required to execute these steps. These settings include:
parameters that allow you to quickly alter the configuration behavior;
triggers that allow TeamCity to automatically start new builds when certain conditions are met;
build features that extend the configuration's functionality;
agent requirements that allow you to run configuration builds on specific build agents;
and so on.
It is recommended to have a separate build configuration or a pipeline for each sequence of builds (that is performing a specified task in a dedicated environment). This allows for proper features functioning, like detection of new problems/failed tests, first failed in/fixed in tests status, automatically removed investigations, and so on.
Build Configurations vs Pipelines
Before we dive into creating configurations, it’s important to understand the differences between build configurations and pipelines and when to use each. Note that once created, you cannot convert a build configuration into a pipeline or a job, and vice versa.
- Parents
Both build configurations and pipelines are owned by TeamCity projects. Each project can have an unlimited number of configurations and pipelines.
- Children
A build directly owns its build steps.
A pipeline owns jobs, which in turn own regular build steps.
- Supported VCS types
Classic TeamCity build configurations support Git, Subversion, Mercurial, TFS, and Perforce, with integrations for major VCS providers like GitHub, GitLab, Bitbucket, Azure, and others.
TeamCity Pipelines offer built-in integrations with GitHub, GitLab, and Bitbucket Cloud. Other Git repositories can be connected via direct URLs. Subversion, Mercurial, TFS, and Perforce are not currently supported.
- Execution mode
Pipelines always run from start to finish, executing all jobs unless interrupted by errors like compilation failures or connection issues.
Build configurations support conditional step execution. For example, you can add a step that runs only if a previous one fails.
- Dependencies
Currently, pipelines support dependencies only between jobs within the same pipeline and cannot be linked into a larger sequence.
Build configurations can form build chains across different TeamCity projects.
- Configuration as code
Both pipelines and build configurations can store their settings as code, right next to your project source code. Both entities support branched settings, meaning each repository branch can have its own configuration file.
Build configurations store their settings in XML or Kotlin DSL format. You cannot edit these files from the TeamCity UI.
Pipelines store their settings in YAML which can be edited directly in TeamCity.
Kotlin DSL support is planned for future pipeline versions. However, there are no current plans to add YAML support for build configurations.
- Limitations
Build configurations are core TeamCity components, offering extensive features and customization options.
Introduced in TeamCity 2025.07, Pipelines focus on providing the most intuitive way to design CI/CD workflows. However, they currently lack some of the functionality available in build configurations. For example, they do not support the majority of build steps and have no additional build features.
In summary, while both pipelines and build configurations are owned by projects, they serve different needs. Pipelines are ideal for simpler CI/CD workflows in smaller projects (typically up to 10–15 builds). Choose build configurations instead if:
Your project involves more complex workflows than 10–15 sequential builds.
You are an experienced user who needs advanced features (such as Build Approval) not yet available in pipelines.
You require fine-grained control over which build chain configurations run, when, and how.
Create Build Configurations in TeamCity UI
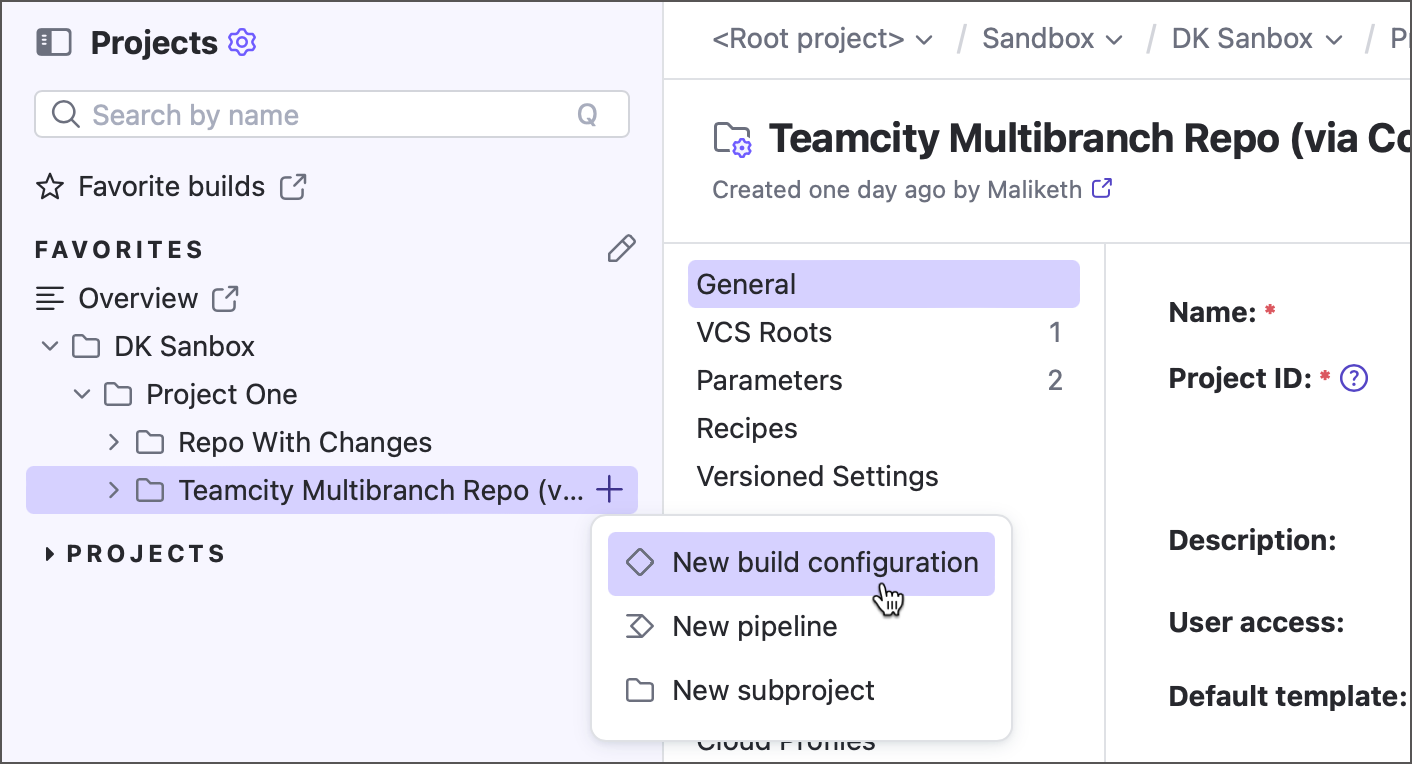
To add a build configuration to a TeamCity project, use the + button in the sidebar...
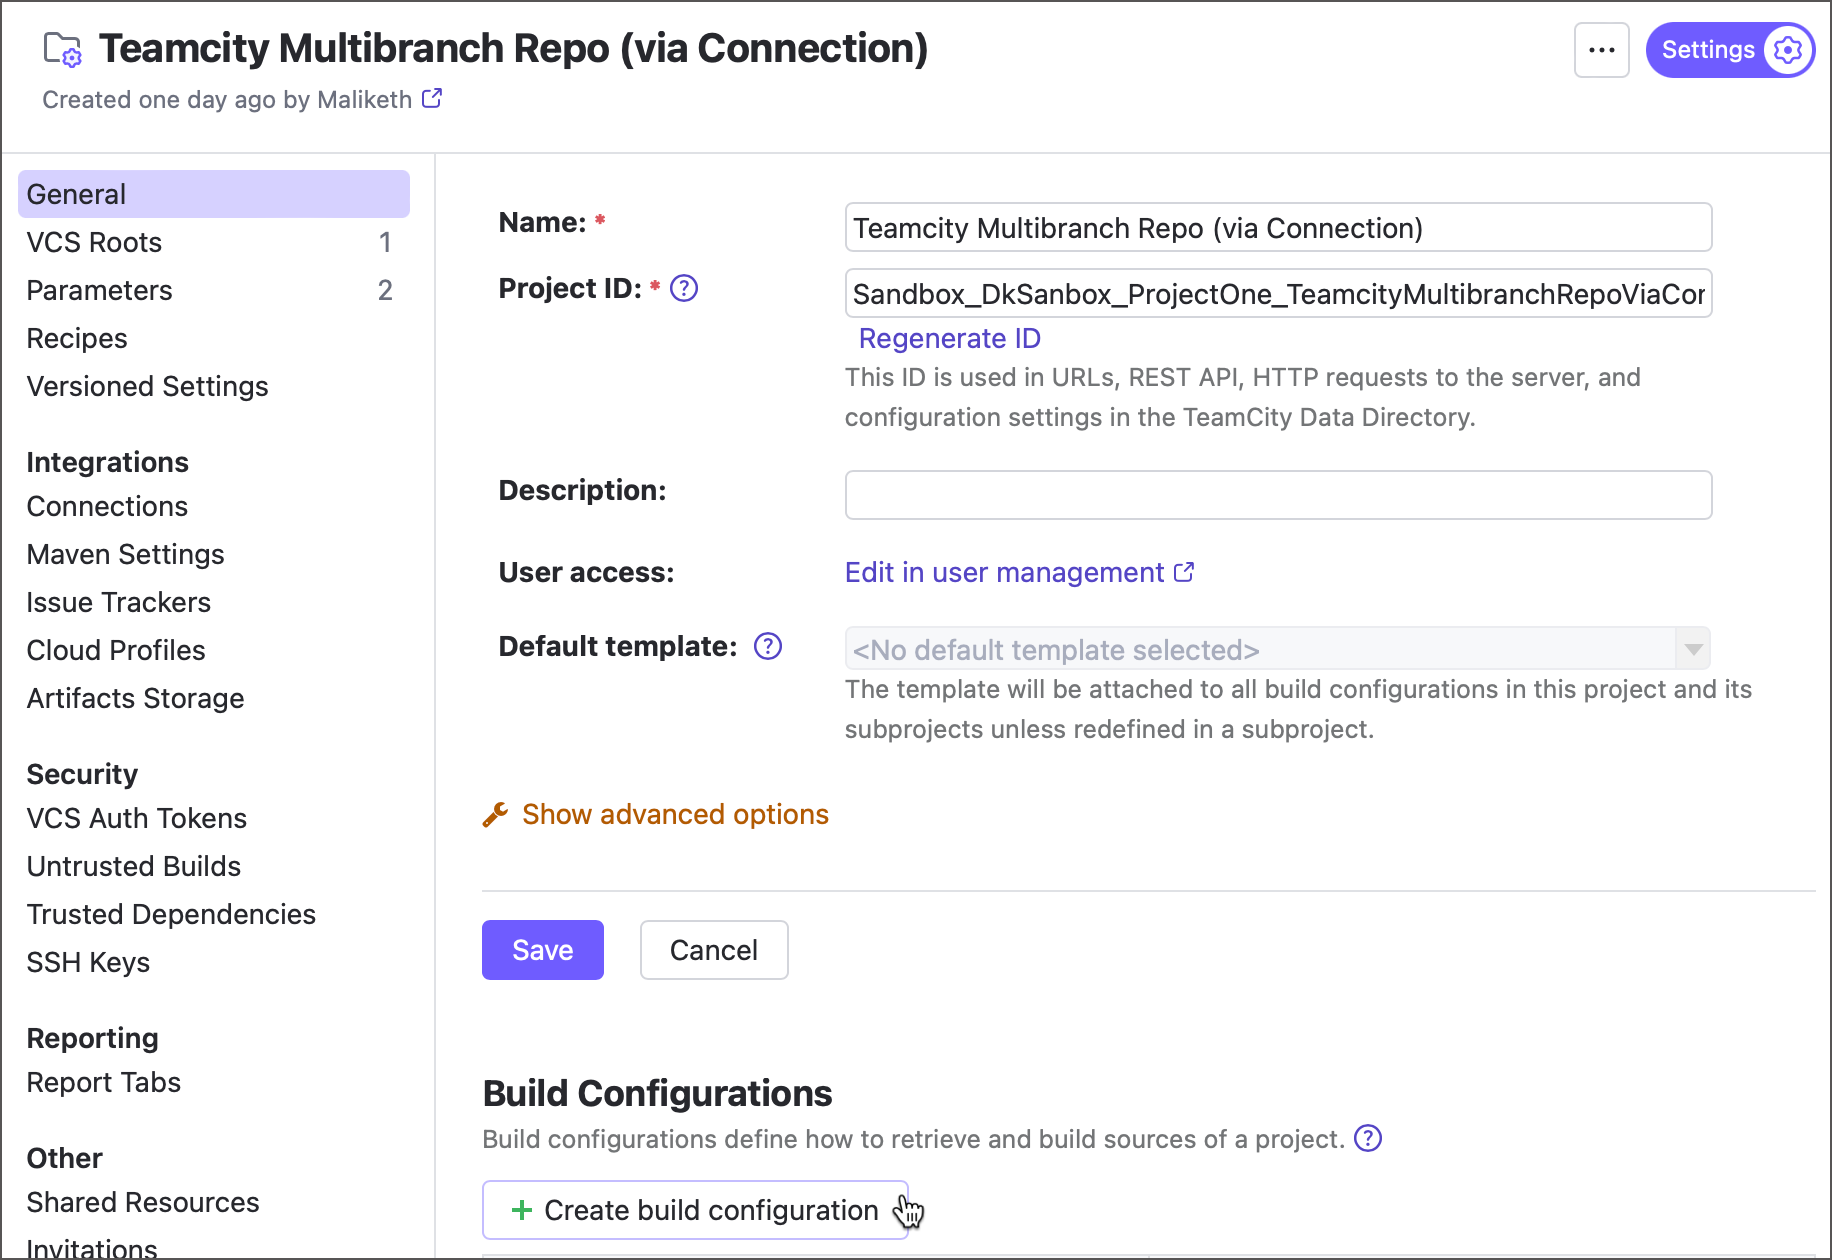
...or click Create build configuration from the General tab of project settings.
Available Options
A build configuration can be one of two major types: a configuration that builds, tests, or deploys a project stored in a VCS, or one that does not require a remote repository (for example, it may employ a 3rd-party REST API to download and process data).
Configurations that check our remote repositories can in turn be created using TeamCity connections or VCS roots.
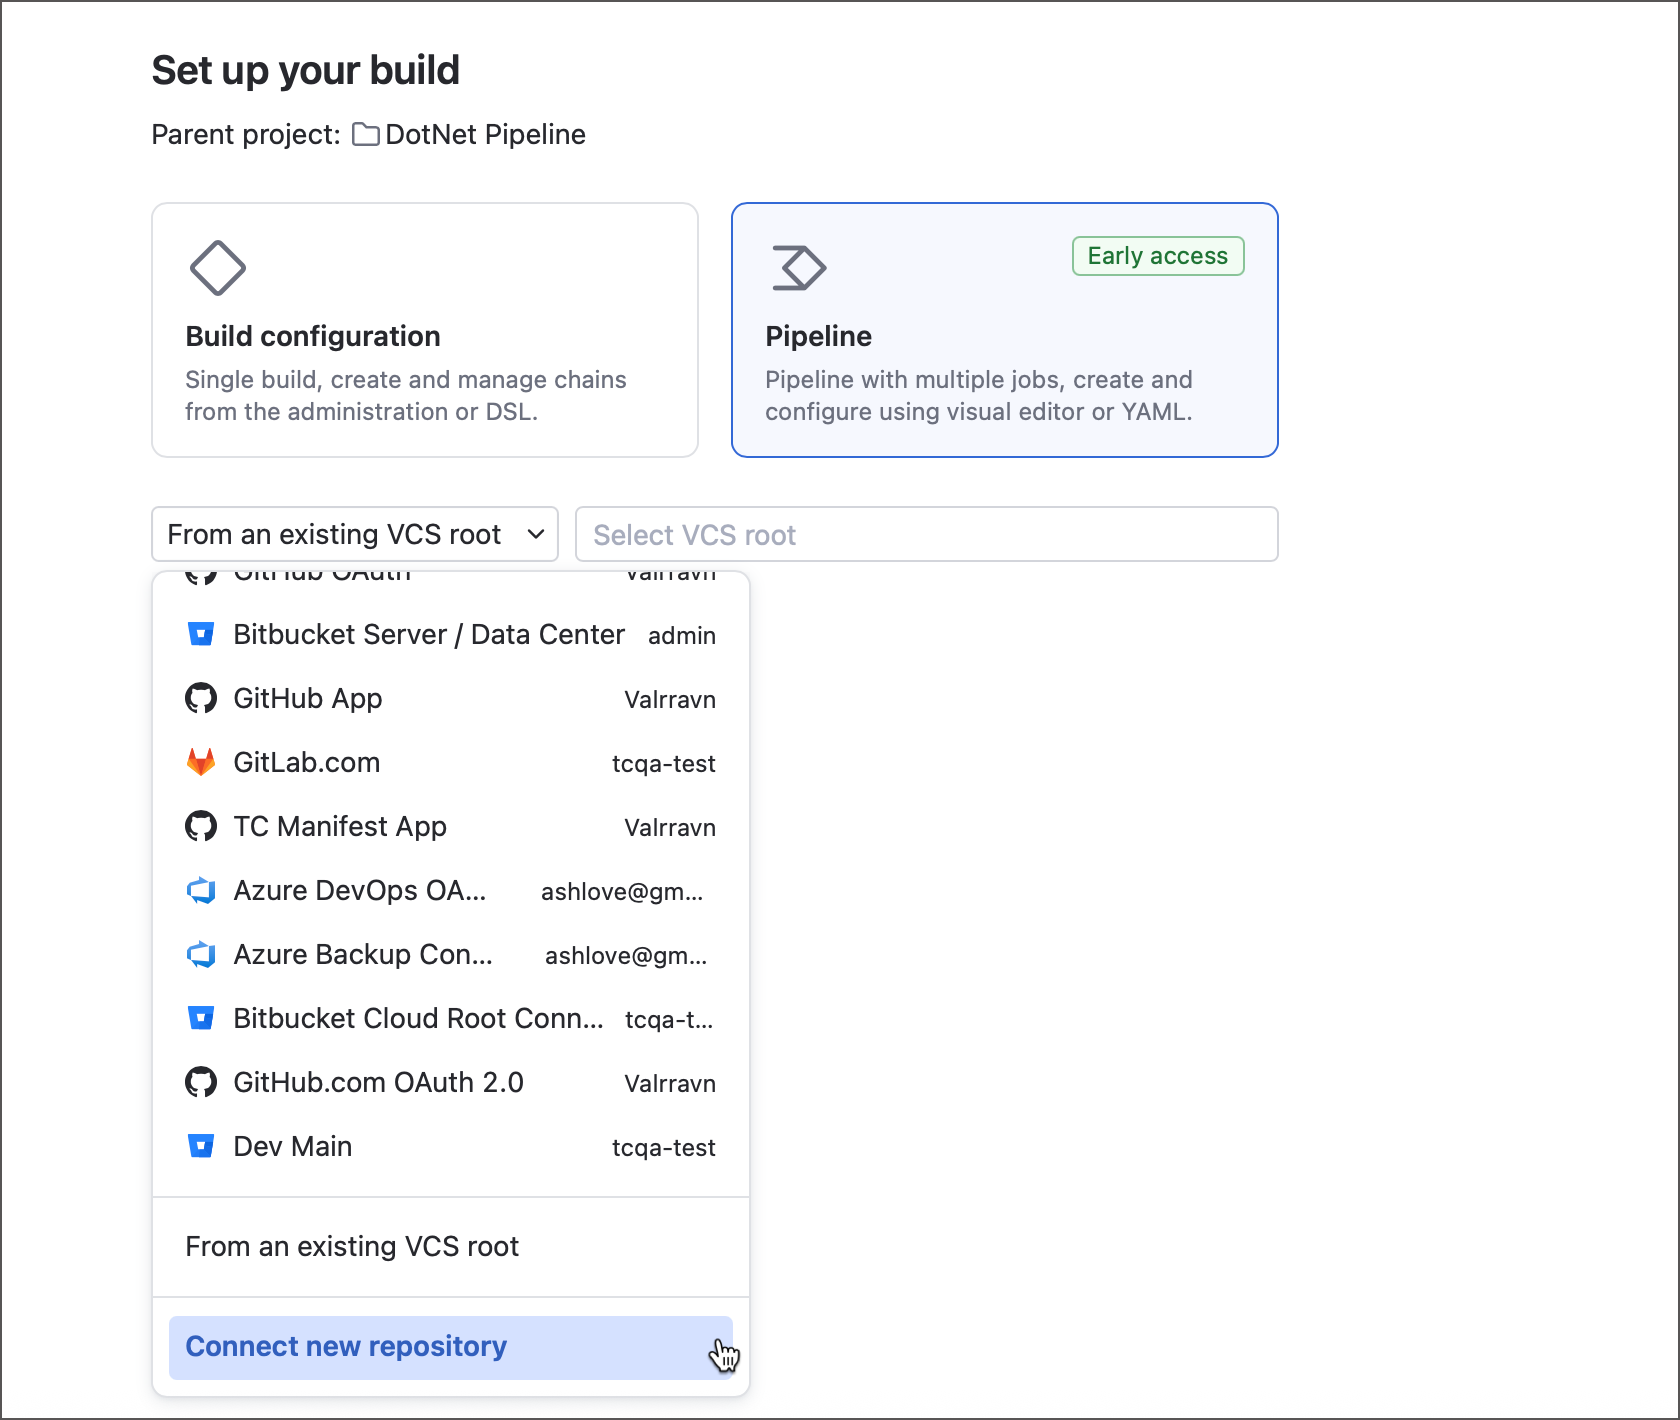
All available options are displayed in the corresponding drop-down on the Set up your build page.
Use a TeamCity Connection
TeamCity connections store all information required to access an external resource: a VCS hosting, a cloud data storage, a Docker registry, a secrets vault, and so on. Using connections is the most convenient way to build your sources: configure it once and just choose a required repository from the list whenever you add new build configuration or pipeline.
The figure above illustrates a list of existing connections: a GitLab connection, a GitHub connection, few Azure connections, and more. If no project among build configuration parents owns a VCS connection, your only option here will be to create a new one via the Connect new repository menu item.
Use a Repository URL
This option allows you to build configuration in one go using a Git, Subversion, Mercurial, TFS, or Perforce repository (depot) URL. You can use any URL type:
A regular repository web link:
https://github.com/Johndoe/my-sample-appAn HTTPS clone URL:
https://github.com/Johndoe/my-sample-app.gitAn SSH clone URL:
git@github.com:Johndoe/my-sample-app.git
To start building a remote repository, follow the steps below.
On the Set up your build page, choose the From any Git URL option.
Choose the authentication type.
- SSH key
Available if the Repository URL is an SSH clone URL. Click Upload SSH key to add a private key, which will be saved in the parent project (parent project settings | SSH keys) and appear in the drop-down menu when configuring additional projects.
Learn more: SSH Keys Management
- HTTPS
Available for HTTP(s) clone URLs, this option provides three authentication options:
Token — issue a personal access token (PAT) on a VCS side and paste it here. You can also use TeamCity Manage Refreshable Access Tokens page to issue tokens.
Password — enter a regular username/password credentials.
Anonymous — available for public repositories. This option should only be used if you do not intend to leverage write access permissions (for example, to post TeamCity build statuses back to the VCS).
Set up basic configuration options.
Name and (optionally) description — public texts displayed in TeamCity UI.
Default branch — the full name of a branch that will become a default one in TeamCity (for example,
refs/heads/main). See the following article for more information: Default Branch.Start builds on new changes in — if enabled, adds a VCS trigger that launches new builds whenever TeamCity detects new commits.
Build configuration type — allows you to select the configuration type depending on its purpose. See this article to learn more about unique features of composite and deployment configurations.
Click Create. TeamCity will bring you to detailed configuration settings, where you can add build steps, edit the list of monitored branches, enable additional build features, and so on.
Use a VCS Root
Every build configuration that processes sources stored in a remote repository does so by leveraging a VCS root. This object stores connection settings required to access a single repository, along with advanced settings: the list of monitored branches, the automatic polling interval, the submodule checkout policy, and more.
If you already have a build configuration or a pipeline that builds, tests, or deploys a required repository, you can reuse a VCS root of that configuration/pipeline. To do this, use either of the following methods:
Create new configuration — select From an existing root option on the Set up your build page.
Edit existing configuration — navigate to Build Configuration Settings | Version Control and click Attach VCS root.
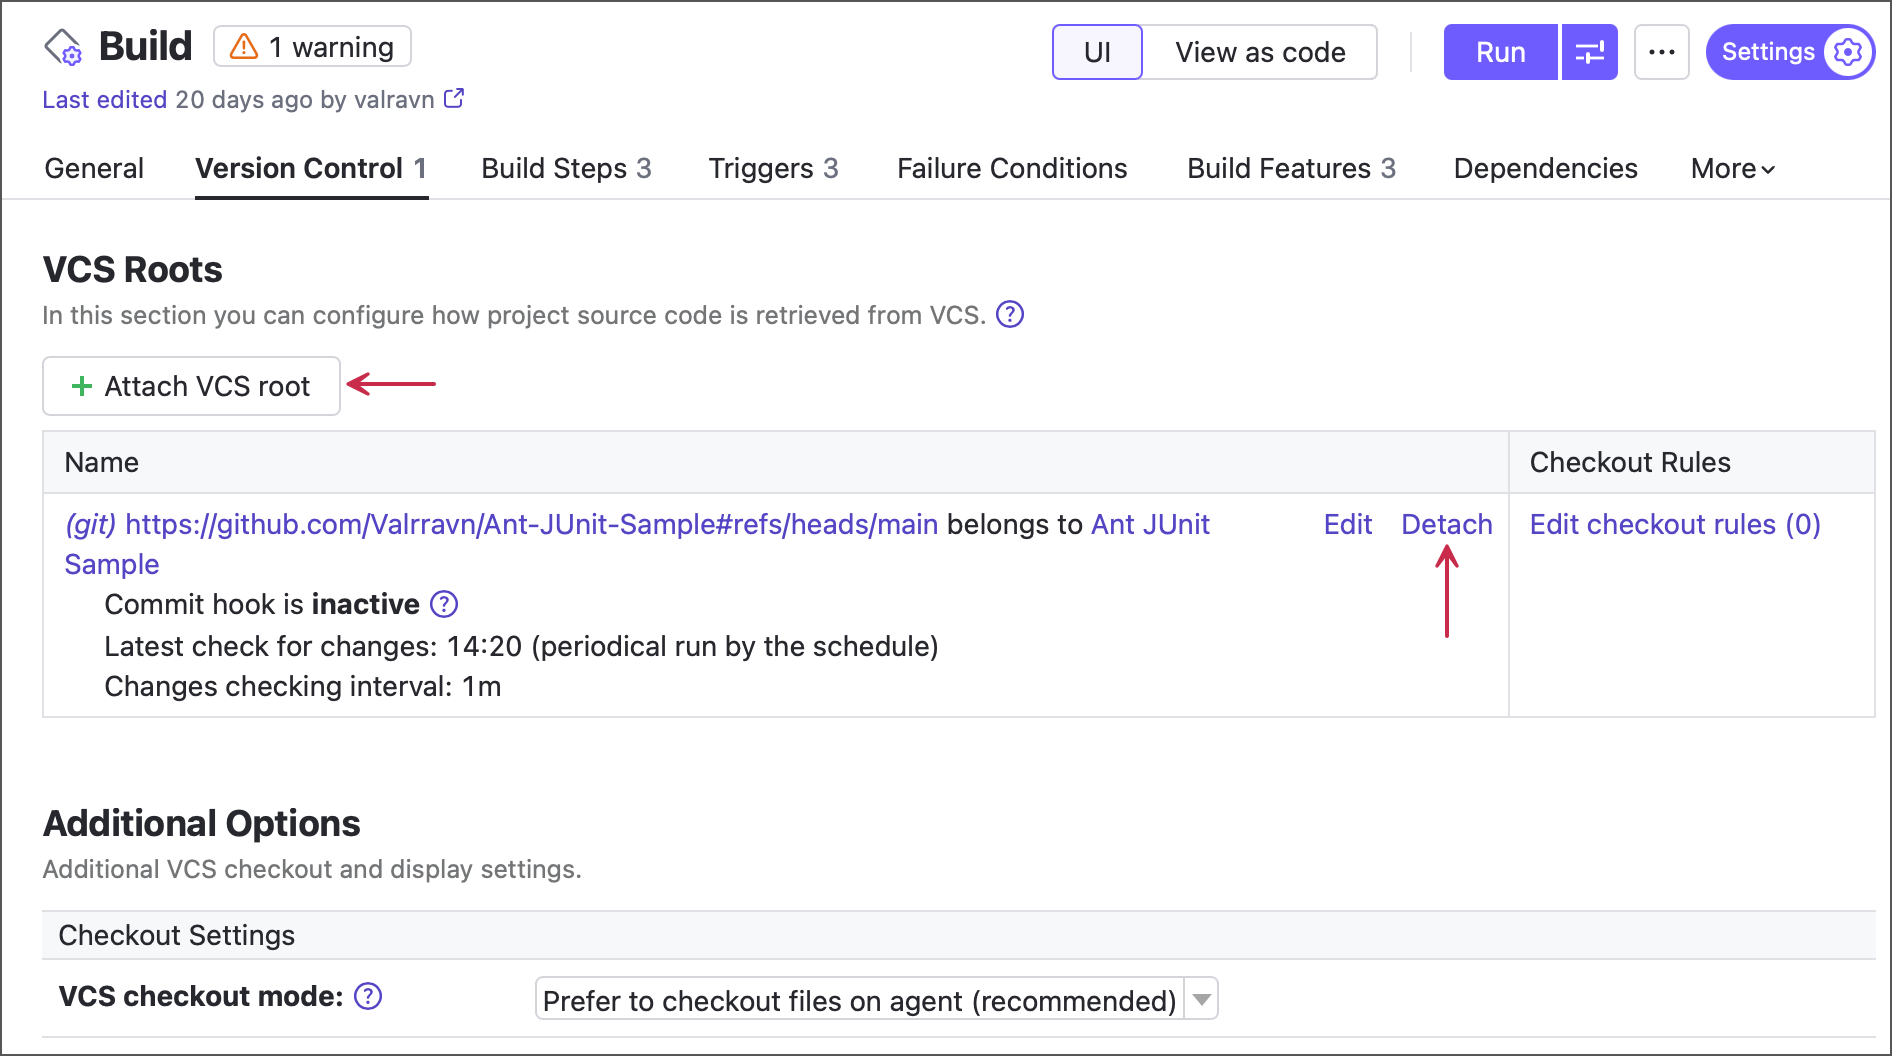
Reusing existing VCS roots allows you to save time on setting up required authorization and branch settings, and avoid creating duplicate roots.
Configuration Without a Repository
This configuration type doesn’t check out any remote repositories when it runs. Its steps, for example, only execute predefined scripts and send HTTP requests.
You can create a new "unbound: configuration in two ways:
On the Set up your build page, select Without repository.
In the classic UI, open the New build configuration page and click the Manually tile.
A VCS root controls the VCS provider connection and repository checkout. Therefore, you can make any build configuration unbound by detaching its VCS root(s). Conversely, attaching a VCS root to a configuration without repositories enables it to check out remote sources. Both actions can be performed in the Version Control section of build configuration settings.

Configuration With Multiple Repositories
Configurations determine which repositories to check out and which branches to track through their attached VCS roots. A configuration can have any number of roots, from none to many.
Typically, a configuration uses a single repository and thus has one VCS root. If you need to build completely separate projects, it’s best to create individual configurations and link them in a build chain if necessary. However, when multiple repositories are related (such as a core product and its plugins), you can attach several VCS roots to the same configuration to build them together. To do this, create a configuration using any of the methods mentioned in this article, then go to the Version Control section of its settings. Here you can create more VCS roots that target required repositories.
The Kotlin DSL snippet below illustrates a configuration with two attached roots.
All VCS roots download sources into the same checkout directory. To avoid file conflicts and keep the folder organized, it’s best to download each repository’s sources into separate subdirectories using root checkout rules. For example, the snippet above places sources in the "MavenRepo" and "GradleRepo" folders within the default checkout directory.
Example: Create a Connection-Based Configuration
In this example, we will add a connection to GitHub and use it to create a new build configuration.
TeamCity supports two GitHub authentication methods: OAuth 2.0 and GitHub App. Both types require minimal customization and take less than a minute to set up. To learn more about both connection types and other VCS provider connections, refer to this article: Configuring Connections.
You can create a connection-based configuration in two ways: create a connection under project settings and select it on the Set up your build page, or do everything from this single page. The tabs below illustrate both approaches.
Use TeamCity UI to add a build configuration to the required project.
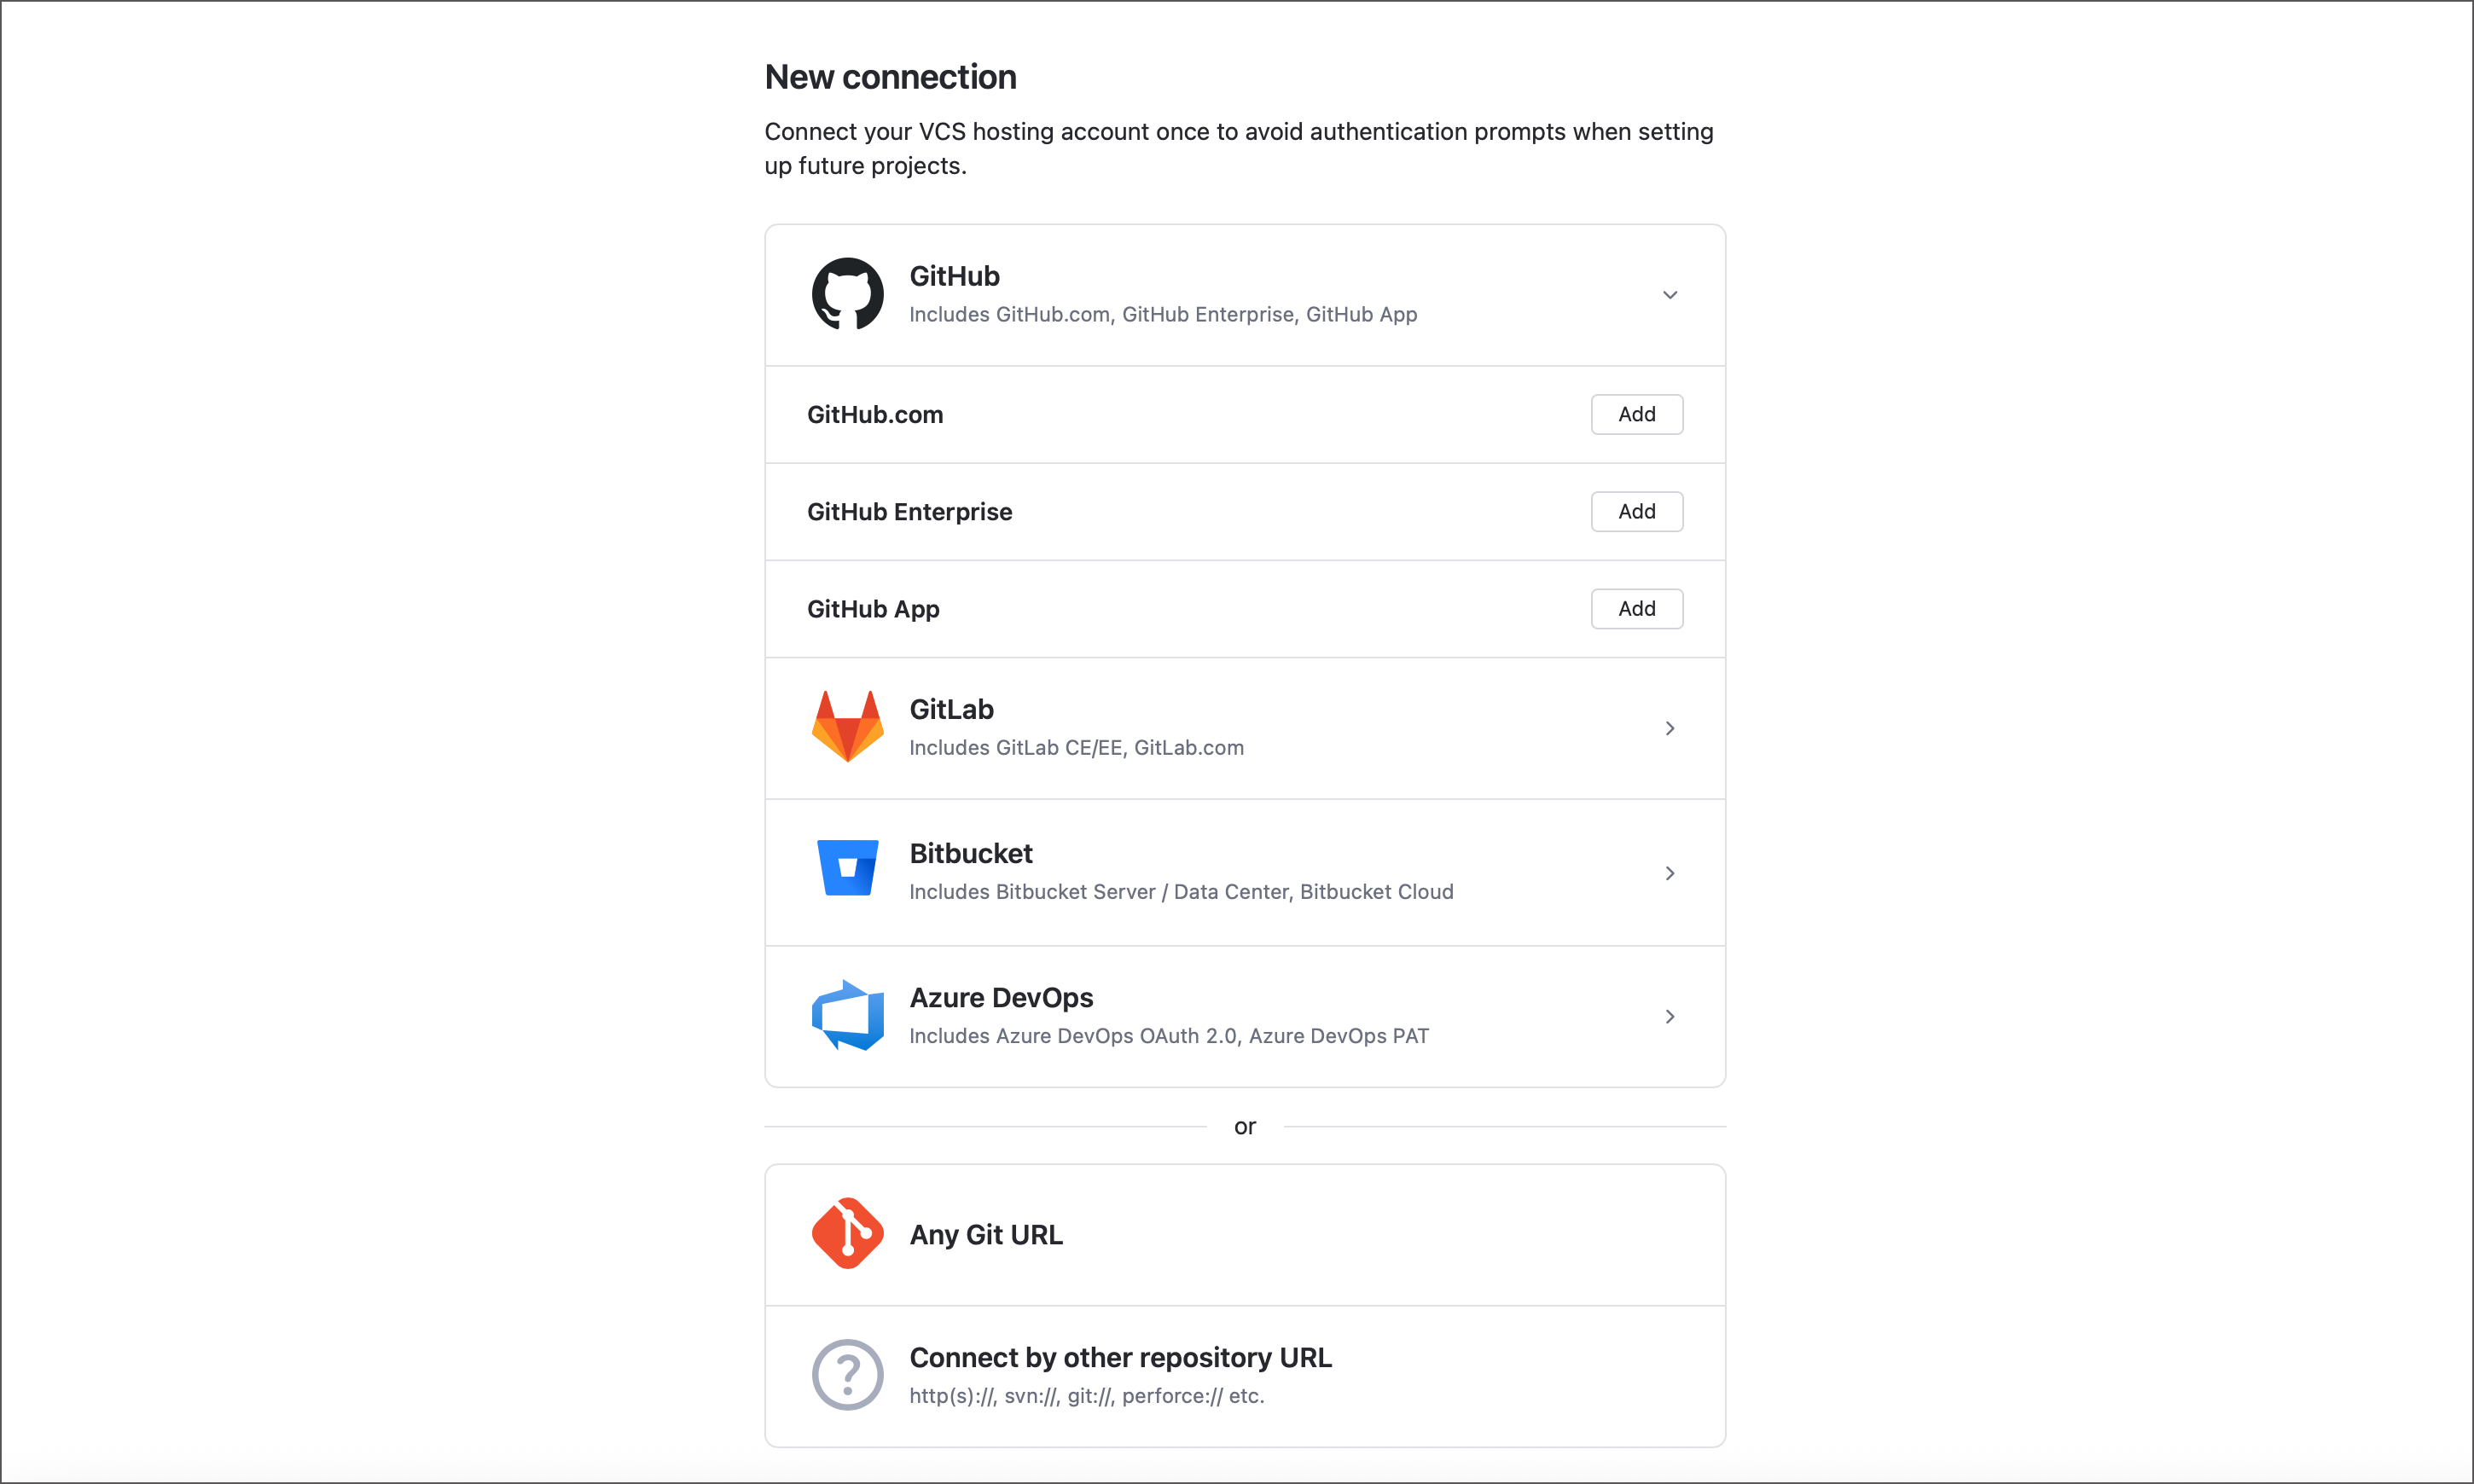
Select Connect new repository from the drop-down menu.
Expand the GitHub tile and choose GitHub.com.
Follow TeamCity instructions to navigate to your GitHub "Developer Settings" page and create a new application.
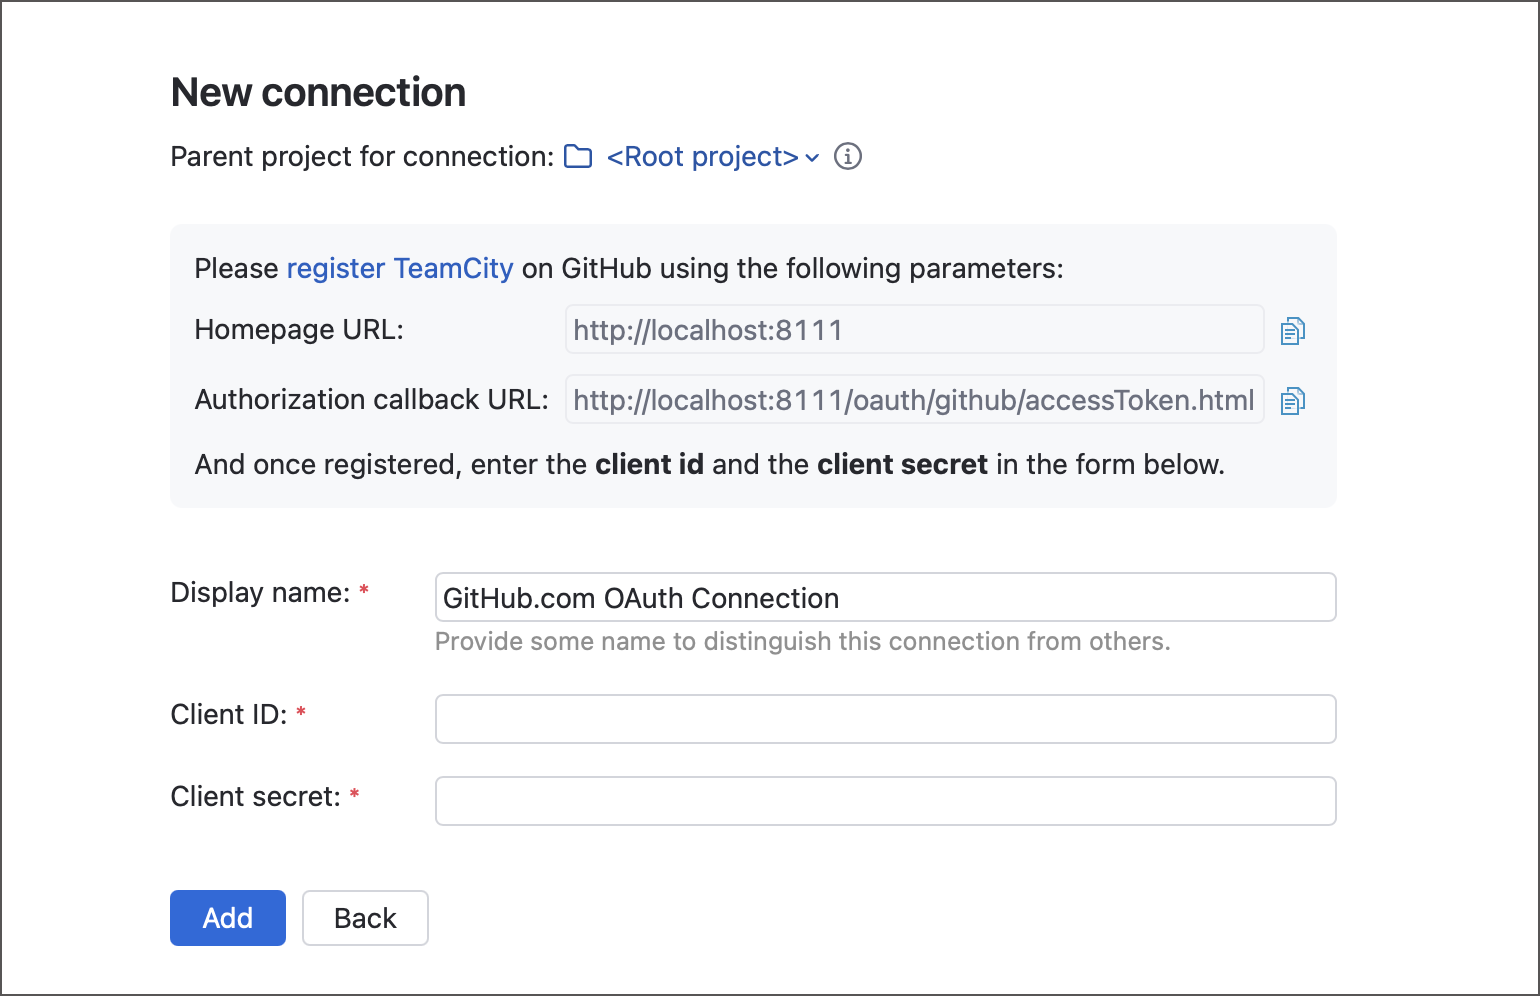
On the GitHub application page, click Generate a new client secret and paste both this secret and client ID to corresponding TeamCity connection properties.
Once the application is installed on GitHub, you can select your new connection in the Set up your build page drop-down menu. Note that upon the first usage, you will need to click Authorize <Username> to log in GitHub using your new connection.
TeamCity will show a list of repositories accessible via the underlying connection. Use the search panel to find the desired repository, then click it to continue.
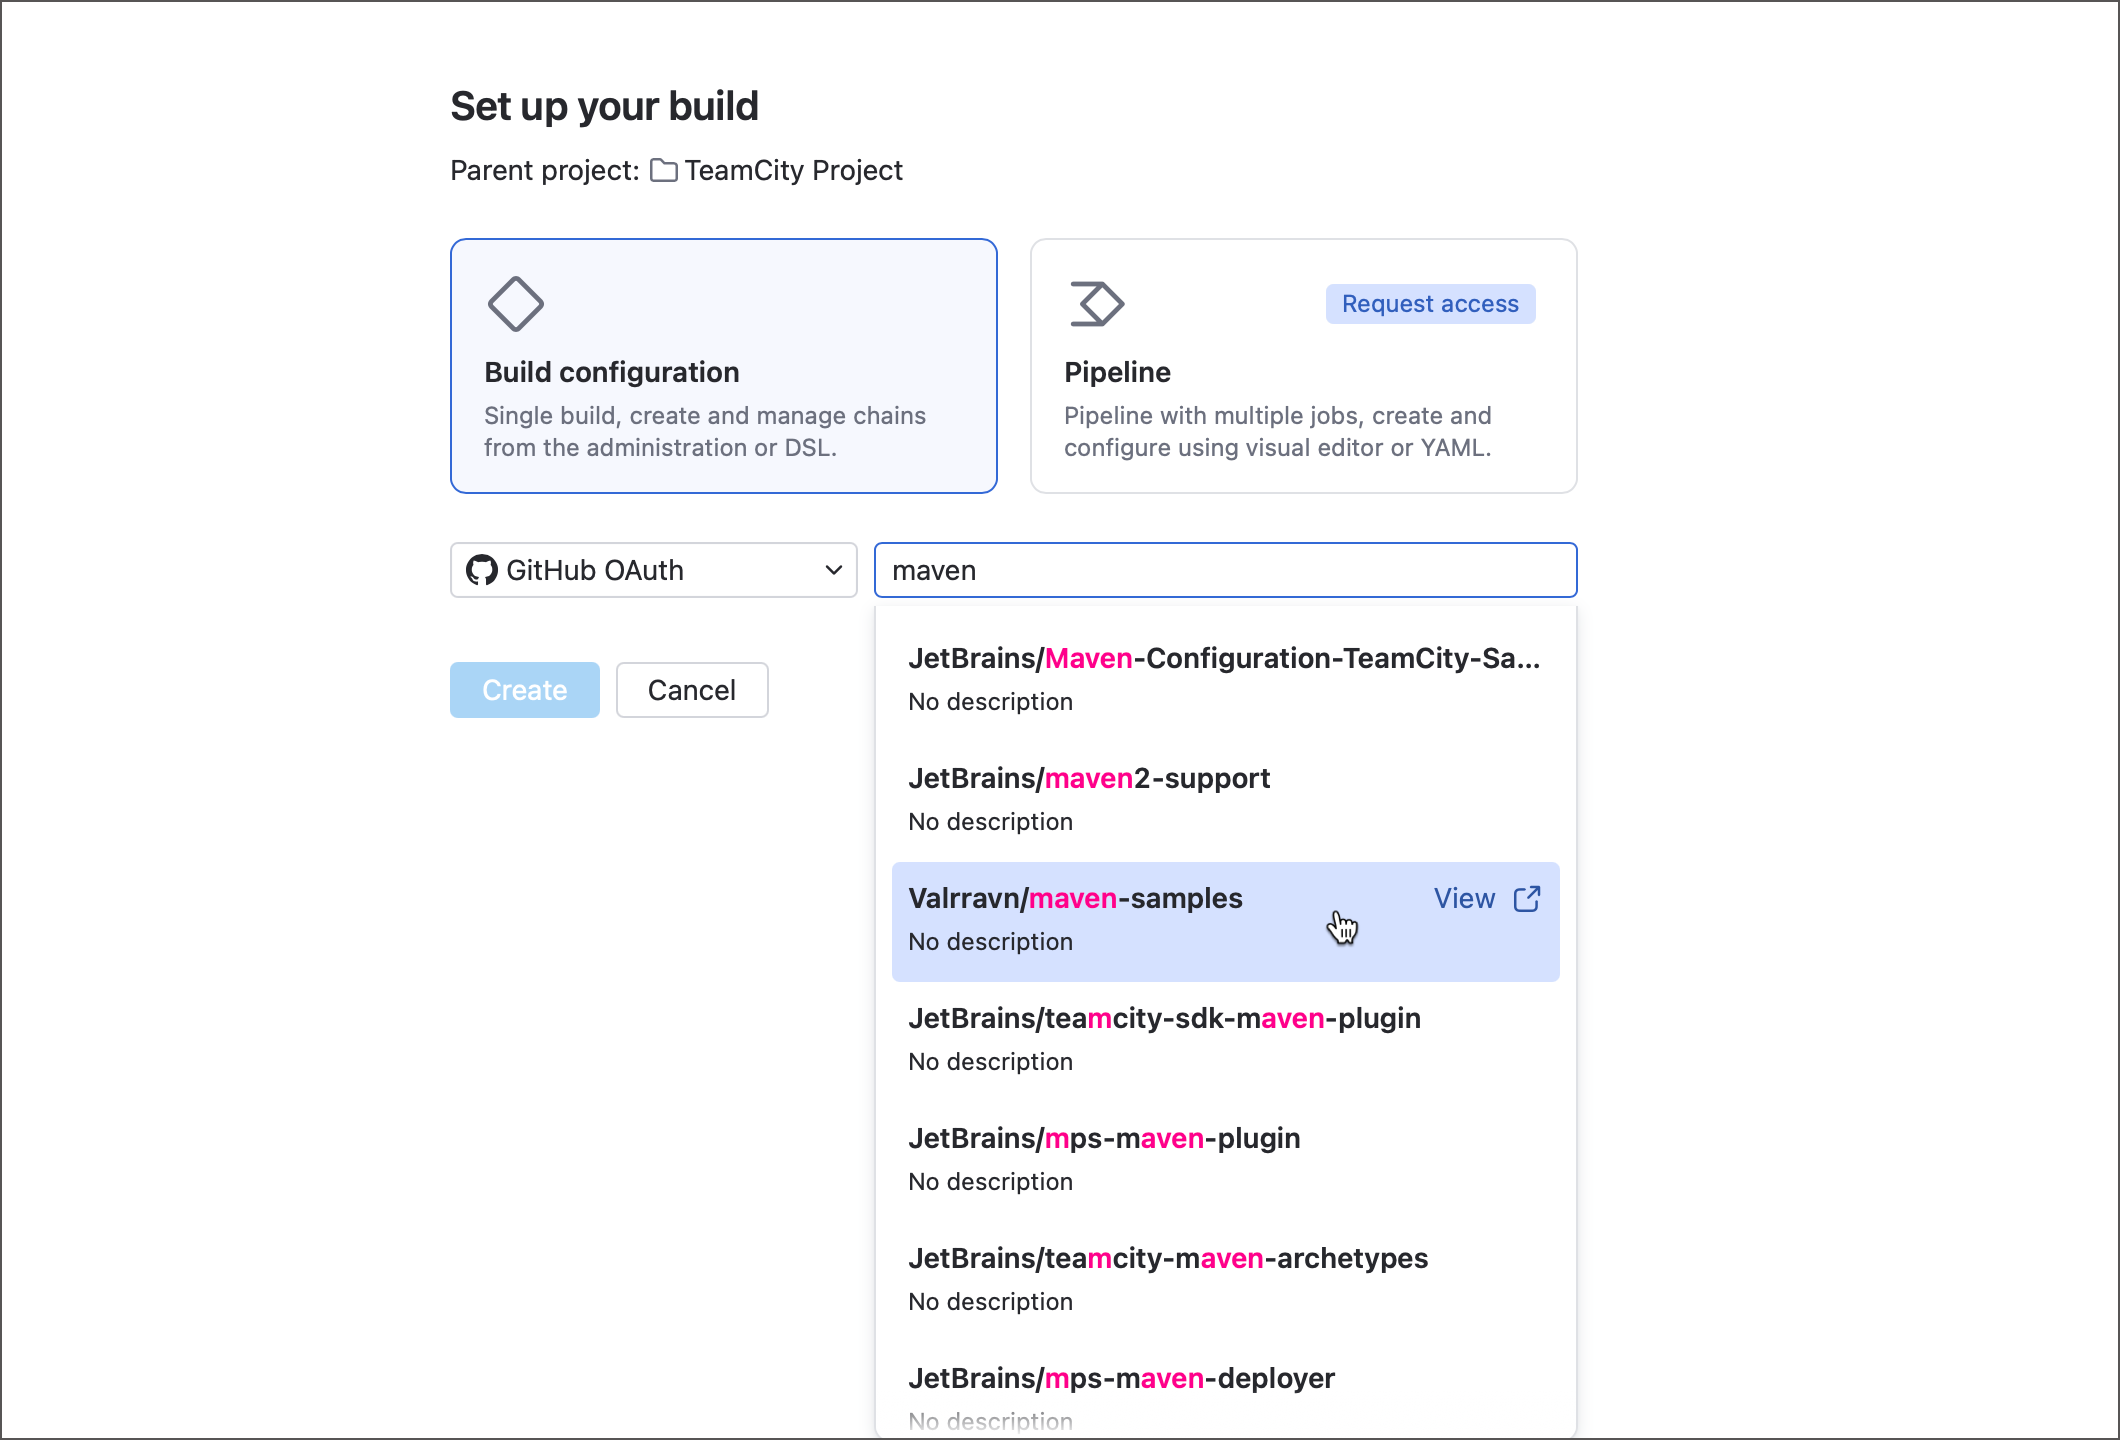
Set up basic configuration options and click Create to finish.
Step 1: Create a connection
Open settings of a project that should own your new GitHub connection. If you want a future connection to be available for any project created on this server, modify the Root project.
Navigate to the Connections tab and click Add Connection.
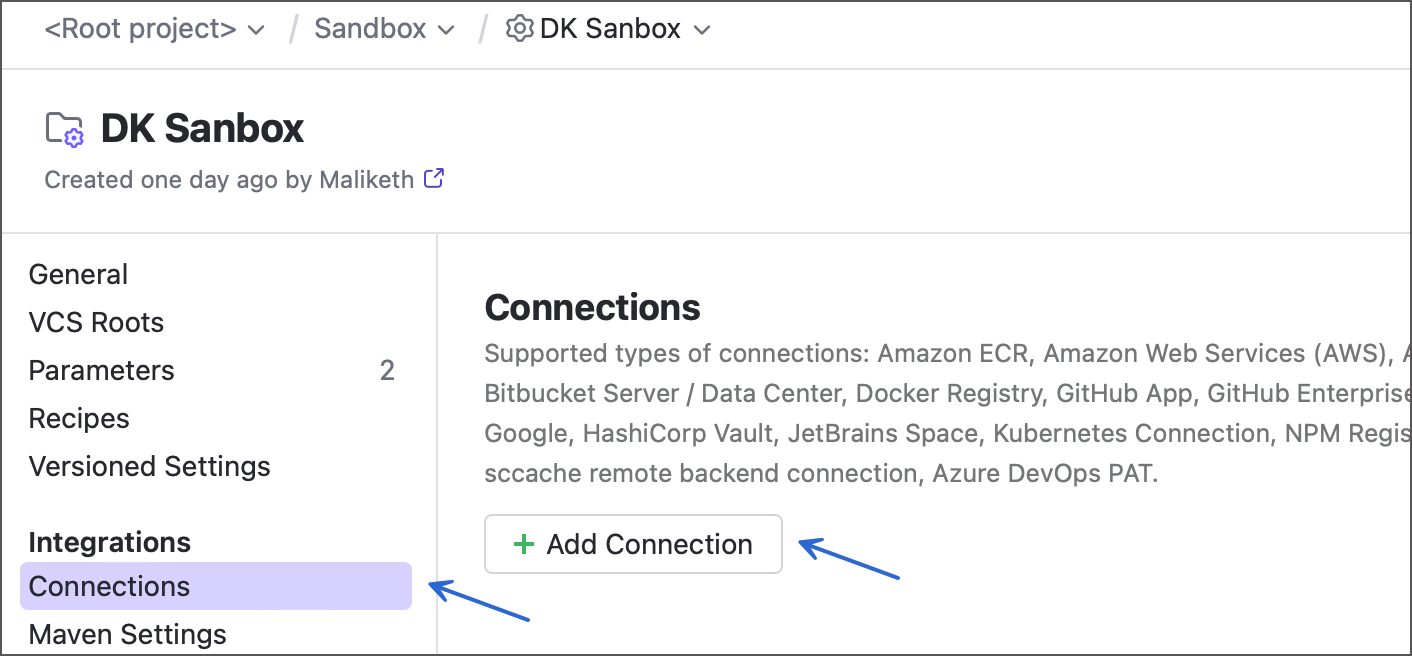
Choose the GitHub App as the connection type and click Create App.
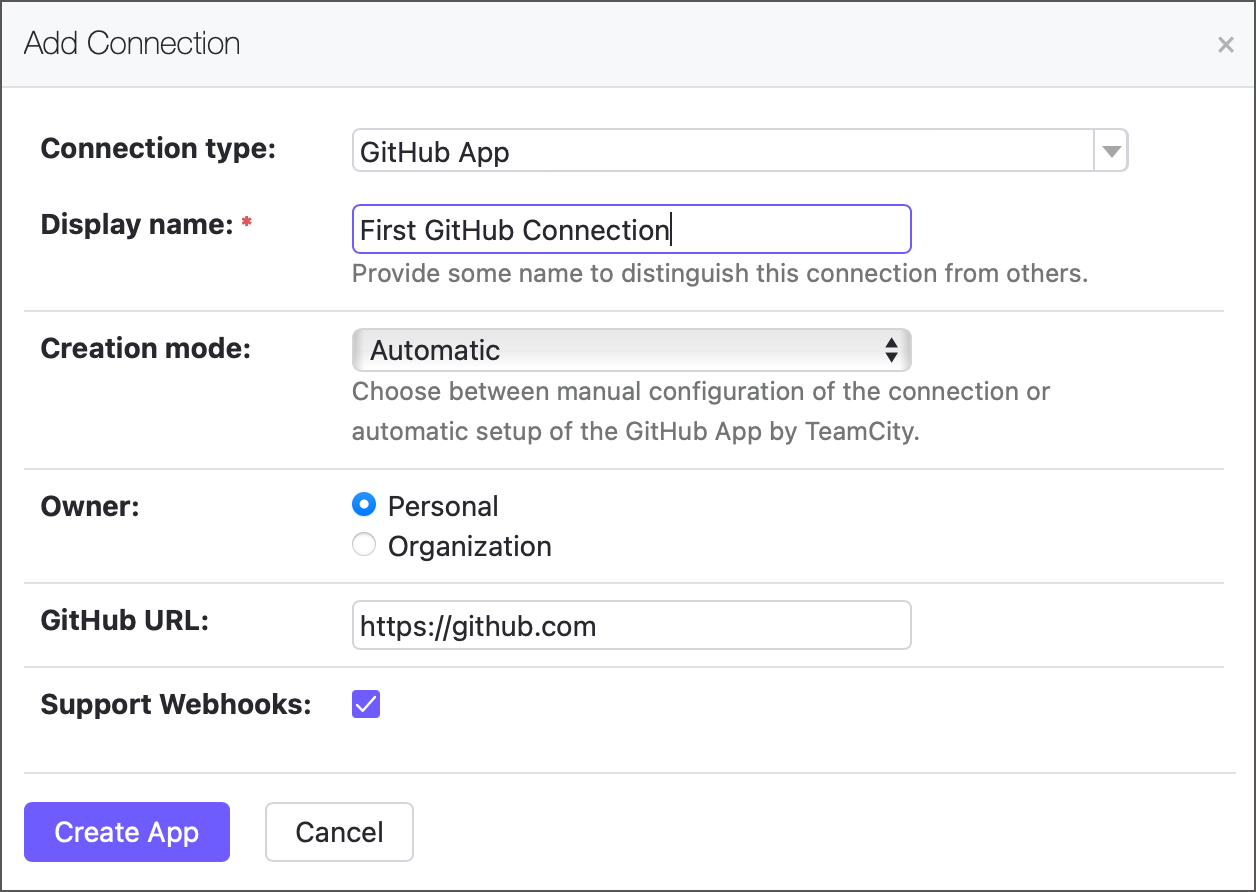
TeamCity will redirect you to GitHub to approve the App, choose its installation location (personal account or organization), and optionally restrict its repository access. You can review and edit the TeamCity-configured App anytime via GitHub Settings | Developer Settings | GitHub Apps or uninstall it on GitHub Settings | Applications page.
After installing the App, you will return to TeamCity, where values for all connection settings (App ID, client ID, client secret, and others) will already be filled in. Click Test connection to verify the setup, then Save to complete it.
Step 2: Create a build configuration
Use TeamCity UI to add a build configuration to the required project.
Choose your new connection from the list. If this connection is used for the very first time, you might need to sign in.
TeamCity will show a list of repositories accessible via the underlying connection. Use the search panel to find the desired repository, then click it to continue.

Set up basic configuration options and click Create to finish.
Create Build Configurations in Kotlin DSL
The following Kotlin code creates a new build configuration that utilizes the target VCS root to interact with a VCS hosting provider:
See these articles for more information:
Create Build Configurations in REST API
The following request creates a new empty TeamCity build configuration owned by the specific parent project.
See the following articles for more information:
Build Configuration Templates
Templates allow you to quickly spawn multiple configurations with identical settings. After a configuration is created, you can override its settings.
You can create build configuration templates manually or extract them from existing configurations.
Create a template manually
Creating templates is identical to creating build configurations via the Manually tile.
Open project settings and navigate to the General settings tab.
Scroll down to the Build Configuration Templates section and click Create template.
Enter the template name and description, and click Create.
Specify settings that should present in every configuration spawned from this template:
Triggers, and more.
Extract a template from a configuration
If you already have a build configuration that you want to use as reference, you can extract a template from it.
Open the Actions menu in the top right corner and click Extract template....
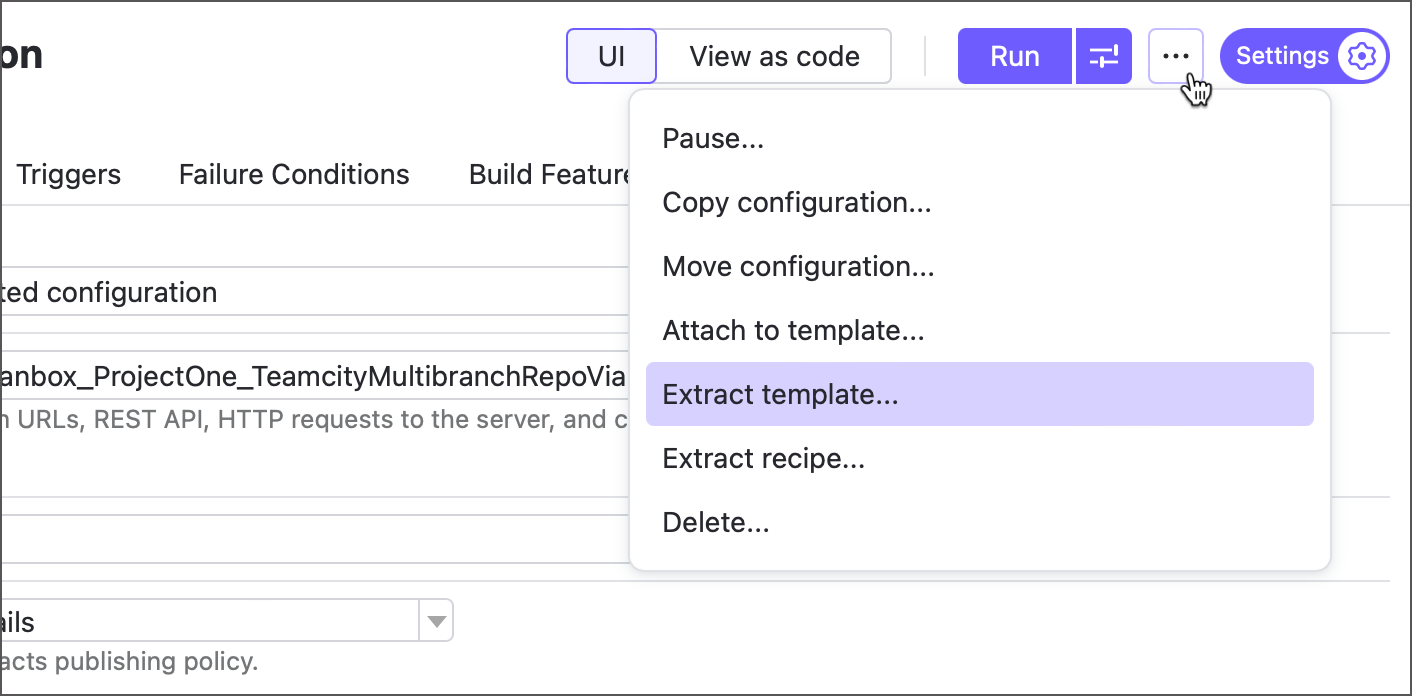
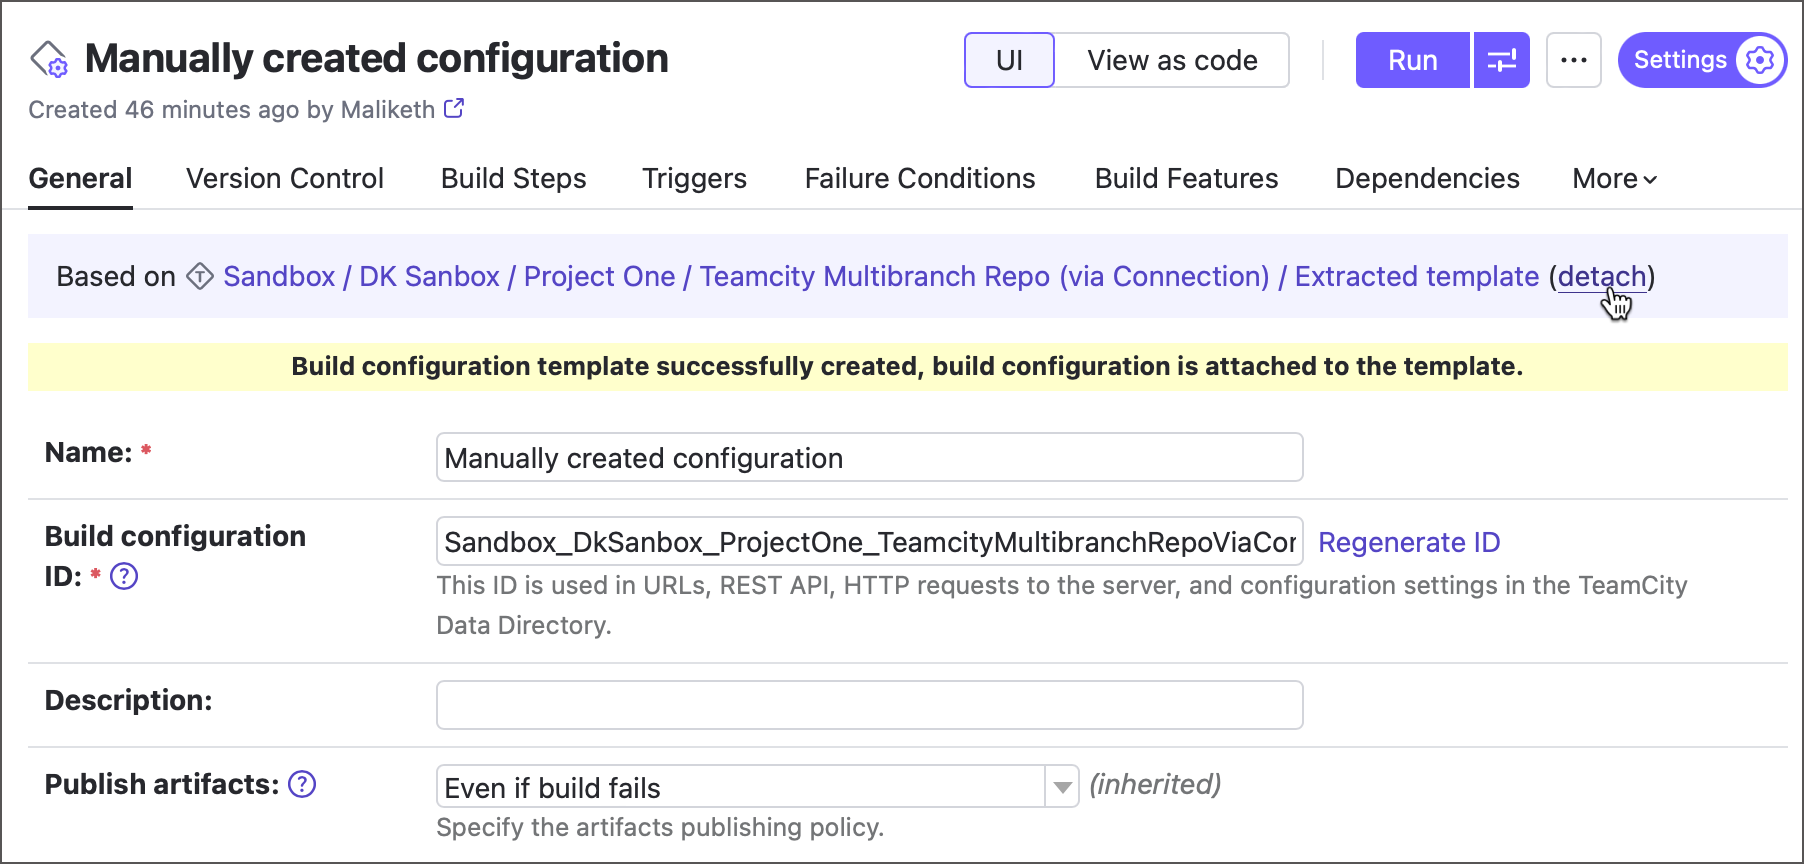
Enter the configuration name and click Extract. You can keep the template ID as its autogenerated value.
The source configuration will be the first to use the new template. To keep it independent, click Detach. Otherwise, any changes to the template will apply to this and all other configurations based on it.
Create a Build Configuration From a Template
You can create a templated build configuration in two ways: from the template settings page, or by creating a regular configuration and choosing a template it should utilize.
Option #1:
Open project settings and navigate to the General settings tab.
Scroll down to the Build configuration templates section and click a required template.
Invoke the Actions menu in the top right corner, and click Create build configuration from this template....
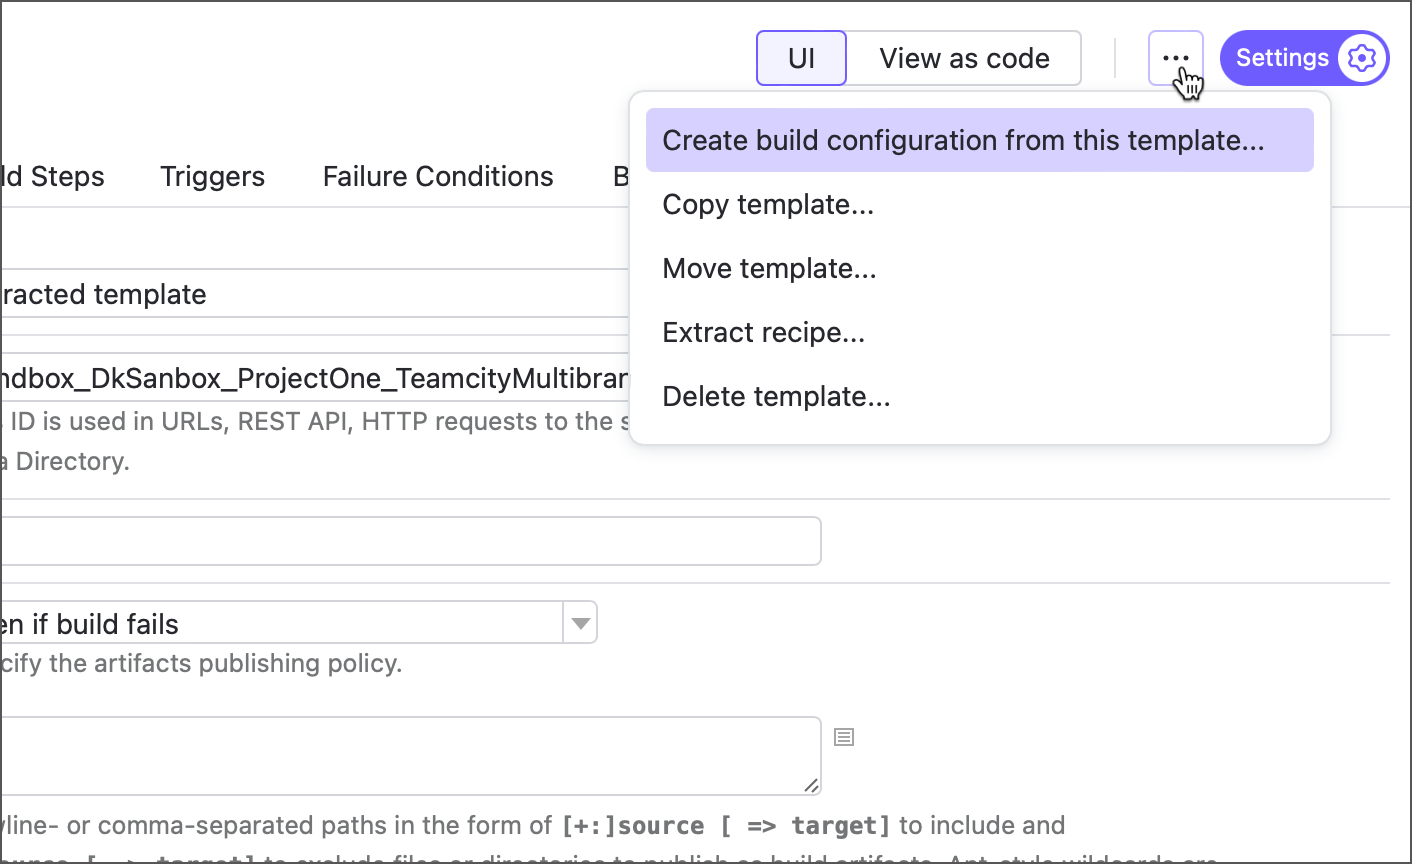
Specify the required settings for the new configuration. Do not click any tiles other than Manually; otherwise, you will create a new configuration where the selected template is not used.
Option #2:
Open project settings and navigate to the General settings tab.
Click Create build configuration under the Build Configurations section.
Click the Manually tile and choose the required template in the Based on template drop-down menu. This menu is available if this project or any of its parent projects own at least one build configuration template.
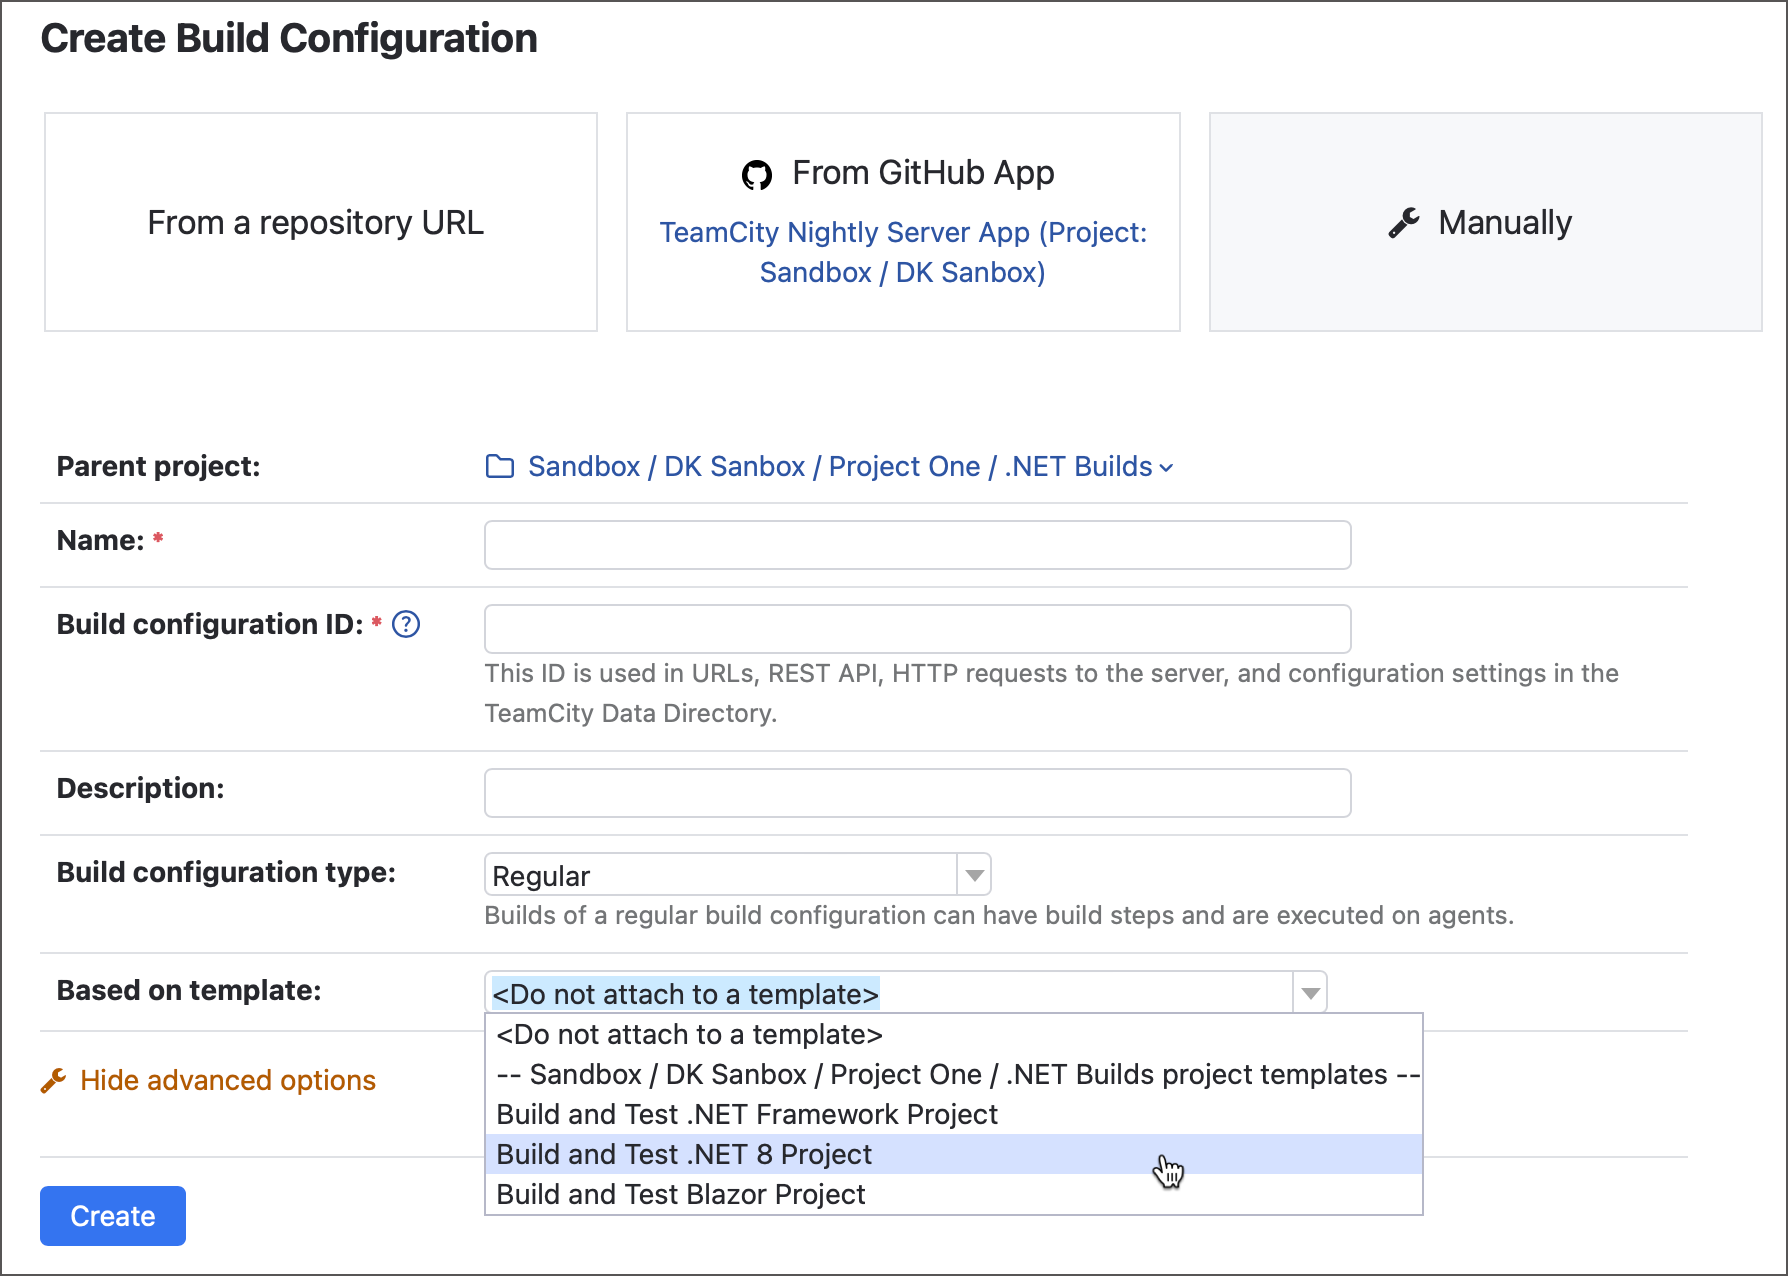
Option #2 is helpful when the Build configuration templates section does not show the required template since it is owned by another (sub)project.
Re-Arrange Build Configurations
You can view all build configurations of a project on the Project Overview page. By default, they are listed in the alphabetical order, but administrators can customize this order.
Build Configuration Settings
Build configuration settings include:
Version control settings, defining how the source code is retrieved from VCS, where it is checked out to, and so on
Build steps, that are sequentially run actions: for example, running msbuild, a script, or unit tests
Triggers, which are rules defining when to start a new build
Failure conditions specifying when a build will be marked as failed
Additional build features
Dependencies:
for snapshot dependencies, TeamCity will run all dependent builds on the sources taken at the moment the build they depend on starts
for artifact dependencies, before a build is started, all artifacts this build depends on will be downloaded and placed in their configured target locations and then will be used by the build
Parameters which allow sharing settings
Agent requirements specifying whether a build configuration can run on a particular build agent.
Permissions to Edit Build Configuration
While only users with Project Administrator's permissions can change project and build configuration settings, there are several ways how contributors to the source code can also affect the build settings and environment.
The default Project Developer role grants users two permissions:
Customize build parameters allows changing the values of build configuration parameters thus potentially affecting how the source code is executed.
Change build source code with a custom patch allows running a custom build based on a user's local sources, not yet committed to the repository.
Besides, all the users who author the source code or/and can write to the repository with project settings stored in Kotlin DSL, could potentially execute their arbitrary code on common build agents.
We recommend considering this aspect when granting users the permissions mentioned above or writing access to the projects' repositories. If necessary, you can adjust the set of permissions granted to each role.
Actions in Build Configuration Settings
Use the Actions menu, located in the upper right corner of the settings screen, to: