Editor gutter
A gutter is a vertical area along the left side of the editor. The gutter provides important information and action icons within easy reach as you work on your code. The appearance and behavior of the gutter can be customized according to your preferences.
If you work on a smaller screen and prefer the gutter and other UI elements to take up less space, you can enable the compact mode.
If you use a screen reader, you can configure it to read line numbers, annotations, and icon tooltips in the gutter.
Configure gutter appearance
To configure gutter appearance, right-click the gutter and navigate to Appearance.
You can configure the following gutter elements:
Line numbers
Breakpoints over line numbers
Indent guides
Sticky lines
Breadcrumbs

Line numbers
By default, the gutter displays line numbers, which makes it easier to reference specific lines of code when discussing with teammates or navigating through code.
Configure line numbers
You can switch between several line numbering modes according to your needs.
Open the Settings dialog (Ctrl+Alt+S) and go to .
With the Show line numbers option enabled, select the required line numbering mode from the drop-down menu:
The standard line numbering that runs sequentially from the top of the file to the bottom, giving each line a unique number. This mode is helpful for direct navigation and referencing specific lines in discussions or error messages.

The line number shows how many lines away each line is from the current position of the caret. This is particularly useful for quickly moving or editing code blocks using keyboard shortcuts.

This mode combines absolute and relative line numbering, showing the absolute line number at the caret's current position and relative numbers on all other lines. It allows using the benefits of both systems for efficient navigation and editing.

Hide line numbers
To hide line numbers, do one of the following:
Right-click the gutter and deselect .


In the Settings dialog, go to and uncheck the Show line numbers option.
Code folding
To tailor your view of the code to the task at hand, you can use code folding. By default, icons in the gutter for unfolded areas are shown on hover.

To always display folding icons, go to and select Always next to Show code folding arrows.
To always hide folding icons, go to and clear the Show code folding arrows checkbox.
Action icons
The list of available gutter icons depends on the configuration of your project, the frameworks that you use, and the plugins that you have installed. For example, action icons can be used to keep track of class implementations and overriding methods, or to run an application .
To access the list of gutter icons available for your project, go to .
To display or hide an icon in the gutter, select or clear the checkbox next to it. If you want to disable all gutter icons, clear the Show gutter icons checkbox on the top of the list.
Bookmarks
Line bookmarks are used for marking specific lines of code to quickly navigate to them later.
Add an anonymous line bookmark
In the editor, place the caret at a line of code and press F11.
Alternatively, right-click the gutter next to the line of code that you want to bookmark and select Add Bookmark.

A bookmark icon appears in the gutter next to the bookmarked line.

Add a mnemonic line bookmark
In the editor, place the caret at a line of code and press Ctrl+F11.
Alternatively, right-click the gutter next to the line of code that you want to bookmark and select Add Mnemonic Bookmark.

In the popup that opens, select a number or a letter that you want to use as an identifier for this bookmark.

If the selected mnemonic is already used, the IDE will ask you whether you want to overwrite an existing bookmark with the new one. Select the Don't ask again option to silently overwrite mnemonics.

Optionally, provide a description for the new bookmark.
Press Enter or click the selected letter or number once again to save the bookmark.
A letter or a number bookmark icon appears in the gutter next to the bookmarked line.

Run and debug scripts and tests
The editor gutter serves as a convenient entry point for running and debugging scripts and tests.
To run or debug a script, open the relevant package.json file in the editor, click
 in the gutter next to the script, and select Run <script_name> or Debug <script_name> from the context menu.
To run or debug a test, open the relevant test file in the editor, click
in the gutter icon next to the test , and select Run '<test name>' or Debug '<test name>' from the list.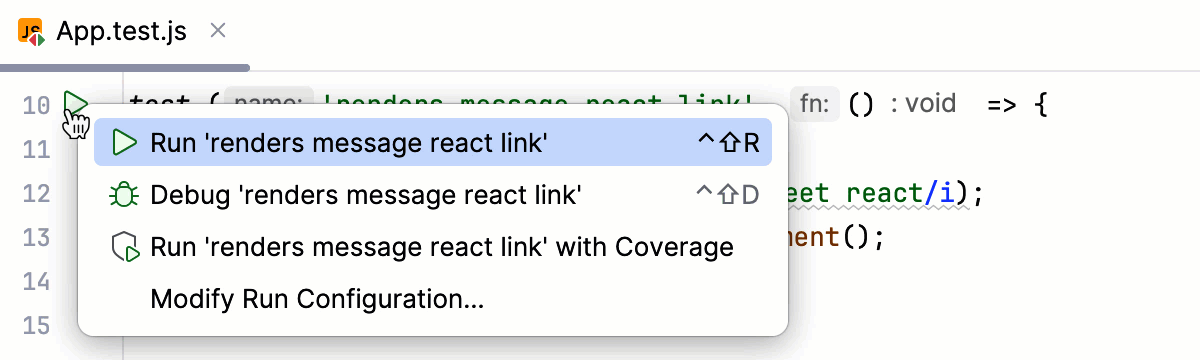
Gutter also allows you to manage breakpoints.
Manage breakpoints
To set a line breakpoint, click the gutter at the executable line of code.
To set a method breakpoint, click the gutter at the line where the method is declared.
To move a breakpoint, drag it to another line in the gutter.
Configure breakpoint icons
By default, breakpoint icons are placed over line numbers to save horizontal space.

To place breakpoints near line numbers, right-click the gutter and deselect .


Version control
Configure Git Blame annotations
You can figure out who introduced which changes to a file by using VCS annotations.
To enable annotations, right-click the gutter and select Annotate with Git Blame.

You can configure annotations to show the information according to your preferences:
Annotation content. Right-click an annotation and go to . You can select the information you want to include in annotations: revision number, change date, author name.
Colors. Right-click an annotation and go to . You can select what to highlight: an order of the changes to make recent commits easier to see, or an author of the changes. To disable highlighting, select the Hide option.
Names. Right-click an annotation and go to . You can select how to label author: using their full name, only first or only last name, initials, or e-mail.
You can also track changes to a file as you modify it in the editor. All changes are highlighted with change markers that appear in the gutter next to the modified lines and show the type of changes introduced since you last synchronized with the repository. When you commit changes to the repository, change markers disappear.
The changes you introduce to the text are color-coded:

The table below lists default line highlighting colors and their meanings in some of the color schemes.
Color | Line Status | Description |
|---|---|---|
| Modified lines | Lines that have been modified since the last update. |
| Whitespace-modified lines | Lines in which only whitespaces have been modified since the last update. |
| Added lines | Lines that have been added since the last update. |
| Deleted lines | Lines that have been removed since the last update. |
You can manage changes using a toolbar that appears when you hover over a change marker and then click it. The toolbar is displayed together with a frame showing the previous contents of the modified line:

You can roll back changes by clicking ![]() and explore the differences between the current and the repository version of the current line by clicking
and explore the differences between the current and the repository version of the current line by clicking ![]() .
.
Instead of reverting the whole file, you can copy any part of the contents of this popup and paste it into the editor.