How to move from Sublime Text to Webstorm
In this section, you’ll find some tips on how to migrate from Sublime Text to WebStorm.
One of the first things that you’ll notice after you download and install WebStorm is that you need a project to get started. The project-first approach helps WebStorm understand the context of what you will be working on better and provide you with more advanced coding assistance.
You have several options to choose from for starting your project:
Clone Repository – Get an existing project from Git or GitHub.
New Project – Create an empty project or generate a project from an existing template, like ones for React, Angular, or Vue.
Open – Open a project stored on your machine.
You can also start with our playground project to get a quick tour of some of the key features – go to New Project | New Project and check the Generate a playground project with onboarding tips box.

If you’ve never used WebStorm or other JetBrains IDEs before, getting used to new shortcuts can be challenging. Here are a few tips that can help you.
If you aren’t ready to say goodbye to Sublime Text shortcuts just yet, you can switch to the Sublime Text keymap. To do so, go to Settings | Keymap, set Sublime Text or Sublime Text (macOS) as your default keymap, and save the changes.

Learning WebStorm shortcuts will come in handy even if you decide to switch to another JetBrains IDE later on – the shortcuts are the same in almost all of them. Here’s what can help you learn them faster:
Memorize WebStorm’s most universal shortcut – Shift + Shift, or Search Everywhere. You can use it to find any file, action, class, or symbol, and see all the matches in one place.
Install Key Promoter X – This extension helps you learn essential shortcuts while working. When you use the mouse on a button inside the IDE, Key Promoter X shows you the shortcut you could have used instead.
Use the WebStorm shortcut cheat sheet – You can download the default WebStorm keymap reference for macOS or Windows and Linux.
WebStorm suggests a predefined keymap based on your environment. You can find this keymap in Settings | Keymap. If you change a shortcut for an action, WebStorm will store those changes in a copy of the predefined keymap and use that copy by default.
note
There are two predefined keymaps for macOS. You can learn about the differences between them here and choose the one that suits you best.
Being an IDE, WebStorm has a lot of powerful features built into it, allowing you to get straight to coding and handle more complex tasks with ease. Most of the time, everything is available out of the box in WebStorm, including the features for debugging, testing, and working with version control systems.
Check out these videos to learn how to get started quickly. For a general overview of the features WebStorm offers, see this page.
WebStorm’s UI might look overwhelming at first. You can customize it and turn off anything you don’t need. Here are some general customization tips.
WebStorm’s plugins work pretty much the same way packages do in Sublime Text. They allow you to extend the built-in functionality and customize the IDE. To explore the available plugins, go to the Marketplace tab under Settings | Plugins. You can then install a plugin by clicking the Install button next to its name.
Here’s what WebStorm looks like with the popular Rainbow Brackets plugin installed. You can read this blog post to learn about some other popular plugins.

WebStorm comes with only a few predefined themes, but there’s a variety of custom options to choose from. To explore them, go to Settings | Plugins and search for “theme” in the Marketplace tab.

You can then go back to the editor and check how the themes you’ve installed look. Choose View | Quick Switch Scheme from the main menu or press Ctrl0` and select Theme. From there, you’ll be able to preview the available themes all in one go.
You can switch to distraction-free mode whenever you want to focus on coding. In the main menu, go to View | Appearance and choose Enter Zen Mode or Enter Distraction Free Mode. The former works the same way Distraction Free mode works in Sublime Text. The latter doesn’t turn on the full-screen view.

Go through the same steps but select Exit Zen Mode or Exit Distraction Free Mode when you’re done.
If you’re looking for an AI coding assistant that’s natively integrated with WebStorm, you can try JetBrains AI Assistant. It includes lots of features like context-aware smart chat or the ability to generate code and write documentation. A free 7-day trial is available.
You can also use GitHub Copilot, Supermaven, Tabnine, and other AI tools in WebStorm – search for the corresponding plugin via the Marketplace tab in Settings | Plugins. Note that those plugins aren’t maintained by JetBrains.
Let’s see how you can set up a few things to work like they do in Sublime Text.
Search Everywhere is your replacement for Sublime Text’s Command Palette and a few other actions. You can use it to find any file, action, class, or symbol, and see all the matches in one place. To open Search Everywhere, press Shift + Shift or use the default Command Palette shortcut (if you’re on the Sublime Text keymap).

WebStorm lets you find and replace text strings both within specific files and entire projects. To get started, in the main menu go to Edit | Find and select Find (for specific files) or Find in Files (for entire projects). To replace a text string, select Replace or Replace in Files under the same submenu instead.

WebStorm has the Project view, which lets you see the structure of your current projects and browse them. Its default behavior differs from that of Sublime Text. For instance, you need to double-click a file to open it in the editor. Here’s how you can change the default setup to match what you were used to in Sublime Text:
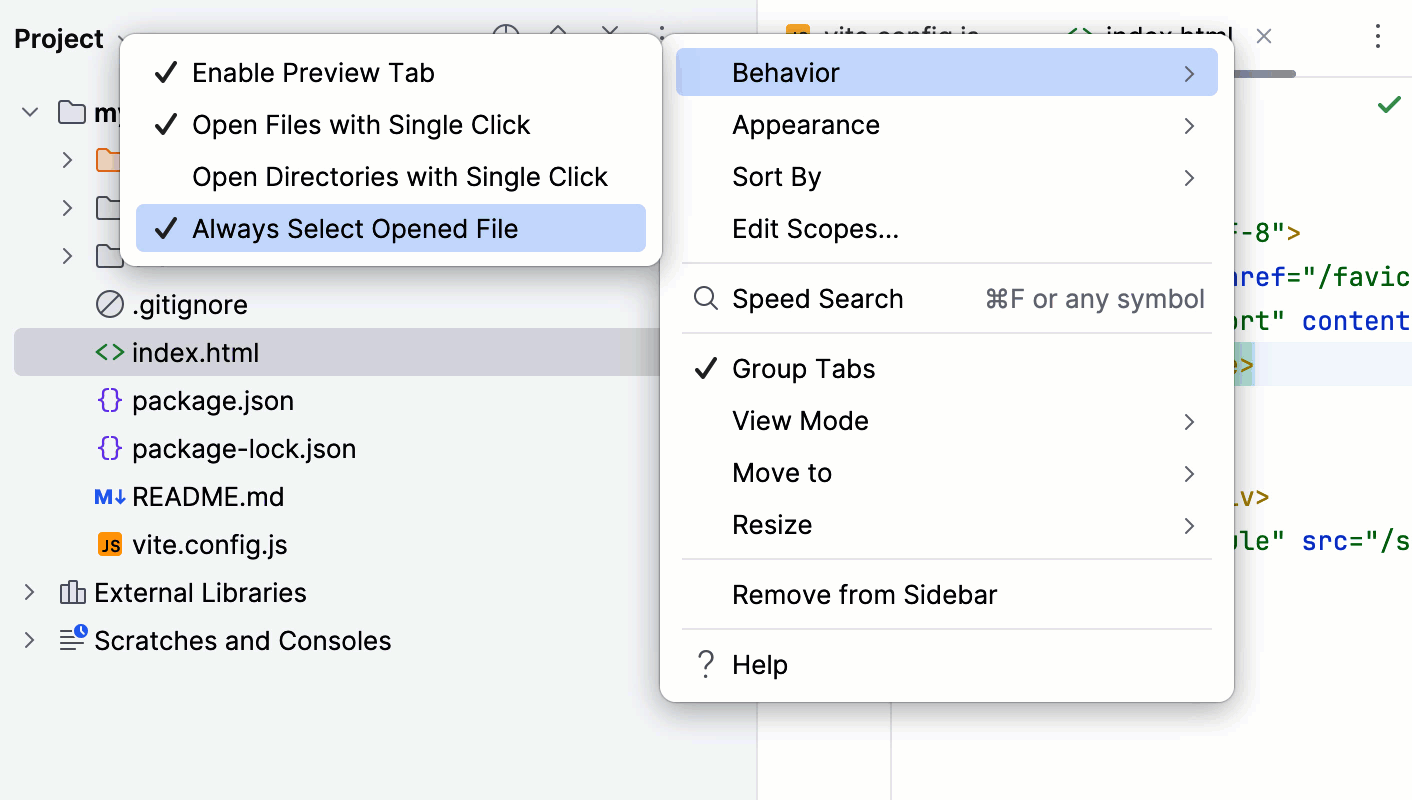
You can go to the Project view settings and select any or all of these options under Behavior:
Enable Preview Tab – Preview files you have selected in the Project tool window in the editor.
Open Files / Directories with Single Click – Open files or directories in the editor with one click.
Always Select Opened File – Auto-select the file that’s currently open in the Project tool window.
WebStorm supports many of the code editing actions that you are used to from Sublime Text, such as extending selection, multiple cursors, adding comments, and more. You can find some of them under Edit in the main menu. You can also explore our collection of tips and tricks.
You can configure WebStorm to perform a specific action or run a tool like Prettier or ESLint every time you save your modified file. To do so, go to Settings | Tools | Actions on Save and tick the necessary boxes there. To learn more about performing actions on save, see this section.
note
By default, WebStorm automatically saves changes that you make in your files. There’s no need to install a similar plugin for this. You can learn more about it here.

You can check out our community forum to find answers to many common questions and ask other WebStorm users for help.
To report a bug or ask for a new feature, please create a new issue here.
Thanks for your feedback!