Manage Assignees
Before you can assign an issue to a user, you need to add this user to the list of assignees in the project where the issue was created.
In YouTrack, any issue field is a custom field. The Assignee field is a default custom field with the user[1] type. This field is auto-attached to all projects. This means that:
The Assignee field is available in YouTrack without additional configuration.
The Assignee can be set to a single value (user account), selected from a predefined list of users.
This field is added automatically to any new project.
The list of users is defined by a set of values that are attached to the Assignee field.
In a new project, the Assignee field includes all members of the project team by default.
You can customize the list of assignees to suit the needs of your project. For more information, see Manage the Project Team.
The most frequent task is to remove users from the list of assignees. If your project requires it, you can add a user or a group that are not members of the project team to the list of assignees.
When you add a user or a group to the list of assignees, provide this user or group with a sufficient permissions to view and edit issues in the project.
Configure Project Assignees
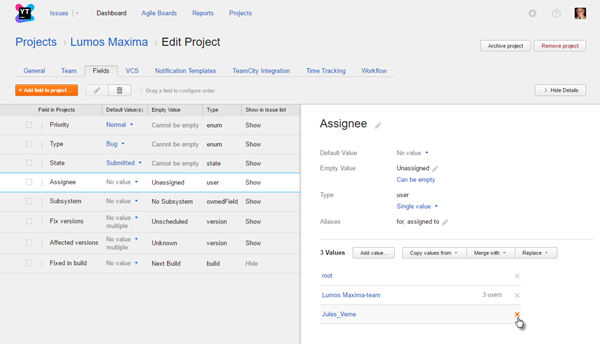
You can add users to or remove users from the list of assignees by editing the values of the Assignee field for this project.
To set the list of assignees for a project:
- Select a project on the Projects page.
Here, you can add a user or group to the project team. For more information, see Manage the Project Team.
Click the Edit project link, then select the Fields tab.
To remove users or groups who should not be assignees in this project, click the Remove icon and confirm the operation.
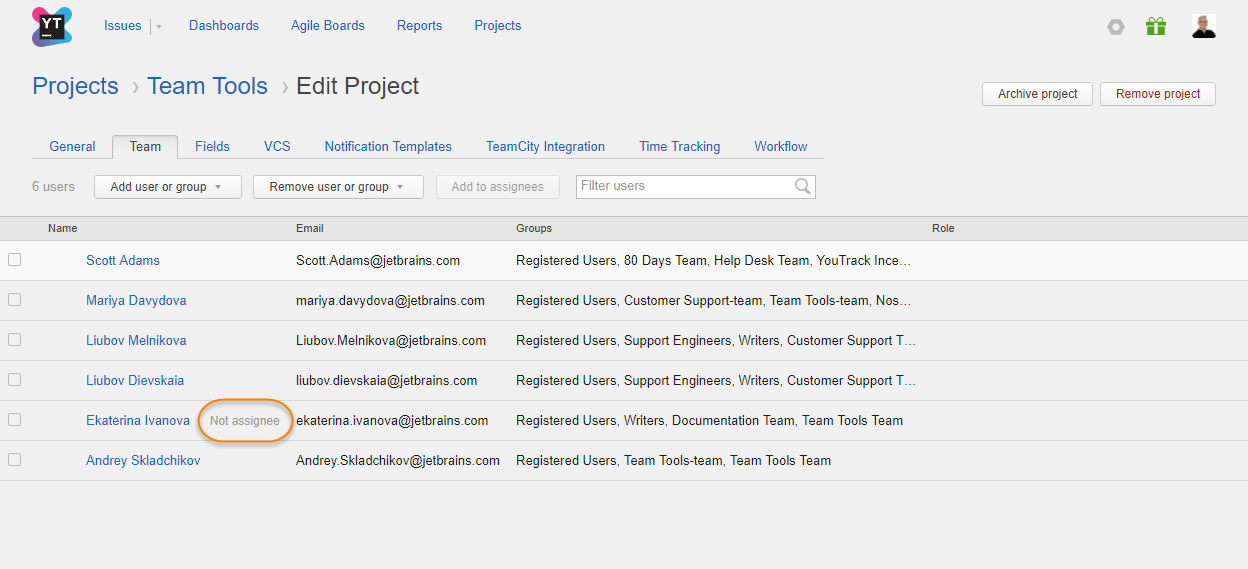
When a member of the project team is not on the list of assignees, the Not assignee flag is visible in the Team tab of the Edit Project page.
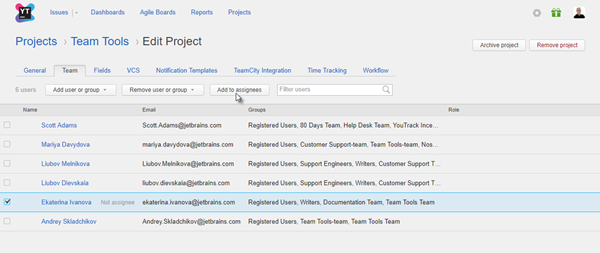
To add a team member to the list of assignees:
Tools for Editing the List of Assignees
The tools described here are applicable to any user or group in the system that is available to you as a project administrator, including users and groups that are not assigned to the project team. When you add a user or a group from outside the project team, provide this user or group with sufficient permissions to view and edit issues in the project.
The following options are available when you select the Assignee field on the Fields tab of your project.
To add a group so that all group members are added to the list of project assignees, click the Add value button and select a group in the dialog.
To add an individual user, click the Add value button and select a user account.
To copy a user from the values in the Assignee field of another project, click the Copy values from button and select an existing set of assignees.
To merge the list of assignees with another set of users, click the Merge with button. In this case, you get a single set of users who are assignees in multiple projects.
To replace the list of assignees with the list of assignees in another project, click the Replace button, and select the Assignee field associated with the project that you want to use.


