JavaScript Workflow Quick Start Guide #
This Quick Start Guide explains the basic concepts you need to start working with workflows in JavaScript.
If you want to skip the warm-up, you can dive right into the API.
If you have never worked with workflows in YouTrack, start with Workflows for more background information.
Permissions #
Before you start, make sure you have permission to create and edit workflows.
Users with Read Project and Update Project permissions can create their own workflows and attach them to their projects.
Users with the Low-level Administration permission can create workflows and attach them to any project.
The controls for creating workflows are only available on the Workflows page, which is accessible in the Project-related settings section of the Administration menu.
Create a Workflow #
The workflow itself is just a container. You can use a workflow to collect a set of rules that you want to apply in your project.
You build workflows to enforce specific business logic, so it's a good idea to sit down and map out your use case before you start.
For this guide, put yourself in the shoes of a project manager. You've just added a field to your project that you want to use to group issues so you can report your progress to your boss. You created a field with the name Phase and added the values Development, Testing, and Ready. Basically, your boss just needs to see how many issues you still have in development or testing to measure your progress against the roadmap.
Now you need to create a workflow that sets the values for this field based on other changes that are applied to the issues in the project. You want to set the values for this field automatically, so your project team doesn't have to worry about setting the value themselves.
To create a workflow: #
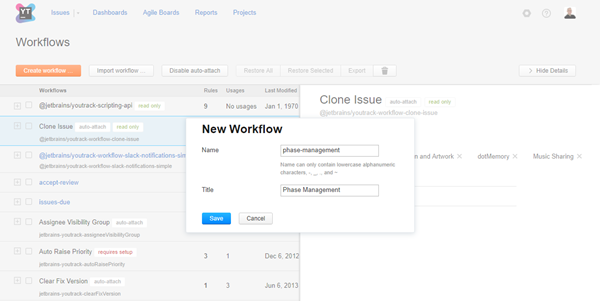
Open the Administration menu and select Workflows from the Project-related Settings section.
- Click the Create workflow button.
The New Workflow dialog opens.
 +
+ - In the New Workflow dialog, enter a name and an optional title. The workflow name follows the standard naming conventions for npm packages. For more information, see https://docs.npmjs.com/files/package.json#name.
For this guide, use phase-management as the name and Phase Management as the title.
- Click the Save button.
Your new workflow is added to the list.
Add a Module to Your Workflow #
So that was simple enough, but you're just getting started. You now have a container where you can store your scripts. You add scripts to your workflow in modules that can contain different types of rules or custom scripts.
The first action that you want to automate in this project is to clear the value of the Phase field when the team decides to postpone a task and move it to the product backlog. When the team postpones a task, they change the value of the Fix version field to Backlog.
This action takes place when a change is applied to an issue, so you want to add a module to the workflow that contains an on-change rule.
To add a module to the workflow: #
Locate the new workflow in the list.
- Click the workflow name to access the workflow editor.
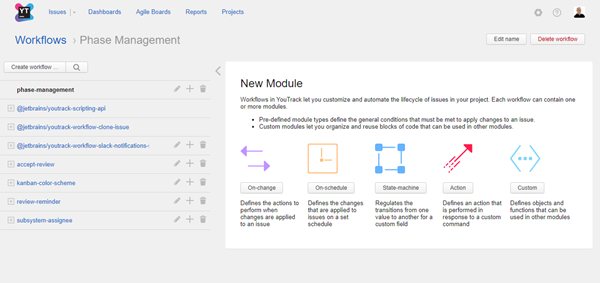
The workflow opens in the workflow editor.
The New Module panel opens in the editor window.
Now, you can add a rule to the workflow using a template.
 +
+ - In the New Module panel, click the On-change button.
The New Module dialog opens.
- Enter a name for the module, like
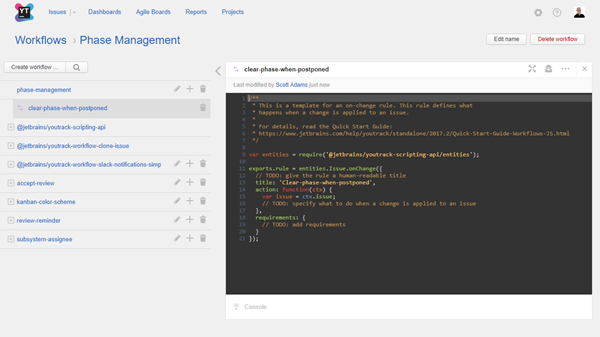
clear-phase-when-postponed, then click the Save button.The new module is added to the workflow.
The module name is displayed as a link.
The template for an on-change rule loads in the editor.
 +
+
Write Your First Rule #
Now you're ready to write your first simple rule. The best way to proceed is to move from one TODO comment in the template to the next, updating the code line by line and removing any unnecessary comments as you go.
To write your first rule: #
- Start with the first comment block in the template:
/**
* This is a template for an on-change rule. This rule defines what
* happens when a change is applied to an issue.
*
* For details, read the Quick Start Guide:
* https://www.jetbrains.com/help/youtrack/standalone/2017.4/Quick-Start-Guide-Workflows-JS.html
*/
Aside from showing you how to add comment blocks to your modules, this comment tells you what type of rule is defined in this template and points you to this quick start guide. Since you're already here and you know what this type of rule does, go ahead and delete the whole block.
- Check out the first line of code:
This variable declaration references the
entitiesmodule in the workflow API. This means that all of the properties and methods that are contained in theentitiesmodule can be accessed in this rule.If there are properties and methods that belong to other modules, for example, the
workflowmodule, just add arequirestatement and point to the module you want to reference, like this:The most important point here is that you need to be familiar with the workflow API and know which modules contain the properties and methods that you need for your workflows. For this rule, you only want to update the value in a custom field. Issues and their custom fields are all accessible from the
entitiesmodule, so you can keep therequirestatement that is built into the template. - Set the
exports.ruleproperty.A script can export exactly one rule to this property. In the template, this property is set with the
entities.Issue.onChangemethod. This method declares a rule that is triggered when a change is applied to an issue, so you're all set. You already determined that this script will be handled as an on-change rule when you loaded the template. - Set a value for the
titleproperty.For an on-change rule, this property is optional. You can already see that the value you used for the module name has been copied to the title. You want the title to be user friendly and help other users recognize what this rule does. For this example, change the title to
Clear Phase when Fix version is set to Backlog.After you set the title, remove the
TODOon the line that precedes it. - Write a
guardconditionThis is where you actually start to code. With the
guardproperty, you define the conditions that must be met for the rule to be applied.The template has already declared the guard as a function that accepts a context as an argument:
This simply means that the all of the code that is defined for the
guardproperty is treated as a function. For the action that follows to be executed, this function must return a value that evaluates totrue.You want this rule to apply an action only when a user changes the value of the Fix version field to Backlog. The following guard returns
truewhen this change is applied to an issue:You can paste this guard over the
TODOinside the guard property. - Set an
action.With the
actionproperty, you define the changes that are applied when the guard condition is met.You can see that the template has already declared the action as a function that accepts a context as an argument:
It then declares a local variable
issueand sets the value to reference an issue in context:You'll want to use a variable declaration for complex rules that update multiple issue properties, but for a rule this simple, you don't need it. All you need to do is specify the action that you want to apply when the guard condition is met, which is to clear the value in the Phase field:
You can copy this block of code and paste it on top of the unnecessary variable declaration and remove the next
TODO.You'll notice that the template closes the body of the function with a right brace and separates this block from the next property with a comma(
},). - Add
requirements.The
requirementsproperty lists all of the components that this rule needs to run properly. This includes definitions for custom fields, issue link types, projects, saved searches, and so on. To learn more about requirements, see Requirements.For your rule, you need to define the requirements for two custom fields: Fix version and Phase.
First, define that the Fix version field stores data as a
ProjectVersiontype, then specify that the field must includeBacklogin the set of values.First, you'll notice that
FixVersionis not the actual name of the custom field. This is an alias. Use an alias for custom names that contain spaces and other non-alpha characters, as it saves you from having to set these values in quotes and brackets. The actual name of the custom field is specified in thenameproperty. The final property for theFixVersionspecifies that the custom field must contain the valueBacklog.Then, set the requirements for the Phase field.
Here, all you need to do is require that the field exists and stores an
EnumField. You don't need to require any values for this field, as the rule sets the value tonull.Copy these blocks of code and paste them on top of the last
TODOcomment. Click the Save button to store your changes.
Open the More actions menu in the workflow editor and select Reformat code. Your finished workflow should look like this:
var entities = require('@jetbrains/youtrack-scripting-api/entities');

exports.rule = entities.Issue.onChange({
  title: 'Clear Phase when Fix version is set to Backlog',
  guard: function(ctx) {
    return ctx.issue.fields.becomes(ctx.FixVersion, ctx.FixVersion.Backlog);
  },
  action: function(ctx) {
    ctx.issue.fields.Phase = null;
  },
  requirements: {
    FixVersion: {
      type: entities.ProjectVersion.fieldType,
      name: "Fix version",
      Backlog: {}
    },
    Phase: {
      type: entities.EnumField.fieldType
    }
  }
});
Then Write Another! #
That was easy enough. Have another go at it. Just remember what you learned from your first rule and add a second module to your workflow.
The next action that you want to automate is to set the value of the Phase field when a change is applied to the State field. This action also takes place when a change is applied to an issue, so you want to add another on-change rule.
To add another module and define a second rule: #
In the sidebar for your
phase-managementworkflow, click the Add module icon and select On-change.- In the New Module dialog, enter
sync-phase-with-state, then click the Save button.The template for a new on-change rule loads in the editor.
Delete the comment block.
Leave the
requiredeclaration for theentitiesvariable as is.Leave definition for the
exports.ruleproperty alone as well.Set the value for the
titleproperty toSet value for Phase when State changesand remove theTODOthat precedes it.Replace the next
TODOwith a definition for theguardproperty. The following guard returnstruewhen a user changes the value of the State field:- Set the
actionproperty.This time around, you'll keep the variable declaration. This helps you reference all of the properties and methods for the
issueobject in theentitiesmodule in context without having to use the explicit referenceentities.issue. To learn more about context, see Context.However, because this rule only needs to update a custom field, you can change the context variable declaration to reference the
fieldsobject:Next, you'll do a little trick. For this rule, you want to change the value in the Phase field when a user updates the State field. You're going to have to set the phase separately for each update, but you can declare the function once. Just insert this function into the body of the
actionfunction:function setPhase(phase) { if ((ctx.issue.fields.Phase || {}).name !== phase.name) { ctx.issue.fields.Phase = phase; } }You can copy this block of code and paste it on top of the next
TODO.You now have a function named
setPhasethat you can use to assign a value to the Phase field.Now write the conditions for changing the value of the Phase field. Frame the conditions and actions as a series of 'if's:
If the State changes to Fixed, set the Phase to Testing.
If the State changes to In Progress or Reopened, set the Phase to Development.
If the State changes to Verified, set the Phase to Ready.
Enter the conditions and actions in a series of control flow statements. Compare the conditions that are listed above to see how they are translated into JavaScript:
if (issueFields.becomes(ctx.State, ctx.State.Fixed)) { setPhase(ctx.Phase.Testing); } else if (issueFields.becomes(ctx.State, ctx.State.InProgress) || issueFields.becomes(ctx.State, ctx.State.Reopened)) { setPhase(ctx.Phase.Development); } else if (issueFields.becomes(ctx.State, ctx.State.Verified)) { setPhase(ctx.Phase.Ready); } - Add the
requirementsfor this rule.For this rule, you need do define the requirements for two custom fields: State and Phase.
First, define that the State field stores data as a
statetype, then specify which values must be included in the set of values for this field.State: { type: entities.State.fieldType, InProgress: { name: "In Progress" }, Fixed: {}, Verified: {}, Reopened: {} },Then do the same for the Phase field, except that this field stores data as an
enumtype.Paste these blocks of code over the last
TODOcomment. Click the Save button.
Open the More actions menu in the workflow editor and select Reformat code. Your finished workflow should look like this:
var entities = require('@jetbrains/youtrack-scripting-api/entities');

exports.rule = entities.Issue.onChange({
  title: 'Set value for Phase when State changes',
  guard: function(ctx) {
    return ctx.issue.fields.isChanged(ctx.State);
  },
  action: function(ctx) {
    var issueFields = ctx.issue.fields;

    function setPhase(phase) {
      if ((ctx.issue.fields.Phase || {}).name !== phase.name) {
        ctx.issue.fields.Phase = phase;
      }
    }

    if (issueFields.becomes(ctx.State, ctx.State.Fixed)) {
      setPhase(ctx.Phase.Testing);
    } else if (issueFields.becomes(ctx.State, ctx.State.InProgress) ||
      issueFields.becomes(ctx.State, ctx.State.Reopened)) {
    setPhase(ctx.Phase.Development);
    } else if (issueFields.becomes(ctx.State, ctx.State.Verified)) {
      setPhase(ctx.Phase.Ready);
    }
  },
  requirements: {
    State: {
      type: entities.State.fieldType,
      InProgress: {
        name: "In Progress"
      },
      Fixed: {},
      Verified: {},
      Reopened: {}
    },
    Phase: {
      type: entities.EnumField.fieldType,
      Development: {},
      Testing: {},
      Ready: {}
    }
  }
});
So What's Next? #
Now that you have a valid workflow stored in YouTrack, you have a few options. There's still a lot to learn and do.
Use this list to find your next hill to climb or mountain to conquer.
Put your workflow to work! | To apply your business logic, you need to attach your workflow to one or more projects. For more information, see Manage Workflows for Multiple Projects. |
|---|---|
Know the rules | This guide introduced you to one rule type, but there are others to learn and master. Update issues on a set schedule or on demand with a command and manage transitions between values in a custom field. For more information, see Workflow Rules. |
Keep learning | How would you like to see an on-schedule rule in action? Learn a thing or two about working with dates and times? Now that you're up and running, increase your knowledge by reading the Workflow Tutorial. |
Explore the possibilities | You won't be able to unlock the full power of workflows if you don't know what they are capable of. We've collected a set of common use cases to spark your imagination. For more information, see Use Cases for Workflows. |
Shop around | There are tons of default workflows that are already available in YouTrack and waiting to be put to good use. While many default workflow are attached to projects automatically, most are optional. Check out the list of default workflows to see if there are automations that you want to use in your project, or adapt to match your business logic. For more information, see Default Workflows. |
Dig deeper | You've only scratched the surface. The more you know about the workflow API and how to reference its properties and methods in JavaScript, the better you can customize your projects. For more information, see JavaScript Workflow Reference. |
Integrate | The REST client implementation in the workflow API lets you script push-style integrations with your favorite tools. For more information, see Using REST API Methods in JavaScript Workflows. |
Go pro | You can export this rule for editing in an IDE that supports JavaScript, like WebStorm. The export option also helps you write and test workflows in a test environment before you import them to your production server. You can also import scripts that were created in an external editor. For more information, see Import and Export Workflows. |