Mailbox Integration
The Mailbox Integration transforms incoming email messages into issues and comments in YouTrack.
Message Processing
This integration pulls email messages from a connected mail server. Each message is parsed and analyzed by YouTrack. The messages are processed according to the mailbox rules that are defined for the project.
New Issues
If YouTrack cannot find any values that associate an incoming message with an existing issue, a new issue is created. YouTrack uses the following information from an email message to create a new issue:
The message subject is copied to the issue summary.
The message body is copied to the issue description.
The mailbox rule that processes the email message determines which user is set as the reporter. The reporter can either be the message author or a default user.
Like any issue that is created manually, YouTrack assigns the issue an ID in the selected project.
Comments
When YouTrack detects that an incoming message is related to an existing issue, the body of the message is added to the issue as a comment. YouTrack matches an incoming message to an existing issue under the following conditions:
The values for the
message-id/in-reply-toproperties in the message header match a previously processed email message. This is a standard method of parsing MIME-encoded messages. YouTrack uses these values to thread comments when a recipient replies to notifications that are sent when an issue is created or updated in the project.If you move an issue to another project, the reply to a related message is processed as a new issue in the connected project, not as a comment in the original issue.
The message subject contains the ID of an issue in the same project.
Attachments
In email replies that are generated when comments are added to the issue in YouTrack, links are generated for new files that are attached to the issue or comment. These links are signed by the user who attached the files and provide direct access to the attachments. The recipient of the email reply can open and view these attachments without logging in to YouTrack.
To learn more about signed links for issue attachments, see Links to Issue Attachments.
Related Issues
In situations where the subject of an incoming message matches the summary of an existing issue, but the message does not contain any of the values that associate it with an existing issue a new issue is created. YouTrack processes these messages as follows:
The prefixes that are added to forwarded messages and replies (FW:, RE:) are ignored.
If the option in the mailbox rule is enabled, text that is set in square brackets is also ignored.
YouTrack creates an issue and sets the message subject (minus the text strings that are ignored) as the issue summary.
YouTrack finds the issue with the same summary that has the lowest ID number and adds a relates to link to it.
Setup
To process incoming email messages as issues in YouTrack, you must first enable and configure the Mailbox integration.
This procedure requires the following steps:
Configure the project that you want to use to manage issues that are created by the integration.
- Import the trusted certificates for your mail server into YouTrack.
Define the rules that are applied to incoming email messages.
Configure Your Project
Before you start, create a project or configure an existing project to manage issues that are created by the mailbox integration. Later in this setup, you create a mailbox rule that references the project.
To configure a project for use with the mailbox integration, set the From address to the email address that you want to use to send emails. This setting overrides the global From address that is used for generic notifications. Setting this value in your project lets you manage incoming and outgoing messages with a dedicated email address.
You also have the option to set the Reply-to address for notifications in your project. Use this setting when, for example, the address that you use to send email notifications cannot receive replies.
To set the email addresses for an existing project:
Click the Projects link in the header.
Select the project from the list.
In the right side-panel of the project page, click the Settings link in the Administration section.
The Edit Project page opens with the Settings tab selected.
In the From address input field, enter the email address that you want to use to send emails.
Optionally, enter the email address that you want to receive replies in the Reply-to address field.
Set the Schedule for Fetching Email Messages
YouTrack fetches email messages from the specified mail servers according to a schedule. The default interval is every hour. You can change the schedule to a predefined interval or specify a custom interval with a cron expression. The schedule is not set independently for multiple mail servers. The same schedule is applied to all mail servers that are integrated with the YouTrack server.
To specify an interval for fetching email messages:
In the Integrations section of the Administration menu, select Mailbox Integration.
From the Fetching interval drop-down menu, select a pre-configured time interval. To specify another time interval, select Custom and enter a cron expression. For example, to pull fresh data every 45 minutes, every day, use the following expression:
0 0/45 * * * ?For details about cron expressions format, please refer to the cron trigger tutorial.
Import Trusted Certificates from Your Mail Server
Your mail server may require that you establish a secure connection over SSL. Before you can add your hosted server to YouTrack, you may need to import its SSL certificate.
If your mail server has a valid certificate that is signed by a well-known certificate authority (CA), the public key and certificate are already stored in the web browser. You should be able to connect to your mail server without importing its SSL certificate.
If the certificate for your mail server is self-signed, you need to import the certificate and public key to establish a secure connection.
To enable a secure connection between YouTrack and your mail server:
Export the certificate and public key for your mail server as a DER-encoded file. These files use the .der, .cer, and .crt extensions.
In the Server Settings area of the Administration menu, select SSL Certificates
Click the Import trusted certificate button.
In the Import Trusted Certificate dialog, enter a name for the certificate.
Click the Choose file button and select the certificate file from your local directory.
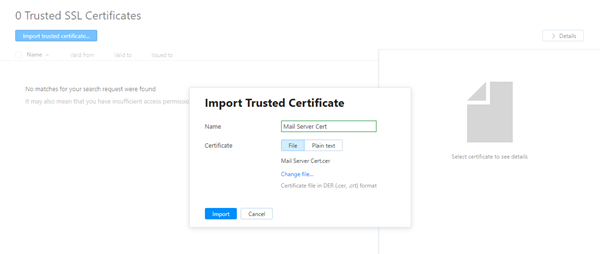
Click the Import button.
The certificate for your mail server is added to YouTrack.
Connect to a Mail Server
To enable the integration, you need to connect to one or more mail servers.
For mail servers that use POP/POPS or IMAP/IMAPS, follow these instructions.
For Microsoft Exchange and Office 365 mailboxes, additional setup is required. Read the instructions that follow and configure your mail service to be compatible with this integration.
For Gmail, there are special requirements for the account that you use to connect to the mail server. For details, see Special Requirements for Connecting to Gmail.
Connections to Microsoft Exchange and Office 365 Mailboxes
The mailbox integration only supports POP/POPS and IMAP/IMAPS. The default protocol for Microsoft Exchange, MAPI, is not supported. If you want to connect to a Microsoft Exchange Server, you have two options:
Enable and configure either POP or IMAP on the Exchange Server, then configure the authenticated SMTP settings. With these mail connectors enabled, you can follow the instructions below and establish a connection.
Pay attention to the special instructions for Microsoft Exchange mailboxes.
Establish a connection through an intermediate gateway server. This lets you connect to the Exchange Server with POP/IMAP and SMTP disabled. The DavMail exchange gateway, for example, converts proprietary Exchange formats into email protocols that YouTrack understands. For setup instructions, refer to the DavMail Gateway documentation.
With this setup, follow the instructions below to establish a connection to the gateway server.
For Microsoft Exchange and Office 365, the mailbox integration supports connections to shared mailboxes. You can use the login and password of any user who is a member of the shared mailbox to authenticate.
Special Requirements for Connecting to Gmail
Google accounts have settings that restrict access to third-party applications that use less secure sign-in technology. By their definition, this applies to connections that authenticate with a username and password, which are vulnerable to hijacking.
The setup requirements are based on the current setting for managing less secure apps. The requirements apply to the Google account that you use to authenticate with the Gmail server.
If you're connecting with a Google account that you manage yourself, the following options are available:
Generate an application-specific password (App Password) in your Google account and use it for authentication. Leave the option to enable access for less secure apps in your Google account Off.
App Passwords can only be used with accounts that have 2-Step Verification turned on.
Enable Less secure app access for your Google account and connect using your username and password (not recommended).
If you use a Google account that is managed by your organization as part of G Suite, verify which of the following settings is currently enabled for your domain.
Setting | Requirements |
|---|---|
Disable access to less secure apps for all users | The Google account that you store in the mailbox integration settings must have 2-Step Verification enabled. To connect to the Gmail server with this account, generate an application-specific password in your Google account.
|
Allow users to manage their access to less secure apps | You may be able to connect to the Gmail server with your Google username and password. This setup is only available when:
If you have enabled 2-Step Verification for this Google account, you need to generate and use an application-specific password. Configure the mailbox integration settings as if access to less secure apps were disabled. |
To connect to a mail server:
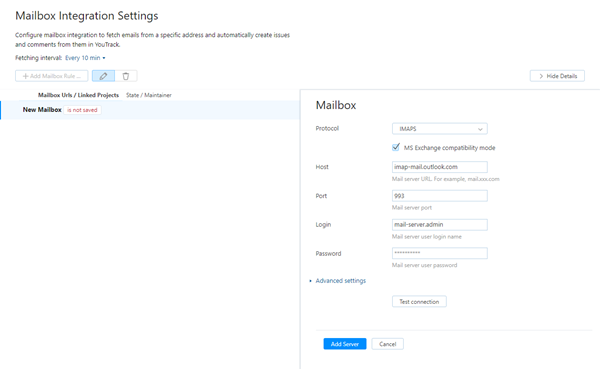
On the Mailbox Integration Settings page, click the Add New Mail Server link.
Enter values for the following settings:
Setting
Description
Protocol
Select the protocol that is used by the mail server. The mailbox integration supports the POP/POPS and IMAP/IMAPS protocols.
Host
Enter the URL of the mail server. For example,
mail.jetbrains.com.Port
Enter the port that the mail server listens to. The default port is set automatically when you select the mail server protocol.
Login
Enter the username of the account that authorizes access to the mail server.
Password
Enter the password of the login user account.
Expand the Advanced settings section and configure the following optional settings:
Setting
Description
SSL Key
If your mailbox supports a secure connection, select an SSL Key from the drop-down list. The SSL Key must be imported into YouTrack. For instructions, see SSL Keys.
Connection Timeout
Set the maximum amount of time to wait for complete data transfer from the mail server before closing the connection. The default value is set to 60 seconds.
Socket Timeout
Set the maximum amount of time to wait for a response from the mail server before disconnecting the socket. The default value is set to 60 seconds.
Click the Test Connection button to verify the configuration. If the connection cannot be established, correct your settings and test the connection again.
Click the Save button.
The mailbox integration settings are saved.
Repeat these steps to add connections to additional mail servers.
Define Mailbox Rules
Now that you have connected YouTrack to a mail server, configure the rules for processing incoming email messages.
Mailbox rules are processed sequentially.
If a message matches the filter that is defined in the first rule, it is processed according to the instructions that are defined in this rule. The message is not considered for processing by any subsequent rules.
If the message does not match the filter that is defined in the first rule, it is evaluated against the criteria for the second rule, and so on.
When a message does not match any filters, an internal record is created to register that the message was received. No further action is taken. The message is still considered to have been processed and is deleted from the mail server if the corresponding option is enabled in the mailbox rule.
You can create multiple mailbox rules that process messages in different ways. For example, you create a rule that scans the message body for words like "overdue" and "urgent" and automatically set the priority of the issue. You can then create additional rules to process the messages that don't contain these words.
To define a mailbox rule:
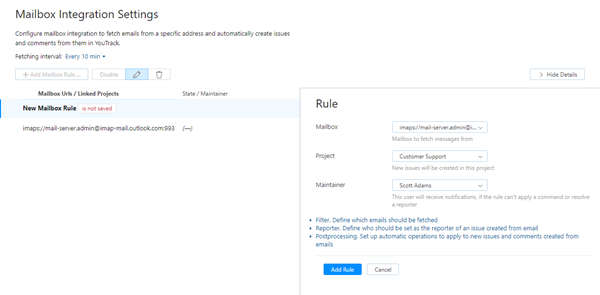
On the Mailbox Integration Settings page, click the Add Mailbox Rule button.
Enter values for the following settings:
Setting
Description
Mailbox
Select the mailbox from which YouTrack fetches email messages.
Project
Select which YouTrack project is assigned to issues that are created from incoming email messages.
Maintainer
Select the username of the user who is responsible for the integration. The maintainer receives notifications when a command is unsuccessful or the issue reporter cannot be resolved. By default, the user who creates the rule is set as the maintainer.
Click to expand the Filter settings.
These settings determine which emails should be fetched from the mail server. These settings are optional. If you want to process all incoming emails in YouTrack, continue with the next step.
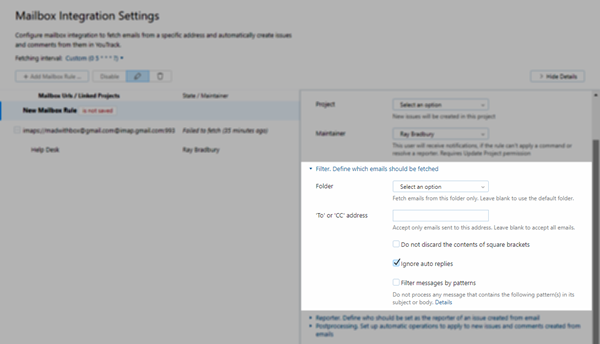
Enter values for the settings that are displayed in this section of the new rule:
Setting
Description
Folder
Select a folder to fetch only email messages that are delivered to this folder. If you don't select a folder, the integration fetches all email messages from the server except messages that have been permanently deleted. This includes messages in the sent, spam, and trash folders. For this reason, we strongly recommend that you select a folder, for example, the Inbox.
'To' or 'CC' address
Enter an email address to fetch only email messages that are sent to this address. When used, YouTrack only applies this mailbox rule to messages that are sent directly to the specified recipient or sent as a carbon copy (CC).
If you set a value here, use the same email address as the From address in the project that is set as the Project for this mailbox rule. Otherwise, replies to messages that are sent by the mailbox integration are not added to issues as comments.
To process all email messages in the specified folder, leave this field empty.
Do not discard the contents of square brackets
Enable to include text that is set in square brackets in the issues and comments that are processed by YouTrack.
Ignore auto replies
Enable to ignore email messages that are sent as automatic replies to messages that are sent from the YouTrack server. This setting prevents you from adding comments to issues when you receive automated out-of-office replies.
Filter messages by patterns
Enter a pattern to search for in the message subject. You can write the patterns as regular expressions. If the pattern is detected in the message subject, the email message is ignored.
Enter multiple patterns on separate lines in the input field.
Also apply the filter to message body
Enable to exclude emails that contain text that matches the specified patterns in the message body.
This option is only shown when the Filter messages by patterns option is also enabled.
Click to expand the Reporter settings. These settings define which user is set as the reporter for each issue that is processed from an incoming email message.
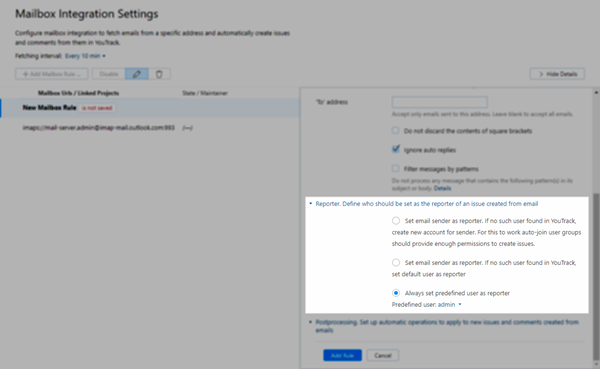
Select one of the following options:
Option
Description
Set email sender as reporter. If no such user found in YouTrack, create new account for sender
YouTrack tries to find a user account with an email address that matches the author of the email message. If an existing account is not found, a new user account is created. Credentials for accessing YouTrack are sent to the author in the notification message that is sent when the issue is created.
Set email sender as reporter. If no such user found in YouTrack, set default user as reporter
YouTrack tries to find a user account with an email address that matches the author of the email message. If an existing account is not found, a default user account is set as the reporter. Select an existing user account from the Default user drop-down list.
Always set predefined user as reporter
When enabled, YouTrack automatically sets the specified user as the reporter for all issues that are created from incoming email messages.
Click to expand the Postprocessing settings. These settings define how YouTrack handles issues and comments that are created from incoming email messages. These settings are optional. If you don't want to automatically update issues that are processed by YouTrack, continue with the next step.
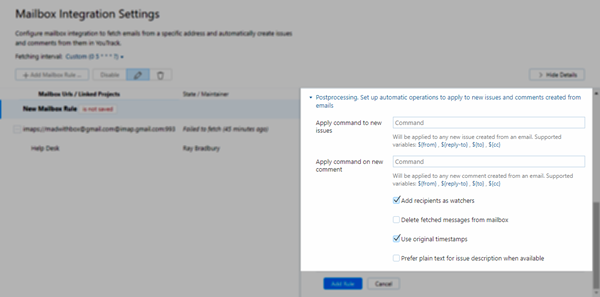
Enter values for the settings that are displayed in this section of the new rule:
Setting
Description
Apply command to new issues
Enter a command to apply automatically to all issues that are created from incoming email messages. You can insert placeholders that reference values that are stored in the email message. For example:
for [user] fromMail ${from}This command applies the following changes to any issue that is created from an incoming email message
The issue is assigned to the specified user.
The value for the custom field fromMail is set to the email address of the message author.
For details, see Placeholders.
Apply command on new comment
Enter a command to apply automatically when a comment is added to an issue from an incoming email message. You can also use placeholders in these commands. For details, see Placeholders.
Add recipients as watchers
Enable to add users whose email addresses are included in the
To:andCC:fields of the email message as watchers for the issues that are created from the incoming email message.Delete fetched messages from mailbox
Enable to delete all messages from the mail server after the corresponding issues have been created in YouTrack.
Original timestamps (IMAP only)
Enable to set the creation date of the issue or comment to the timestamp of the original email message. Otherwise, the creation date is set to the date and time when the email message was processed by YouTrack.
Prefer plain text for issue description when available
Enable to use the plain-text version of the message for the issue description whenever the incoming message contains a plain-text version of the email. If a plain text version is not available, the content from the HTML version of the message is wrapped
{html}tags, formatted in YouTrack Wiki syntax, and used for the issue description instead.Click the Save button.
The settings for the mailbox rule are saved.
Placeholders
You can use placeholders in the Postprocessing settings of a mailbox rule. These placeholders reference attributes in the original email message. The placeholder is replaced with the corresponding value in the message when it is processed by YouTrack. The following placeholders are available:
Placeholder | Description |
|---|---|
${from} | The email address of the message author. |
${from name} | The sender name of the message author. |
${reply-to} | The value that is stored in the |
${to} | The email addresses of all message recipients that are entered in the |
${cc} | The email addresses of all message recipients that are entered in the |
Troubleshooting
If you experience problems setting up the mailbox integration, see if any of the following conditions apply.
Condition | You are unable to establish a connection to the mail server. |
|---|---|
Cause | The external service is unavailable. |
Solution | Verify that your mail server is running. |
Cause | The connection is blocked by a firewall. |
Solution | Open the ports in the firewall that are used by YouTrack and the mail server. |
Cause | The connection to the external service is blocked by the proxy server. You are trying to connect over the wrong port. |
Solution | Set the system properties for your server that let YouTrack connect to other services through the proxy server. For instructions, see Proxy Configuration. |
Cause | The mail server requires a secure connection. |
Solution | Import the certificate for your mail server into YouTrack. For instructions, see SSL Certificates. |
Cause | Your SSL certificate for the mail server has expired. |
Solution | Renew and import the updated certificate into YouTrack. For instructions, see SSL Certificates. |
Cause | You are trying to connect to an Exchange mailbox and there are configuration problems in either the mail server or YouTrack. |
Solution | Check the following setup requirements:
If you are still unable to establish a connection, submit a support request. |
Condition | You are unable to establish a connection to your mail server over an unsecured protocol. YouTrack returns the error |
|---|---|
Cause | Your IMAP or POP3 server uses an extension that enables STARTTLS. YouTrack requires a secure connection to your mail server. |
Solution | Import the SSL certificate for your mail server into YouTrack. For instructions, see SSL Certificates. If both YouTrack and your mail server run on a private computer network, you can generate and import a self-signed SSL certificate for your mail server. |
Condition | Incoming email messages are not converted into issues in YouTrack. |
|---|---|
Cause | The user that is set as the reporter for issues that are processed from incoming email messages does not have permission to create issues in the project. |
Solution | Check the Reporter settings for your mailbox rules.
|
Condition | Incoming email messages are converted into issues in YouTrack. Incoming replies are not added as comments. |
|---|---|
Cause | The From address in the project settings uses an email address that is not processed by the mailbox rule or is not set. New issues are created from messages that are sent to the mail server, but replies to incoming messages are sent from another address. Replies to these messages are not sent to the mail server that is configured for the mailbox integration. |
Solution | Set the From address for the projects that are selected in your mailbox rule settings to an address that is processed by the mailbox integration. Check the Filter settings for your mailbox rule. If you set the 'To' address, use the same email address as the From address in the project that is set as the Project for this mailbox rule. |
