Update Issues on an Agile Board
An agile board lets you visualize how issues and tasks move from creation to completion. As issues move through this process, you and your team apply updates that reflect your actions.
This page describes how to update issues on an agile board. You can apply the same changes that you would for issues in the Issues list or single issue view, but the location of these controls is unique to the agile board.
Issues as Cards
The first thing you'll notice is that issues are transformed into interactive cards that you can move around the board. When you move a card to another position on the board, the values that represent the new column or swimlane are updated in the fields that identify these positions on the board.
Controls for updating other issue properties are displayed on the card itself. The amount of detail and number of interactive elements are affected by the Size slider in the header. The following example shows the controls that are visible on a large-sized card.
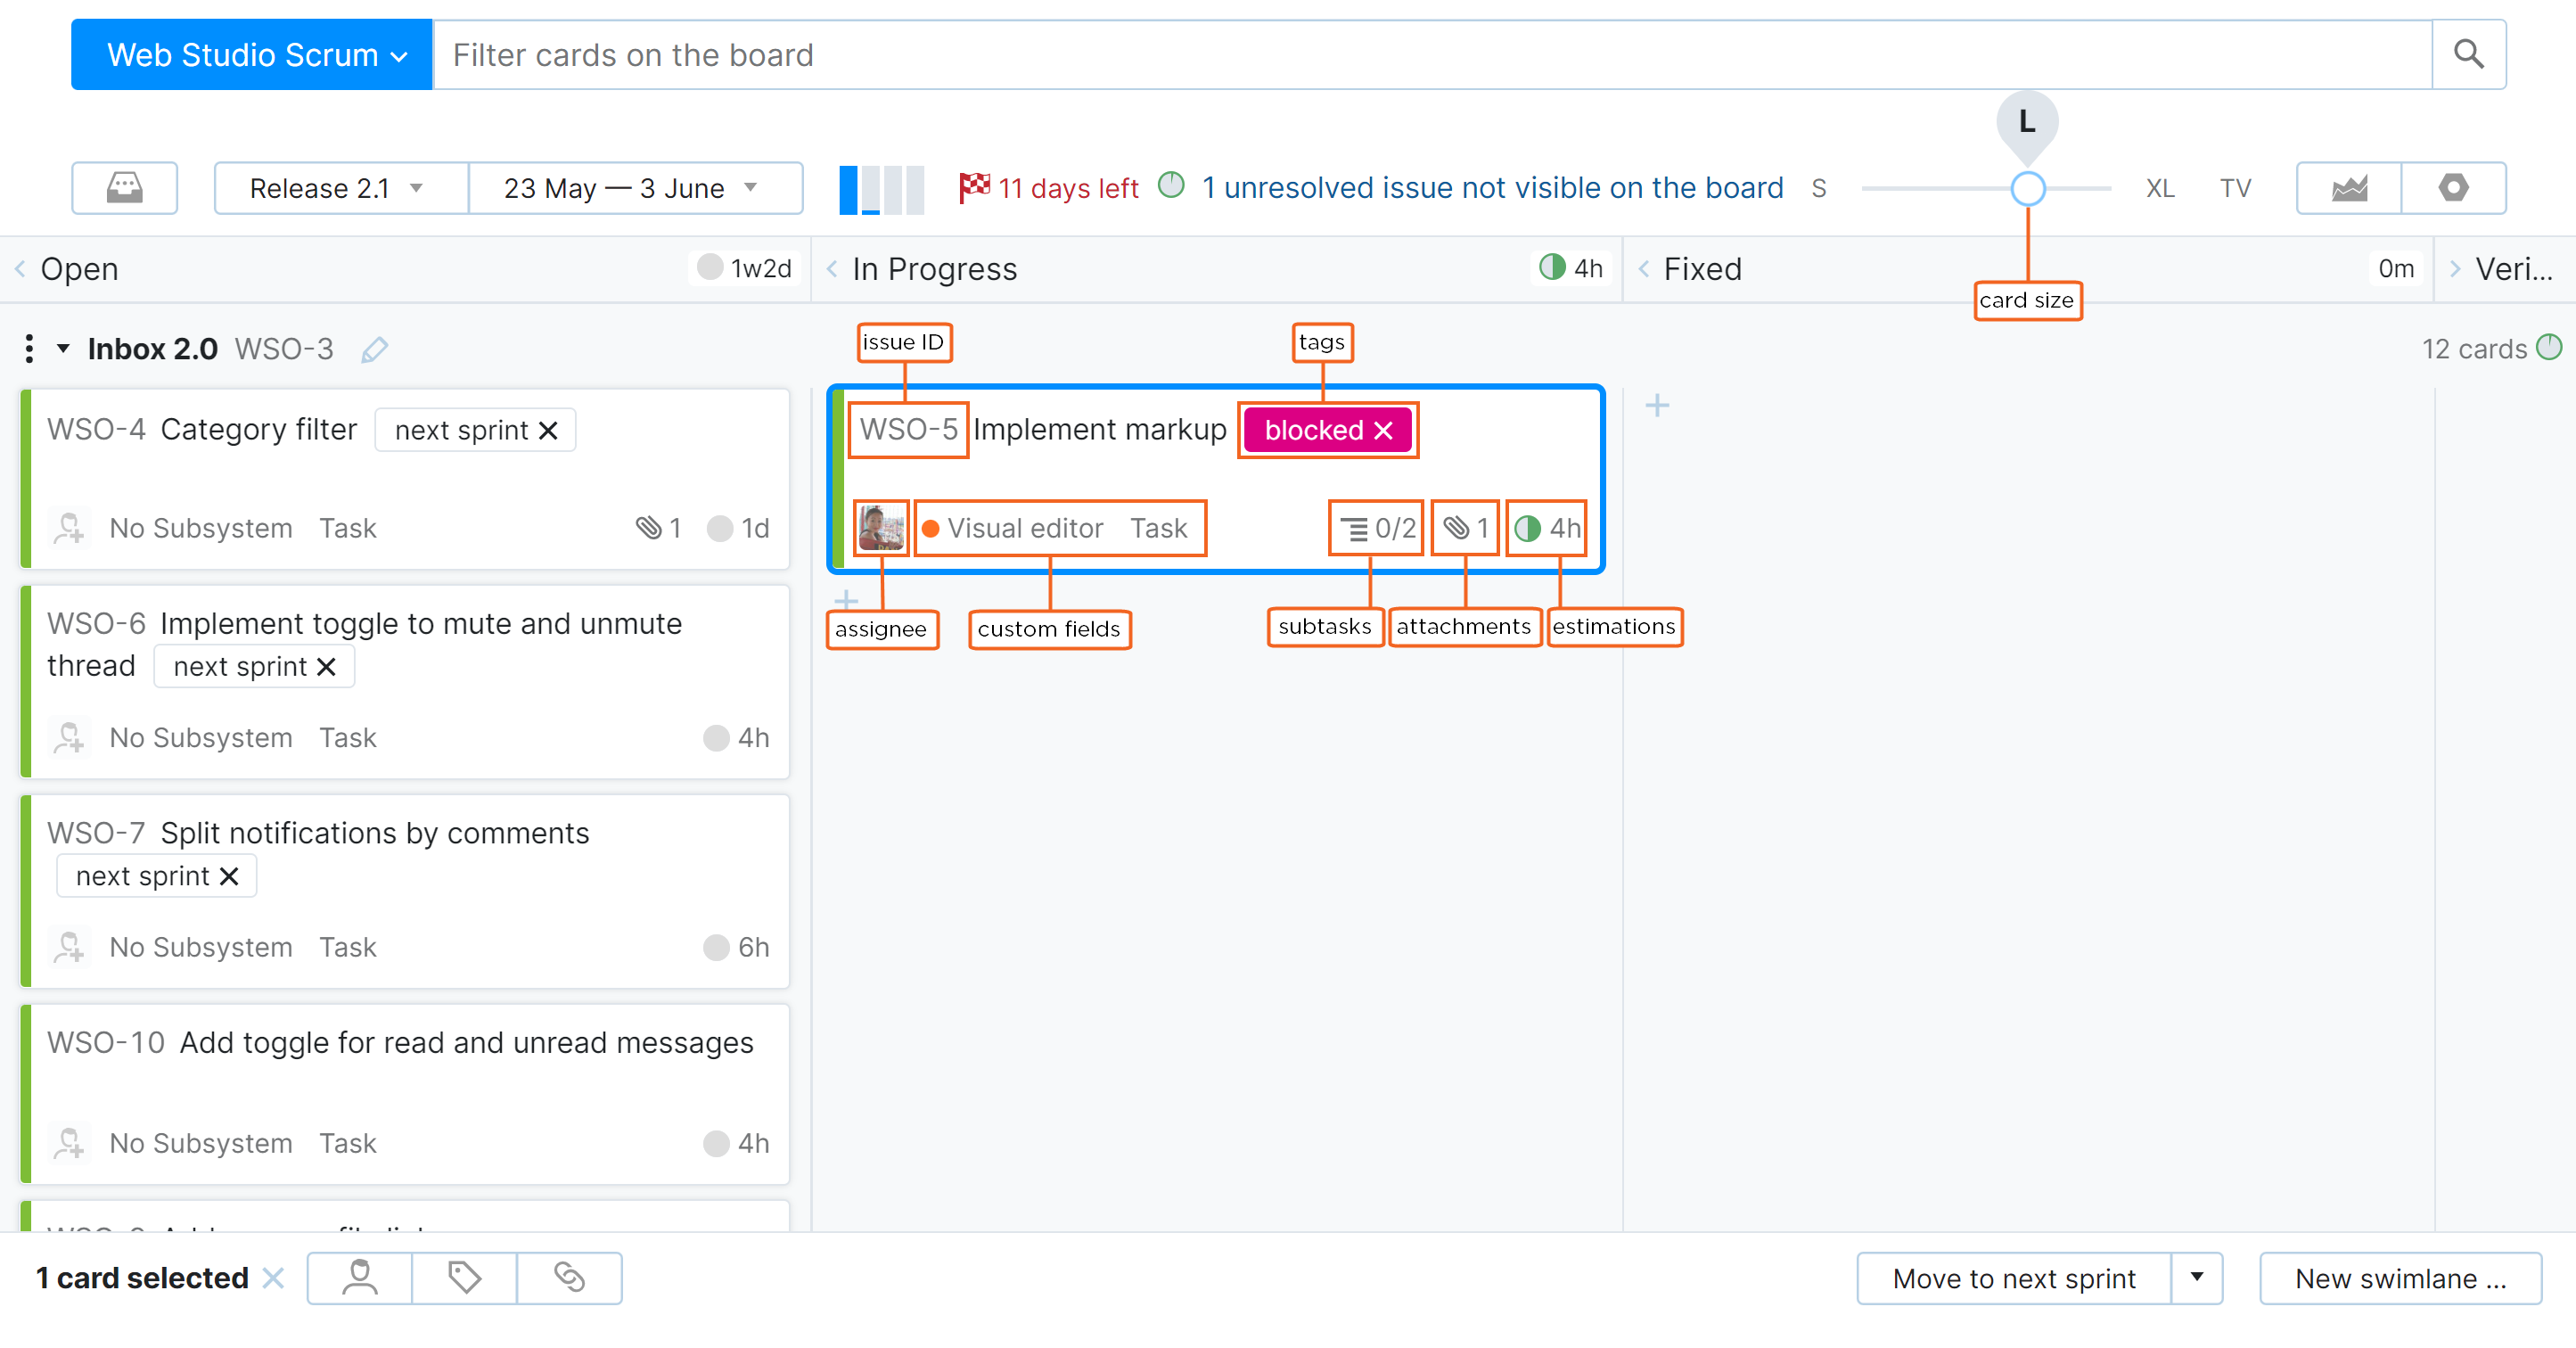
You can apply the following actions to one or more issues as cards on the board:
Action | Description |
|---|---|
Open the issue in single issue view | The issue ID is set as a link to the issue. When you click this link, the issue opens in a new browser tab. |
Update custom fields | Each card displays the first three custom fields in the project, excluding fields that are used in the board settings and Assignee. To update the value for a field, click the field and select a value from the list. Use the input field to filter values in the list. |
Remove tags | The card displays as many tags as can be shown in one line. To remove a tag from an issue, click the Remove tag icon. |
Assign or reassign an issue | The avatar of the current assignee is displayed in the lower-left corner of each card. Unassigned issues display the Set assignee button instead. To assign or reassign an issue, click this control and select a user from the list. Use the input field to filter values in the list. |
View and open subtasks | Issues that are linked as subtasks to an issue that is shown as a card on the board are visible on medium-sized and larger cards.
|
Add attachments | To attach one or more files to an issue, drag files to a card on the board. The card itself becomes a drop zone. |
View and update estimations | If your board shows estimations for tasks, the estimation and progress indicator is displayed in the lower-right corner of each card. Move the pointer over the progress indicator to display the unspent or overdue estimation. Click the estimation to update the value. |
Options for Selected Issues
You can select one or more cards on the board.
Click a card or use the arrow keys to select an issue. The current issue is marked with a blue border. As long as you don't select another issue, updates are applied to the current issue.
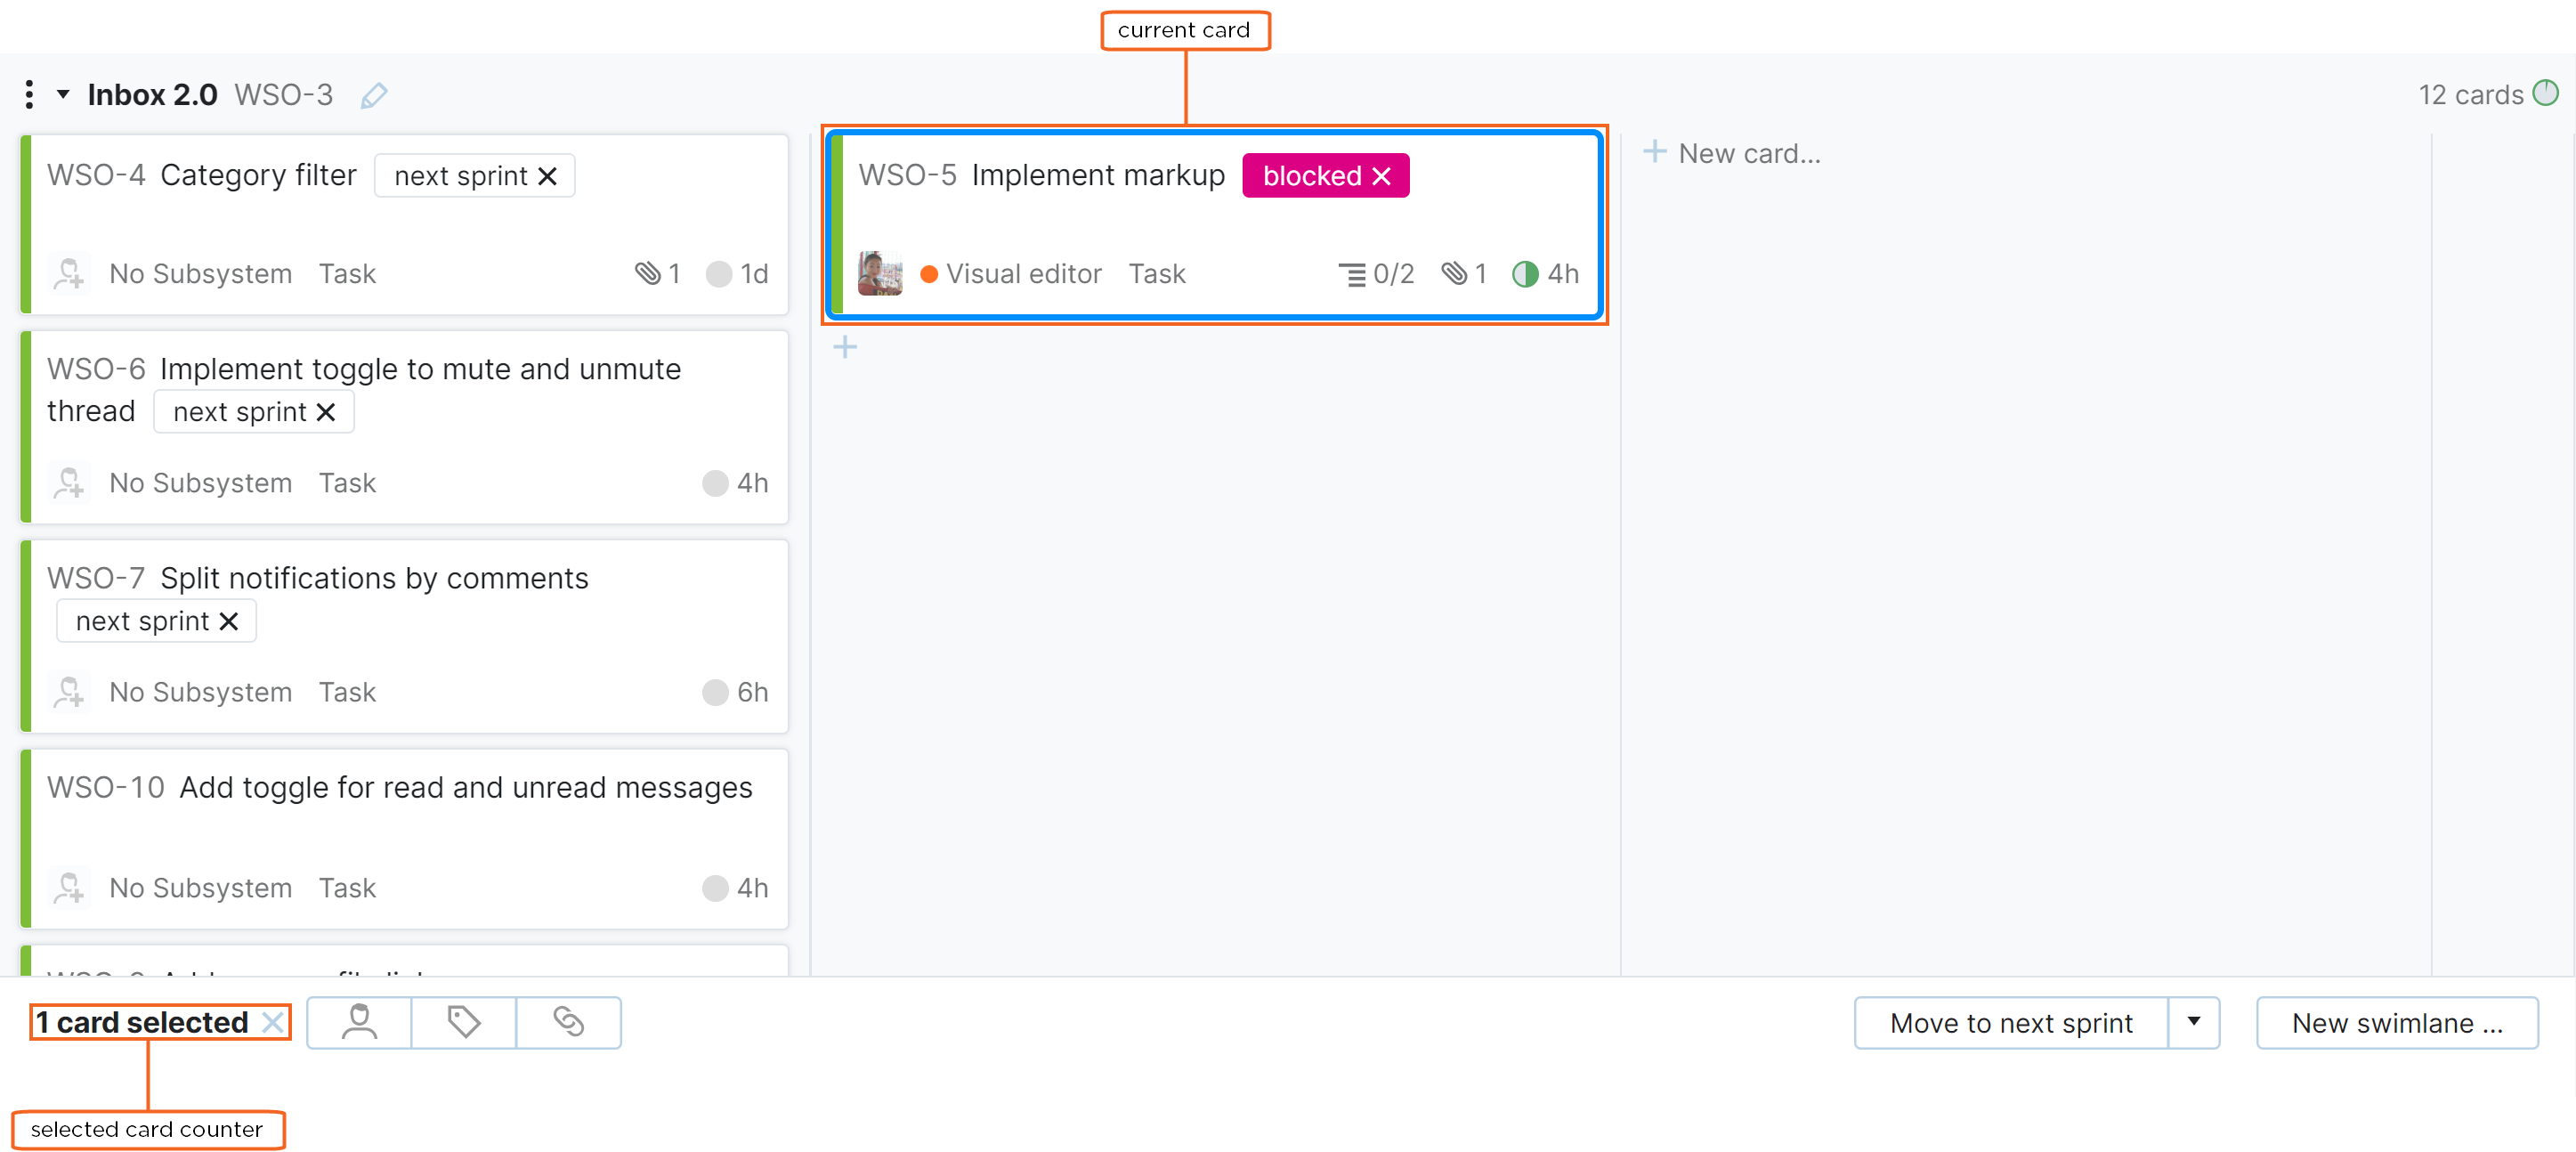
To select multiple issues, use the Spacebar and arrow keys or Ctrl + click with the mouse. Selected issues are marked with a blue background. When you select multiple issue, the current issue (marked with a blue border) is not included in the selection until you select it with the Spacebar or Ctrl + click with the mouse.
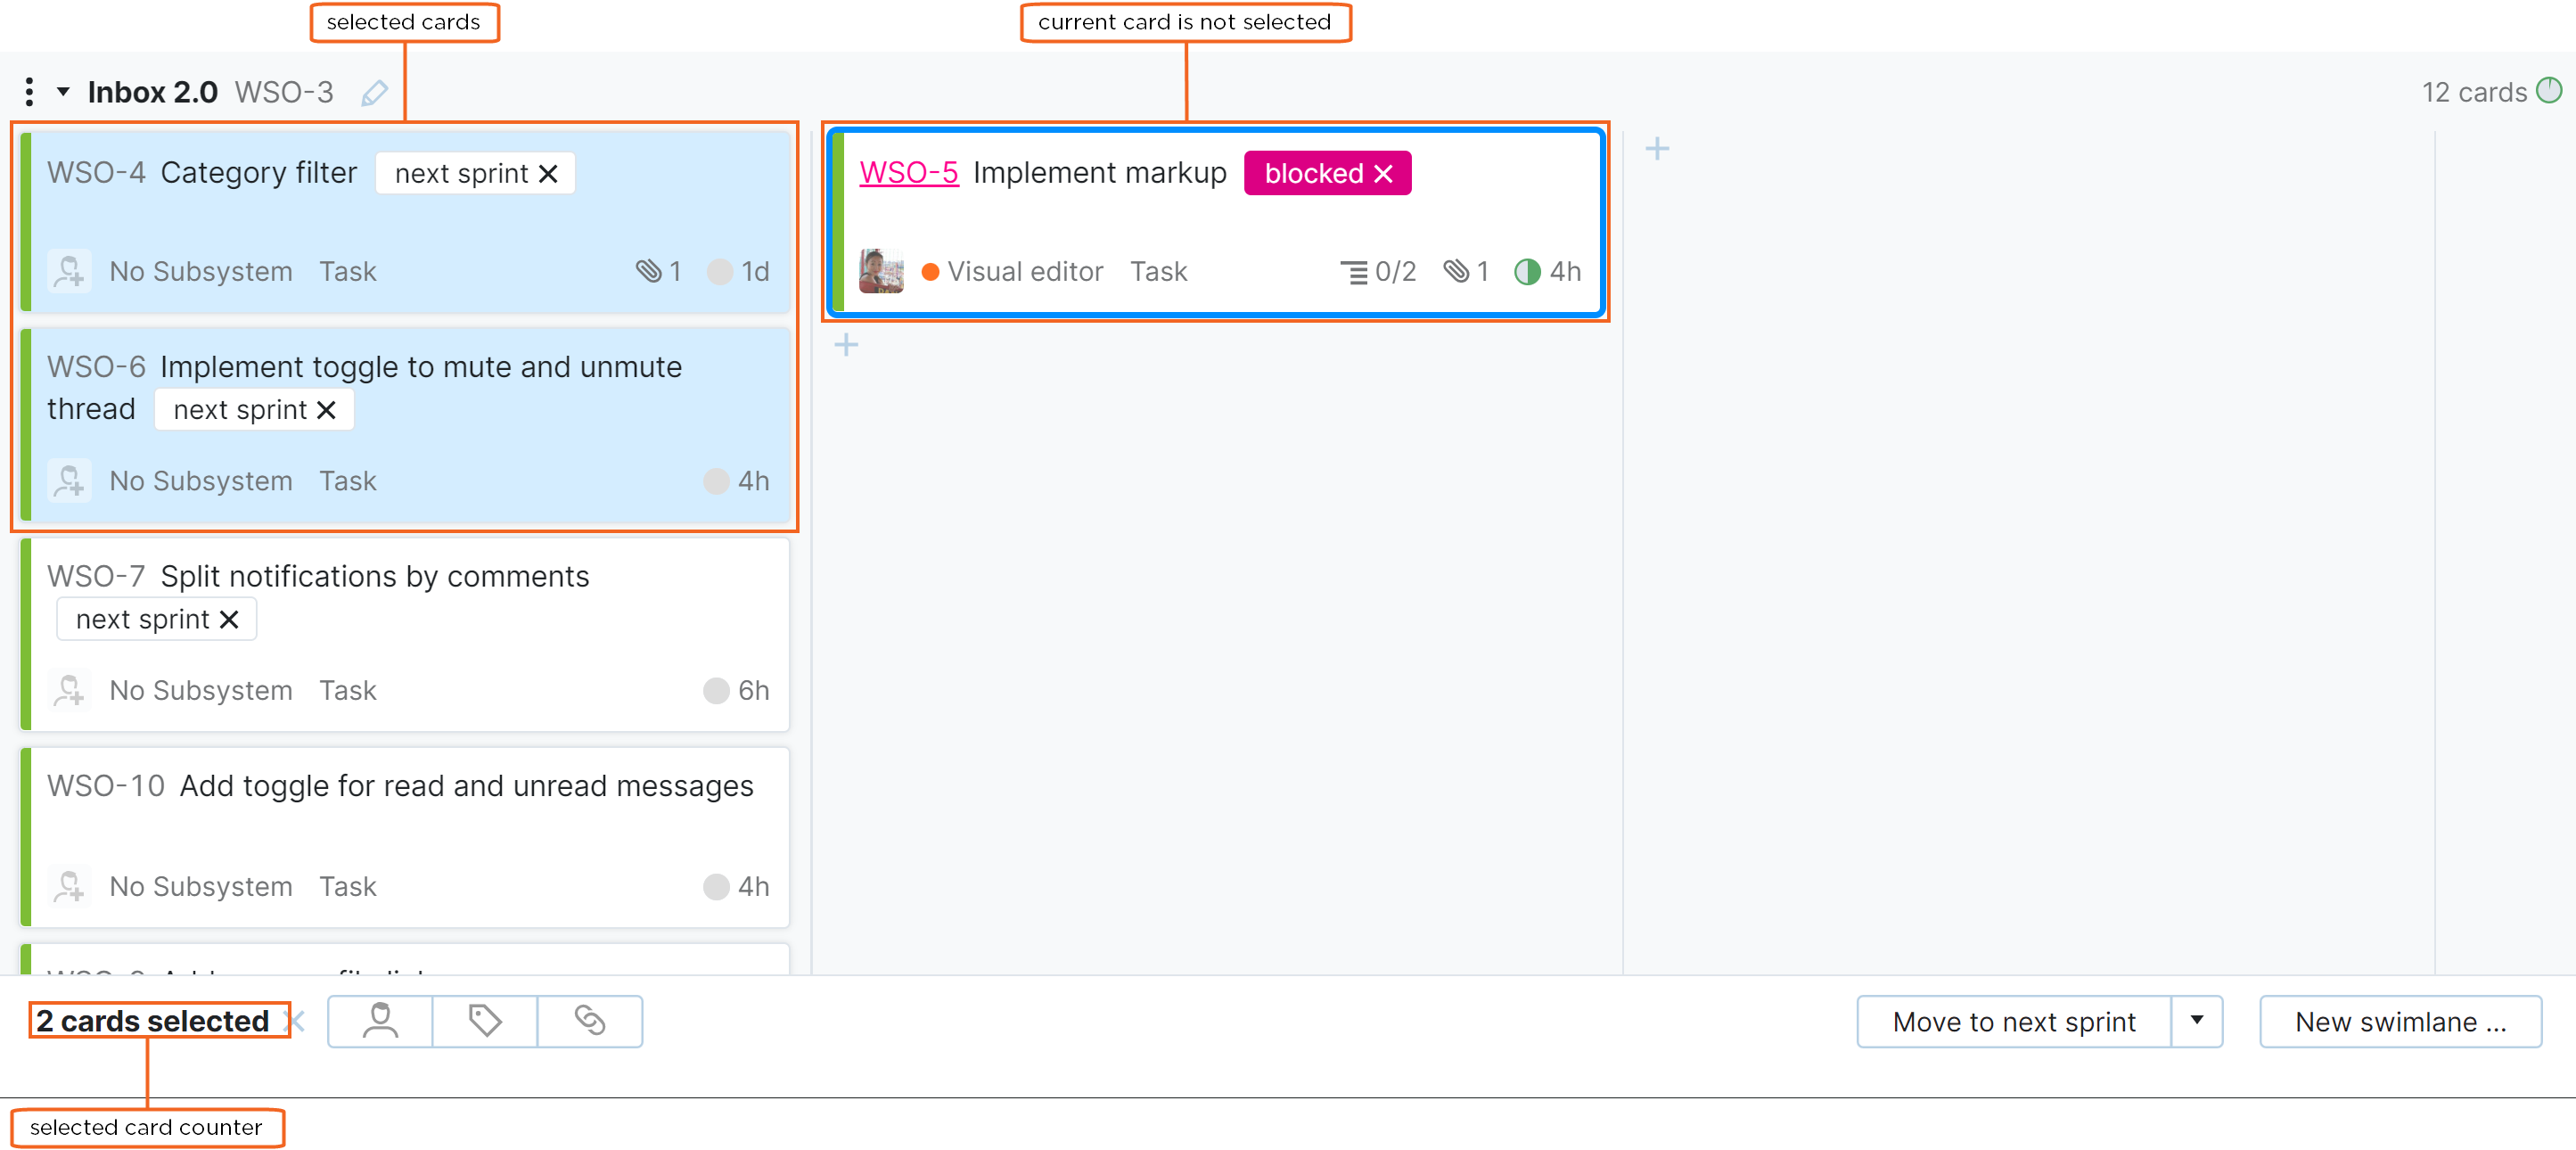
When you select one or more issues, the toolbar at the bottom of the page displays the number of selected issues. The following options are available in the toolbar:
Option | Description |
|---|---|
Remove selection | Click the x icon to deselect selected cards. |
Set Assignee | Opens the list of users who are set as assignees in the project. Select a user to set or change the assignee for all the selected cards. |
Add Tag | Opens the list of tags. Select a tag to add the tag to all the selected cards. |
Add Link | Opens the list of issue link types. Select an issue link type to open the Apply Command dialog and add a link type to all the selected cards. |
Move to Next Sprint | Moves all the selected cards to the next sprint.
The drop-down list next to this control lets you move the selected cards to a specific sprint or return them to the backlog. |
Commands
When you select one or more cards on the board, you can update the selected issues with a command. To enter a command, press Ctrl + Alt + J, or just start typing. When you start typing, the Apply Command dialog opens automatically.

View Mode
When you double-click on a card or select card and press F3, the issue opens in view mode. This mode is similar to the single issue view.
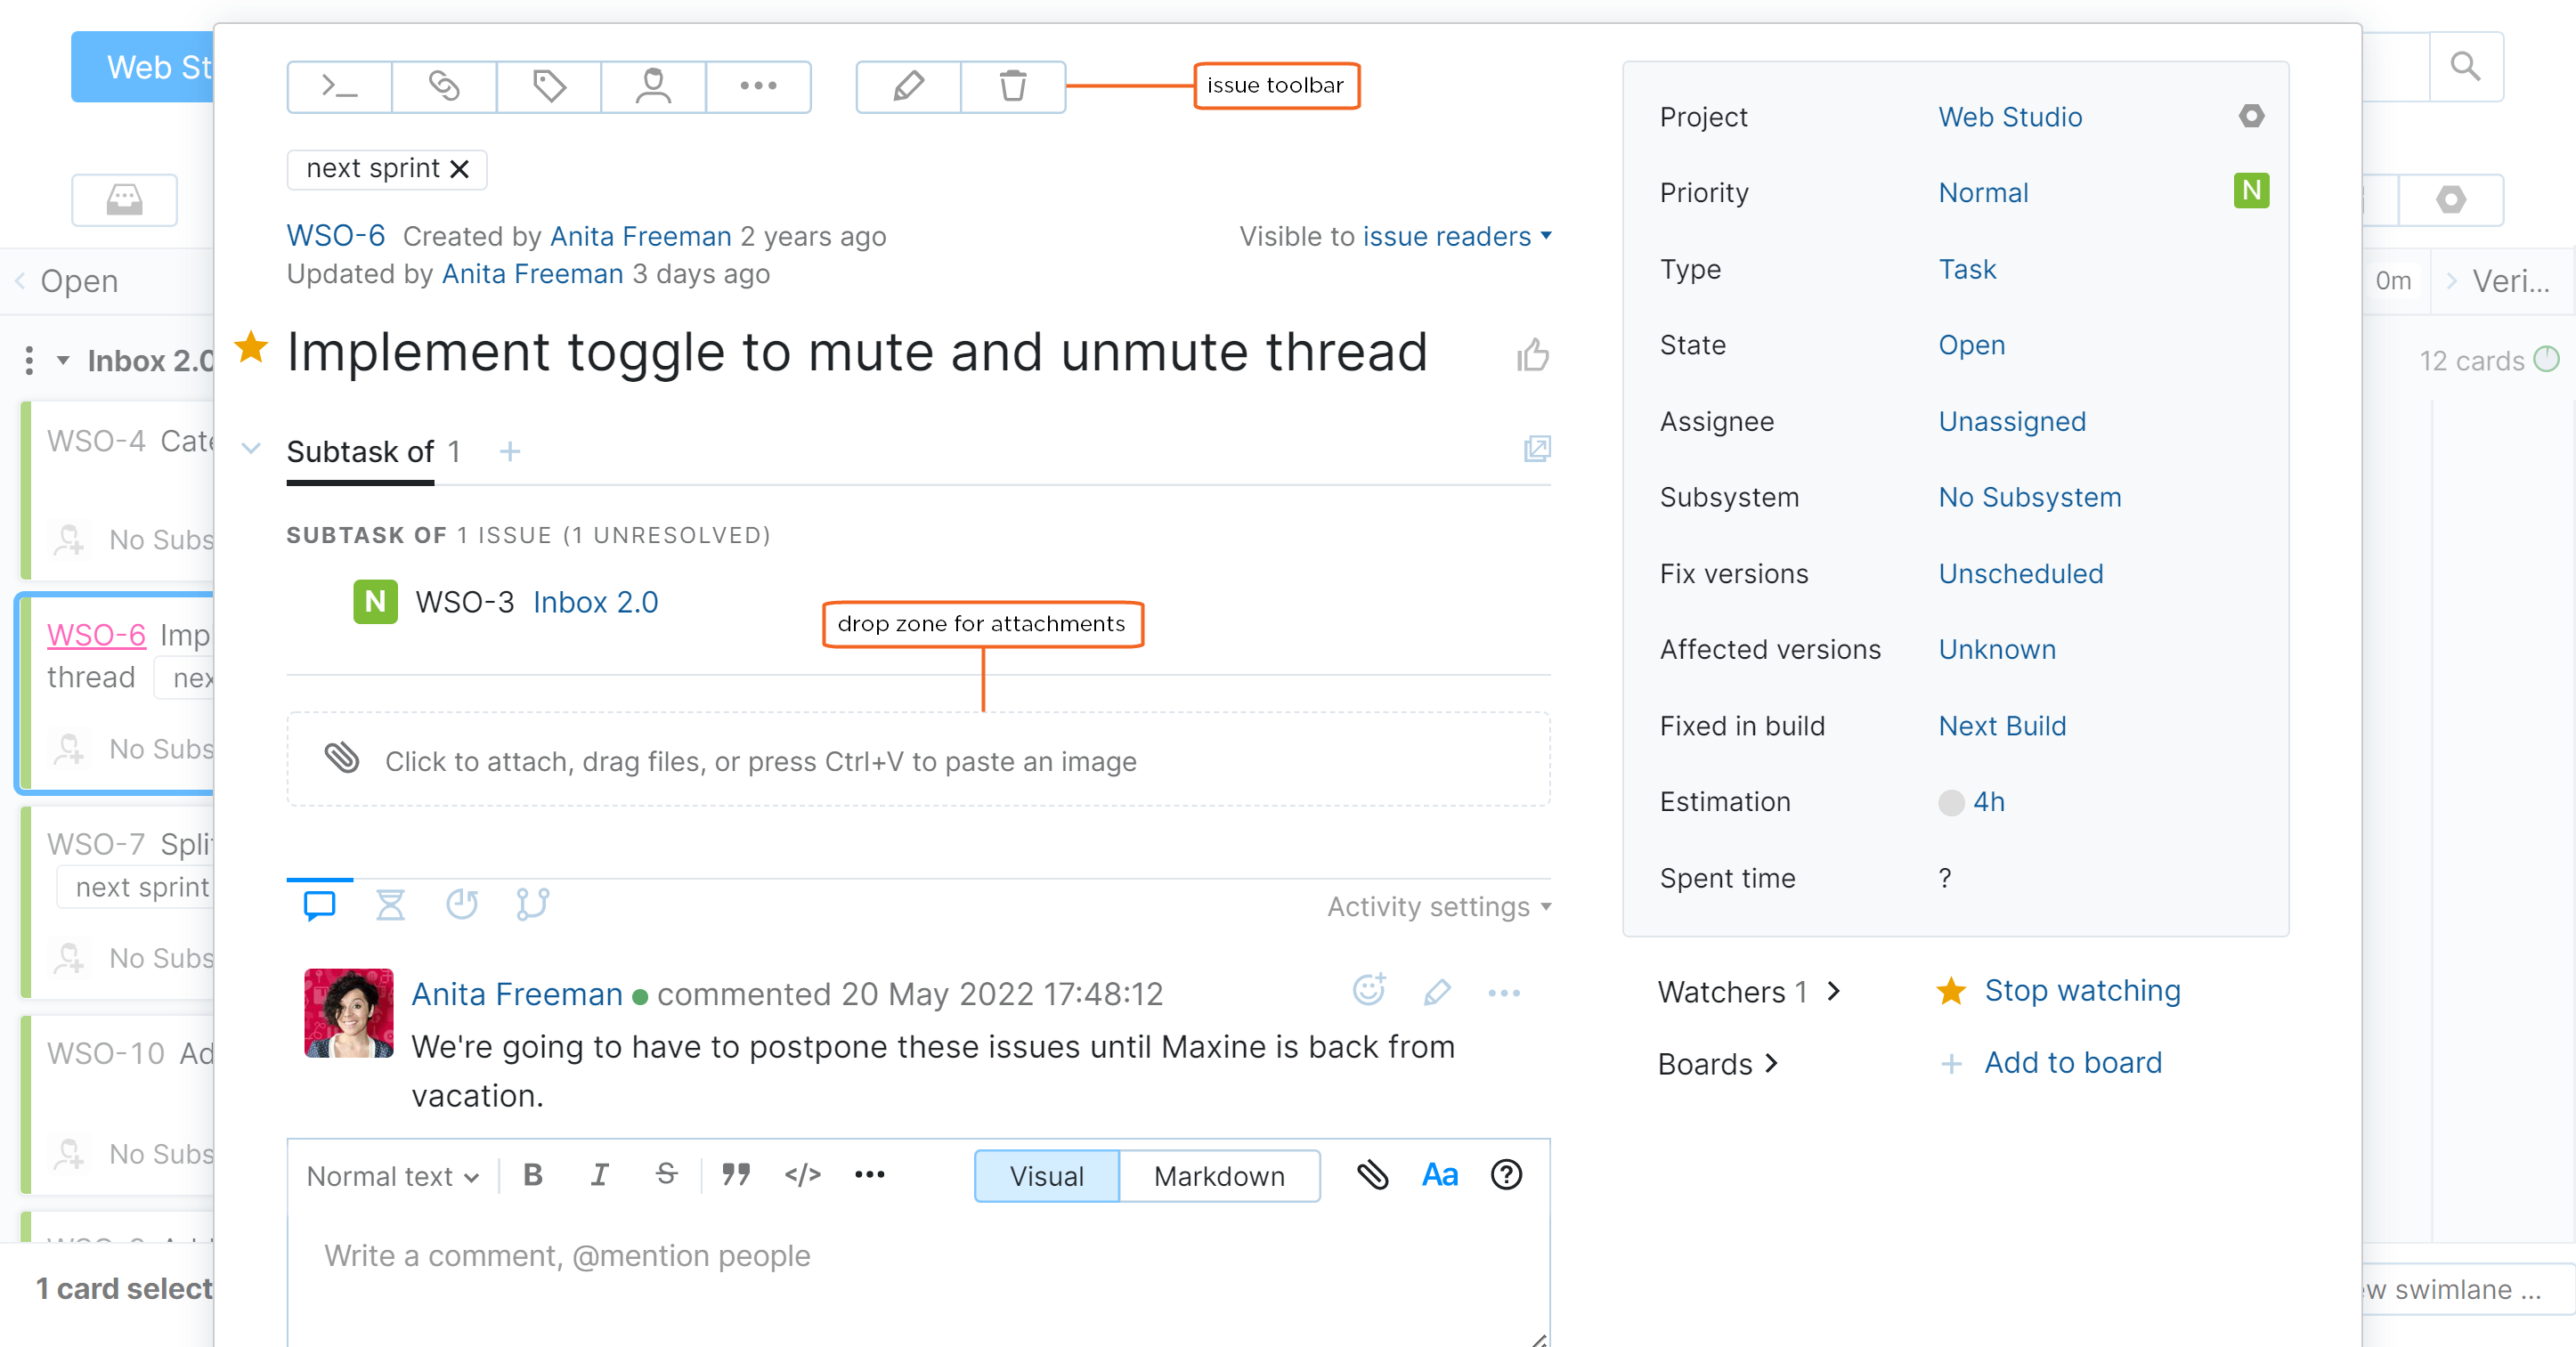
In view mode, the following options are available in the toolbar:
Control | Description |
|---|---|
Star issue | Add yourself to the list of watchers. If you are already watching this issue, you are removed from the list. |
Open Apply Command dialog | Opens the Apply Command dialog. Enter a command to update multiple issue properties at once. |
Add link | Adds a link from the current issue to another issue. Select the link type from the drop-down list. |
Add tag | Adds a tag to the issue. Use the input field to filter the list of tags. Select an item from the list to add a tag to the issue. |
Assign issue | Sets the Assignee for the issue. Use the input field to filter the list of assignees. Select a user from the list to set or the assignee. |
Show more | Opens a menu with additional actions. |
Edit issue | Opens the issue in edit mode. Here, you can change the basic properties of the issue, such as the Project, Summary, and Description. |
Delete issue | Deletes the issue. |
Visible to | Sets the visibility for the issue. To restrict the visibility, select a group from the drop-down list. |
The following options are available from the Show more menu:
Option | Description |
|---|---|
Clone issue | Creates a copy of the issue. The values that are assigned to custom fields for the current issue are assigned to the new issue. The new issue is added as a card to the same column and swimlane as the original issue. |
Print issue | Opens the issue on a printer-friendly page. Use the Print command in your browser to print the page. |
Add files | Opens a dialog to locate and attach a file. |
Add files privately | Opens a dialog to attach files and restrict their visibility. Click to select files or drag files to the drop zone. Select a group from the Visible to drop-down list to restrict the visibility for the attachments. |
Vote for issue | Add your name to the list of voters. If you have already voted for the issue, your vote is removed. You cannot vote for your own issues. |
Repeat last command | Applies the most recent command that you entered in the Apply Command dialog. |
In view mode, you have additional options for adding attachments to an issue. For issues without attachments, a drop zone is displayed.
Click the drop zone to select and attach files.
Drag files to the drop zone.
Press Ctrl + V to paste an image from the clipboard.
For issue with attachments, additional options are available from the Attachments menu.
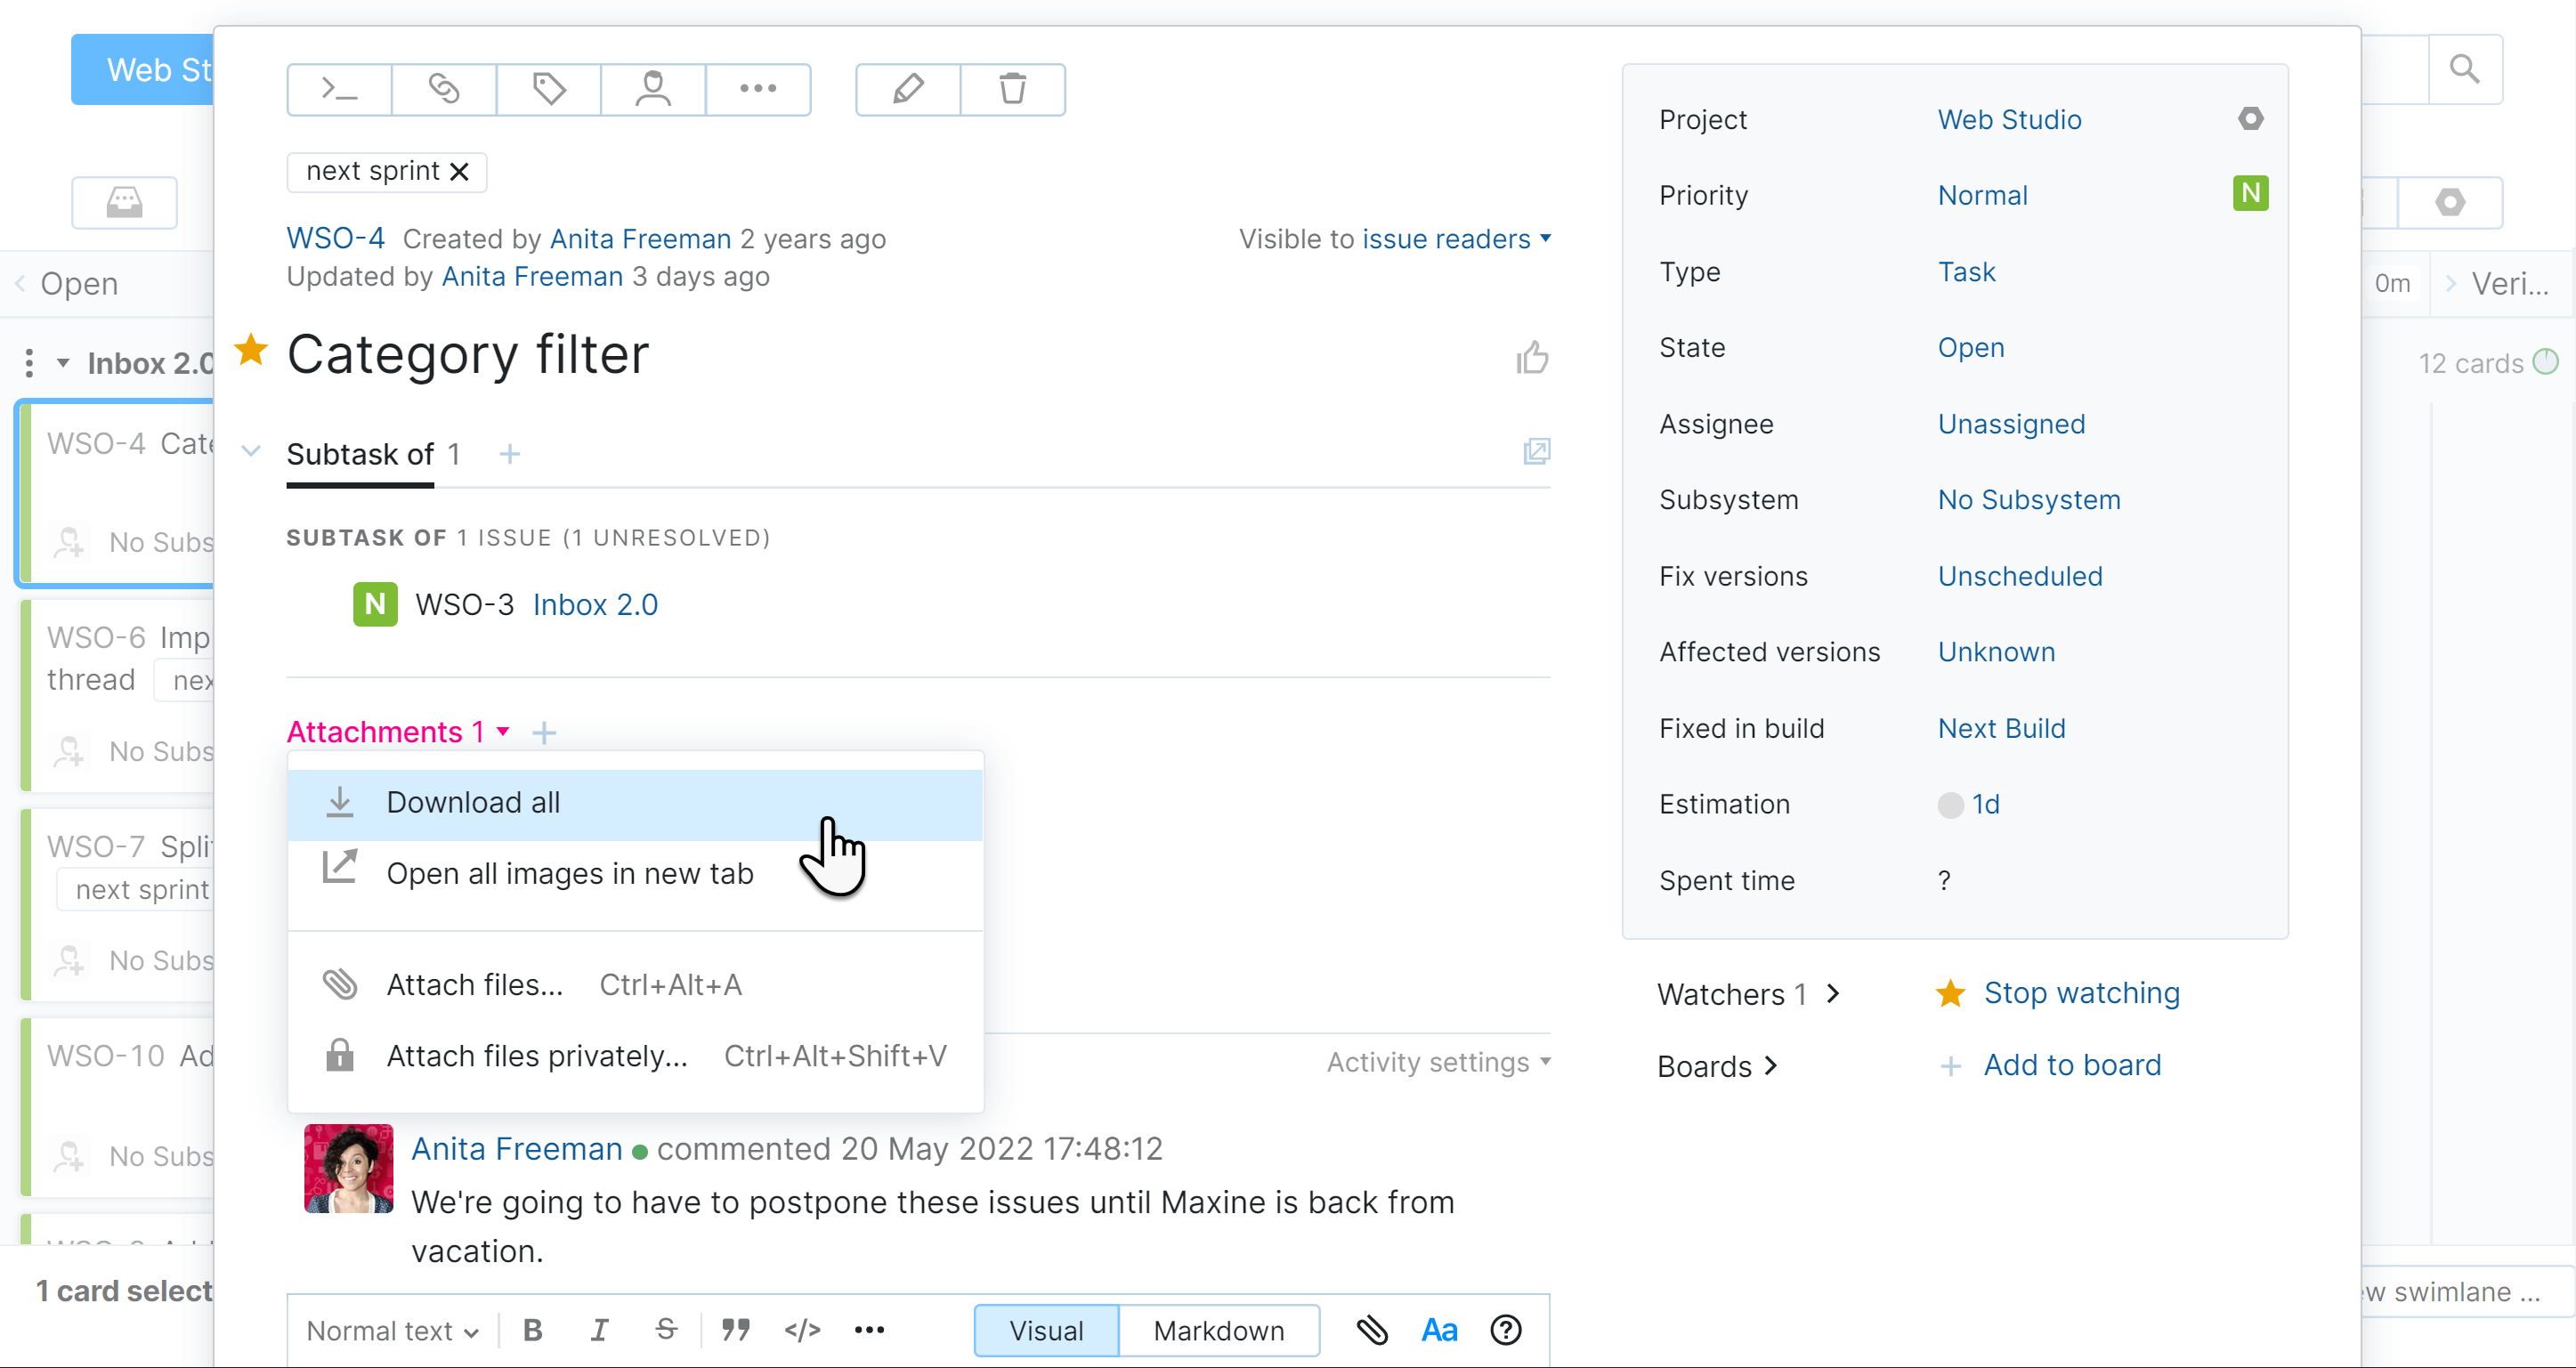
Option | Description |
|---|---|
Download all | Downloads all the attachments in a zip archive. |
Open all images in new tab | Opens all the images that are attached to the issue in your web browser. All the images that are attached to the issue open in a new browser tab. |
Add files | Opens a dialog to locate and attach a file. |
Add files privately | Opens a dialog to attach files and restrict their visibility. Click to select files or drag files to the drop zone. Select a group from the Visible to drop-down list to restrict the visibility for the attachments. |
Additional options are available for individual attachments. Move the pointer over an attachment and click the icon that corresponds with the option.
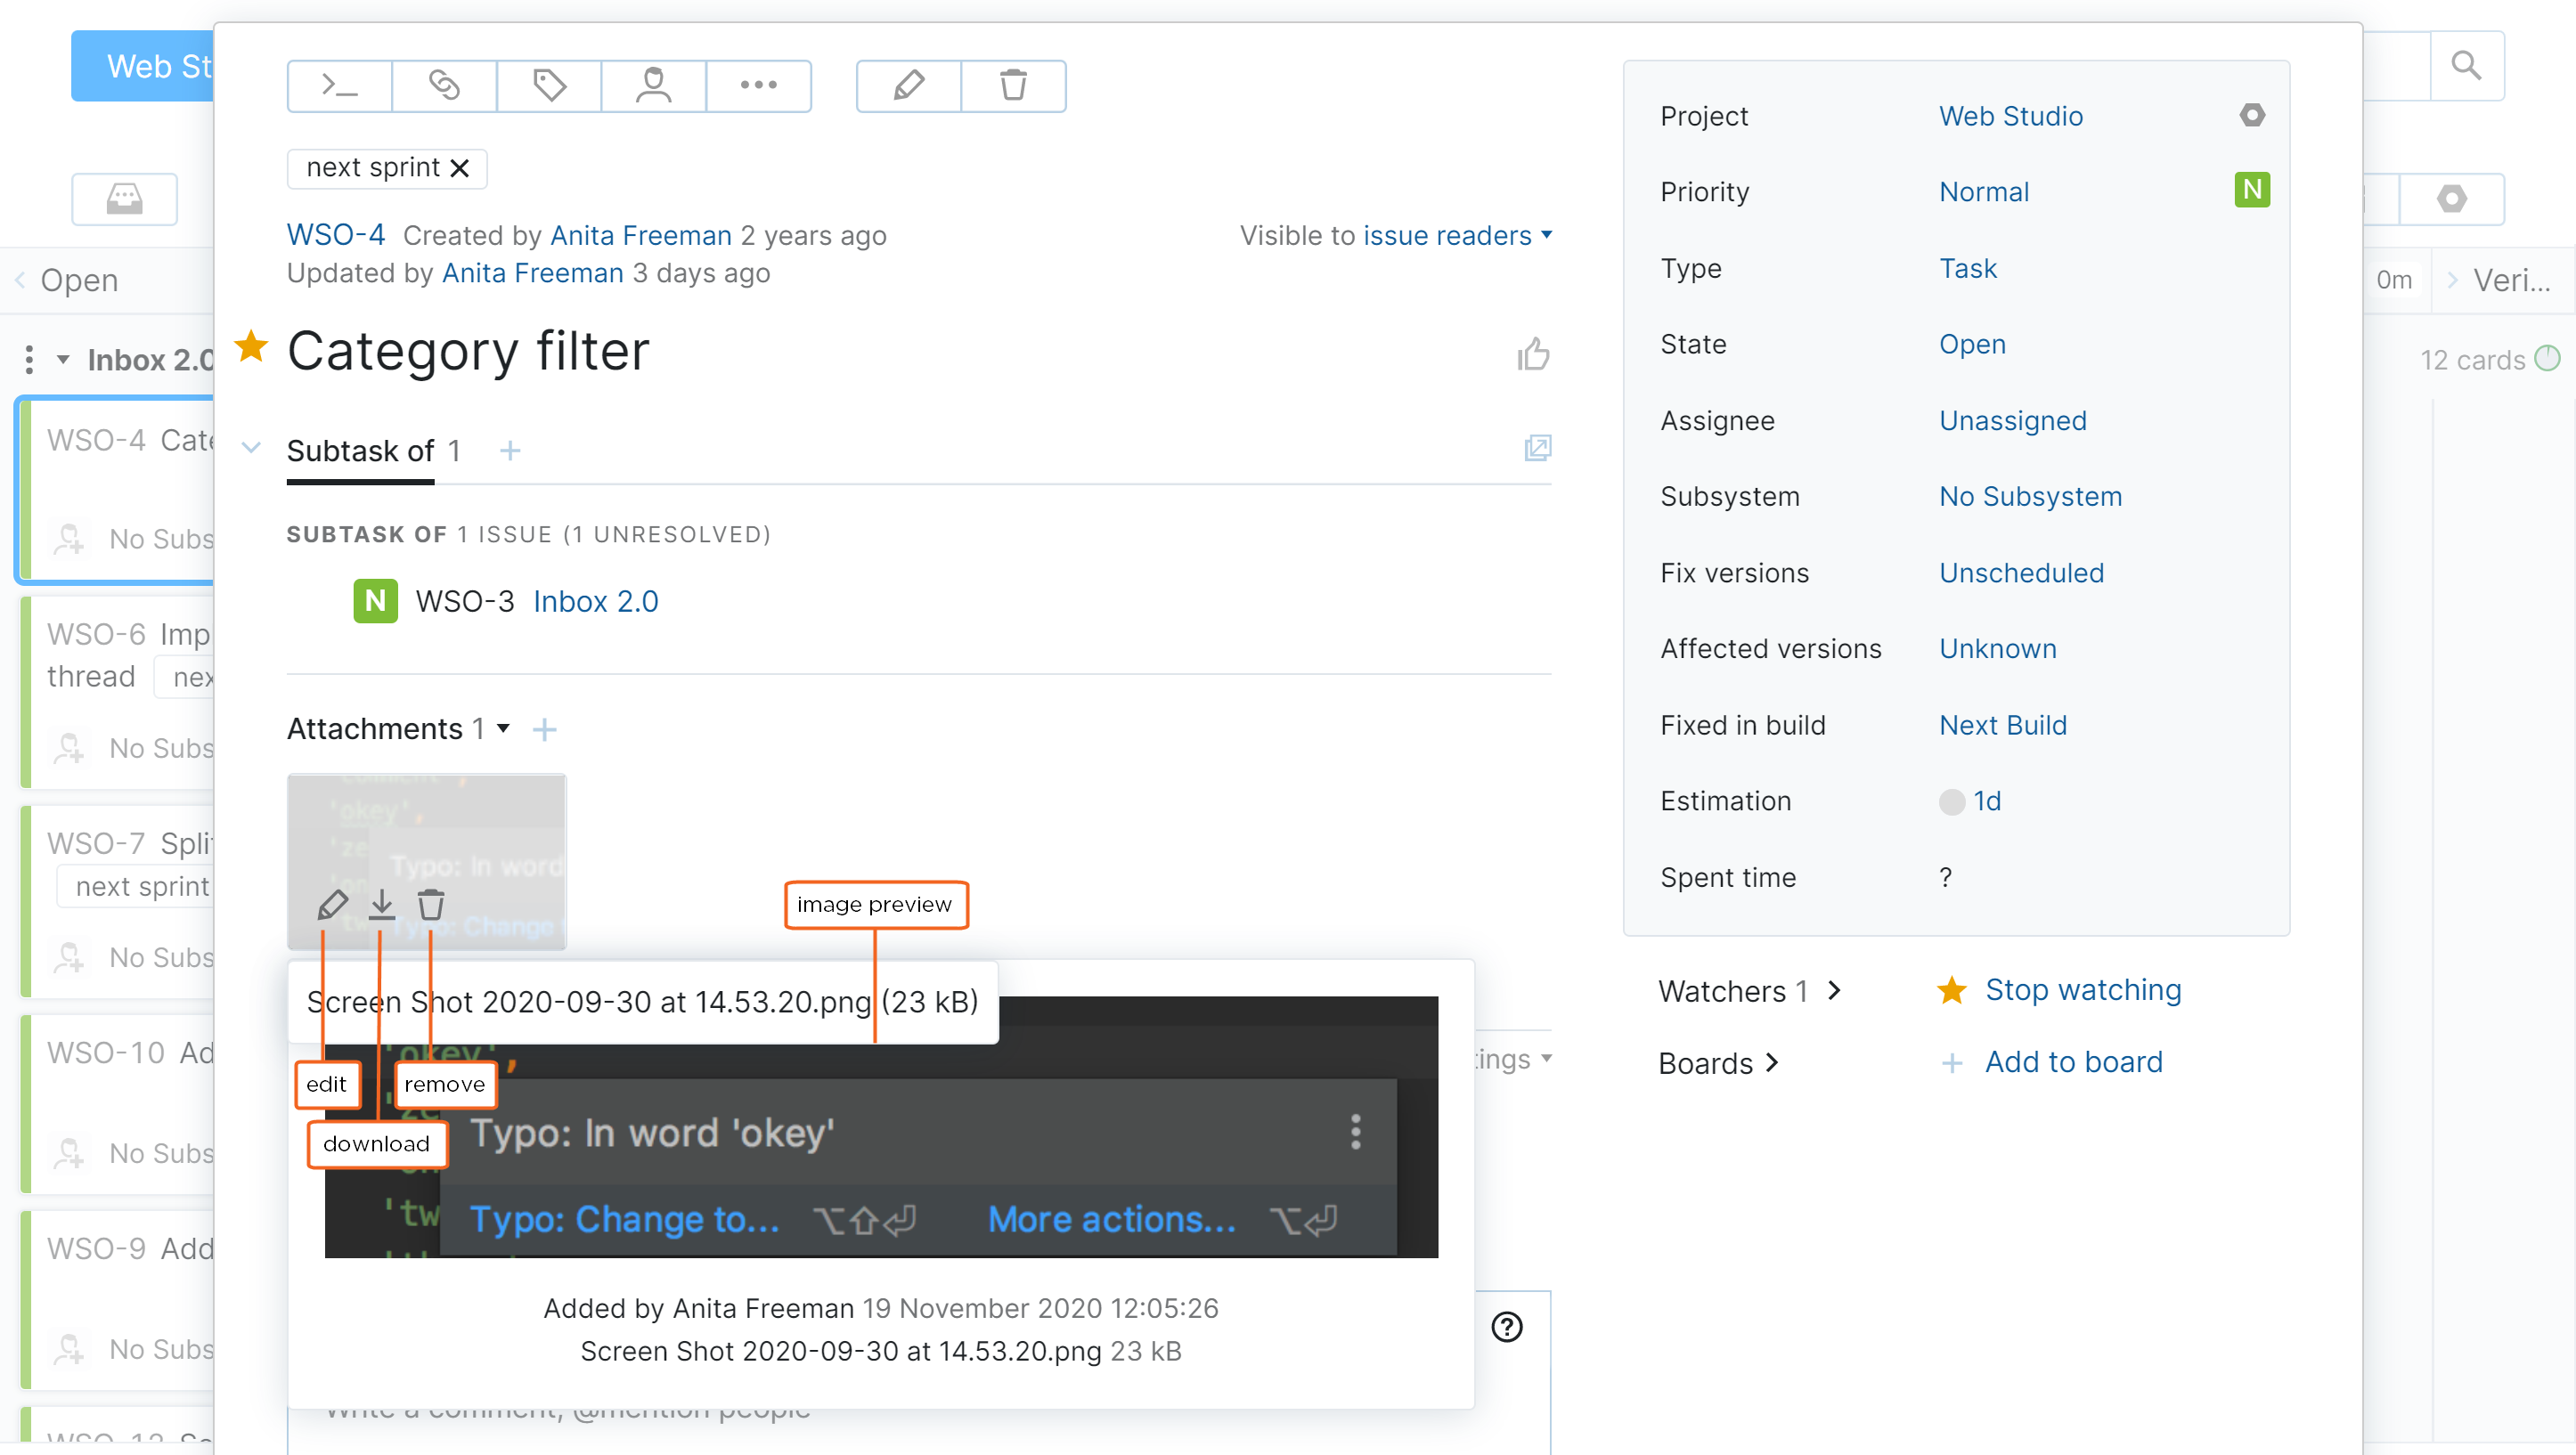
Option | Description |
|---|---|
Download | Downloads the attachment in its native format. |
Edit |
|
Remove | Removes the attachment from the issue following a confirmation dialog. |
When you select a card and press F2, the issue opens in edit mode. In addition to the updates that you can apply in view mode, edit mode lets you update the issue Summary and Description.
To exit view mode or edit mode, press Esc or click outside the issue pop-up window.
Activity Stream
In this issue view, all changes applied to an issue are displayed as a single feed with filters that let you select which types of changes you want to show or hide.
Here's an example of the activity stream filtered to show comments and VCS changes:
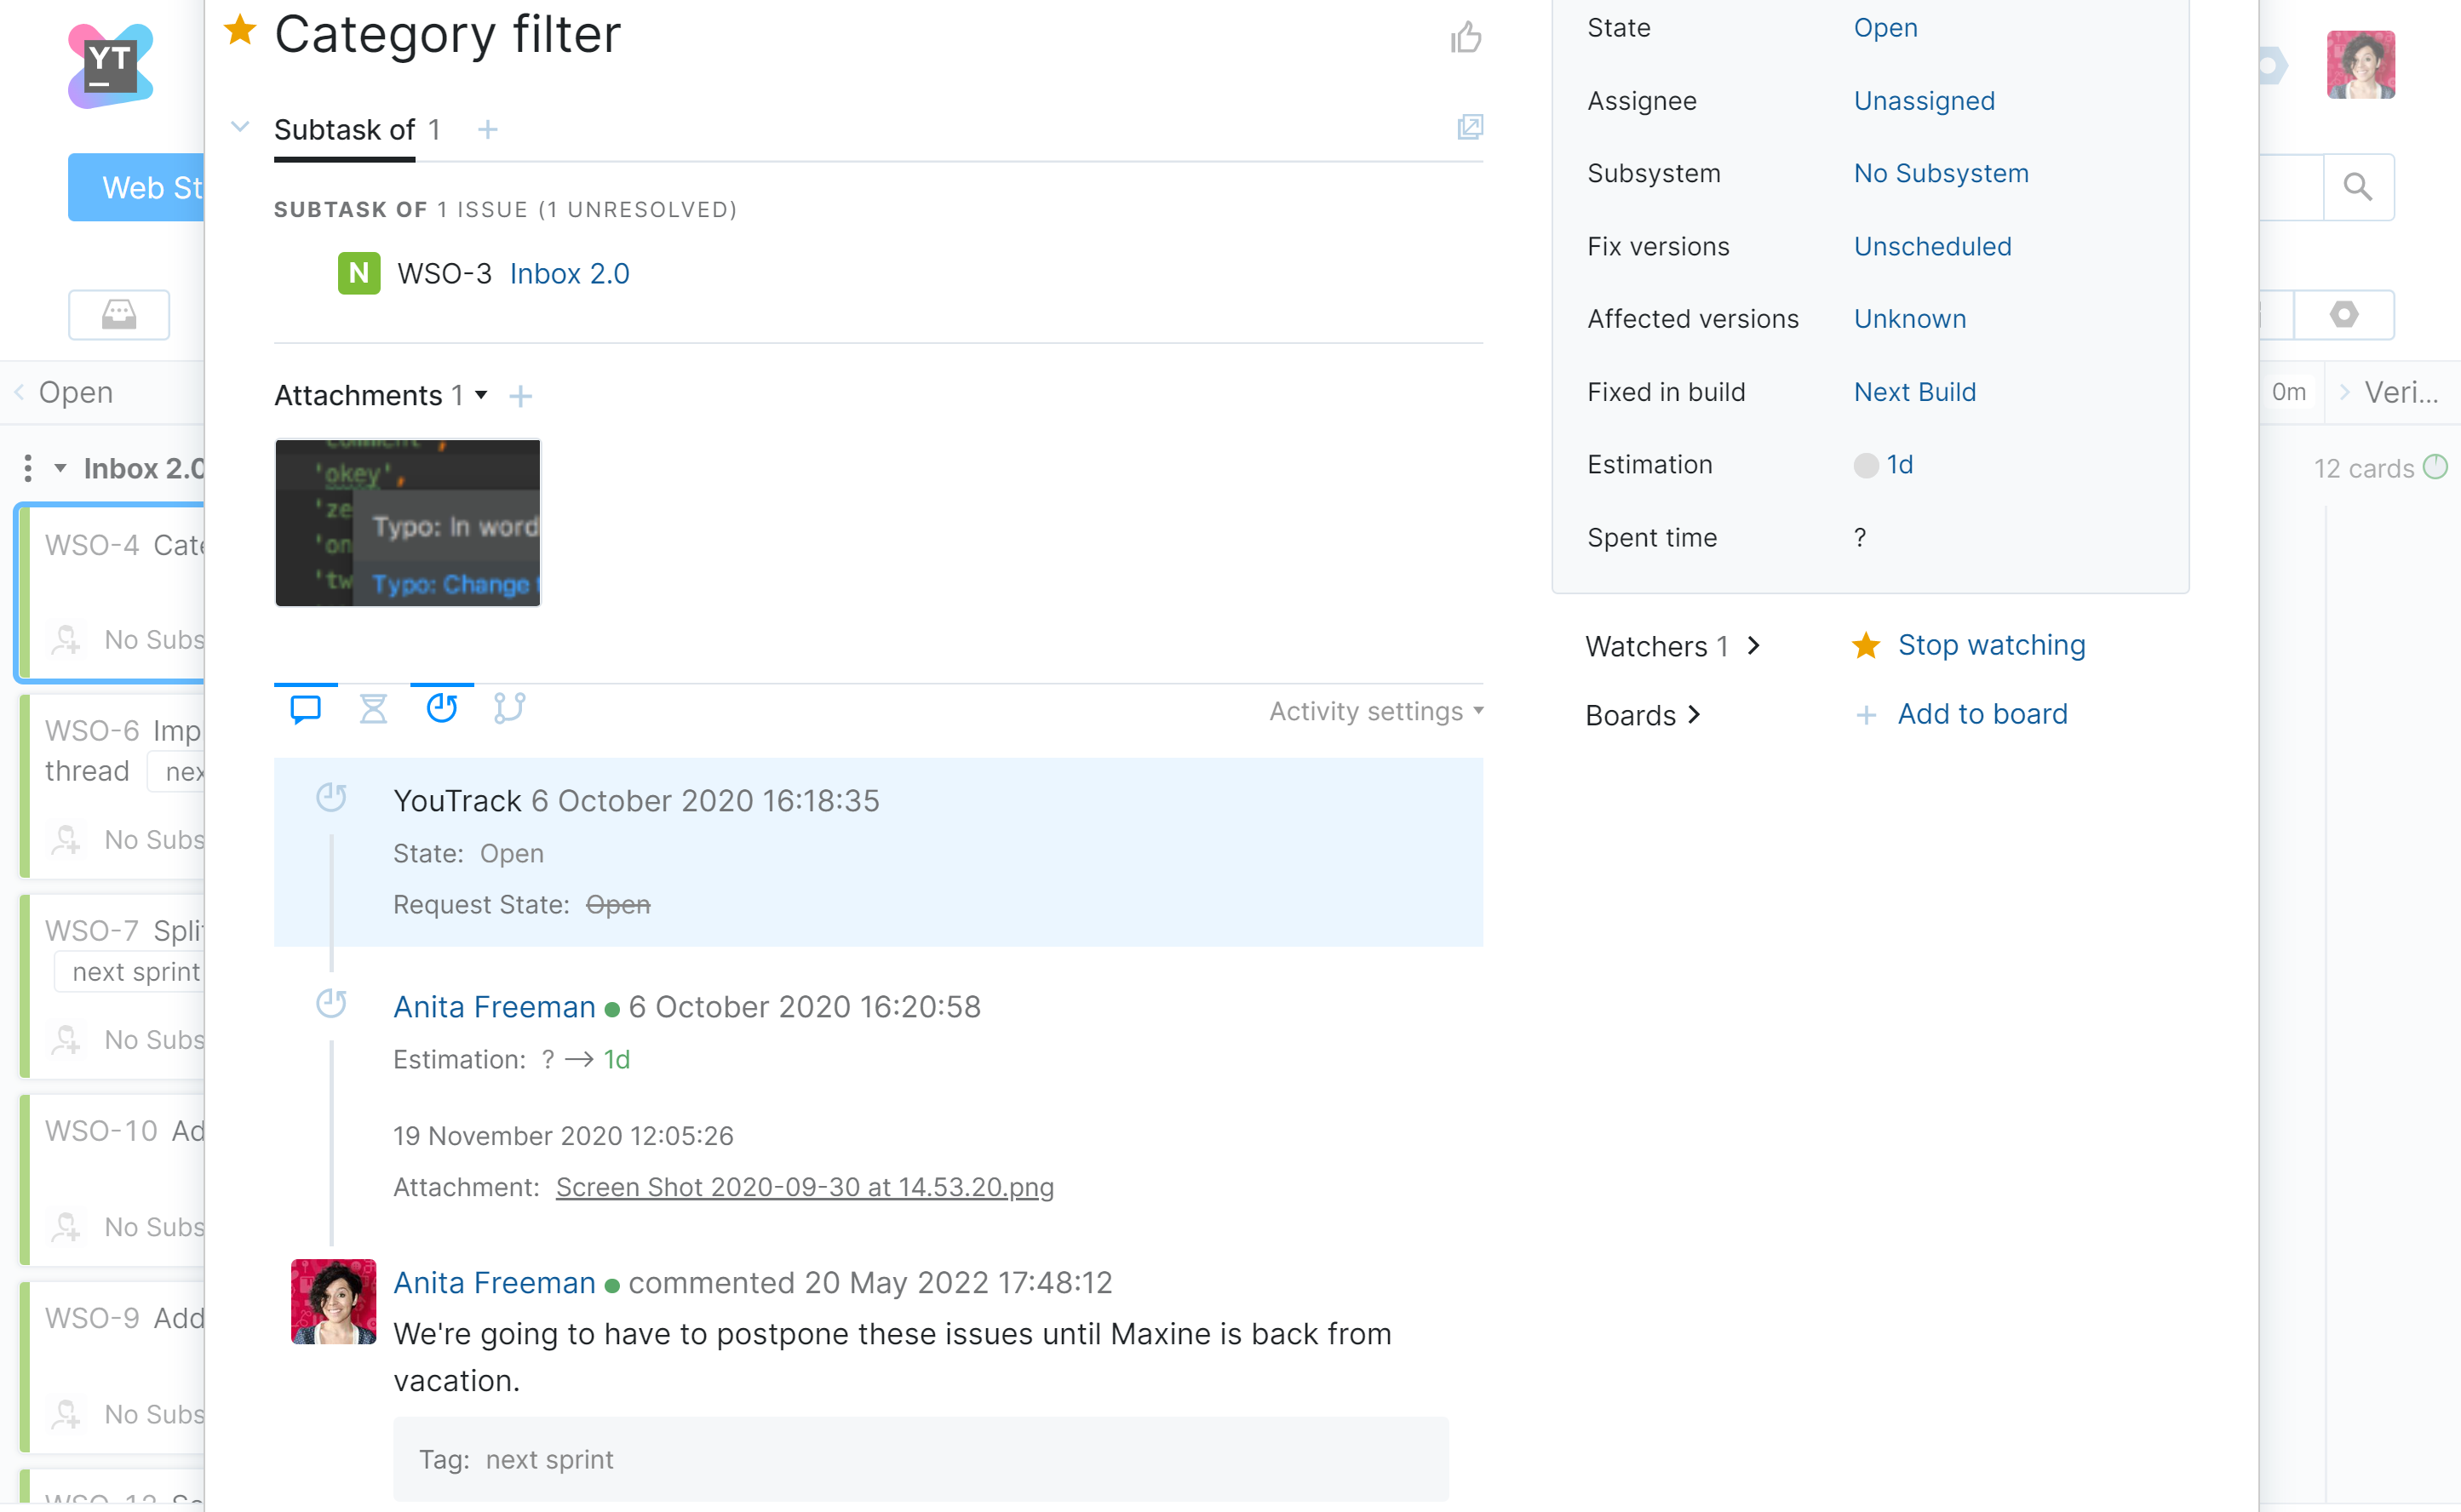
The following controls are available in the toolbar at the top of the activity stream:
Control | Description |
|---|---|
Comments | Toggles the visibility of comments in the activity stream. |
Spent time | Toggles the visibility of work items. This control is only visible when the Time Tracking feature is enabled in the project. |
Issue history | Toggles the visibility of the issue change history. |
VCS changes | Toggles the visibility of VCS changes that have been linked to the issue. This control is only visible when the project is integrated with a version control system or is connected to a VCS through an integration with TeamCity. |
Code reviews | Toggles the visibility of activities related to a code review in Upsource. This control is only visible when an integration with Upsource is configured for the project. |
The following options are available from the Activity settings menu:
Control | Description |
|---|---|
Sort: oldest first | Displays changes in chronological order. |
Sort: newest first | Displays changes in reverse-chronological order. In this mode, the input field for comments is displayed at the top of the activity stream. |
Show permalink | Displays a link to the issue with the currently active set of activity types. |
Issues as Swimlanes
On agile boards that use issues as swimlanes, the swimlane itself represents an issue. All the cards that are added to the swimlane are linked as subtasks to the issue that represents the swimlane.
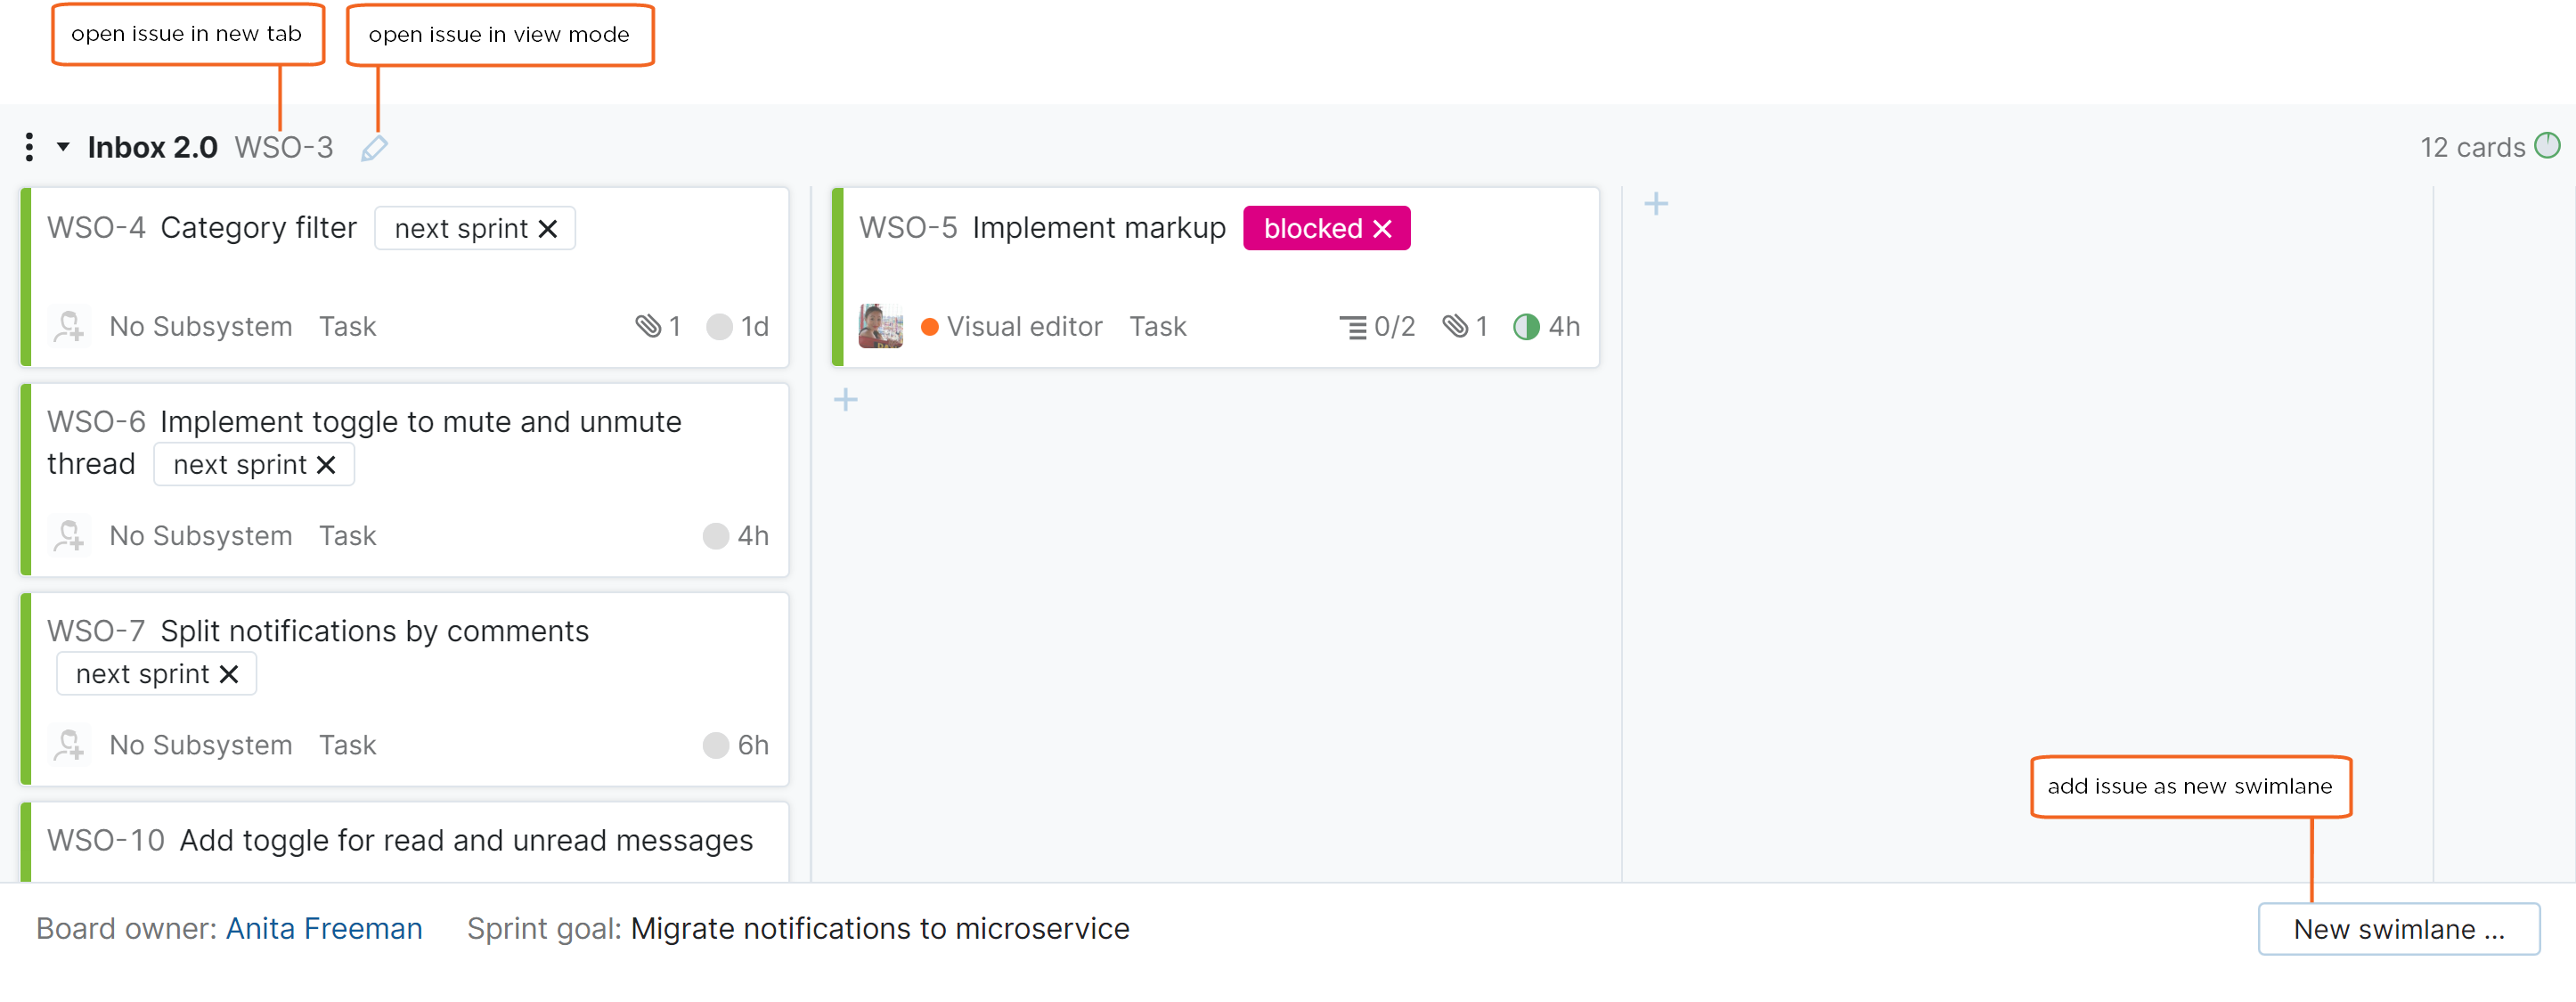
When you reorder swimlanes on the board, the issues that represent each swimlane are not modified in any way. Some teams use the order to determine which features or user stores should be resolved first, but the order does not affect the value of the Priority field in the issue itself.
Use the following actions to update issues that represent swimlanes on the board:
Action | Description |
|---|---|
Open the issue in single issue view | The issue ID is set as a link to the issue. When you click this link, the issue opens in a new browser tab. |
Open the issue in view mode | Click the edit icon to open the issue in view mode. Here, you can apply updates to the issue that represents the swimlane just as you would when you open a card in view mode. |
Add a new issue as a swimlane | The New swimlane button in the toolbar at the bottom of the board opens a dialog for a new issue. Enter a summary and description, then click the New swimlane button in the dialog to add this issue to the board as a swimlane. |
Move the issue to the backlog | To remove a swimlane from the board and return the issue to the backlog, click the Backlog button to show the backlog, then drag the swimlane to the backlog. All the cards that are assigned to the swimlane are also returned to the backlog. |