Online Forms
Using an online form for customer support lets you provide customers with a web-based interface that they can use to submit inquiries, requests, or complaints. These forms can include fields for the customer's contact information, a description of the issue or question, and any relevant details, such as order numbers or account information. These submissions are transformed into YouTrack tickets for your helpdesk agents to manage, track, and resolve.
Online forms can be a convenient and efficient way to manage customer support requests, as they allow you to quickly gather information from customers and route these requests to the appropriate representatives for resolution. They can also be used to track the status of support requests and ensure that customer inquiries are addressed in a timely and consistent manner. Using online forms for customer support can reduce the workload on phone support, as many customers prefer to use this method of communication over the phone.
To view the list of online forms that are available for use in your helpdesk project, access the project settings, select the Channels tab, then select Online Forms.

Before you can start using online forms in your helpdesk projects, there are features that need to be configured at the global level. If you encounter problems with your helpdesk setup, ask a system administrator to verify the status of the following features.
Feature | Description |
|---|---|
Requests submitted using online forms are transformed into tickets in YouTrack. By default, YouTrack sends a notification confirming the submission of the request through the online form. When agents post public comments in a ticket, it generates an email notification that is sent to the customer who submitted the request. If email notifications are disabled or misconfigured, your customers do not receive any of these messages. YouTrack Server installations are not configured to connect to an external mail service out of the box. This connection must be set up by a system administrator or another user with Low-level Admin Write permission. For instructions, see Enable Email Notifications. | |
Online forms can be targeted by spammers who use automated tools to submit large numbers of form submissions. CAPTCHA (Completely Automated Public Turing test to tell Computers and Humans Apart) challenges can help prevent these types of attacks by requiring users to demonstrate that they are human. Before you can add a CAPTCHA challenge to your online forms, you need to connect with the Google reCAPTCHA service. This configuration is available from the Common Settings page for your authentication modules. For instructions, see reCAPTCHA Settings. If your YouTrack Server installation is connected to an external Hub service, your auth module settings are configured directly in Hub. To learn how to configure CAPTCHA settings in a Hub installation, please refer to the Hub documentation. | |
Cross-Origin Resource Sharing (CORS) is a security feature implemented in web browsers that allows web servers to specify which origins are allowed to access resources on their server. Whenever you embed an online form into an external website, the user who creates the form needs to specify the list of target domains where this form will be hosted. Any domain that is added to the list of Target domains for an online form is automatically added to the list of allowed origins in YouTrack and cannot be removed from the list. However, CORS requests can be blocked due to other factors, like invalid or expired SSL/TLS certificates or Content Security Policy (CSP) configuration on the host site. |
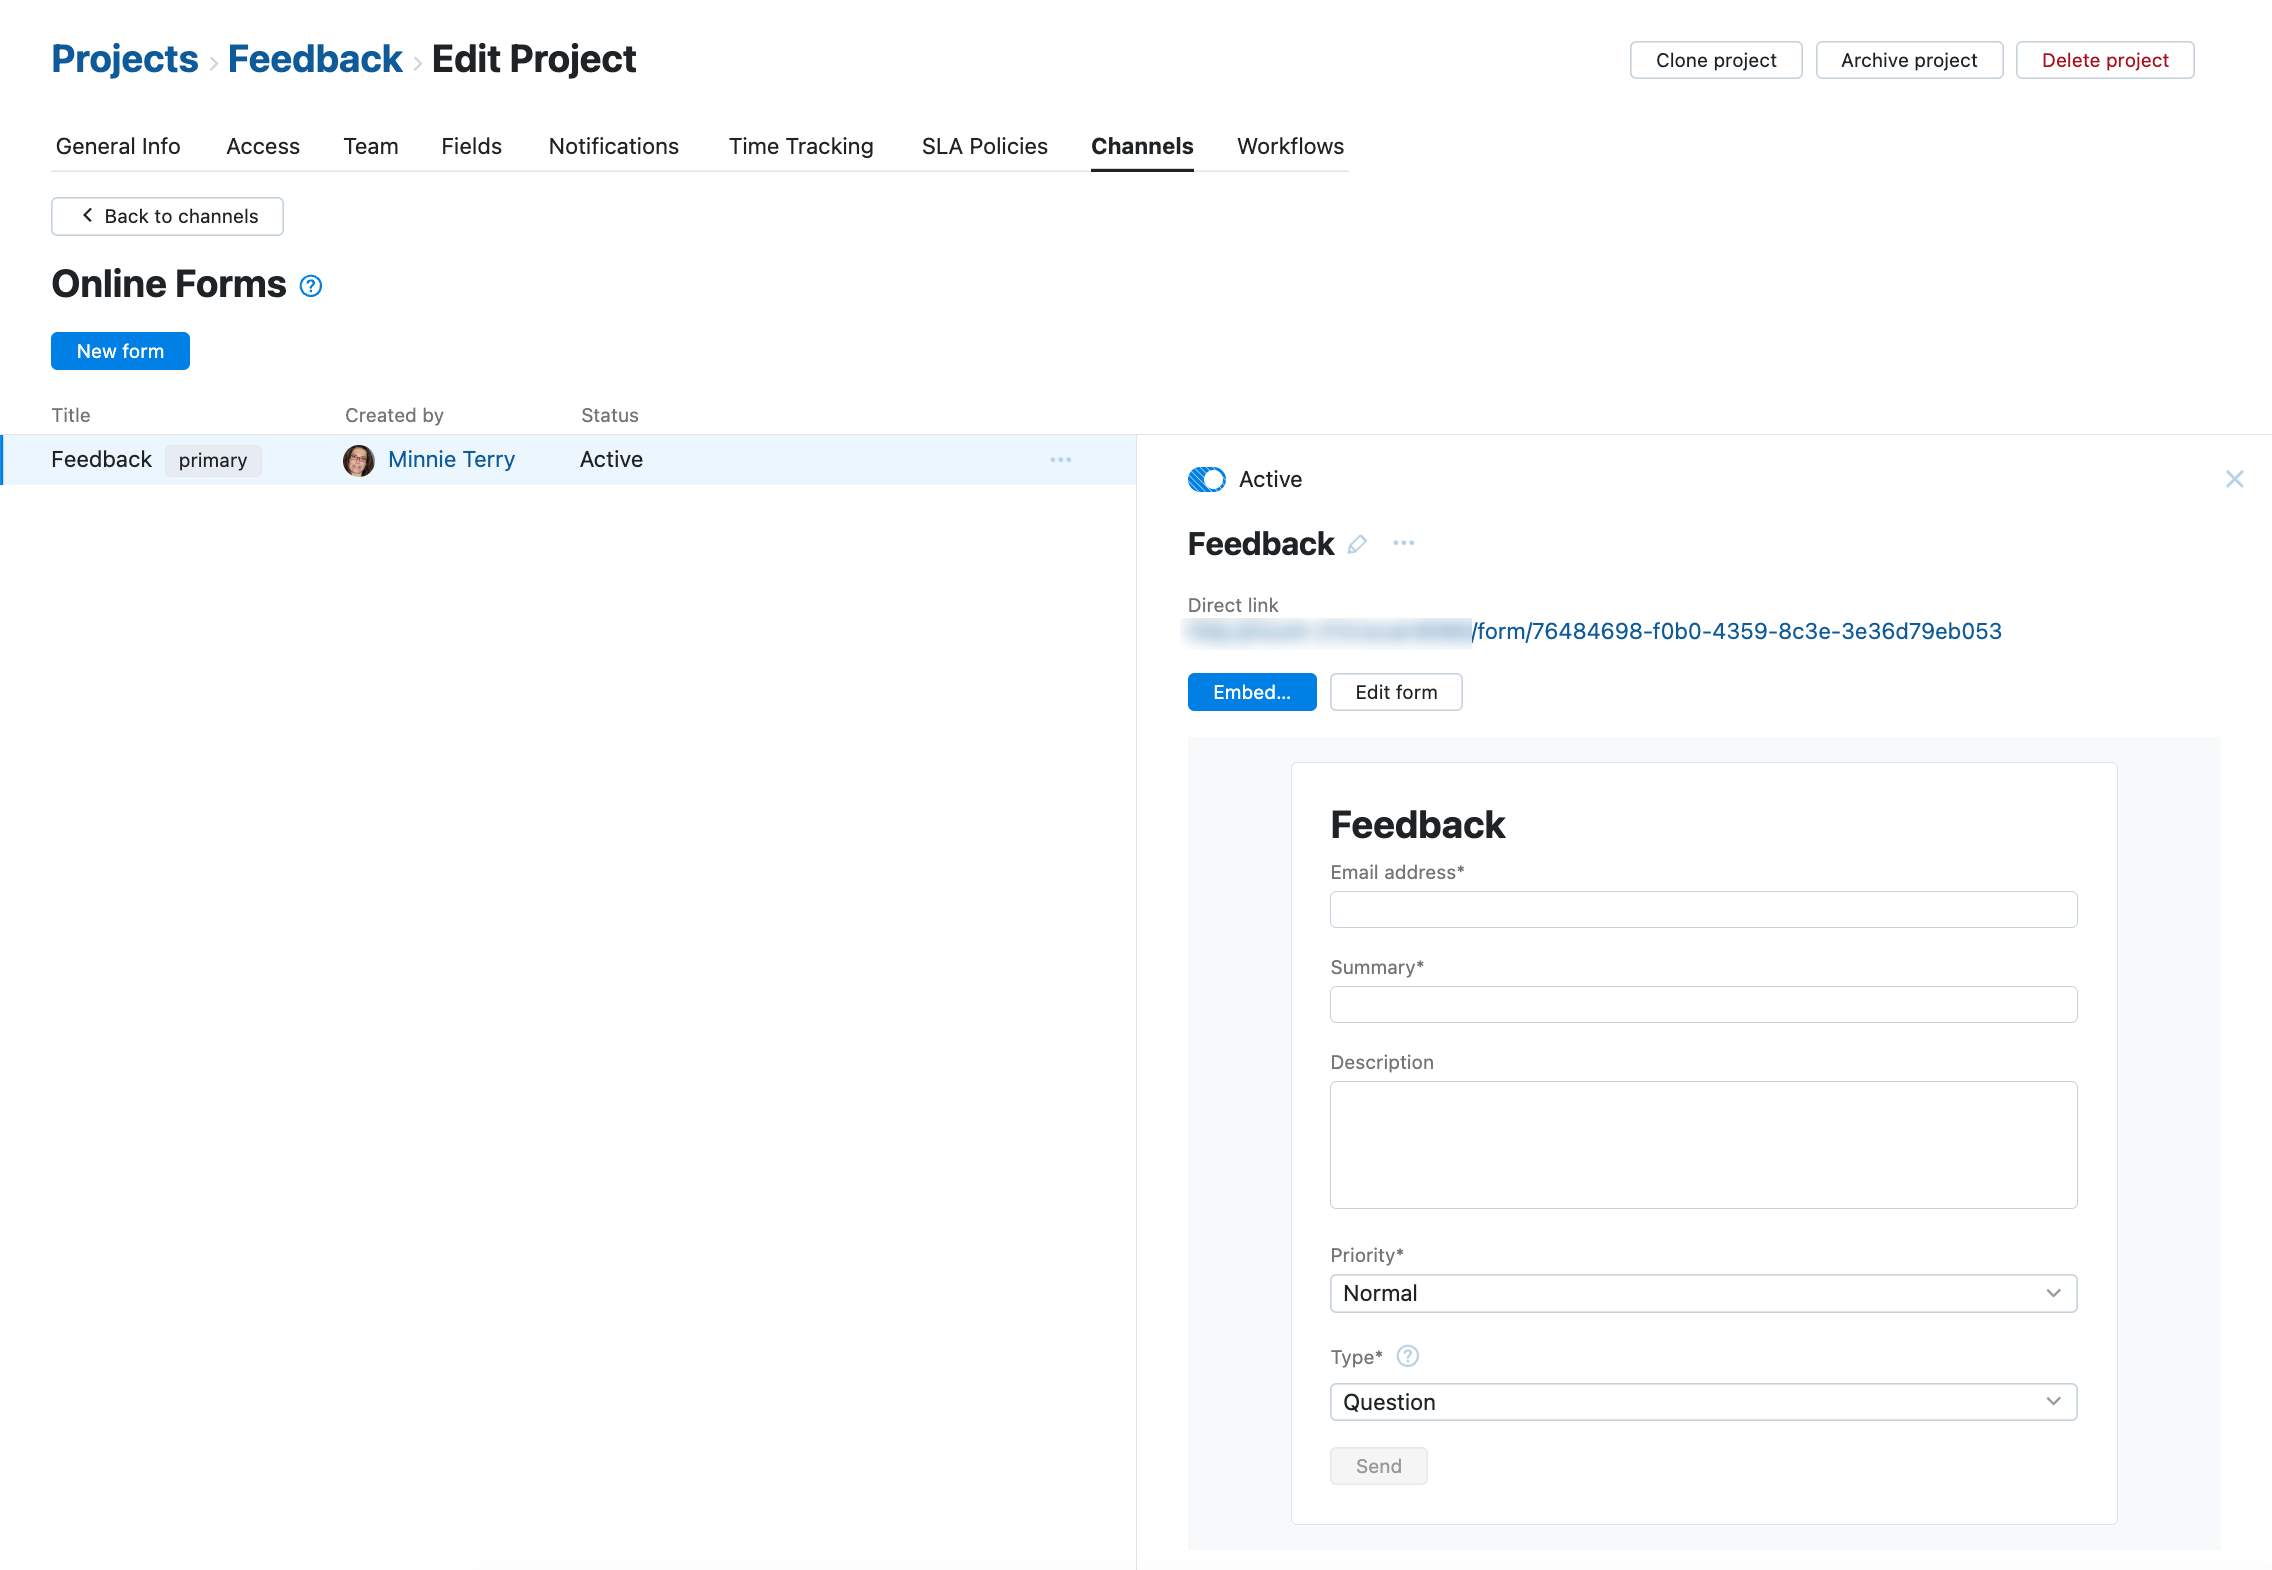
Each helpdesk project includes a default form for collecting customer requests. You can customize it to include fields or questions that are relevant to your project or the purpose for using the form.
warning
CAPTCHAThe default form does not include a CAPTCHA challenge, which makes it vulnerable to spam attacks. If you start to see a sudden spike in the number of submissions or tickets that contain gibberish, irrelevant or inappropriate content, or links to suspicious websites, we strongly recommend that you add a CAPTCHA challenge to the form.
tip
Target DomainsThe Target domains setting for the default online form is empty by default. This means there aren't any external websites that have preauthorized clearance to send cross-origin requests to YouTrack.
If you only plan to use this form by sending direct links in messaging clients (for example, email, Slack, or Twitter), this setting is optional. However, if you plan to embed the form in one or more pages on your website, be sure to add these domains to the settings for the form.
Different forms can be customized to capture specific information related to different types of inquiries or support requests. For example, you might have one form for general inquiries, another for technical support, and a third for billing questions. By having multiple forms, you can ensure that the information provided by customers is relevant to their specific request, which can help streamline the support process.
Each helpdesk project supports an unlimited number of online forms.
tip
Requires permissions: Update Project
Click the Projects link in the application header.
Locate your helpdesk project in the list.
Open the options menu for the project, then select Channels.
Select the Online Forms channel.
The list of online forms that are available in your helpdesk project is shown.
Click the New form button.
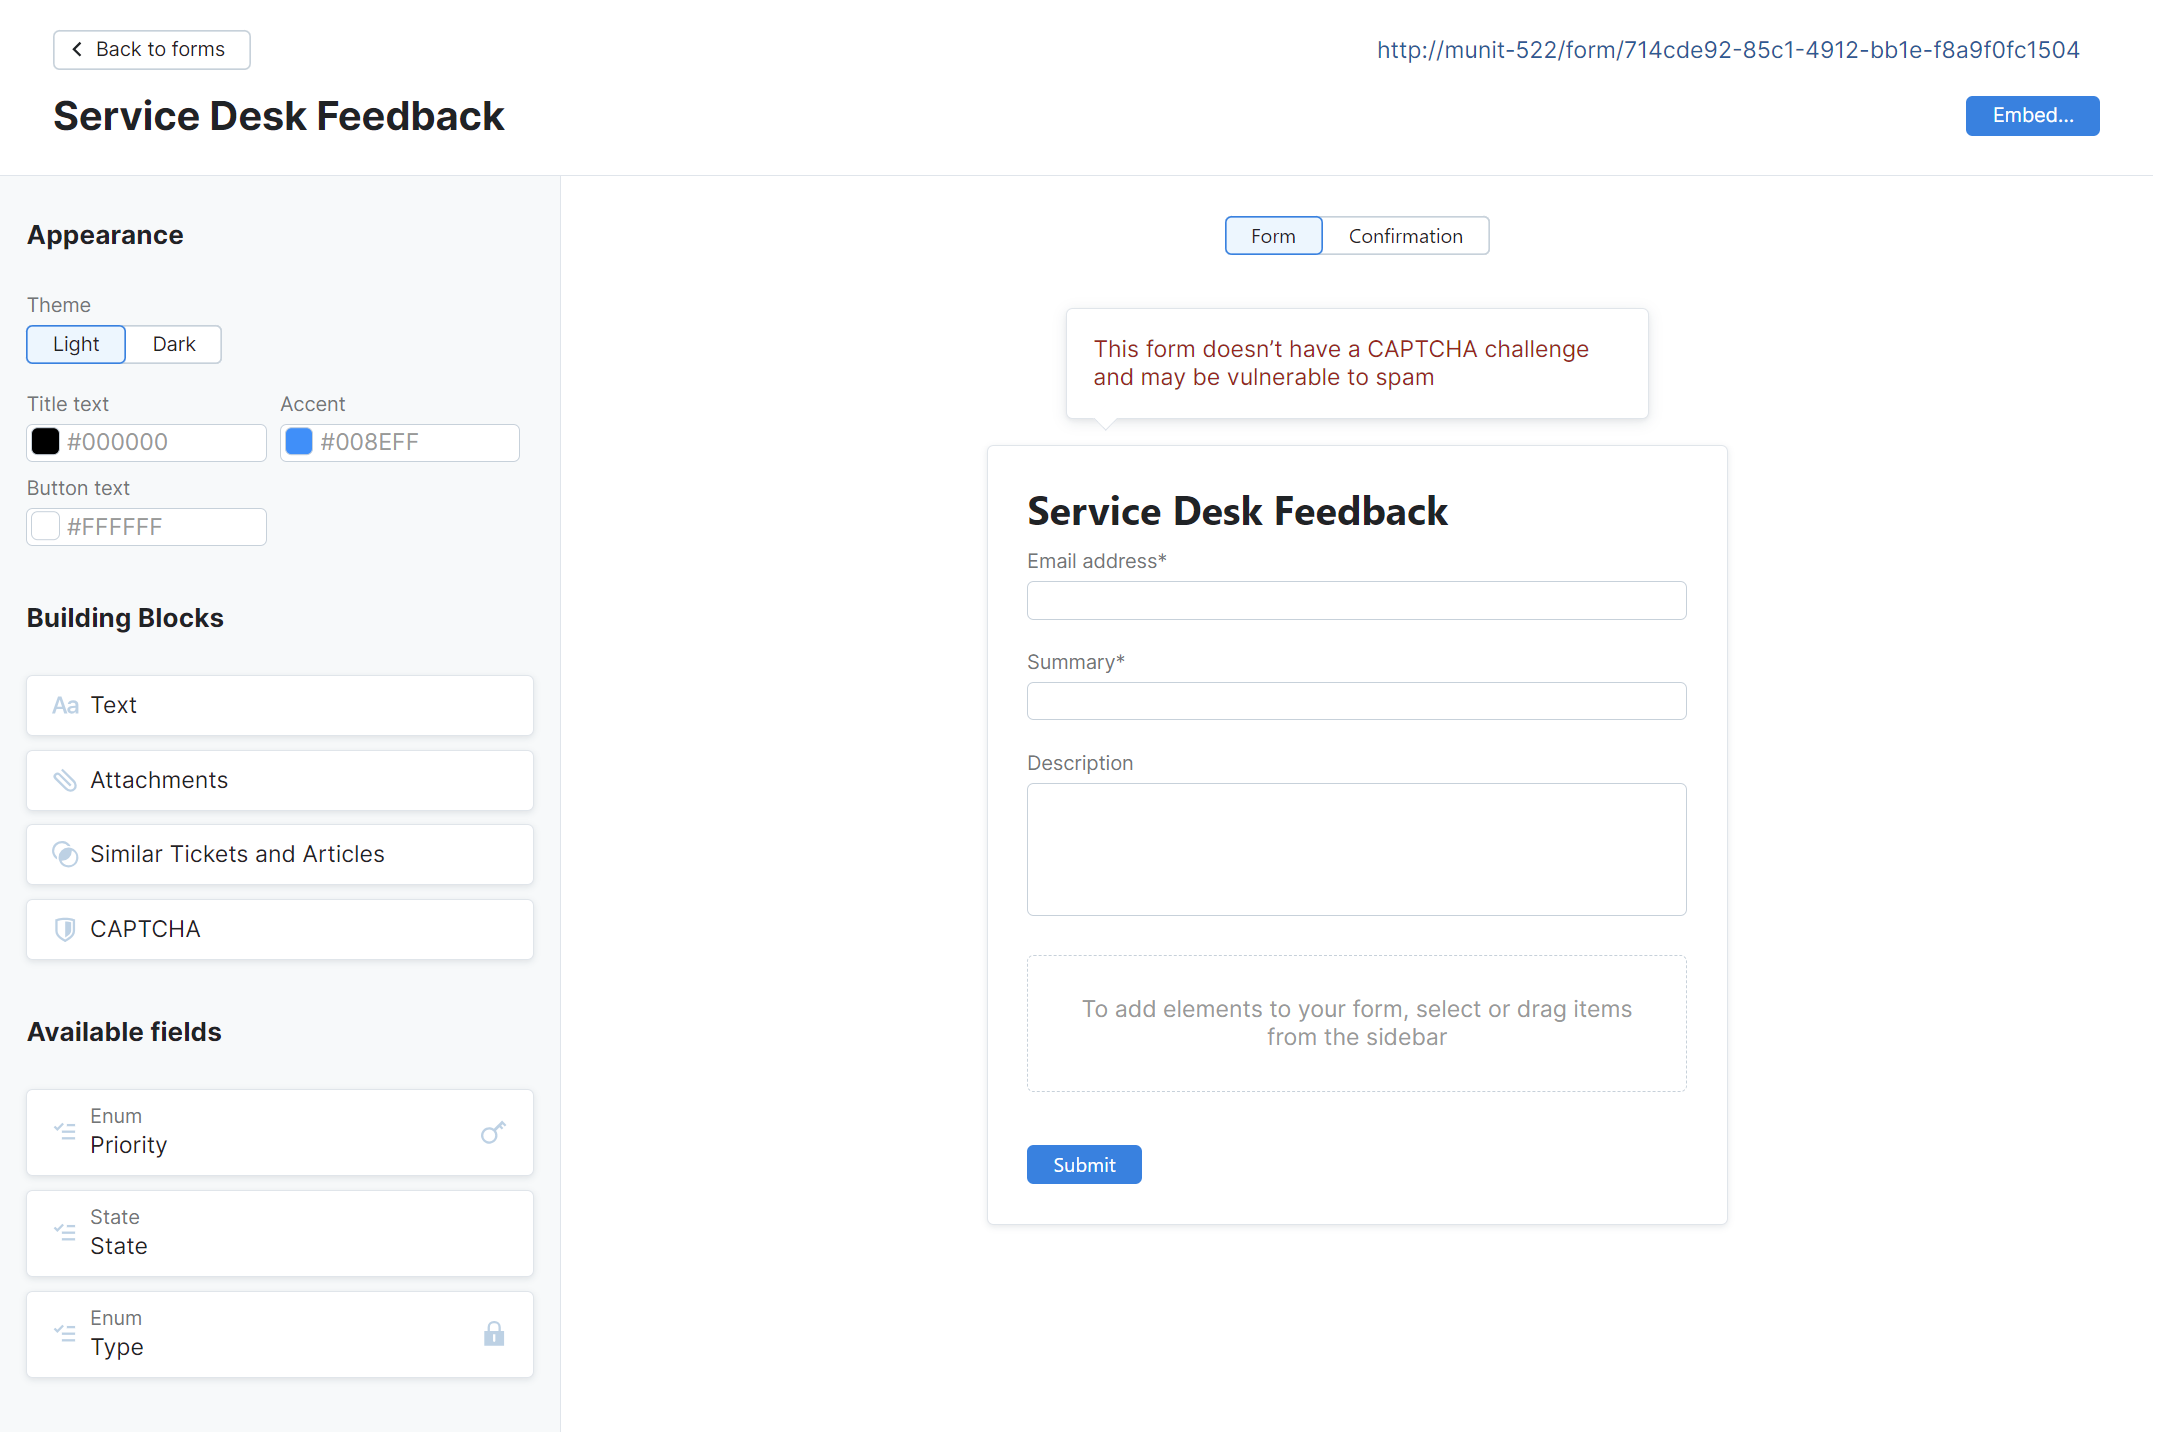
Configure the form to capture the information you want to collect from your customers. For a detailed explanation about each setting, see Form Settings.
All edits to the form are saved in real time without requiring additional confirmation.
As your business evolves, you may need to collect new information from customers. Adding new fields to your form can help you capture this information, which can be used to improve your products or services or to better understand your customer base.
You may also find over time that certain fields on your form may become irrelevant or redundant. By removing these fields, you can streamline the form and make it easier for customers to fill out.
You can also update other settings, adding text blocks, adjusting the visual appearance, changing the confirmation text, and more.
tip
Requires permissions: Update Project
Click the Projects link in the application header.
Locate your helpdesk project in the list.
Open the options menu for the project, then select Channels.
Select the Online Forms channel.
The list of online forms that are available in your helpdesk project is shown.
Select the form you want to update from the list.
Click the Edit form button in the detail sidebar.
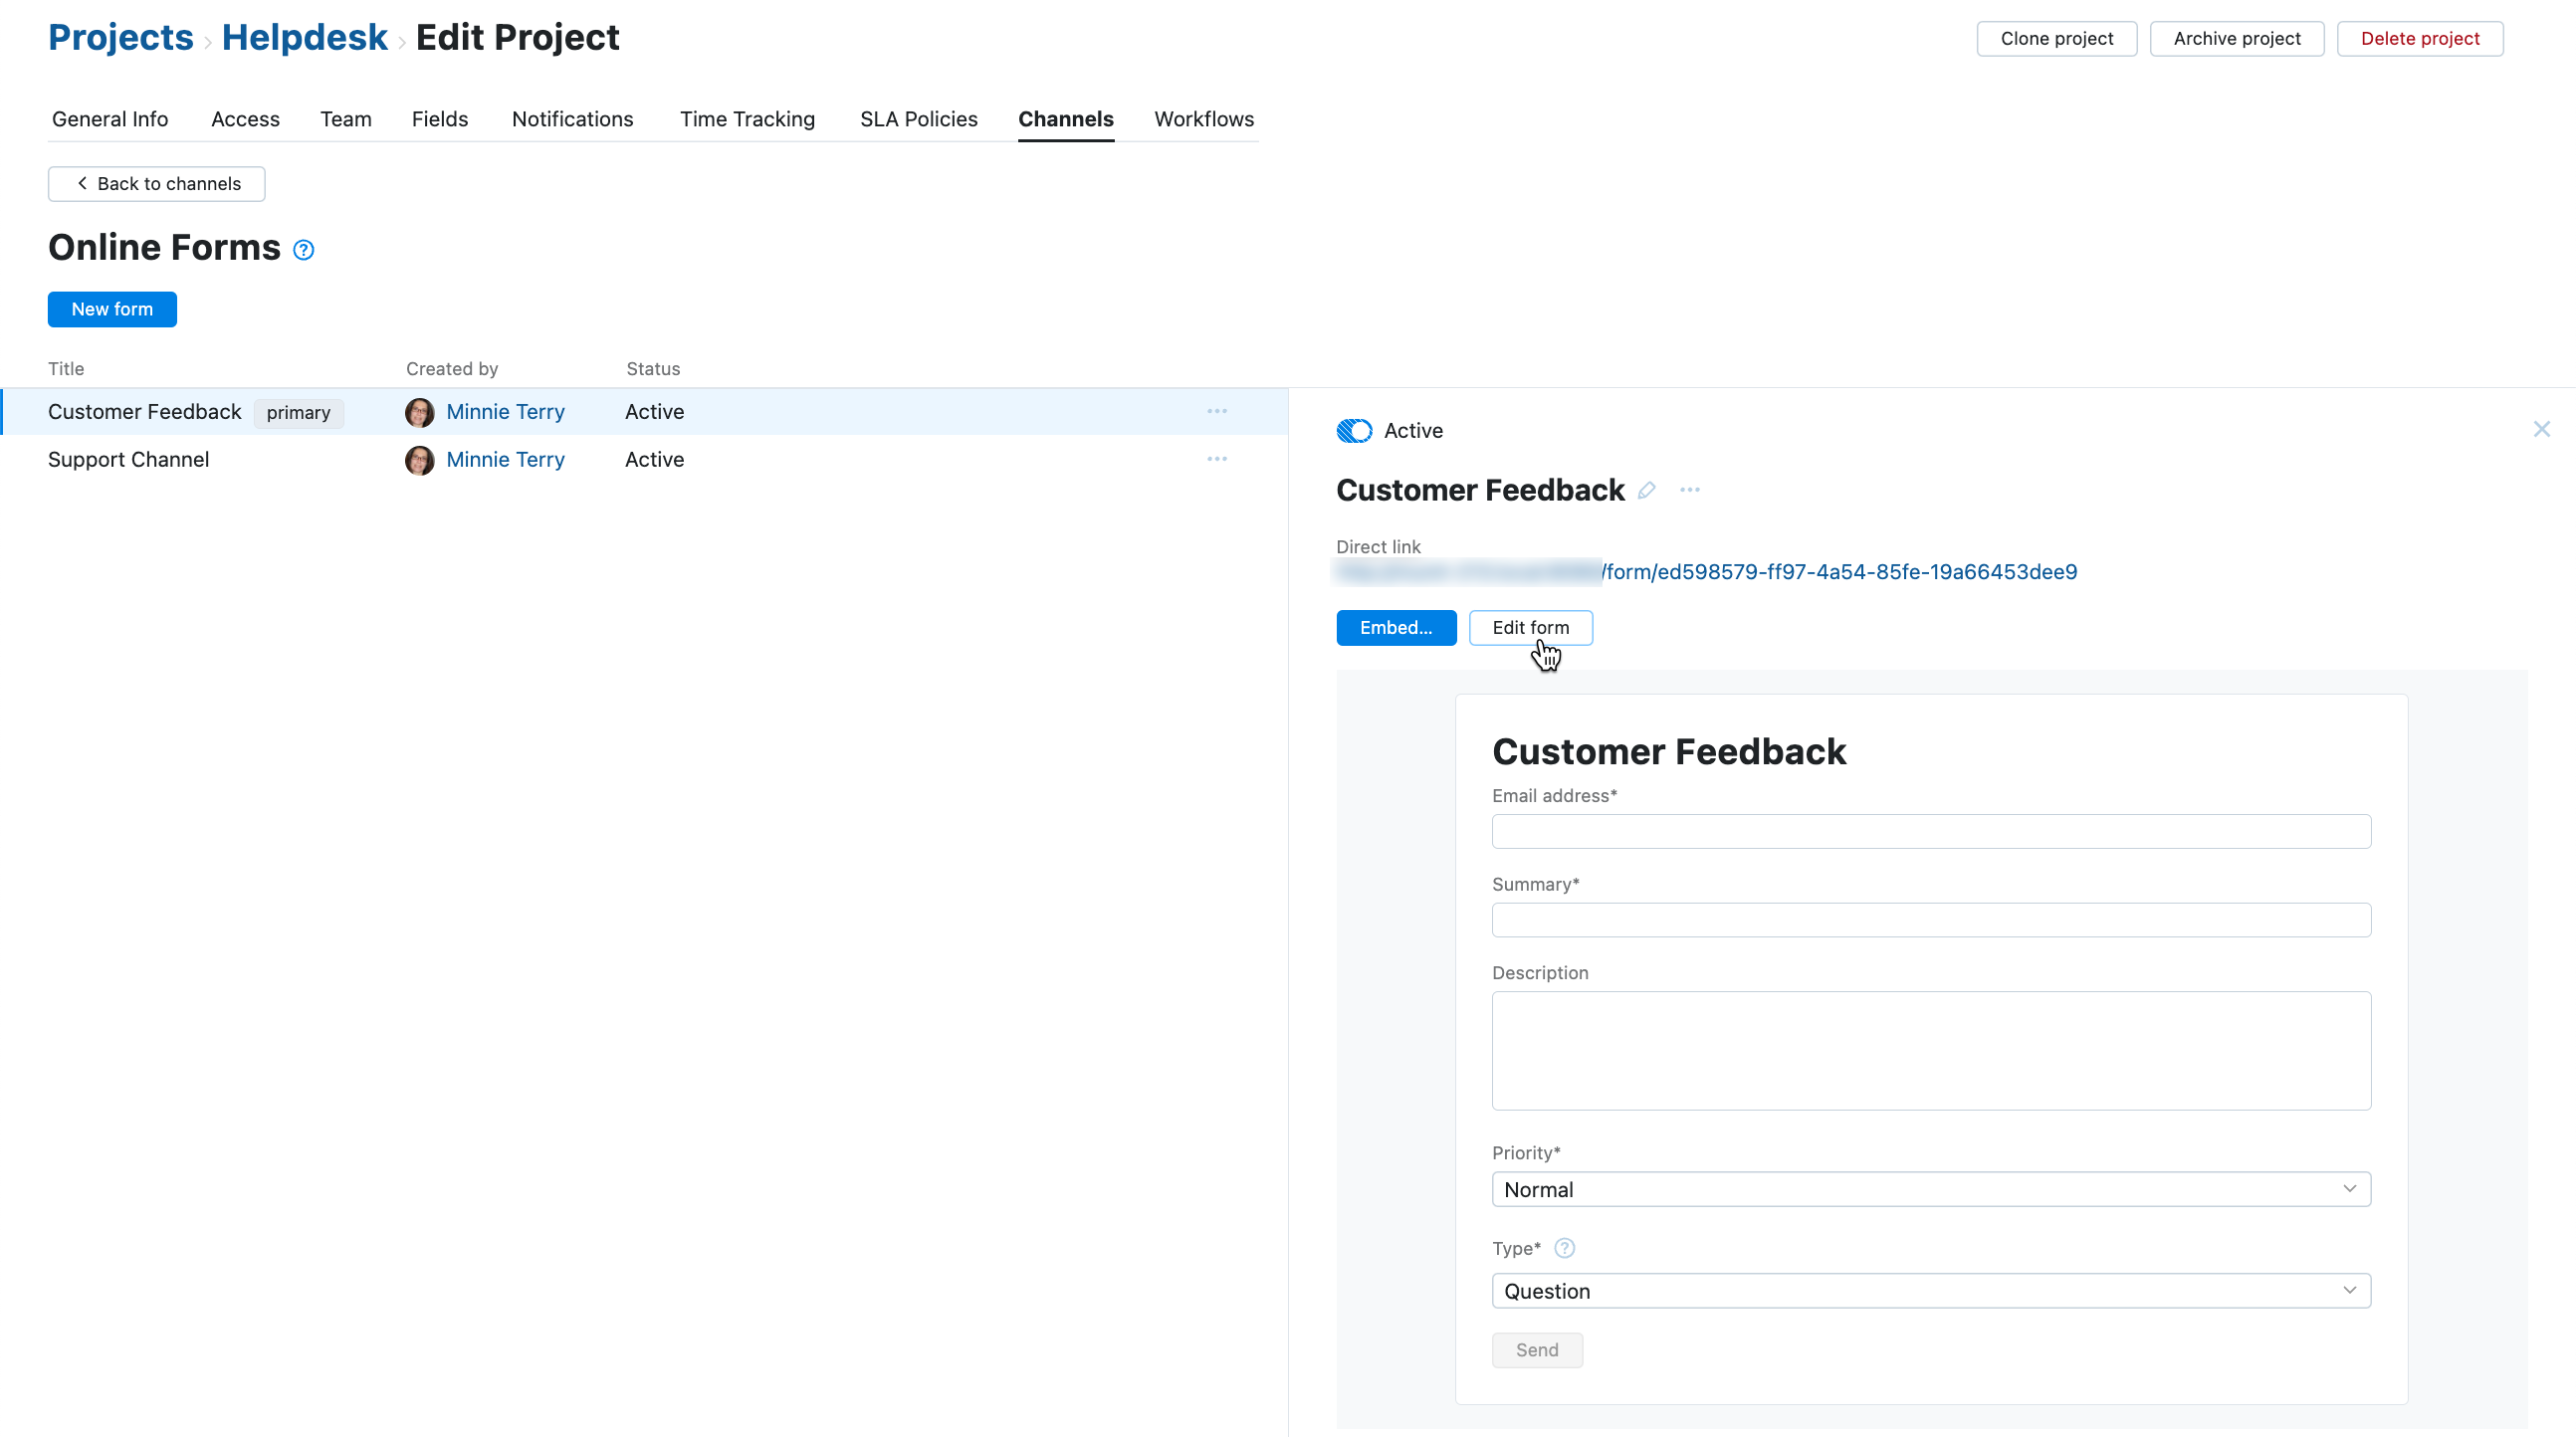
Update the settings to suit your needs. For a detailed explanation about each setting, see Form Settings.
As with the form creation flow, all edits to the form are saved in real time without requiring additional confirmation. This means forms that have been embedded in external websites are updated immediately.
Changes to attributes that are referenced in the HTML code require that you redeploy the form in external sites. This includes changes to the Mode (popup or inline) Theme (dark or light), or Language.
Online forms support a range of settings that let you customize its appearance and define the data points you want to capture from your customers. Use the information provided in the following tables to build forms that work for you.
The following settings are available for all online forms.
Setting | Description |
|---|---|
Form title | Sets the text that is shown as that appears at the top of the form. To edit the form title, click the text in the header of the page. |
Captures the email address of the visitor who uses the form to submit a request. This input is not mapped to any custom field in the project. Instead, it's used to create accounts for new reporters or match customers who have previously submitted requests with their existing reporter accounts. | |
Summary | Captures a summary of the support request. This input is mapped to the Summary field in tickets that are created using this online form. |
Description | Captures a description of the support request. This input is mapped to the Description field in tickets that are created using this online form. |
note
Help TooltipsThe Email, Summary, and Description blocks have an additional setting that lets you add help tooltips to the corresponding controls on the form. Use these settings to provide your customers with additional instructions for filling out the form.
To add a help tooltip, click the Edit element properties icon to the right of the block, enter your text in the Help tooltip field, then click the Save button.
Online forms are configured to show a confirmation message when reporters submit their support requests. This setting is shown when switching to the Confirmation view.
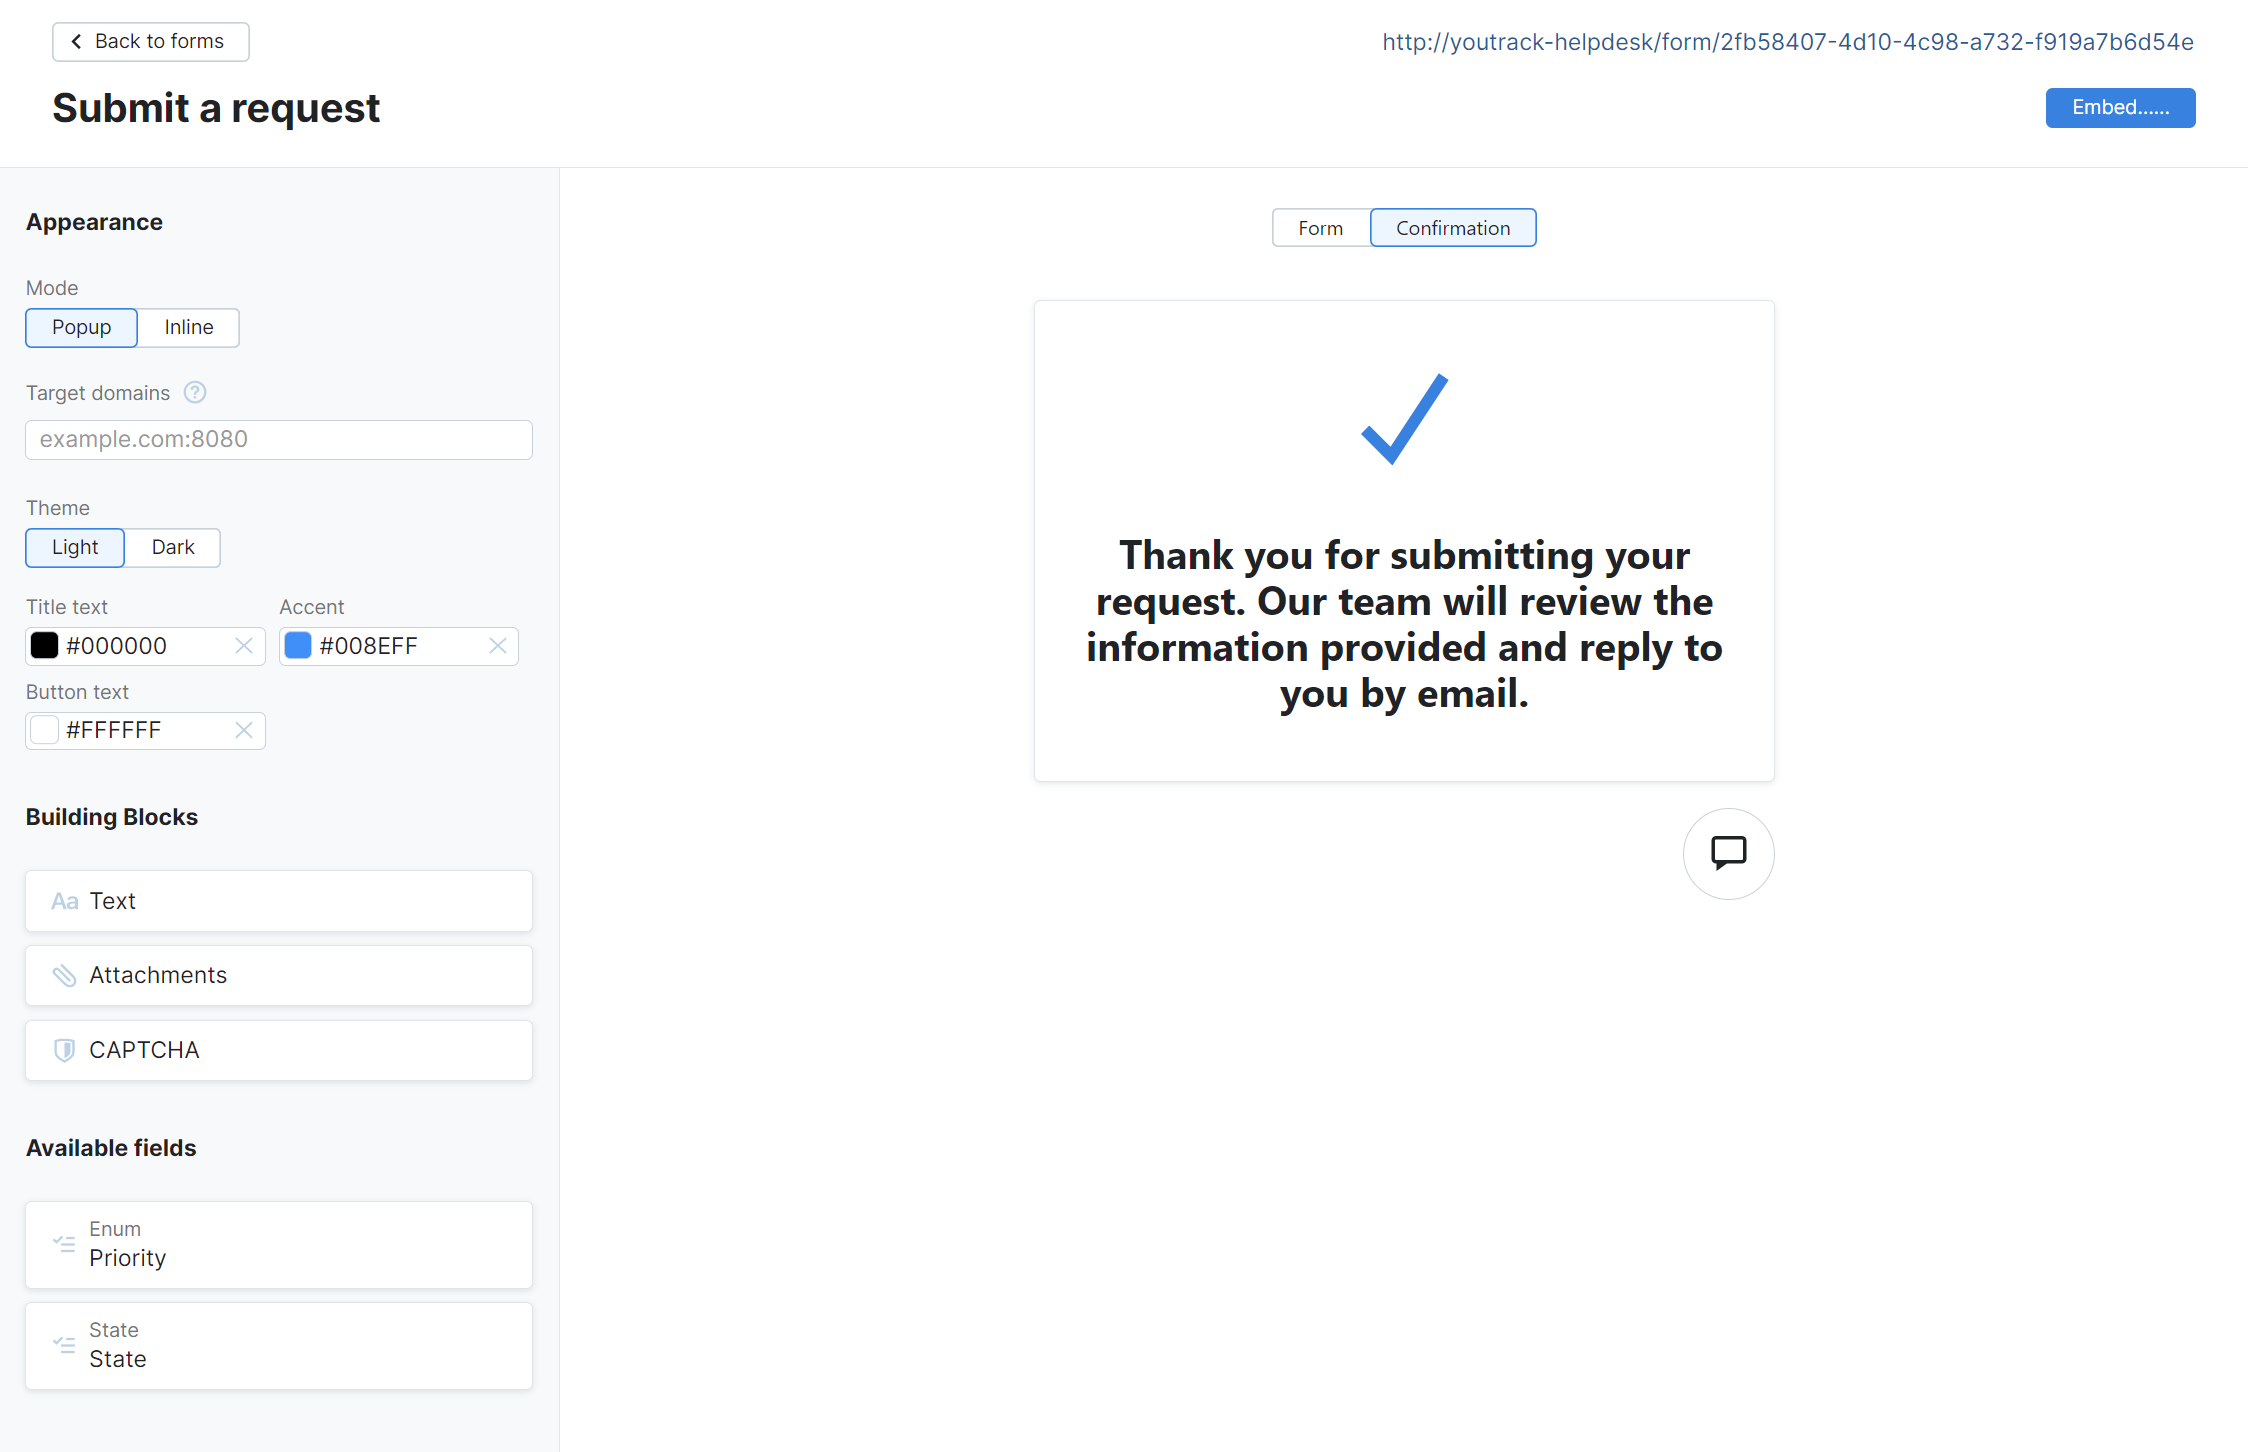
A confirmation message is provided by default. To edit the default message, click the Edit element properties icon, then customize the text to your liking. When done, click the Save button.
The following settings are shown in the Appearance section of the online form creation sidebar.
Setting | Description |
|---|---|
Mode | Determines whether the preview in the form editor is displayed as a popup dialog or an inline form.
This setting only applies to forms that are embedded in external websites. Forms opened using direct links are always displayed inline. |
Theme | Determines whether the form is shown using a light or dark theme. |
Title text | Determines the color that is applied to the heading that appears at the top of the form. Enter values in three or six-digit hex notation. For example, #09C, #0099CC. |
Accent | Determines the color that is applied to the accented form elements. This includes the outline for input fields and other controls and the primary action button used to submit the request. Enter values in three or six-digit hex notation. For example, #09C, #0099CC. |
Button text | Determines the color that is applied to the text on the primary action button. Enter values in three or six-digit hex notation. For example, #09C, #0099CC. |
The following settings are shown in the Building Blocks section of the sidebar. To add any of these elements to your form, drag them from the sidebar to the form preview.
Setting | Description |
|---|---|
Text | Adds a placeholder for a single paragraph of text to the form. Line breaks added to the settings for a text block are ignored, so if you want to add multiple paragraphs of text, use a separate text block for each. Each form can contain an unlimited number of text blocks. To set the text in a text block, drag the text block to the form preview, then click the Edit icon to the right of the block. Enter the desired text, then click the Save button. |
Attachments | Adds a drop zone where customers can attach one or more files. Files uploaded using online forms are subject to the Max upload file size limitation defined at the global level for your YouTrack site. To learn more about this setting, see System. |
Similar Tickets and Articles | Adds a section to the form for displaying a list of tickets and helpdesk articles that have words in their summary or title that match the summary for a new support ticket. The list of similar tickets and articles is updated as the reporter updates the summary in the ticket. This feature is intended to help users find solutions to their problems or answers to their questions without having to submit a support request. |
CAPTCHA | Adds a CAPTCHA challenge to your online form. Visitors who are unable to prove that they are not robots are blocked from submitting requests. Before you can add a CAPTCHA challenge to your online forms, a system administrator needs to set up a connection with the Google reCAPTCHA service. For details, see reCAPTCHA Settings. |
The Available Fields section of the sidebar displays custom fields that are used in your helpdesk project that haven't already been added to the form. The Assignee field cannot be added to online forms and is excluded from this list. To add any of these fields to your form, drag them from the sidebar to the form preview.
For fields that store a list of values (like enum or ownedField types), you can choose which value is selected by default after dragging it to the form preview.
note
Help TooltipsBlocks for custom fields have an additional setting that lets you add help tooltips to the corresponding controls on the form. Use these settings to provide your customers with additional instructions for filling out the form.
To add a help tooltip, click the Edit element properties icon to the right of the block, enter your text in the Help tooltip field, then click the Save button.
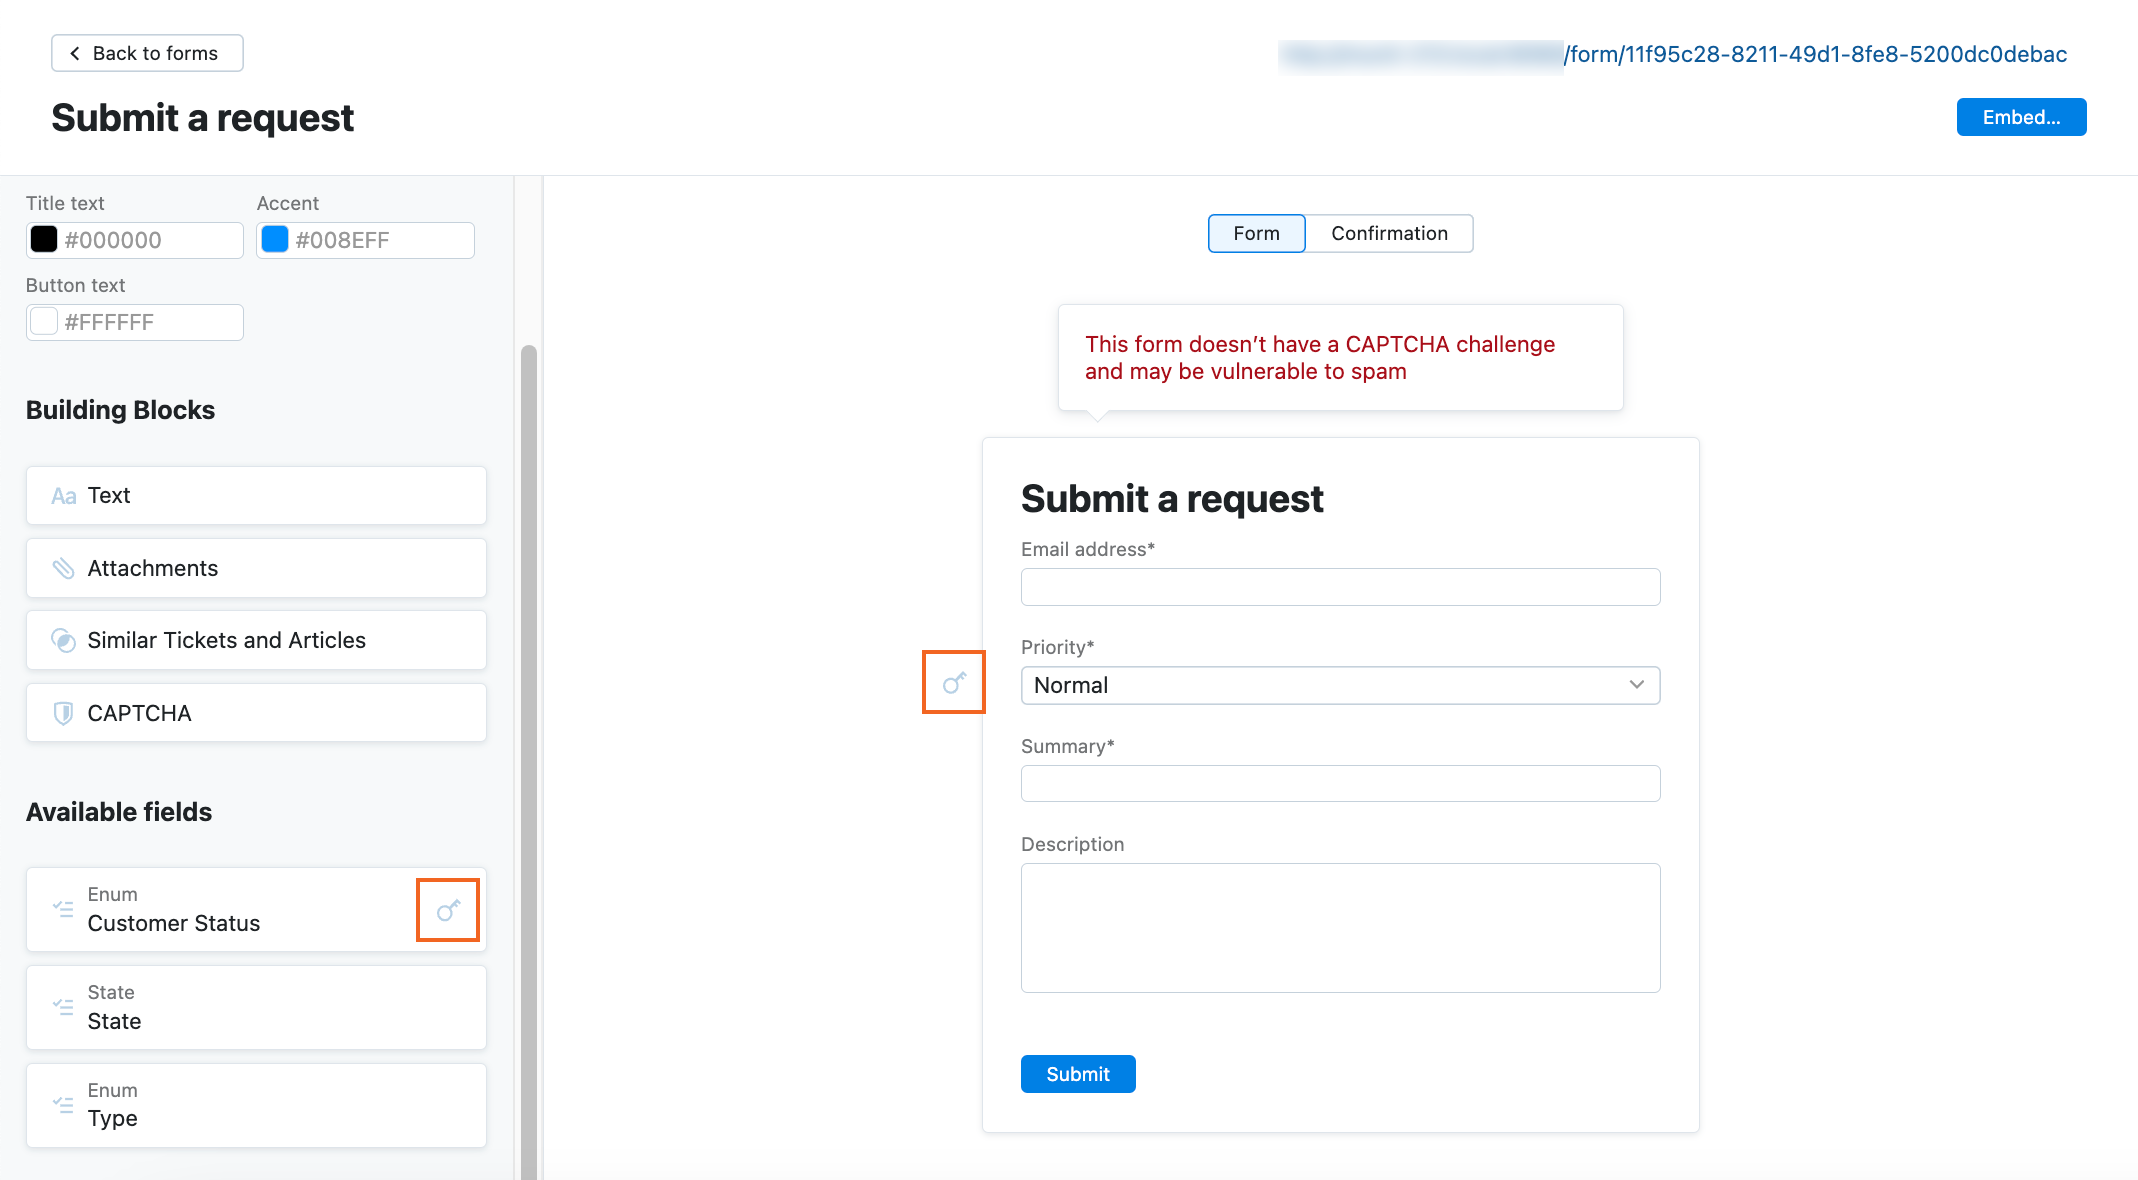
You can add private fields to your form. When submitting a form, the ticket reporter can set a value to a private field. When an agent or a standard user views the ticket, they can only view or update a private field if they have specific permissions. For details about private fields and required permissions, see Private and Public Issue Fields.
If your project has private fields, these are flagged with a key icon in the sidebar and the form preview. When submitting the form, reporters don't see which fields are private.
When designing an online form, you may want to require the reporter to provide specific information in their ticket. In YouTrack, you can achieve this with required fields.
Each online form has at least two required fields:
Email address
Summary
You can add more required fields to your form. When you add a custom field that is required in this project to an online form, it becomes a required field for this form. For more details about required fields in YouTrack, see Required Custom Fields.
When creating a ticket, reporters can click the Send button only after they've filled all required fields. Until then, the Send button is deactivated.
On the form, the required fields are marked with asterisks.
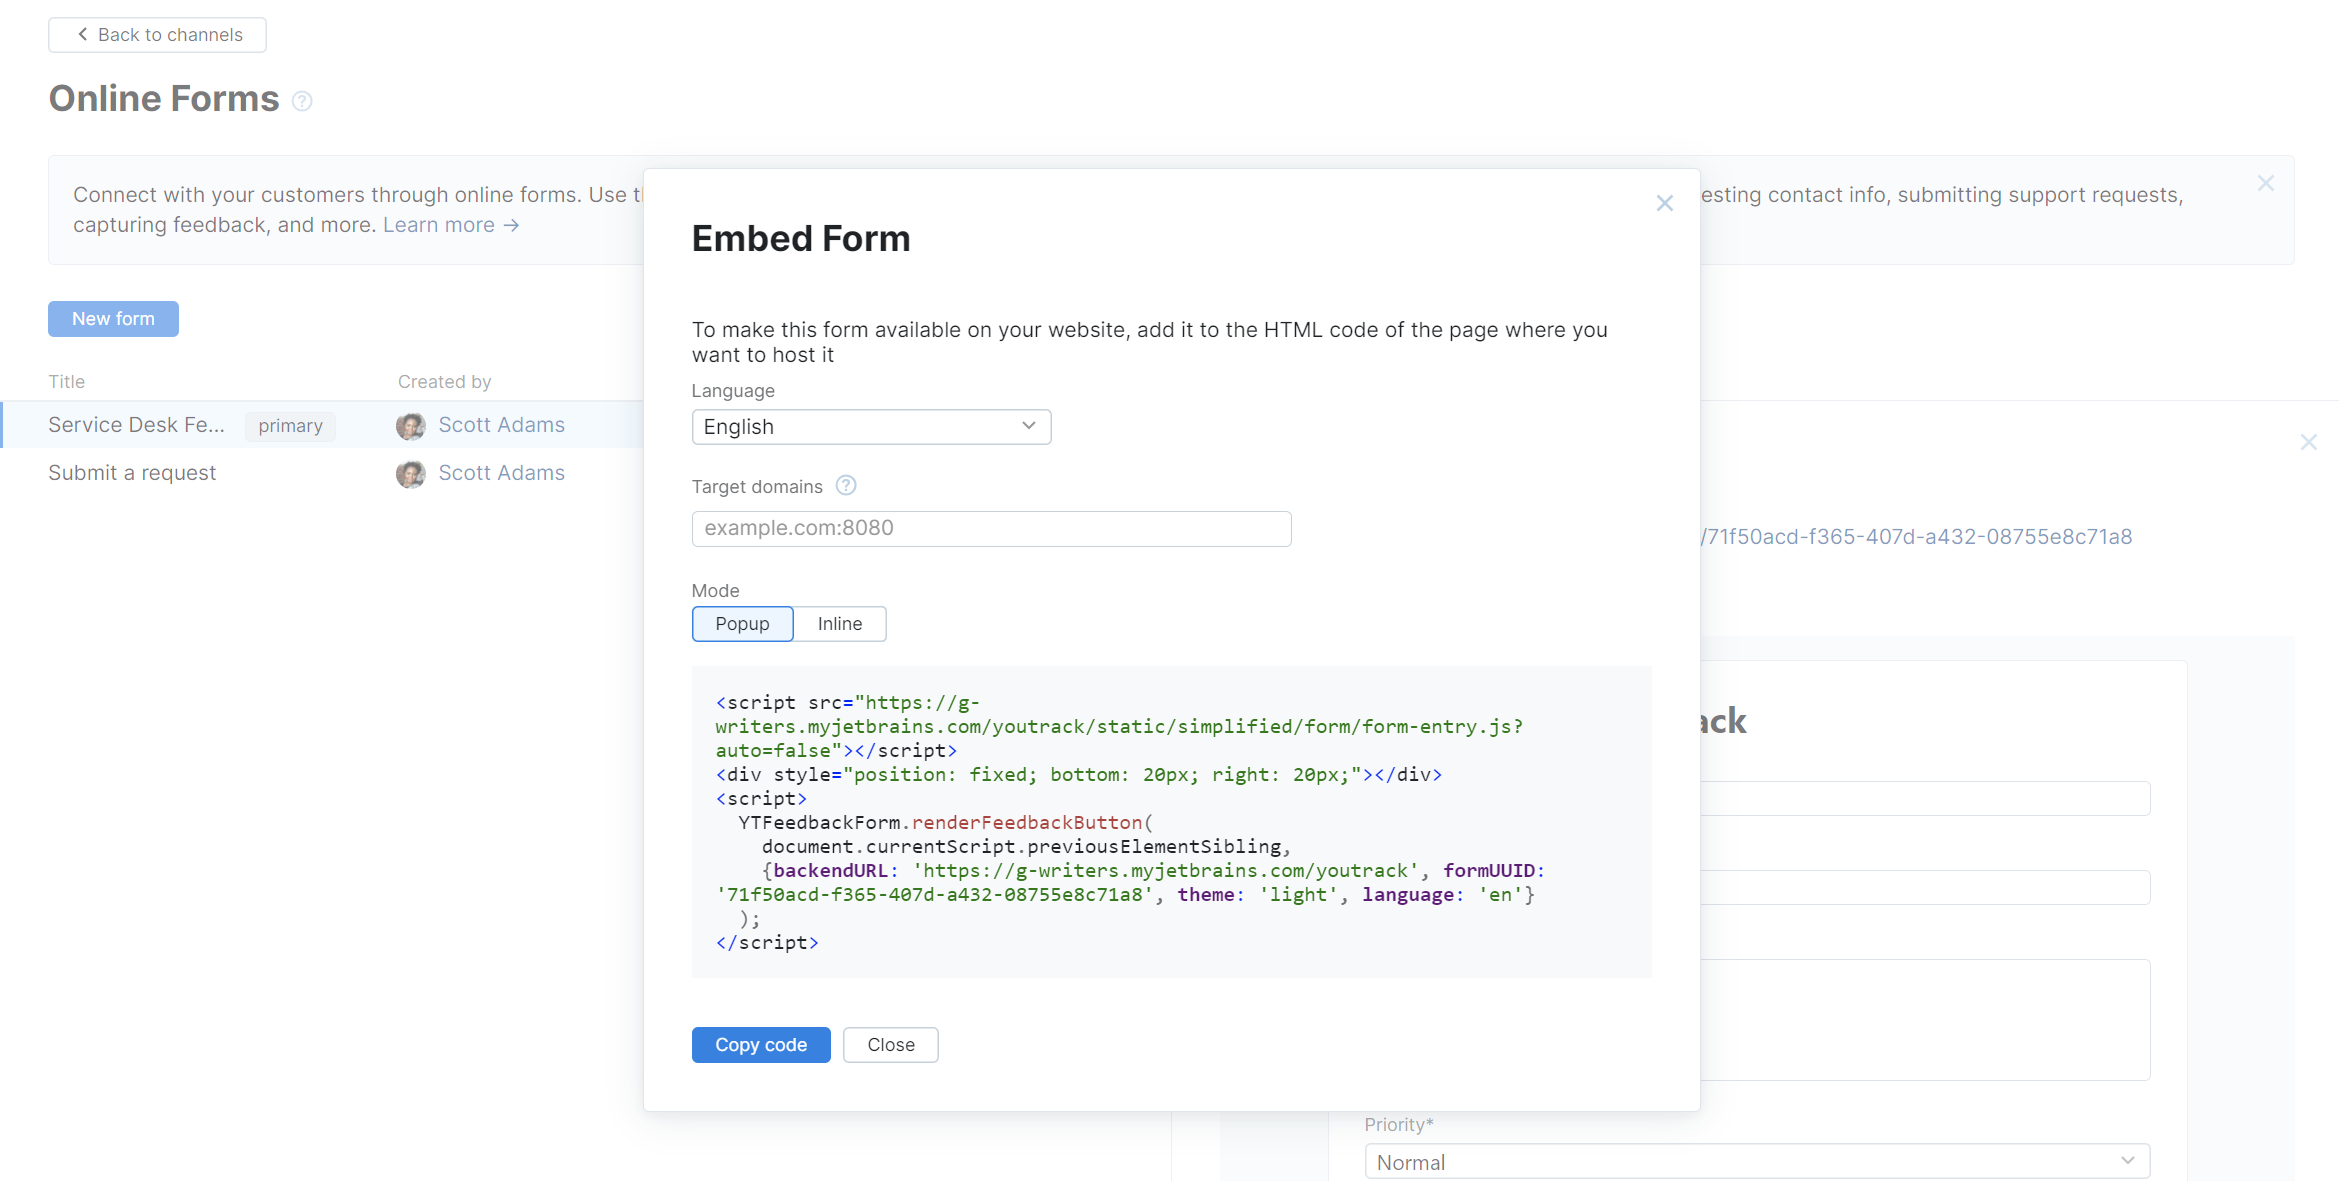
YouTrack's online form builder automatically generates an embed code that you can copy and paste into the HTML code of any web page.
When using Inline mode, this code is a JavaScript snippet that creates an inline frame containing the form.
In Popup mode, the code includes an interactive button that displays the form when clicked.
tip
Requires permissions: Read Project
Click the Projects link in the application header.
Locate your helpdesk project in the list.
Open the options menu for the project, then select Channels.
Select the Online Forms channel.
The list of online forms that are available in your helpdesk project is shown.
Select the form you want to use from the list.
Click the Embed button in the sidebar.
Select the Language you want to use for the form. This determines which language is used to show elements that are provided by YouTrack, including various tooltips and input validation errors.
Use the Target domains setting to store the list of web domains where you plan to use the form. Adding domains to this list gives this site preauthorized clearance to send cross-origin requests to YouTrack.
This setting is only visible when the option to allow all origins for cross-origins resource sharing (CORS) is switched off for your YouTrack site. To learn more about this setting, see Server Configuration | Resource Sharing.
Select which Mode you want to use to display the form on your web page.
Click the Copy code button.
Paste the code directly into the HTML page where you want to display the form.
Deploy the updated page to your website.
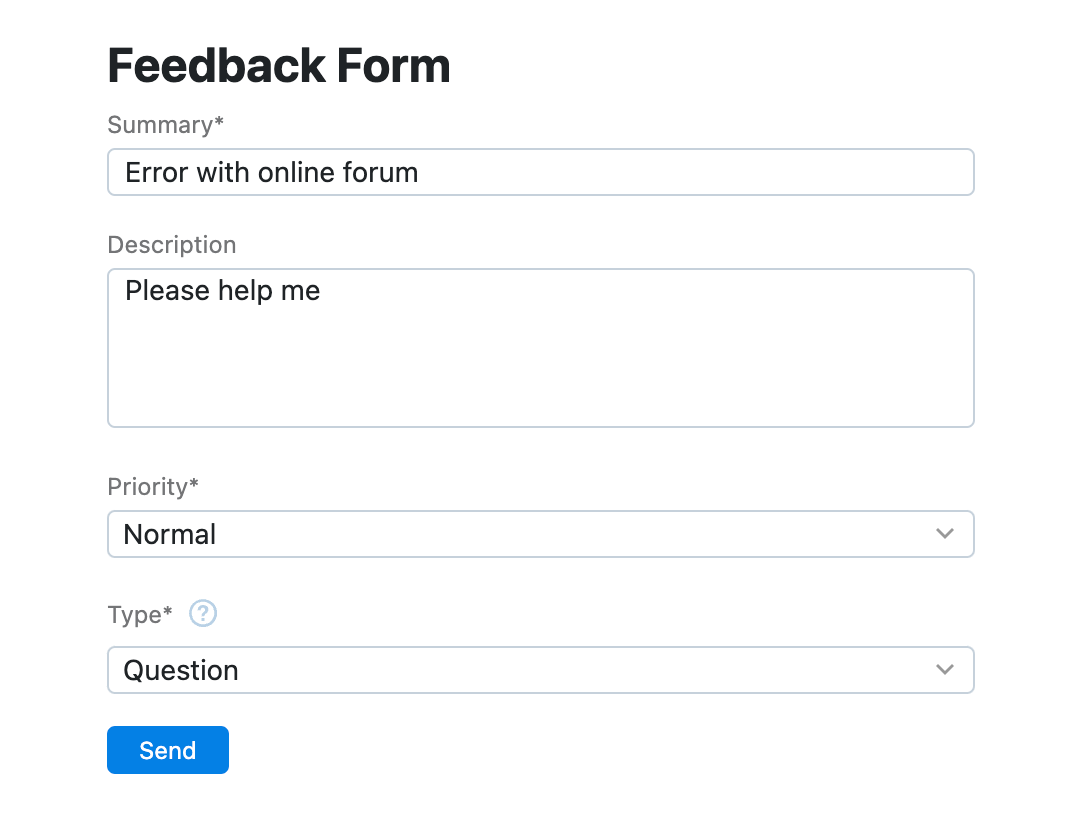
You can add parameters to the online form link to prefill the Summary and Description fields of an online form. This could be useful to have parts of the form prefilled when passing a link to those experiencing a specific problem.
tip
Requires permission: Read Project
Click the Projects link in the application header.
Locate your helpdesk project in the list.
Open the options menu for the project, then select Channels.
Select the Online Forms channel.
The list of online forms that are available in your helpdesk project is shown.
Select the form you want to use from the list.
Copy the Direct link for the online form.
Add a question mark
?at the end of the URL and one or both of the following parameters to the end of the online form link:summary=<your summary goes here>description=<your description goes here>Use an ampersand
&between the summary and description.Use the HTML encoding
%20for spaces between words.
http://<your YouTrack address>/form/a8ed823a-87ac-4852-84e0-89fad346228b?summary=Error%20with%20online%20forum&description=Please%20help%20me
When customers reach out to you through unofficial support channels and social media, you have the option to send them a direct link to your online form. Sharing a link to an online form can provide the recipient with direct access to the specific form they need to fill out, rather than having to navigate through the support website to find the form.
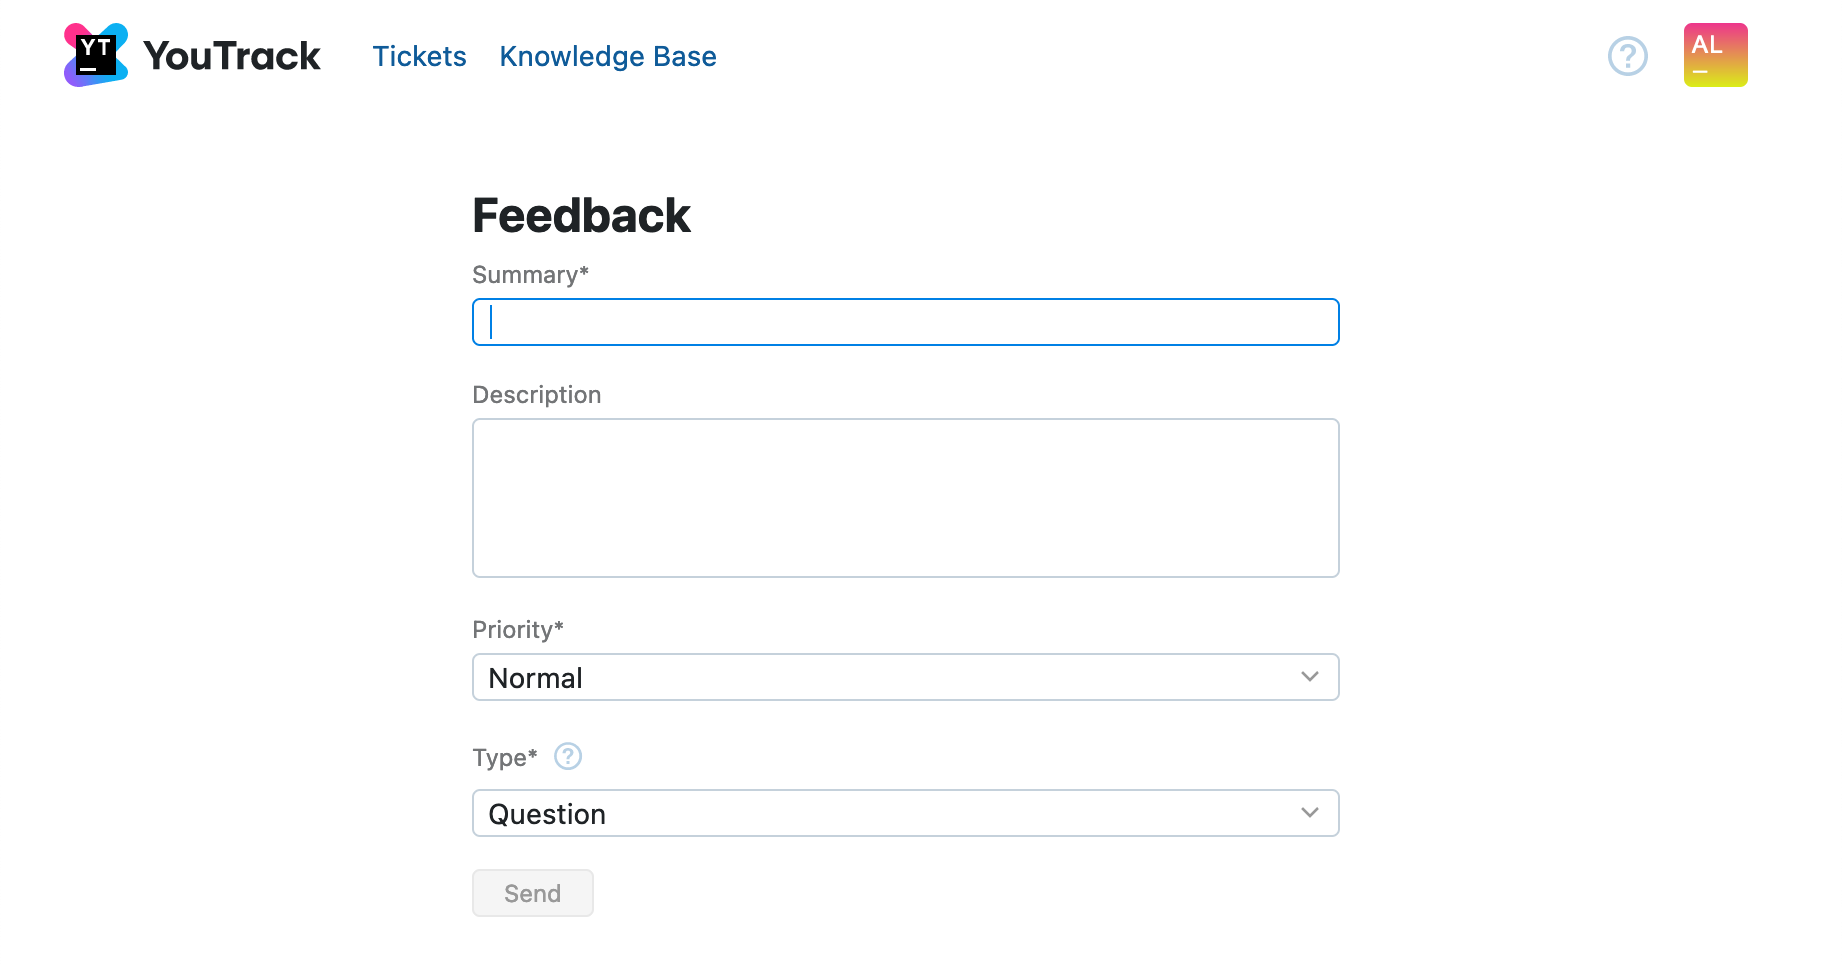
Links to online forms open directly in the interface that is customized for helpdesk reporters in your YouTrack site. This page contains links that let reporters view their reported tickets, browse public articles in the knowledge base, and submit new tickets.
Each project may have one primary online form. This determines which form is available to reporters who report tickets directly in YouTrack.
The default form that is generated automatically when you create a helpdesk project is also set as the primary form.
tip
Requires permissions: Update Project
Click the Projects link in the application header.
Locate your helpdesk project in the list.
Open the options menu for the project, then select Channels.
Select the Online Forms channel.
The list of online forms that are available in your helpdesk project is shown.
Open the Show more menu for the form you want to use as the default for your project.
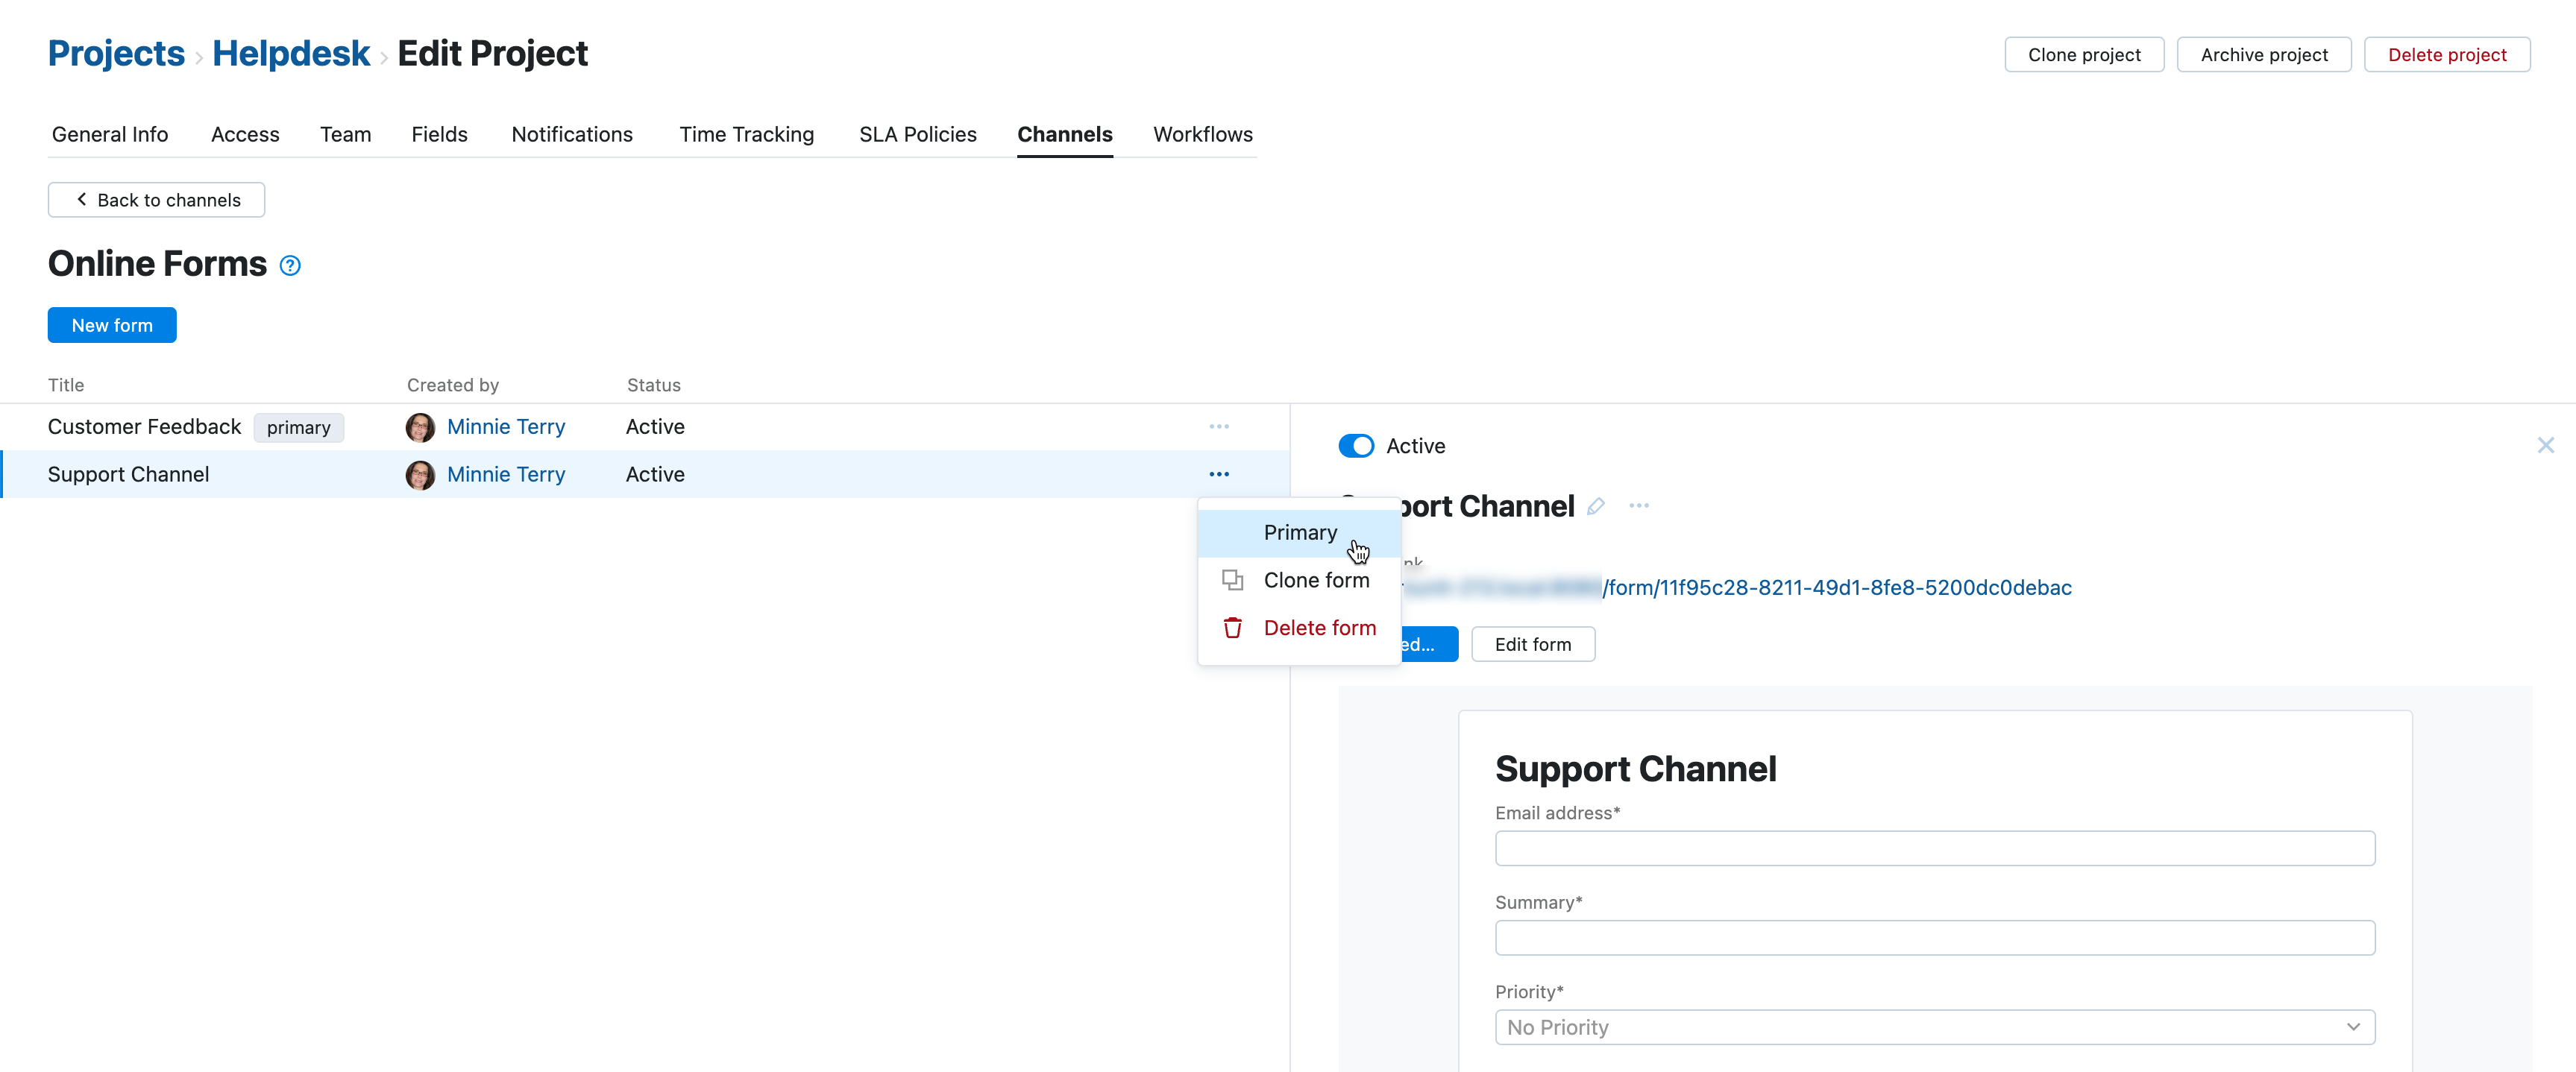
Select the Primary option.
The form is set as the primary one for this project.
If another form was set as primary before this action, it loses the primary status.
Instead of channeling all feedback to one primary form in YouTrack, you may want your customers to use forms specifically tailored for each use case.
In such cases, you can configure your project not to have any primary form. Instead, your ticket reporters will use a link to a specific form according to each particular use case.
To configure a project without a primary form, select the current primary form from the list of project forms, open the Show more menu, and deselect the Primary option.
If you need several forms for your project, you can clone an already existing form to build another one on its basis.
tip
Requires permissions: Update Project
Click the Projects link in the application header.
Locate your helpdesk project in the list.
Open the options menu for the project, then select Channels.
Select the Online Forms channel.
The list of online forms that are available in your helpdesk project is shown.
Open the Show more menu for the form you want to clone.
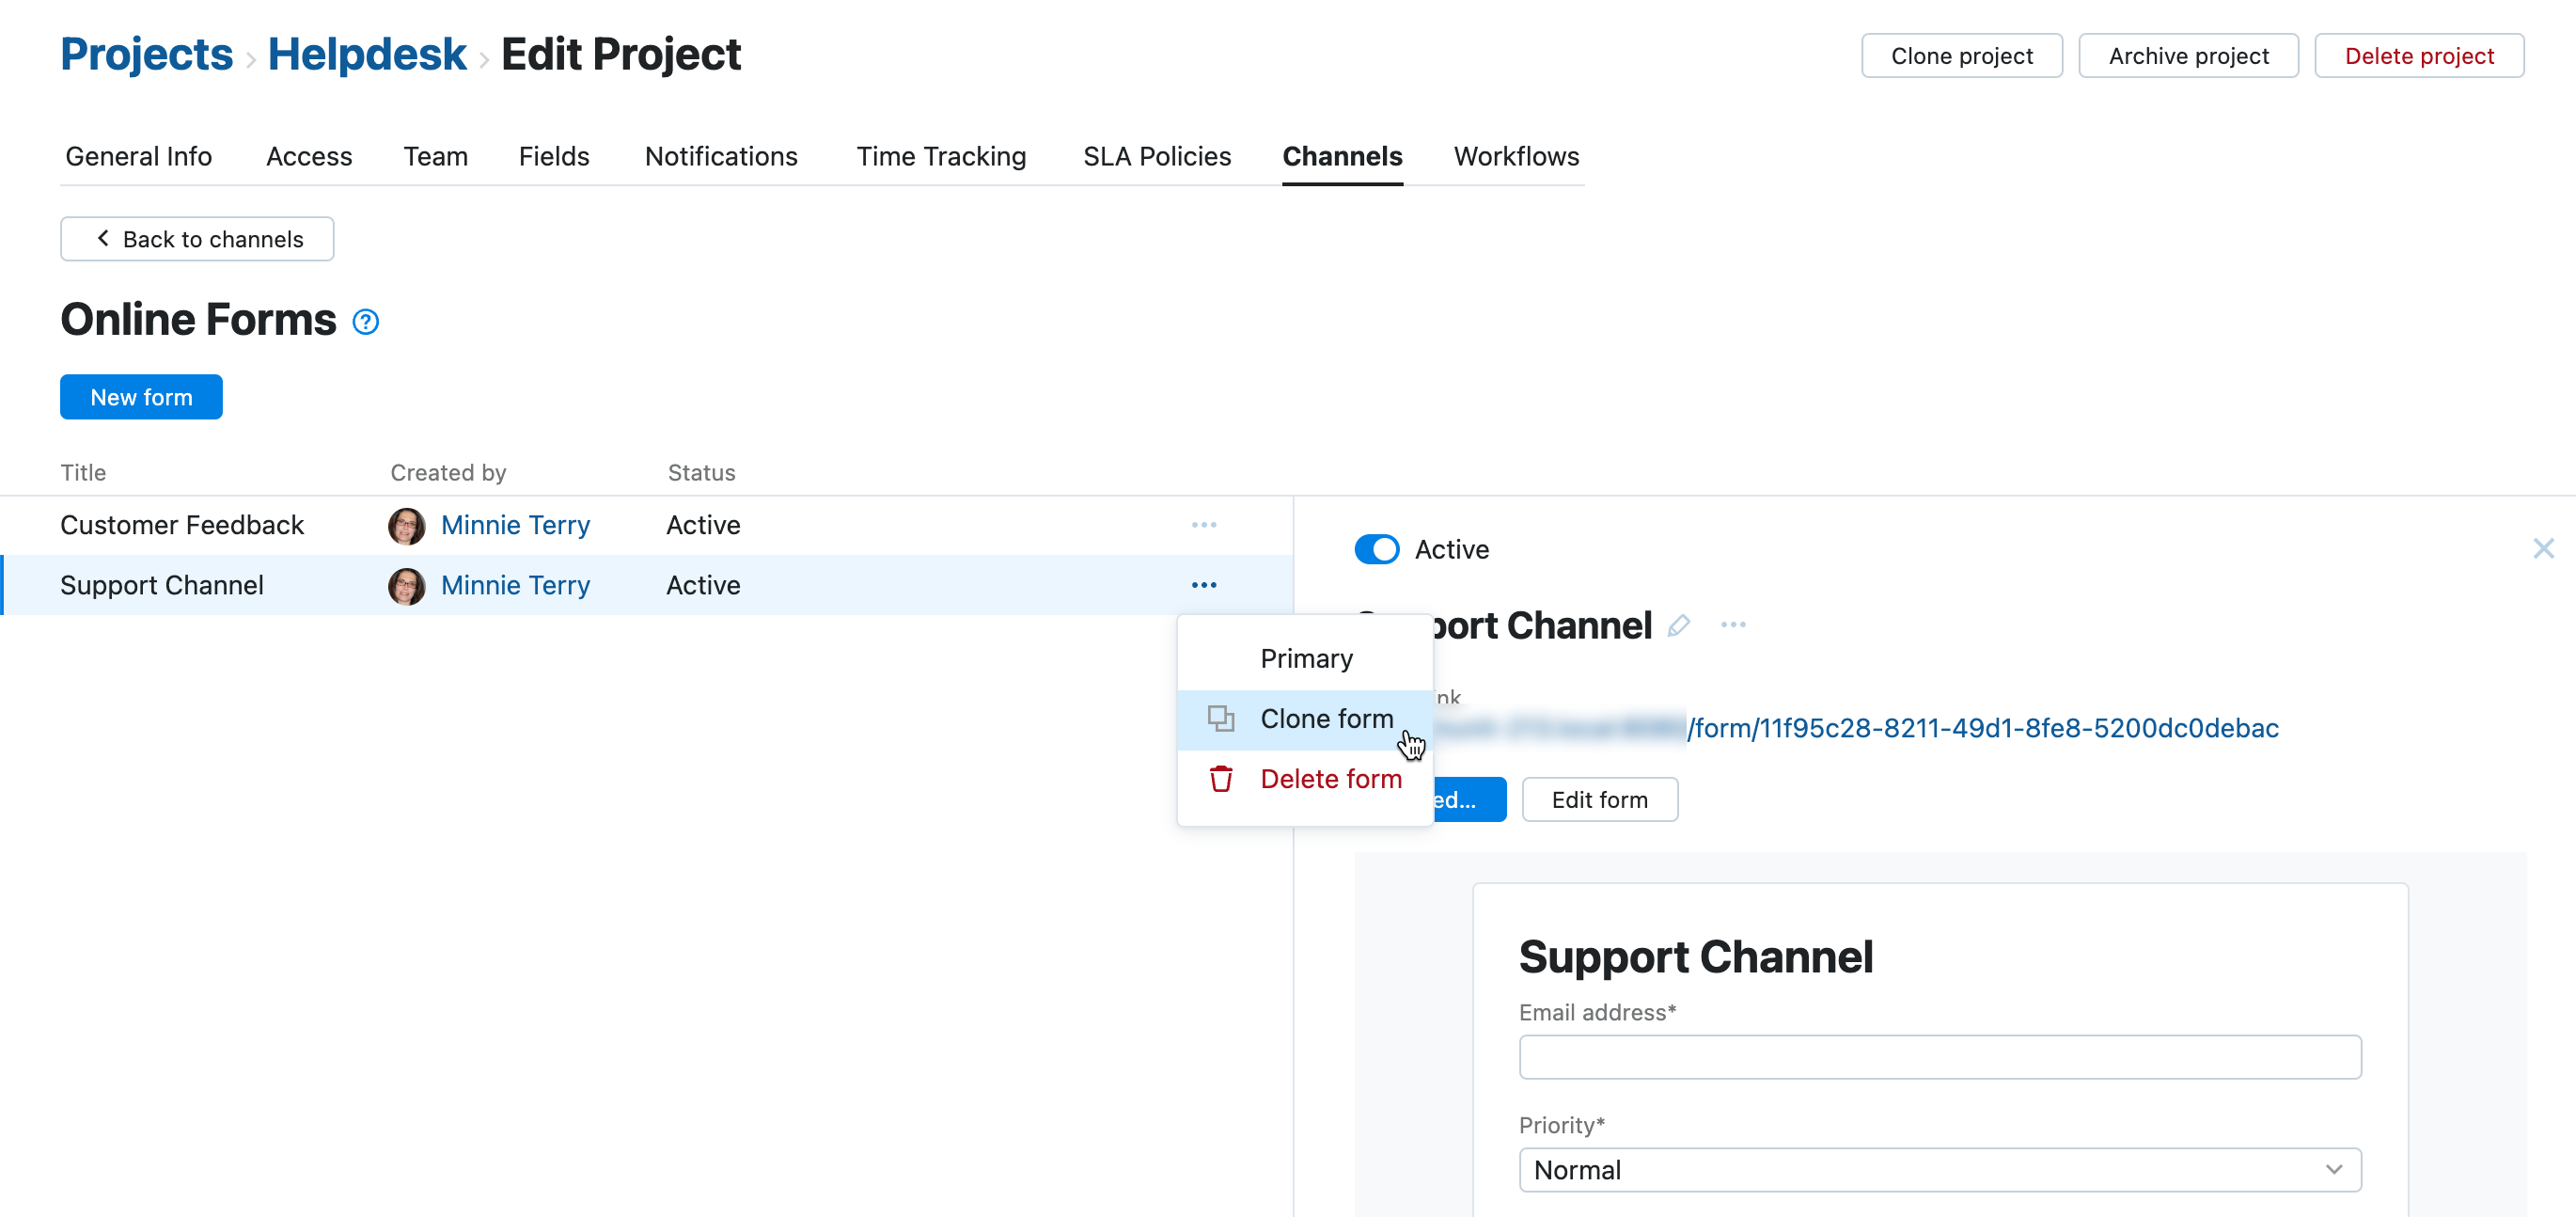
Select the Clone form option.
A clone of the original form appears on the list of forms.
The new form has a different URL.
The new form is activated.
When you create an online form, it is set to active by default. If you no longer need a form, but you might still need it in the future, you have the option to deactivate it.
When you deactivate an online form, the direct links that point to the form and pages where the form has been embedded are broken. Tickets that were created using the form are not affected in any way.
tip
Requires permissions: Update Project
Click the Projects link in the application header.
Locate your helpdesk project in the list.
Open the options menu for the project, then select Channels.
Select the Online Forms channel.
The list of online forms that are available in your helpdesk project is shown.
Select the form that you want to deactivate from the list of forms.
note
You cannot deactivate the primary form of a project.
Switch the Active toggle to the off position.
The form is deactivated.
If the purpose for which the form was created is no longer valid, you may want to delete it to avoid cluttering your database or confusing users.
When you delete an online form, the unique ID that is assigned to the form is deleted as well. This means direct links that point to the form and pages where the form has been embedded are broken. Tickets that were created using the form are not affected in any way.
When you delete the form that is currently designated as the default form in your project, the next form in the list is set as the default instead.
tip
Requires permissions: Update Project
Open the Show more menu for the form you want to delete.
Select the Delete form option.
Click the Delete button in the confirmation dialog to confirm this action and delete the form.
The form is deleted from YouTrack.
