EditorConfig
note
To use EditorConfig, make sure the EditorConfig plugin is enabled in the settings. Press CtrlAlt0S to open settings and then select Plugins. Click the Installed tab. In the search field, type EditorConfig. For more information about plugins, refer to Managing plugins.
Aqua allows you to manage all code style settings for each individual set of files with EditorConfig support.
All you need to do is place an .editorconfig file in the root directory containing the files whose code style you want to define. If you have several code styles in your project (for example, for tests and for production code), you can have several .editorconfig files in corresponding folders in your project. This allows you to follow multiple code style standards at the same time.
All options from the .editorconfig file are applied to the directory where it resides as well as all of its sub-directories on top of the current project code style. If anything is not defined in .editorconfig or other .editorconfig files located in parent directories, it's taken from the current code style scheme. You can find more information about undefined (unset) properties in the EditorConfig documentation.
All options in the .editorconfig file are divided into the following categories:
Standard options such as
indent_size,indent_style, and so on. These options do not have any domain-specific prefixes.Generic IntelliJ options that have the
ij_prefix and are applicable to all languages:ij_visual_guidesij_formatter_off_tagij_formatter_on_tagij_formatter_tags_enabledij_wrap_on_typingij_continuation_indent_sizeij_smart_tabs
Common IntelliJ options are supported by many (but not all) languages. They start with the
ij_anyprefix, for example,ij_any_brace_style.IntelliJ language-specific options starting with the
ij_<lang>_prefix where<lang>is the language domain ID (normally a low-case language name), for example,ij_java_blank_lines_after_imports.
All IntelliJ .editorconfig properties have corresponding options in the code style scheme and have similar names.
note
The same options can be defined as a common option and a language-specific option, for example,
ij_<...>_brace_style. Language-specific options have higher priority over common or generic options.
In the Project tool window (Alt01), right-click a source directory containing the files whose code style you want to define and select New | EditorConfig from the context menu.
Select the properties that you want to define so that Aqua creates stubs for them, or leave all checkboxes empty to add the required properties manually.
tip
Use code completion while filling .editorconfig files.
To preview how changes to your code style settings will impact the actual source files, click
in the gutter of the .editorconfig file and select a source file on which you want to preview changes. The preview will open on the right.
Make sure that the file you're selecting corresponds to the mask next to which you clicked
.
You can make changes in the preview pane to try and test how your configuration changes are reflected without worrying about making unwanted changes to the source code: all these changes are discarded when you close the .editorconfig file.
Reformat your code. You can reformat a code fragment, a file, or all files in a directory.
Alternatively, you can configure the IDE to reformat your code on save.
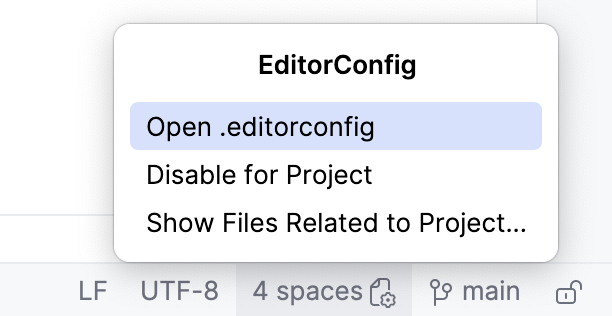
To quickly learn whether the file currently opened in the editor has any code style options that are overridden by properties in an .editorconfig file, use the Indentation widget in the status bar.
The icon in the widget indicates that there's an .editorconfig file that overrides some settings from your current code style scheme.

Click the widget:
Click Open .editorconfig to open the nearest .editorconfig file which affects the file that you're currently working with.
Select Show Files Related to Project to open a list of all .editorconfig files in the project.
Click Disable for Project to disable EditorConfig support in your project and use settings from your current code style scheme. You can also disable EditorConfig support in settings.

Press CtrlAlt0S to open settings and then select Editor | Code Style.
Select the code style Scheme that you want to export: the Project scheme or one of the IDE-level schemes.
Click
, select Export and then EditorConfig File.

Specify the folder to which you want to save the file.
To import code style settings in an .editorconfig file, drag the file to the necessary folder in the Project tool window Alt01 or View | Tool Windows | Project).
If you decide to use IDE settings after creating .editorconfig settings files, you can disable EditorConfig support without removing the created .editorconfig files from your project.
Press CtrlAlt0S to open settings and then select Editor | Code Style.
Clear the Enable EditorConfig support checkbox.
Apply the changes and close the dialog.
Thanks for your feedback!