Go
By default, GoLand suggests creating a Go modules project. With Go modules, you do not need to keep your project files under GOPATH and can easily manage dependencies in your project. Read more about Go modules at go.dev.
Create a Go project
Select .
Alternatively, click New Project in the Welcome to GoLand dialog.
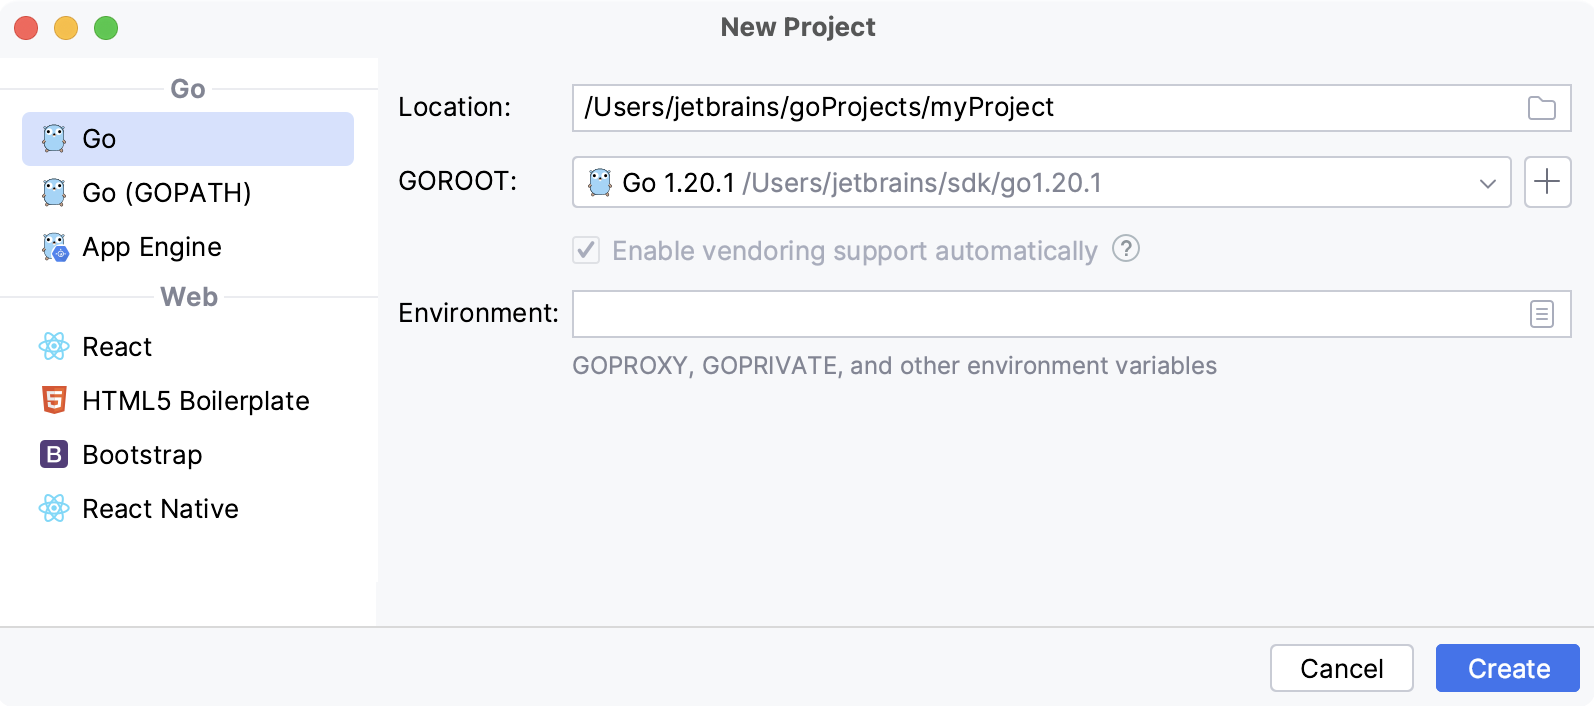
In the New Project dialog, select Go from the list of available projects.
In the GOROOT field, specify the location of your Go installation. GoLand typically detects this location automatically.
To change or install a new version of the Go SDK, click Add SDK (
) and select one of the following options:
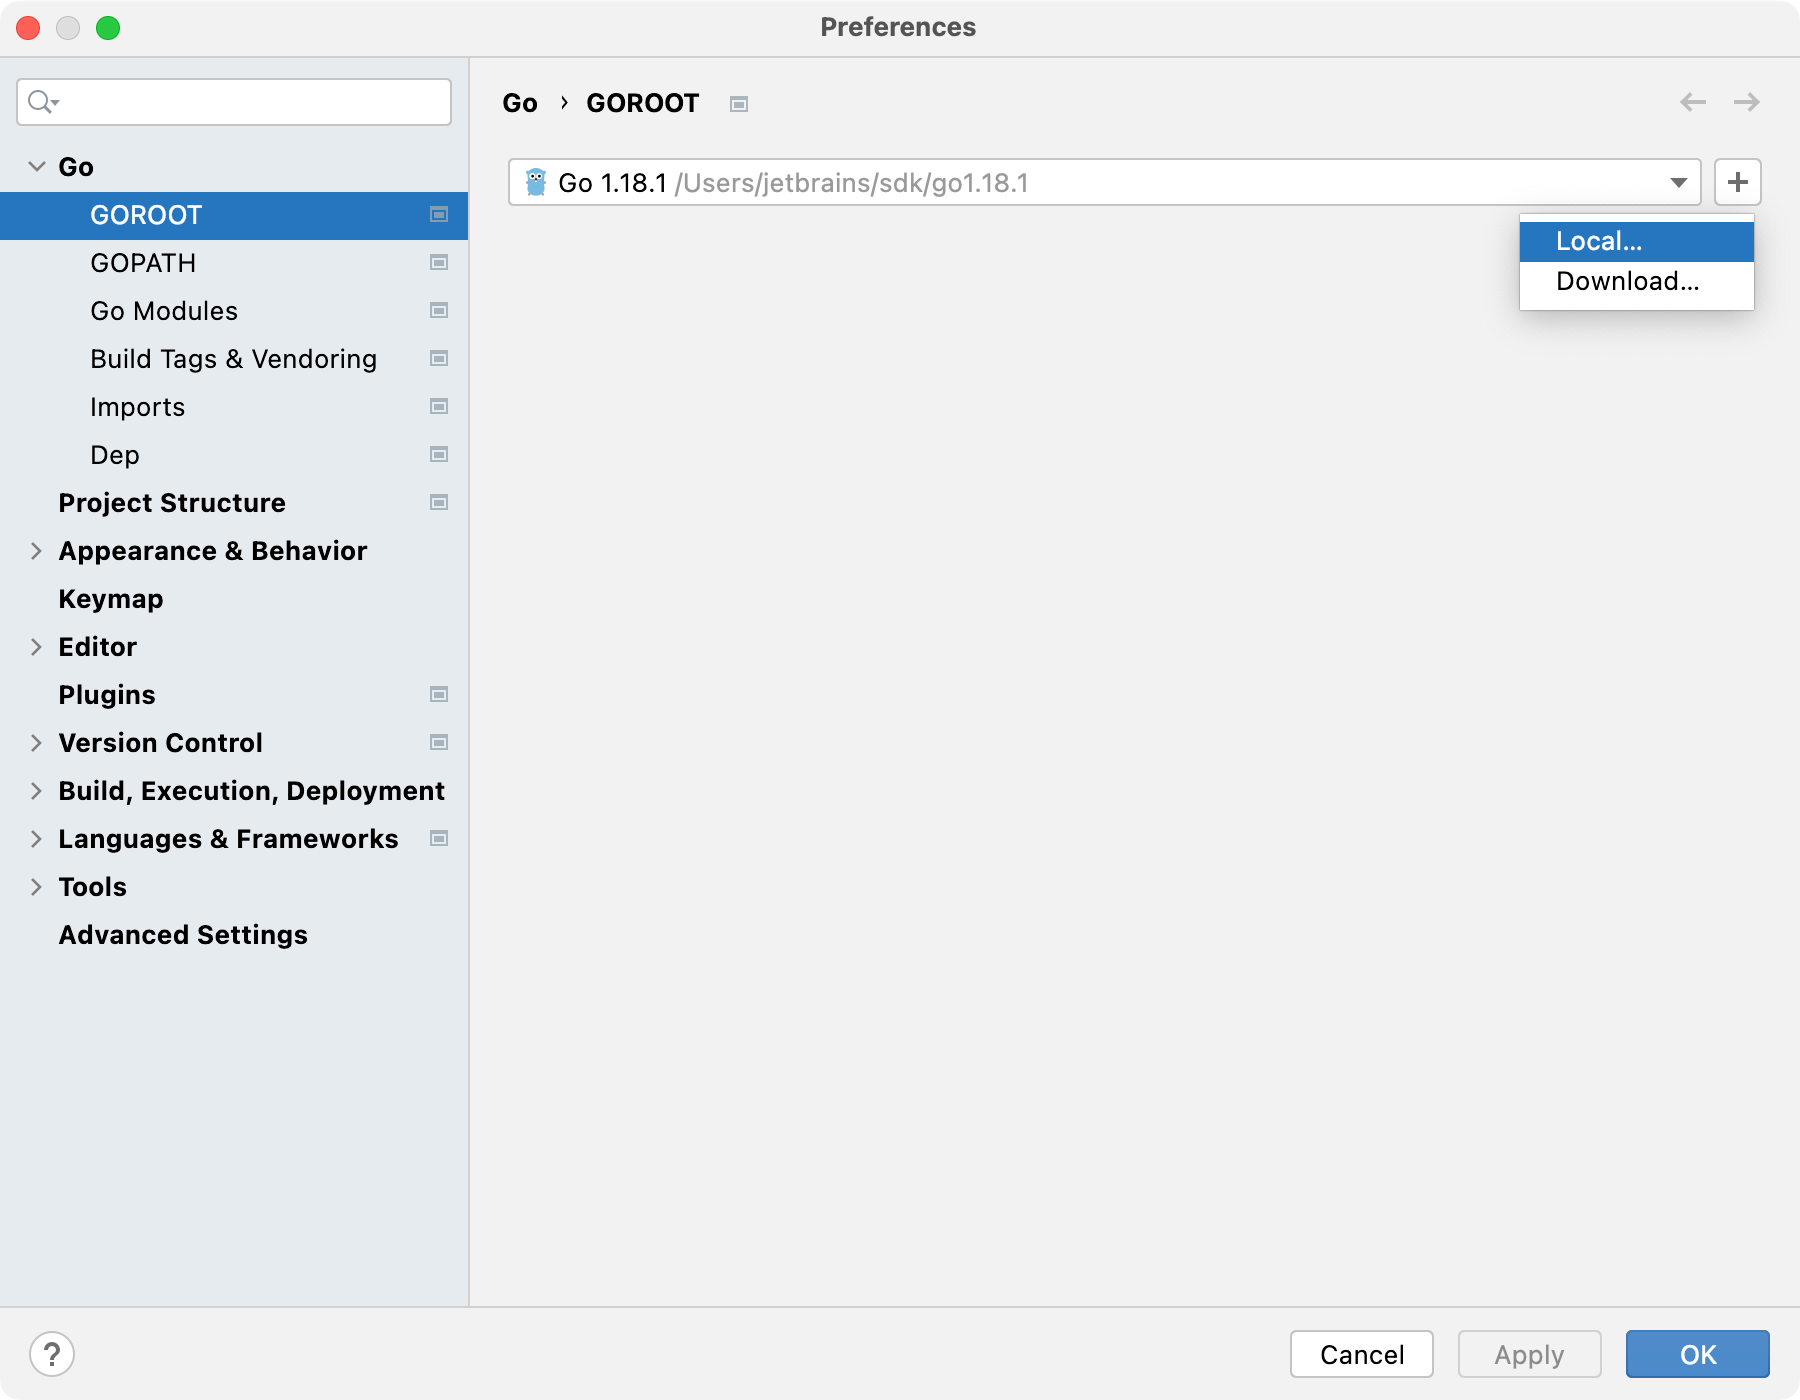
Local: to select a Go SDK version on your local drive.
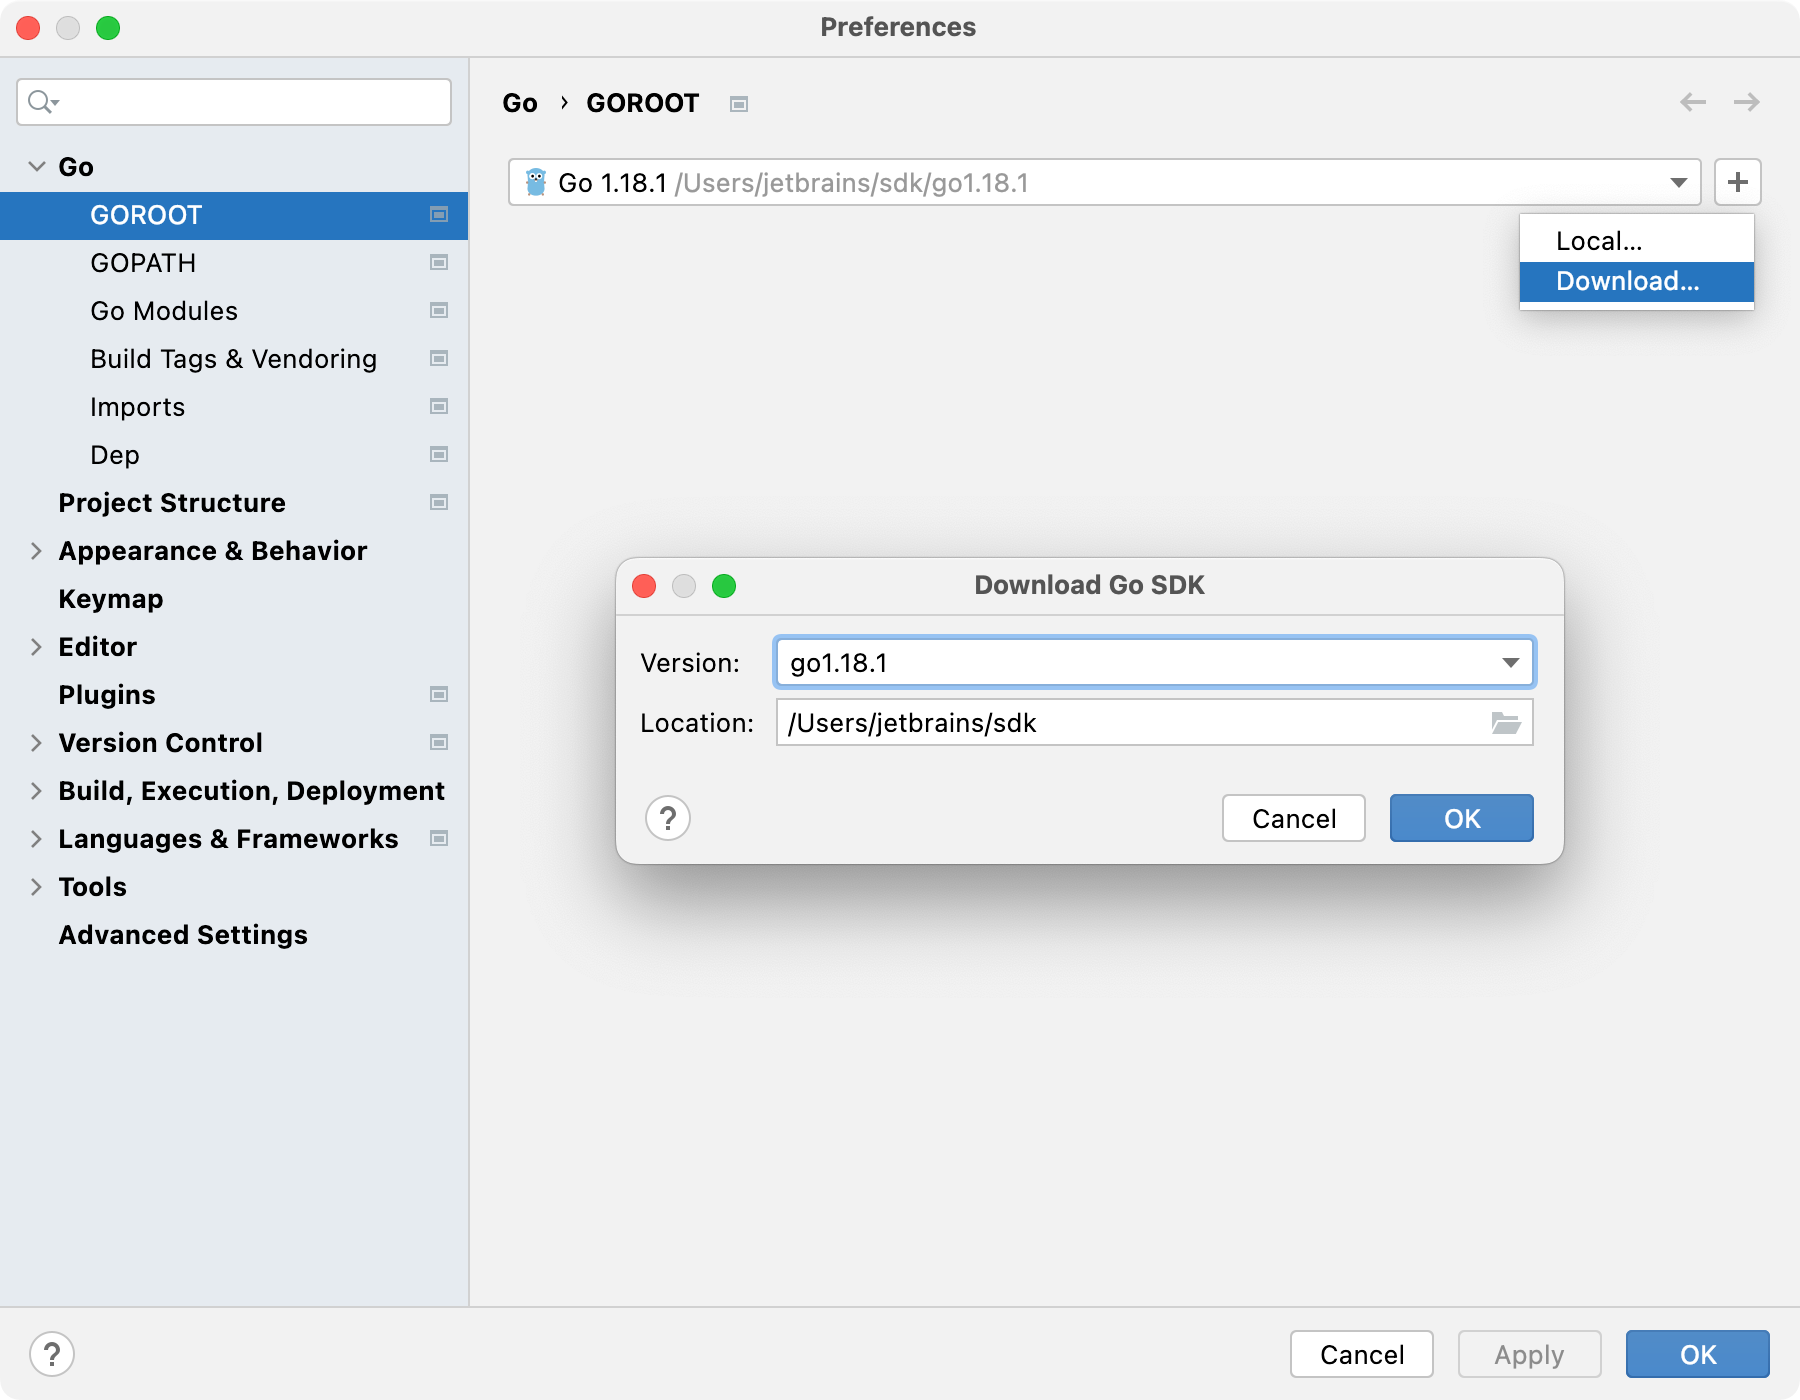
Download: to download the Go SDK from the official repository.
(Optional) Select or clear the Enable vendoring support automatically checkbox.
(Optional) In the Environment field, specify environment variables that you need for your project. For example, the
GOPROXYenvironment variable. Read more about environment variables in the Environment variables section.Click Create.
Using Go modules in your project
In the Project tool window (), Go modules are displayed with their full import path. The version of each Go Module is shown in a dimmed font color to help you distinguish between them.

If you create a new Go modules project in the IDE, Go modules are already enabled. If you pulled your Go modules project from Github, you need to enable Go modules manually.
Enable Go modules in a project
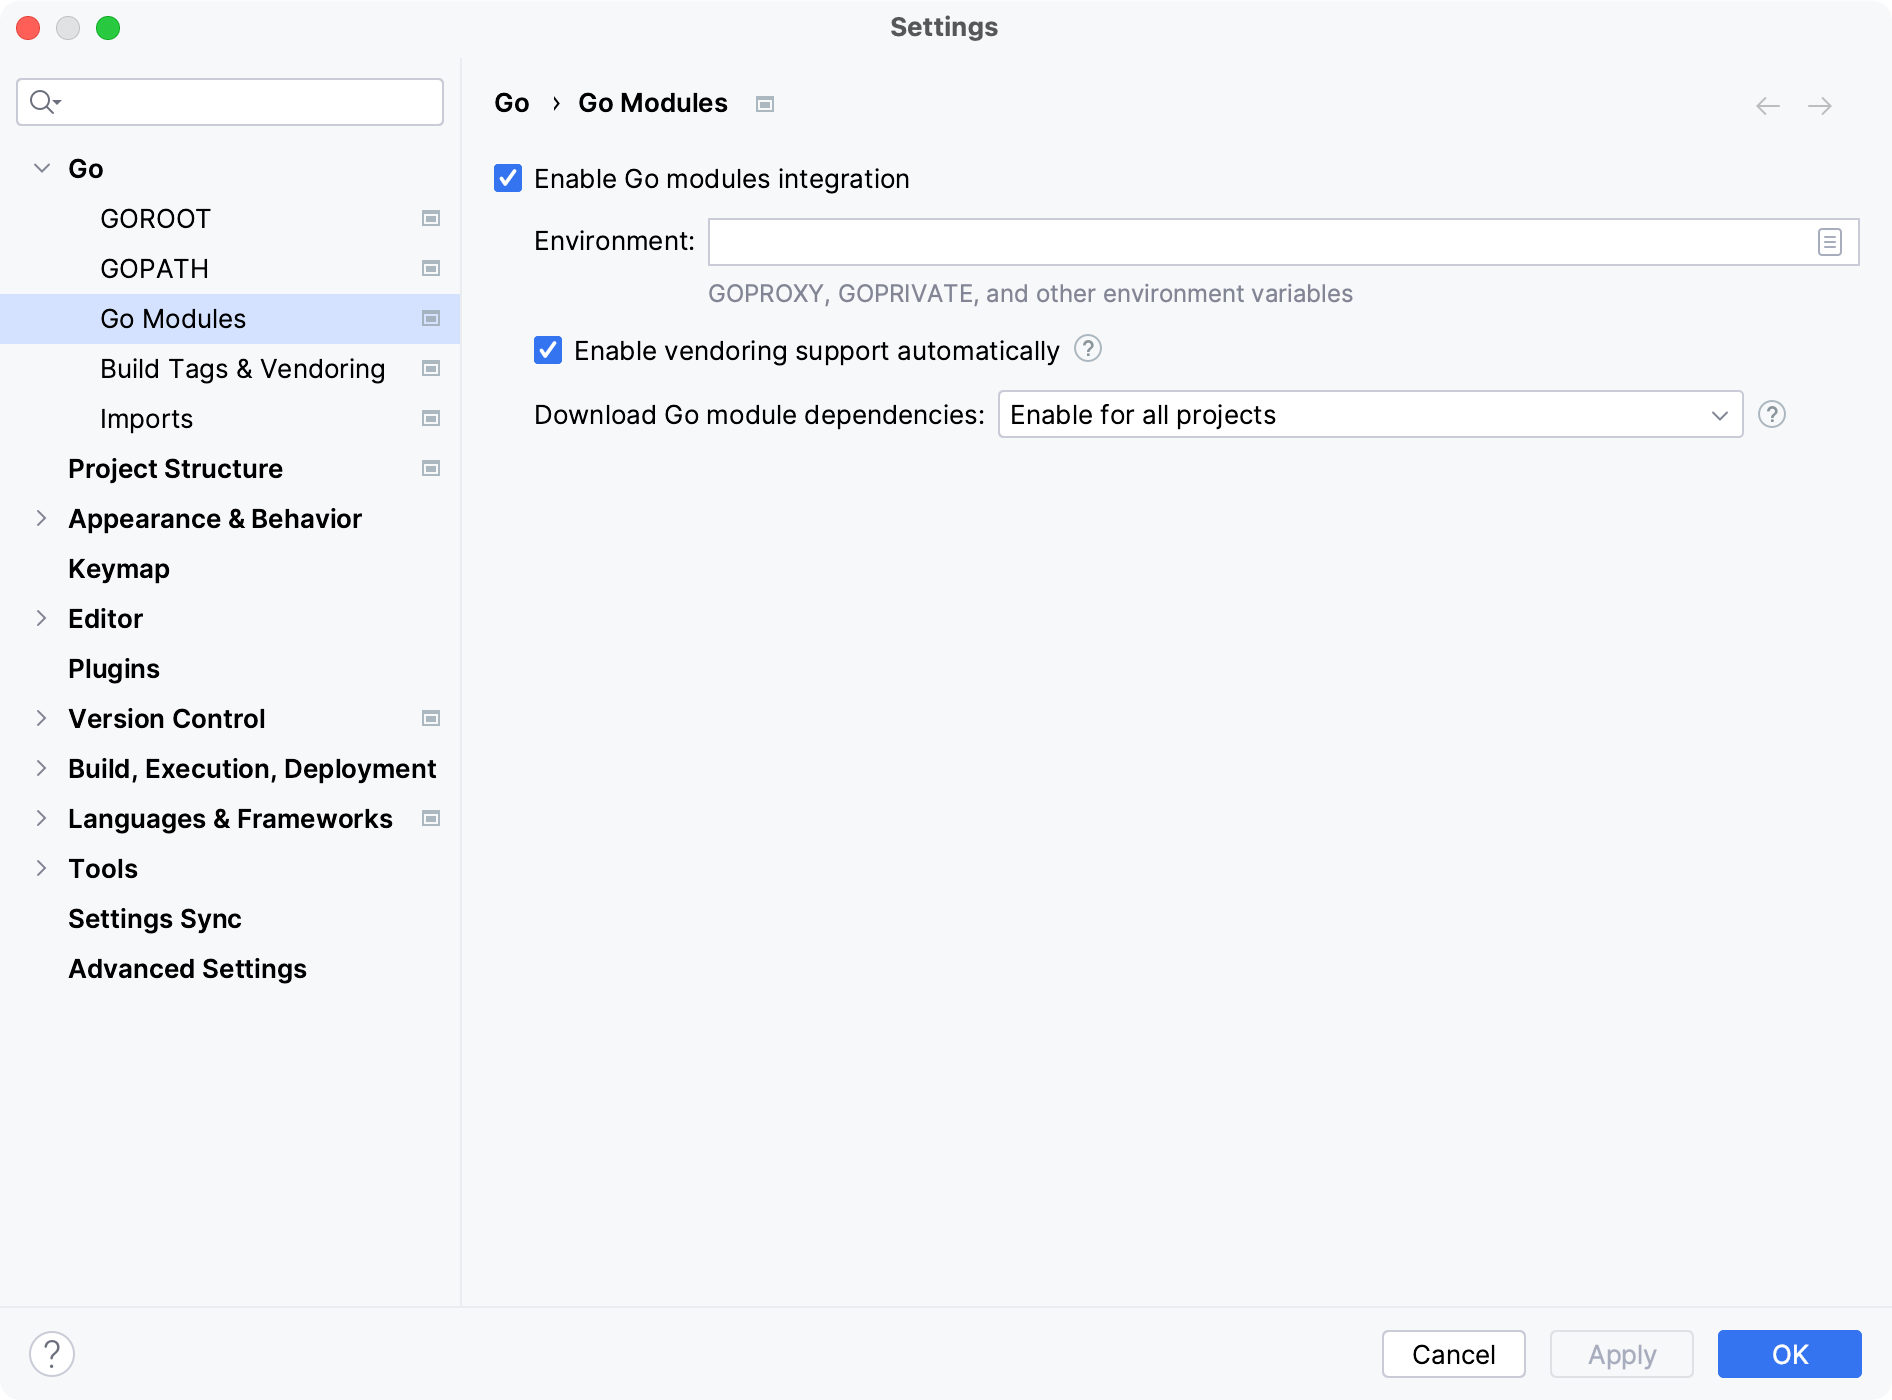
Press Ctrl+Alt+S to open settings and then select .
Select the Enable Go modules integration checkbox.
Click OK.
Working with dependencies
By default, GoLand downloads all the necessary dependencies when you open a project or modify go.mod . You can configure this behavior in settings.
Disable automatic download of Go module dependencies
Open settings by pressing Ctrl+Alt+S and navigate to . .
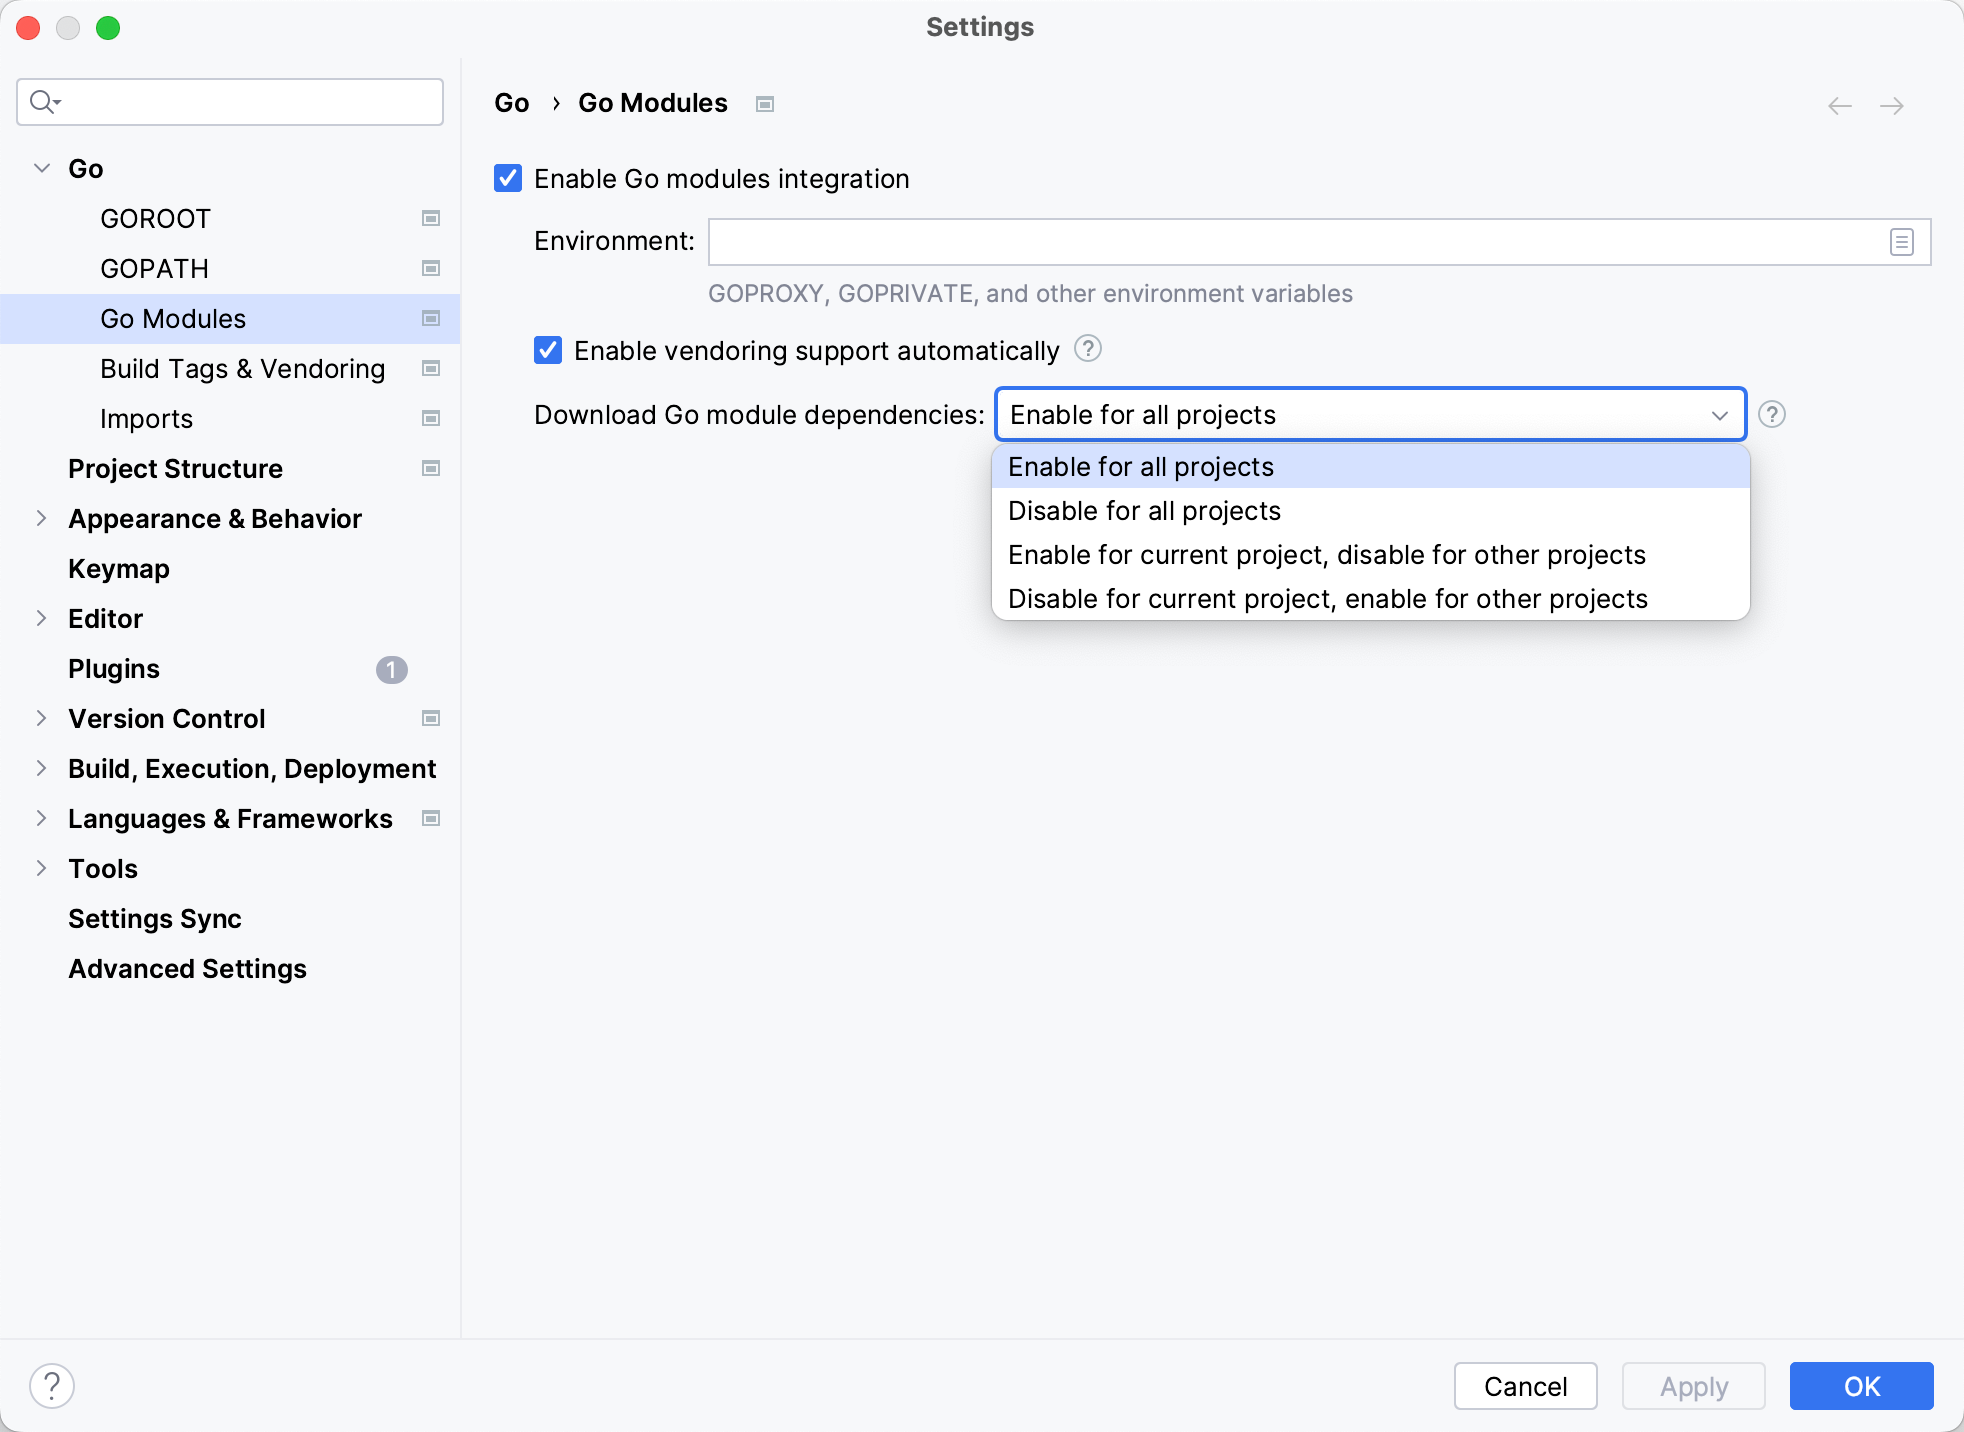
Click the Download Go module dependencies drop-down list and select the necessary option. You can select between the following options:
Enable for all projects: activates automatic download of Go dependencies for all projects that you open. This is the default setting. The IDE runs 'go mod download' automatically after each execution of 'go list -m'. Disable this option if you have a limited internet connection or need to download dependencies only of certain Go modules.
Disable for all projects: turns off automatic download of Go dependencies for all projects that you open.
Enable for current project, disable for other projects: activates automatic download of Go dependencies only for the current project. When a new project is opened in the IDE, the Download Go module dependencies setting will default to Disable for all projects for it.
Disable for current project, enable for other projects: turns off automatic download of Go dependencies only for the current project. When a new project is opened in the IDE, the Download Go module dependencies setting will default to Enable for all projects for it.
Synchronize dependencies from go.mod
Ensure that Go modules integration is enabled. For more information about enabling Go modules integration, refer to Enable Go in a project.
In the Project tool window (), double-click the MOD file.
Click a dependency declaration.
Press Alt+Enter and select action that you want to perform. You can select between the following options:
Fix missing dependencies: fetches and downloads missed dependencies and removes unused ones by calling
go mod tidy/vendor. Inreplacedirectives, the IDE would not download or delete missed dependencies, and the lines with these unused dependencies would be marked red. It is not an error and does not affect how the application works.Download all modules to the module cache: fetches and downloads all the dependencies and places them under the External Libraries in the Project tool window ().
Download <module_name> to the module cache: fetch and download the selected module and place it under the External Libraries in the Project tool window ().

Synchronize dependencies from the opened Go file
Ensure that Go modules integration is enabled. For more information about enabling Go modules integration, refer to Enable Go in a project.
Click a dependency in the
importsection, press Alt+Enter and select Fix missing dependencies.
Configure automatic run of 'go list' for 'go.mod'
Open settings by pressing Ctrl+Alt+S and navigate to .
Select or clear the Reload project after changes in the build scripts option.
You can set the following options depending on your workflow:
Any changes: run
go listafter any modification of go.mod. By default, GoLand automatically runsgo listcommands after every modification of go.mod.External changes: do not run
go listautomatically when you edit the file inside the IDE. After you finished editing files in the IDE, click the Load Go modules Changes icon () to apply and load your changes.

If you do not want to run
go listafter every modification of go.mod, clear the Reload project after changes in the build scripts checkbox.If the checkbox is cleared, you will see the Load Go modules Changes icon on all types of changes: external and internal.
Create a diagram of dependencies
The go.mod file lists dependencies for your project. You can use this file to build a diagram of dependencies.
Enable Go in your project.
Right-click the go.mod file in your project and select .
Toggle vendoring mode
Open settings by pressing Ctrl+Alt+S and navigate to .
Clear or select the Enable vendoring support automatically checkbox and click OK.

Navigate from a dependency import path to package source files
In the Project tool window (), double-click the
go.modfile.Right-click a dependency import path and click Ctrl+B.

Updating dependencies in go.mod
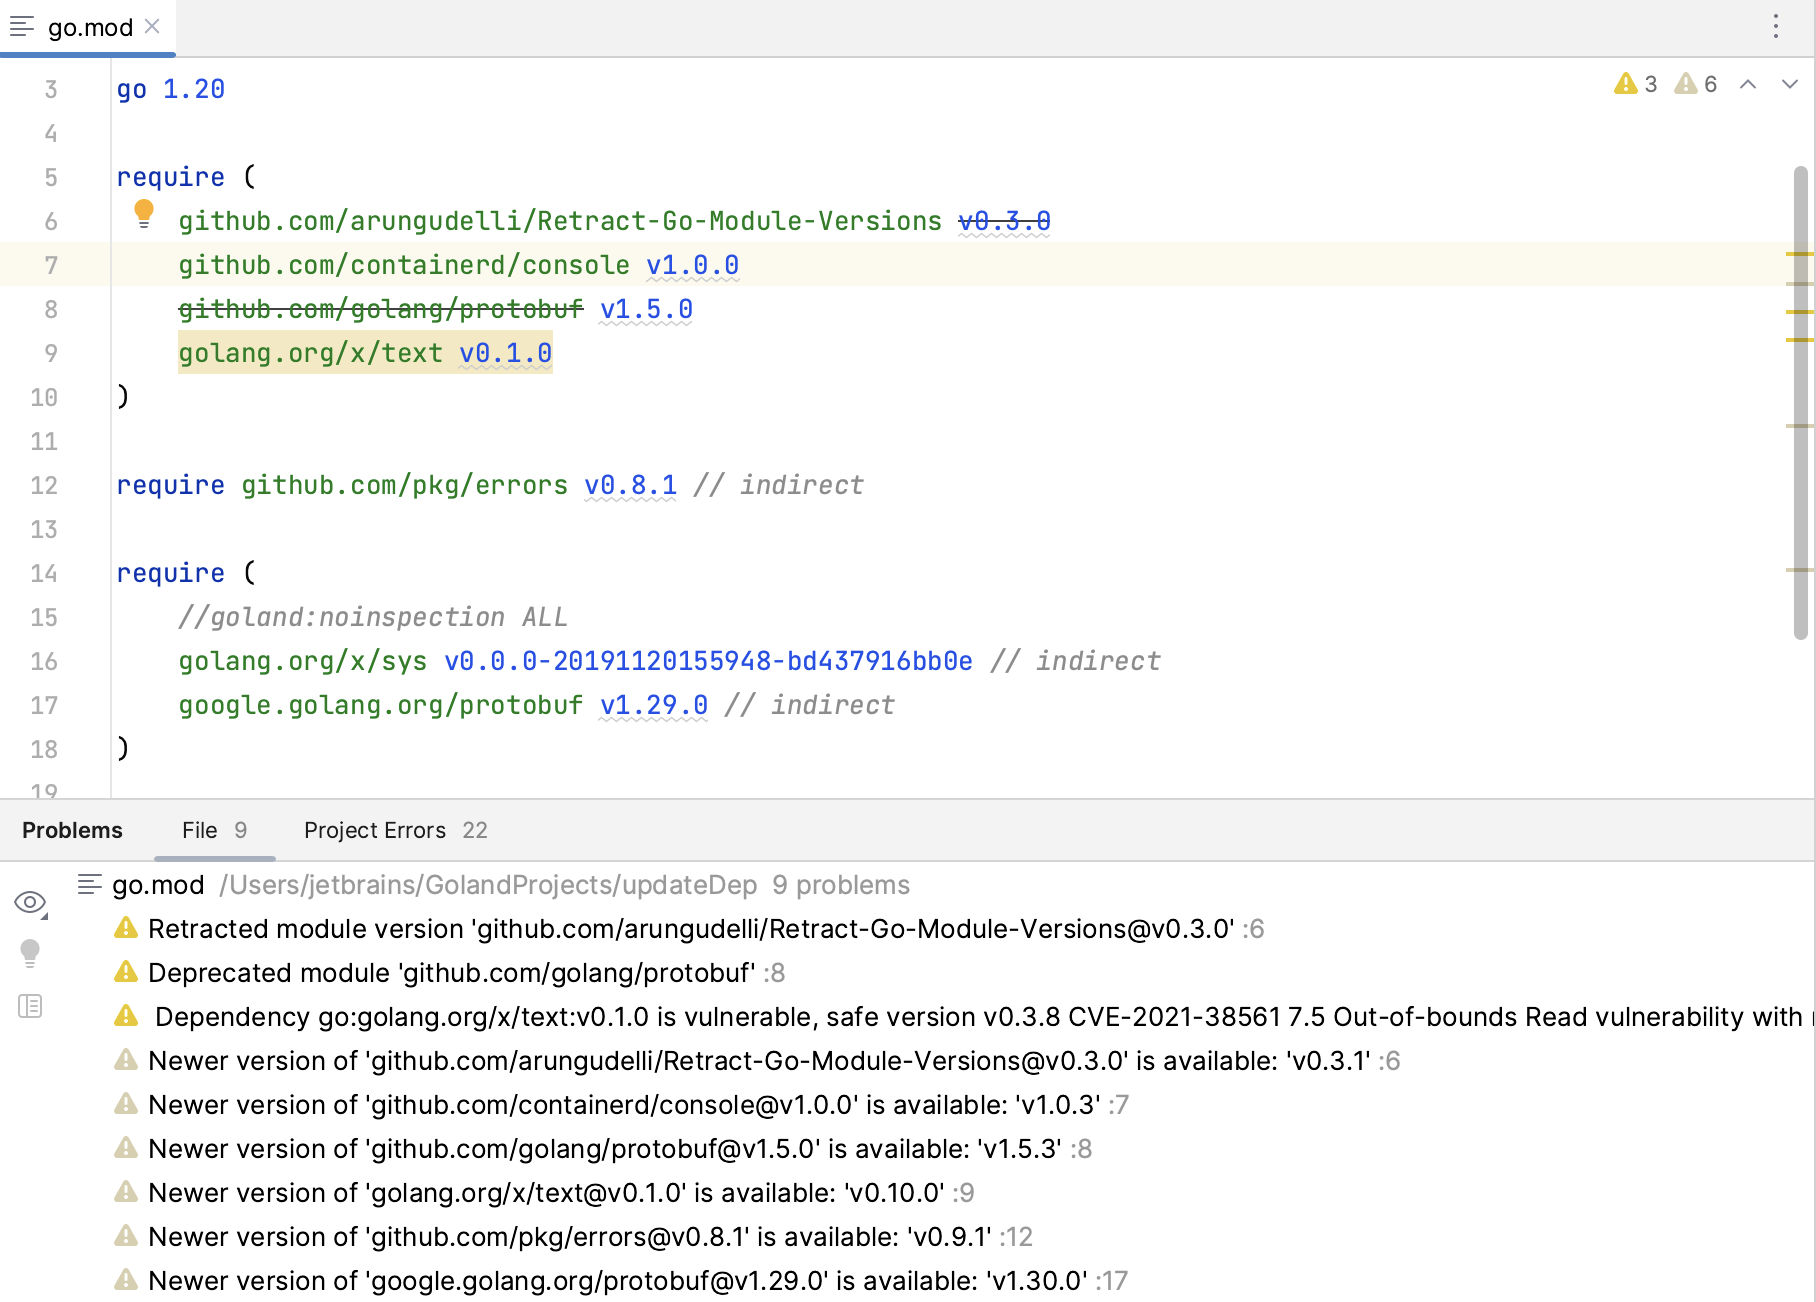
When you access your go.mod file, GoLand will highlight any outdated dependencies. Hovering over the highlighted versions will allow you to employ a quick-fix to update a specific dependency.
Additional options are available to update all dependencies to either the latest patch or the most recent major version. If you prefer, there's also the possibility to update only direct dependencies.
Also, there are two inspections for deprecated and retracted dependency versions:
Deprecated dependency: depicted with strikethrough text, this highlights deprecated dependencies.
Retracted dependency version: also shown with strikethrough text, this indicates retracted version numbers.
Update dependencies
Click the dependency and press Alt+Enter.
Select the intention action that you want to apply:
Change <dependency> version to <new_version>: updates the selected version to the closest one that includes a fix for the identified vulnerability. Note that the closest fixed version is not always the latest version.
Update all dependencies to latest patch version: updates all vulnerable versions to the latest patch version, which includes only bug fixes and backward-compatible changes. For instance, if the current version is 1.2.3 and there are versions 1.2.4 and 1.2.5 available, the latest patch version is 1.2.5.
Update all dependencies to latest version: updates all vulnerable versions to the most recent versions available.
Update direct dependencies to latest patch version: updates all vulnerable versions of direct dependencies to their latest patch versions. A direct dependency is a module that appears in the
importsection in the project source files.Update direct dependencies to latest version: updates all direct dependencies to their latest available versions.
Show vulnerability information about dependencies
Click the dependency and press Alt+Enter.
Select Show vulnerability info for <dependency>.
Customizing inspection settings
You can manage the settings of these inspections, including their scope and severity, by opening settings (Ctrl+Alt+S) and navigating to .
Environment variables
Environment variables provide a way to set application execution parameters. Environment variables can store addresses of proxy servers that you want to use to download dependencies (GOPROXY), names of packages that are considered private (GOPRIVATE), and other values. In GoLand, you can use the following templates for environment variables:
GOPROXY: defines proxy servers that must be used to download dependencies. These proxy servers are used when you trigger the go command. Read more about GOPROXY in Module downloading and verification at golang.org.
GOSUMDB: identifies the name of the checksum database. The checksum database verifies that your packages from the
go.sumfile are trusted. Read more about GOSUMDB in Module authentication failures at golang.org.GOPRIVATE: lists packages that are considered private. The go command does not use the GOPRIVATE or checksum database when downloading and validating these packages. Read more about GOPRIVATE in Module configuration for non-public modules at golang.org.
GONOPROXY: lists packages that are considered private. The go command does not use the proxy when downloading these packages. GONOPROXY overrides GOPRIVATE.
GONOSUMDB: lists packages that are considered private. The go command does not use the checksum database during validation of these packages. Overrides GOPRIVATE.
Other: any environment variable that you want to introduce. For example, you can introduce the
GOMODCACHEenvironment variable that changes the default location of the Go modules cache from $GOPATH/pkg/mod to a user-defined location (for example,$WORK/modcache).
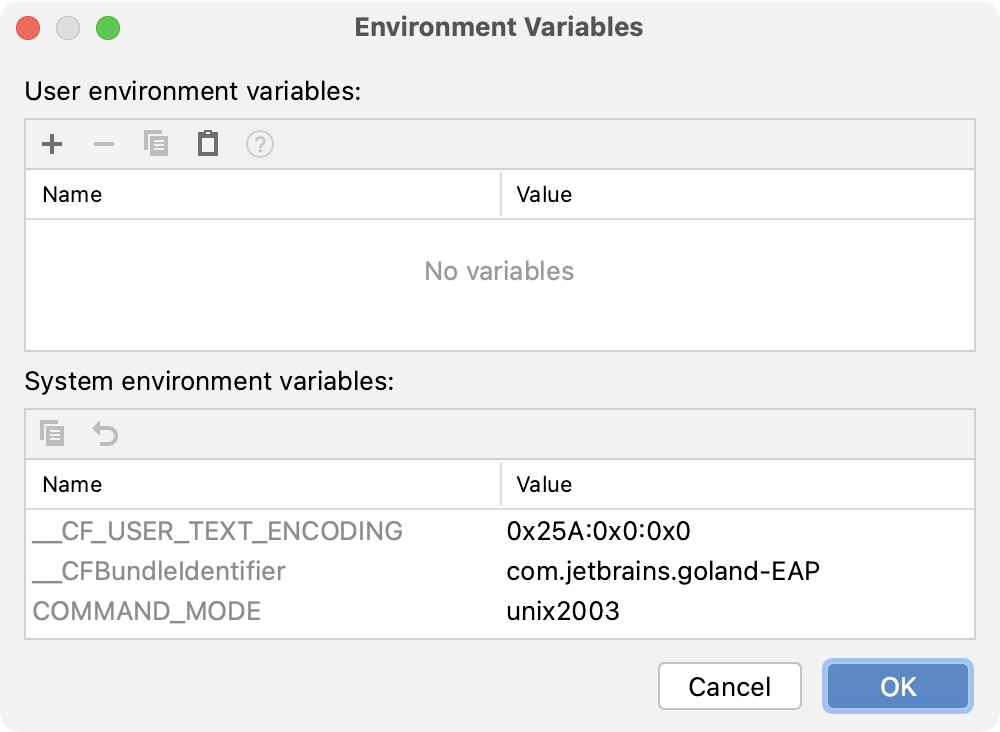
Also, GoLand automatically picks up system variables related to Go modules and displays them in the Environment variables dialog in the System environment variables.
Introduce an environment variable in a project
Press Ctrl+Alt+S to open settings and then select .
In the Environment field, click the Browse icon at the end of the field.
In the Environment variables window, click the Add button (
) and select the template that you want to add.
Installing Go SDK
Select a local copy of the Go SDK
Press Ctrl+Alt+S to open settings and then select .
Click the AddSDK({0}) button (
) and select Local.
In the file browser, navigate to the SDK version that is on your hard drive.
Click Open.
Download the Go SDK
Press Ctrl+Alt+S to open settings and then select .
Click the AddSDK({0}) button (
) and select Download.
From the Version list, select the SDK version.
In the Location field, specify the path for the SDK. To use a file browser, click the Browse icon (
).
Click OK.
Productivity tips
Notify about replacements of local paths in go.mod file
Before you commit your changes, GoLand can show you a notification that you replaced local paths in the go.mod file. This might help you to avoid situations when these replacements are committed by mistake.
Press Ctrl+K or select from the main menu.
In the Commit tool window Alt+0, click the Show Commit Options icon (
) and select the Analyze code checkbox. For more information about committing options, refer to Commit and push changes to Git repository.